How to Draw with Procreate?
Hello everyone, today I'm suggesting that we take a look at an iPad drawing application that has been a real hit with amateurs and professionals alike for several years, Procreate! Today we will cover the basics of the software and learn how to easily create an illustration.
Prepare your tablet and most importantly, your creativity!
THE BASICS OF PROCREATE
Procreate is a paid application (€14.99) available only on IOS (iPhone or iPad) that offers a very intuitive digital drawing interface. Unlike other software, such as Photoshop, Procreate has fewer editing tools. The application was developed to give the impression of drawing almost like on paper, mainly because the iPad screen is used directly as a drawing surface.
For greater comfort, the application recommends the use of an Apple Pen, as this stylus manages pressure and provides greater working comfort. However, we will see later in the article that it is possible to create beautiful illustrations without having to invest in an Apple Pen.
The drawing interface of the app is very clean but still has many very useful tools.

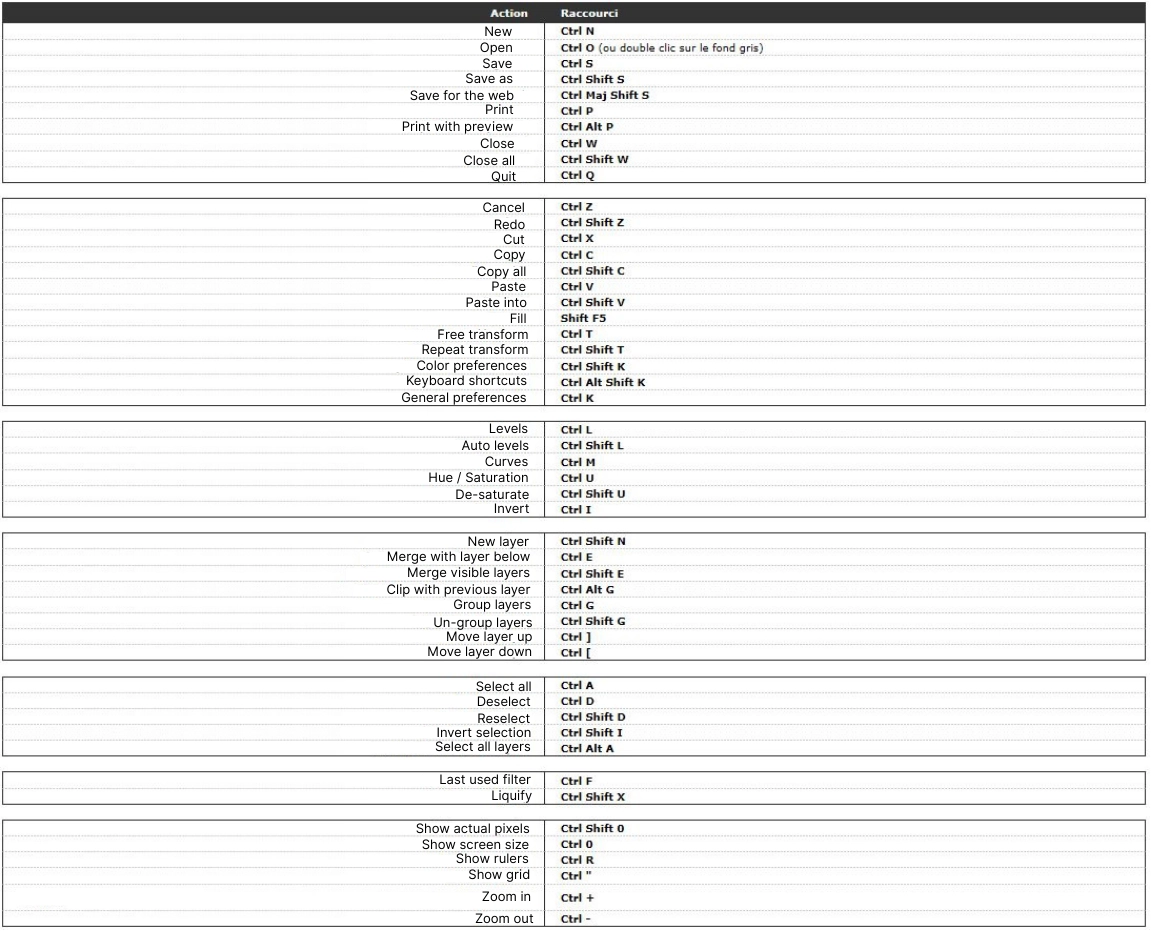
We will then analyse the different tabs in more detail; below are some shortcuts that offer good drawing comfort:
● Cancel an action: Tap two fingers on the screen to undo the action you just performed;
● Cancel multiple actions: Press and hold two fingers on the screen to erase all previous actions; simply lift your fingers to stop the undo action;
â Restore an action: Tap three fingers on the screen to redo the action you just undid;
● Restore multiple actions: Press and hold three fingers on the screen to redo all the actions you just undid, just lift your fingers to stop the redo;
● Zoom in: Place two fingers on the screen in the area you wish to enlarge and pinch to zoom;
● Zoom out: Place two fingers on the screen over the area you want to zoom in on and spread them apart to zoom out;
● Rotate the canvas: Place two fingers on the screen and rotate them in the direction you wish to turn it;
● Create a perfect line/circle: Draw the line or circle and finally hold the stylus down for a few seconds: the line or circle will automatically be perfect.
HOW TO USE THE ACTIONS MENU TO DRAW?
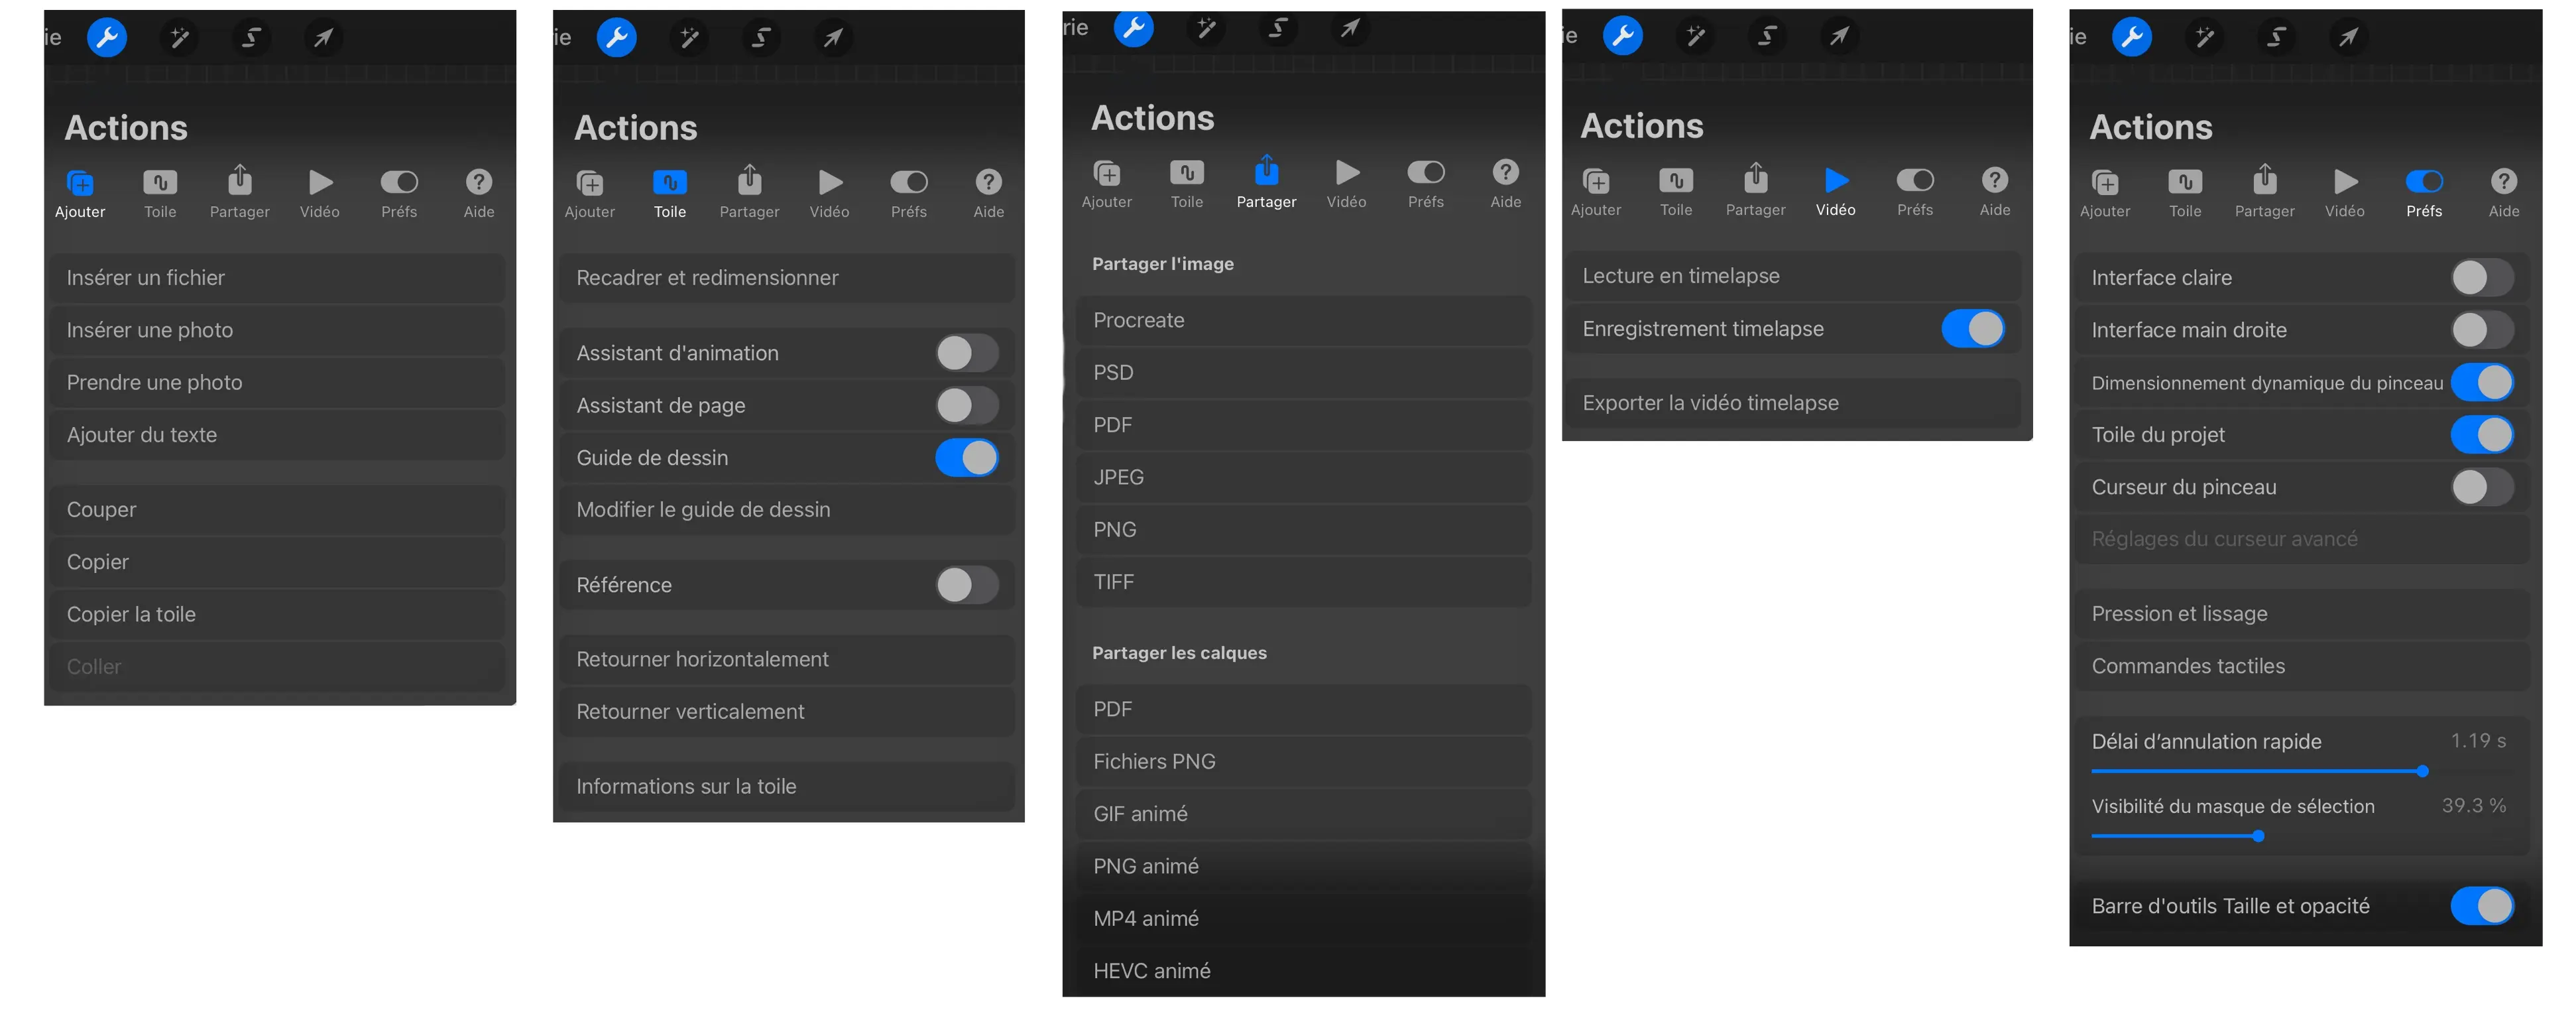
We will now look at the different menus, the first being the actions menu, which is divided into 6 different submenus.
Add: It allows you to insert files, photos, text and cut/copy/paste;
Canvas: It allows you to crop/resize, access different functions to create multi-page PDFs, make small animations or have a drawing assistant (perspective, etc.)... You can also select the reference box that allows you to have a small movable tab or to import your own reference, allowing constant visibility on it;
Share: It allows you to save your illustration in multiple formats;
Video: It allows you to watch the entire video recording of your project and export it in full or in 30-second format;
Preferences: It allows you to activate certain preferences, interface color, right-handed or left-handed mode...
Help: It allows you to access the application manual, support...
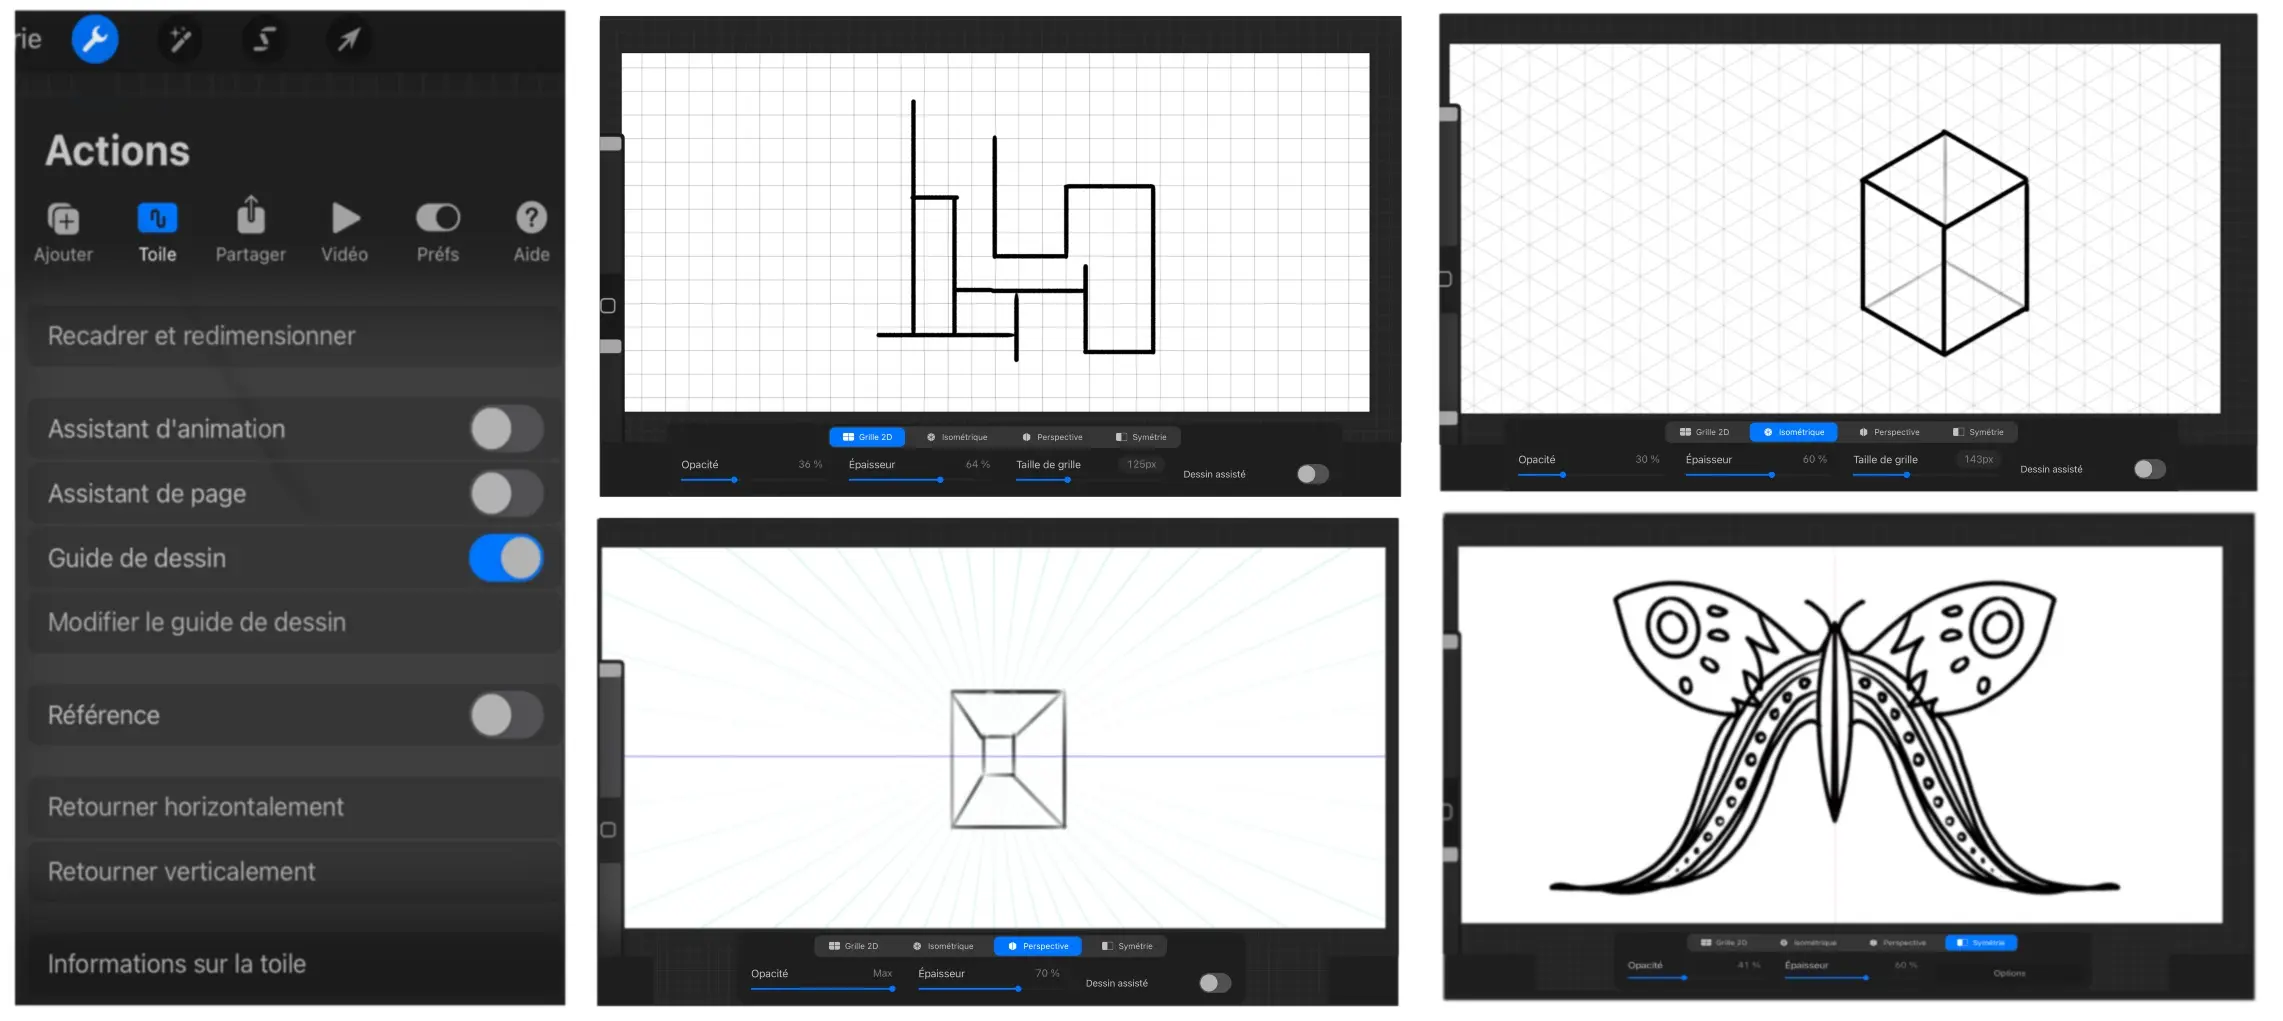
One of the most interesting features is the drawing guide which offers you the possibility to have four different guides, all completely customizable:
2D Grid: It allows drawing perfect horizontal and vertical lines;
Isometric: This tool is perfect if you want to create isometric drawings, as perspective is obtained directly;
Perspective: This tool is slightly more technical because it requires you to position your vanishing points and horizon lines, so it necessitates some prior knowledge of perspective and an idea of the drawing's viewpoint. However, this tool is very efficient and truly handy;
Symmetry: This tool can be very powerful when used correctly, allowing you to choose a line of symmetry and perfectly replicate on the other side what you are currently drawing. Care must be taken not to overuse it as this can quickly make a drawing "dull".
THE ADJUSTMENTS MENU
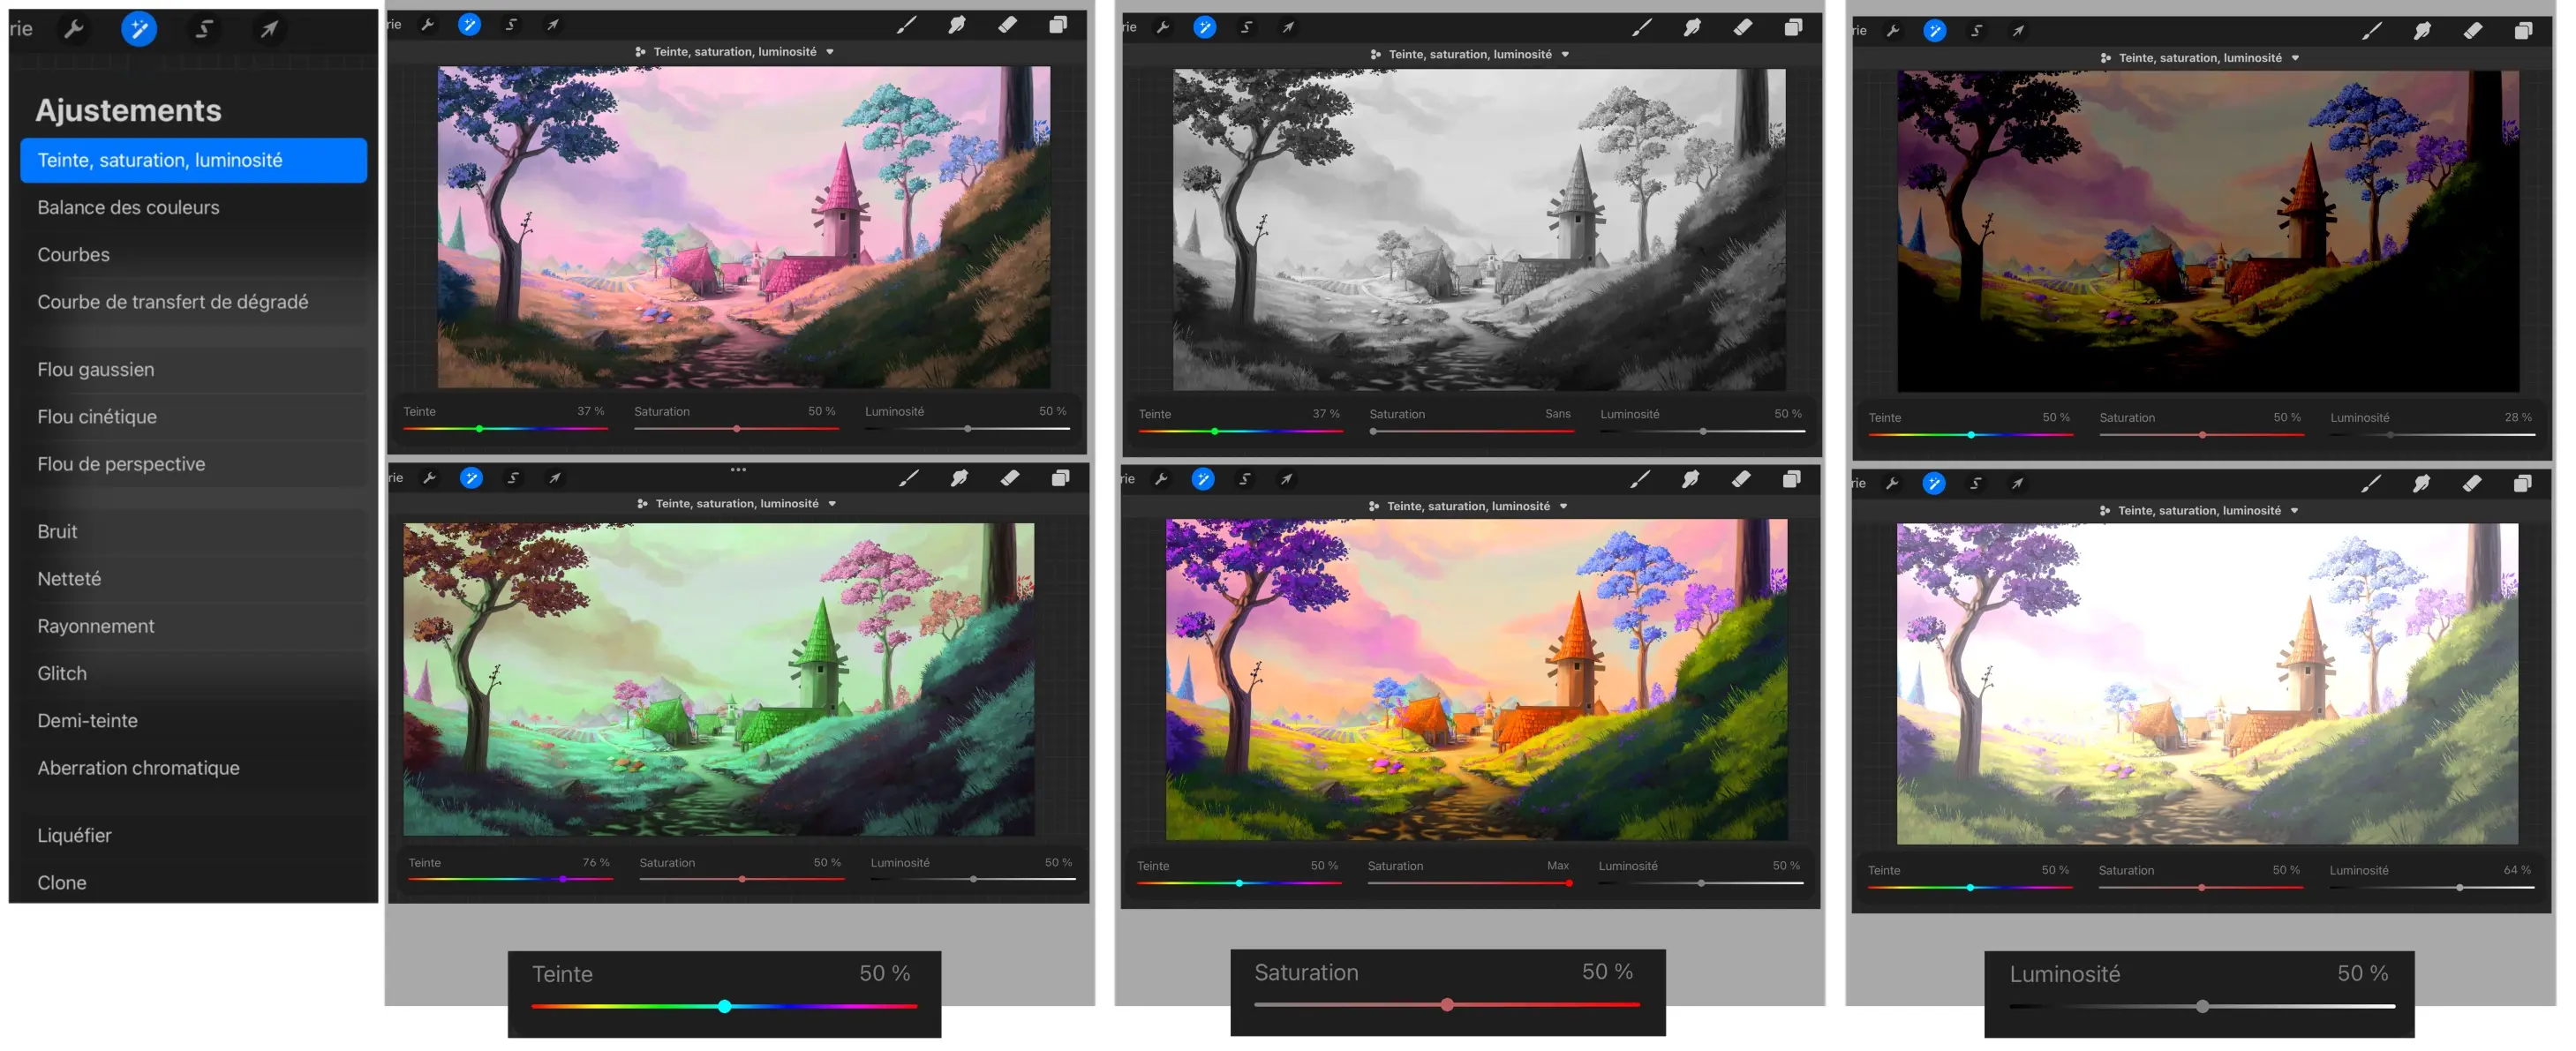
This menu is perhaps the most comprehensive of all and, as its name suggests, allows adjustments to be made. I have taken the example of the same illustration on which I will show you the different adjustments that exist.
HUE, SATURATION, AND BRIGHTNESS
The first adjustment provides access to three bars:
Colour: At the bottom left, it allows you to apply a kind of filter to the entire illustration;
Saturation: In the middle, it allows managing the saturation of the colours in an image, ranging from gray (the least saturated) to the most saturated colours possible. This can quickly rebalance the colour shades of a drawing;
Brightness: At the bottom right, it allows you to darken or lighten the illustration, although not very subtly.
COLOUR CORRECTION TOOLS
Colour Balance: (left) this tool provides access to much finer lines of colour adjustment, the hue tool, which can easily rebalance the colours of an illustration;
Curves: (centre) this tool provides access to a curve that allows you to play with the levels of the illustration, for example it can easily add or remove contrast;
Gradient transfer curve: (right) this tool is a bit more technical, it allows you to replace the nuances of an image with a colour curve. This is often used to start adding color to a black and white drawing.

THE BLUR TOOLS IN DRAWINGS
The power of these tools can be adjusted by making a horizontal movement with your finger on the screen to adjust the blue bar.
Gaussian Blur: (left) this blur is basically a uniform blur, the whole image becomes uniformly softer;
Kinetic blur: (centre) this blur seeks to create an impression of speed as if one is looking at the landscape through a fast-moving vehicle;
Perspective blur: (right) this blur also seeks to create an impression of speed, but more as if we're running fast towards a distant point.

NOISE, SHARPNESS AND RADIATION
Noise: (left) this tool creates noise (kinds of small colored dots). It can add some texture to a drawing but be careful not to overuse it;
Sharpness: (centre) this tool makes the illustration sharper by slightly pixelating it;
Radiation: (right) this tool allows you to add more brightness to the brightest areas of the drawing. This can be handy for adding some contrast but it is better to use it sparingly to avoid the drawing having "burnt out" colors.

GLITCH
This tool offers four different kinds of glitches, which can provide an interesting effect; however, in most cases, this tool is not very useful.
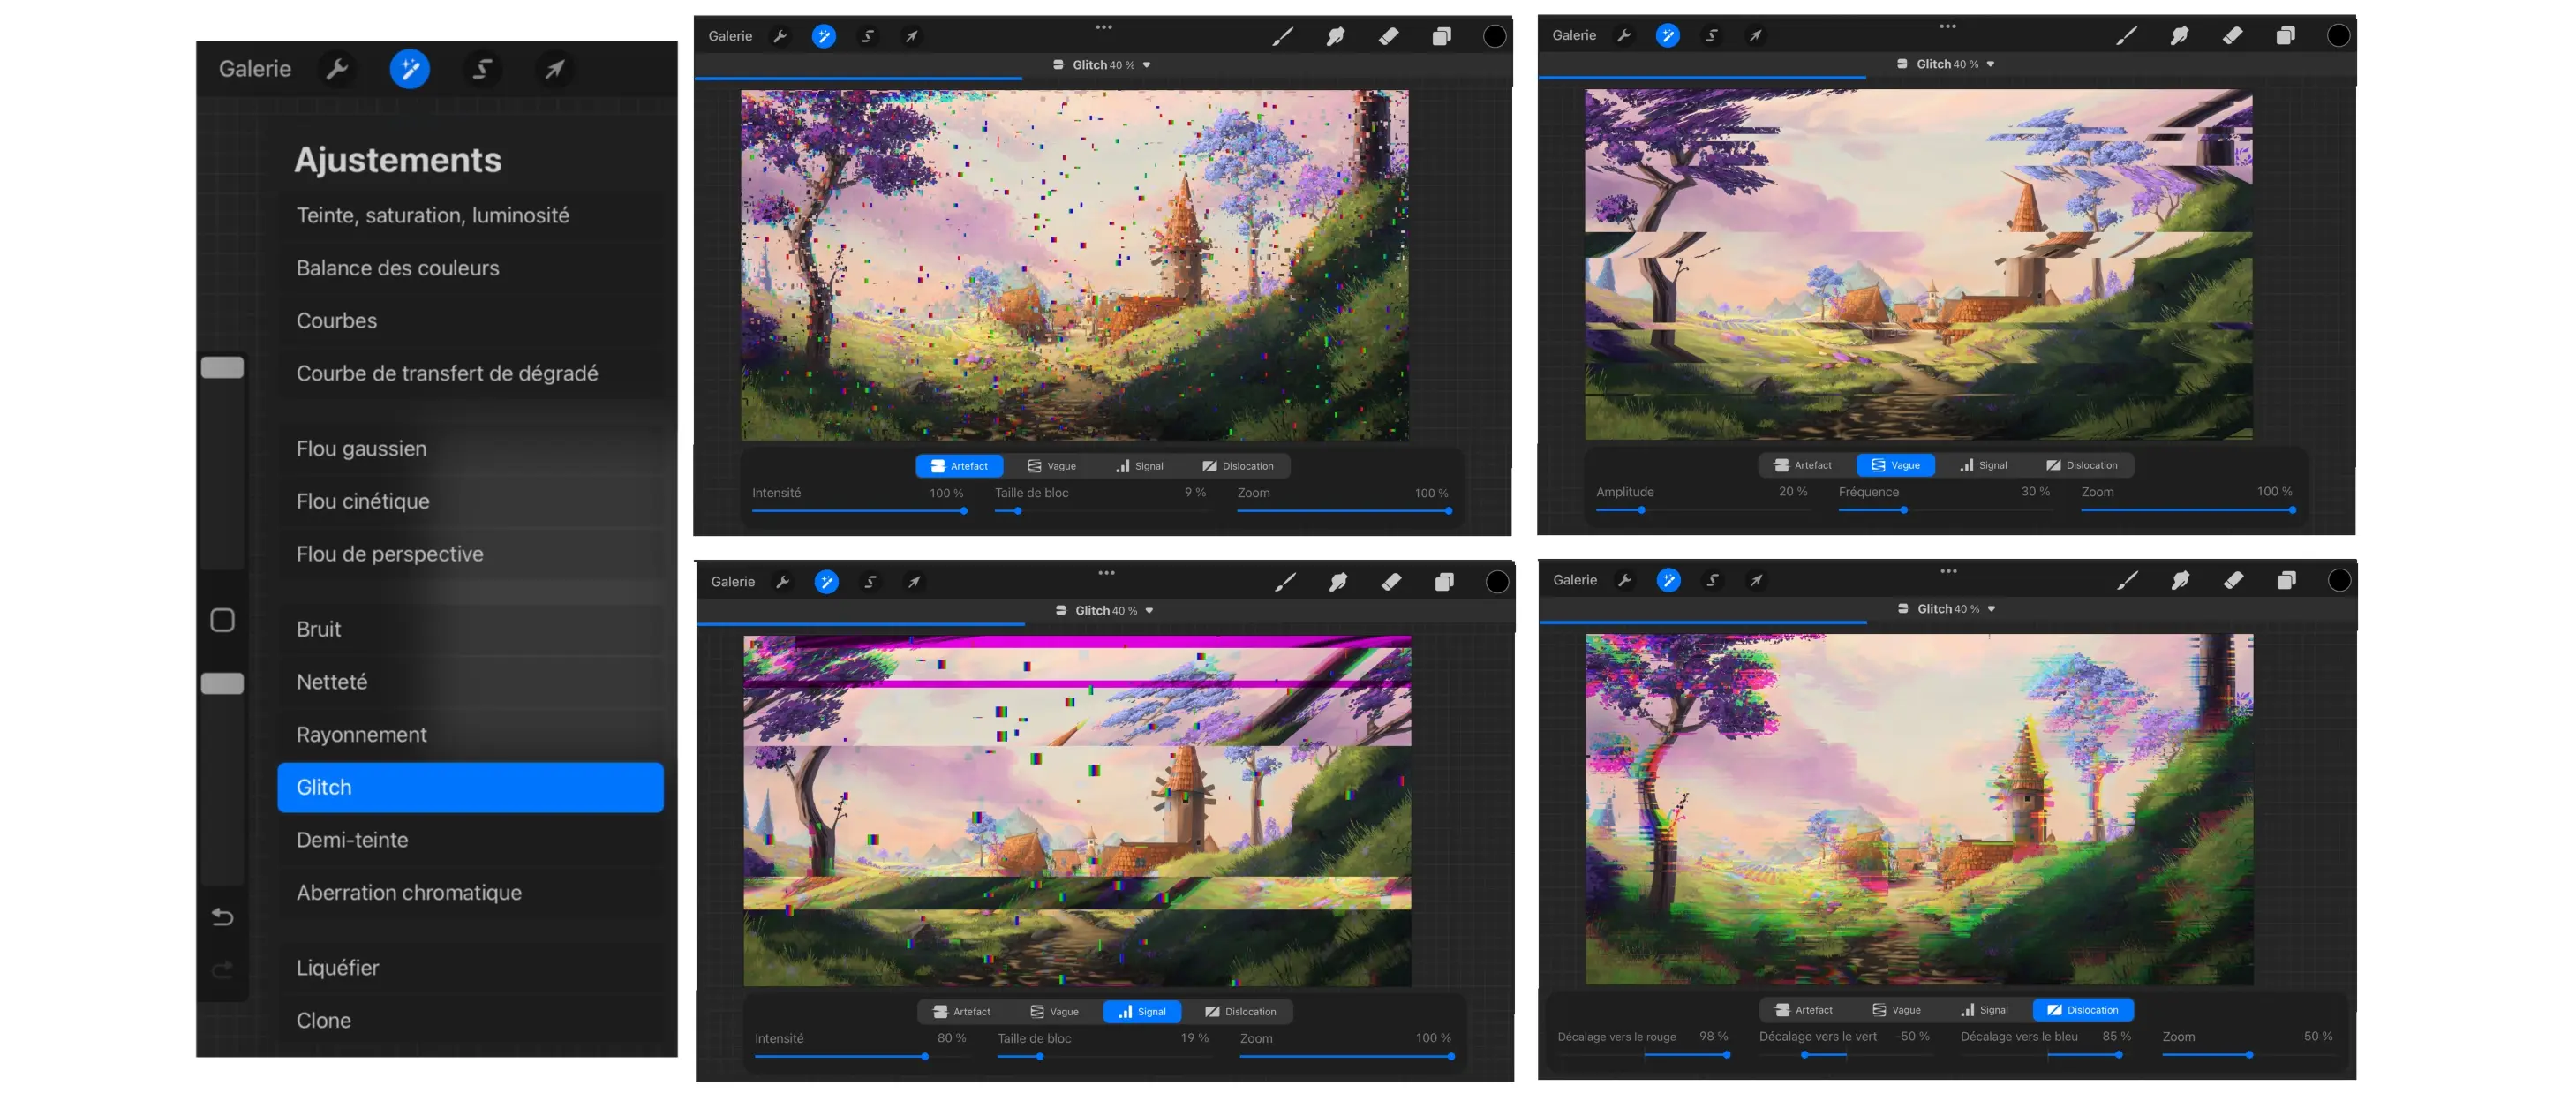
HALF-TONE
This tool offers three different halftones to add some texture to the illustration; just like the glitch, it is rather rare to use it.

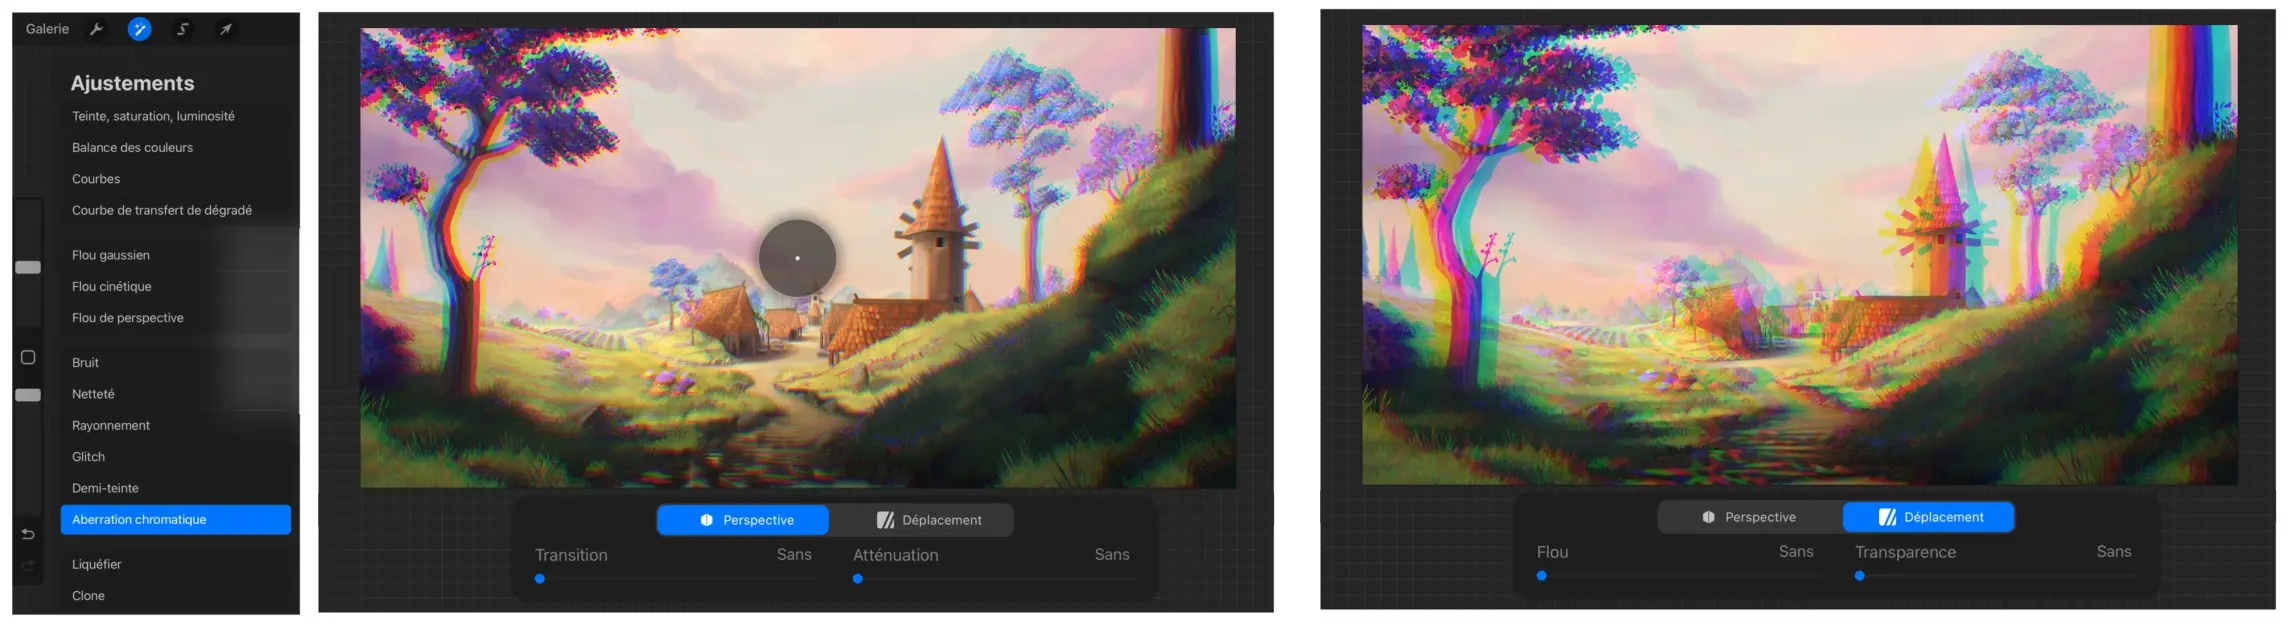
CHROMATIC ABERRATION
This instrument offers two types of chromatic aberration which, like the previous instruments, are occasionally interesting, but a little silly on a daily basis.
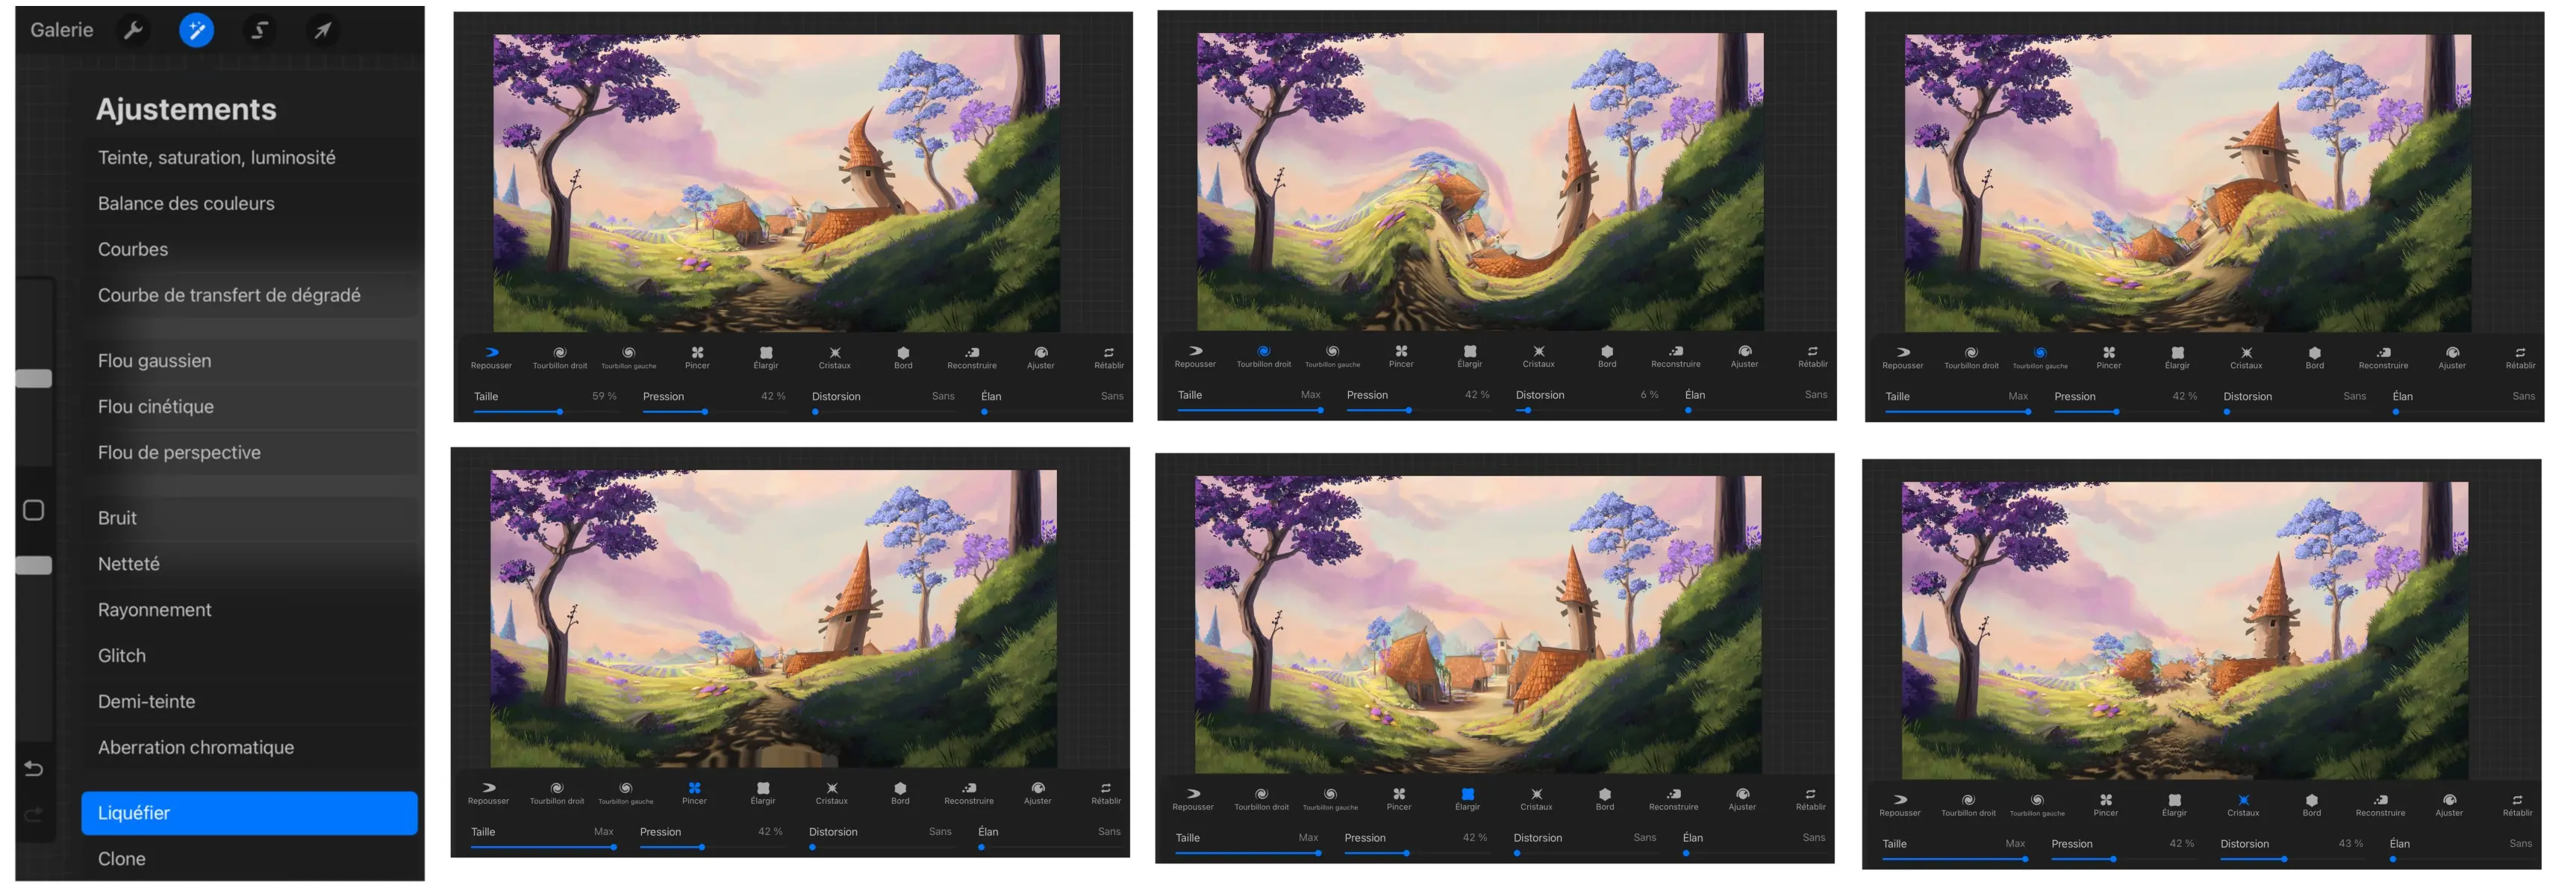
LIQUIFY YOUR DRAWING ON PROCREATE
This tool is more interesting than the previous ones and offers a range of tools for retouching images. It can allow quick corrections of certain parts, moving them, reducing them, etc. However, care must be taken not to overuse it, as you risk quickly obtaining a distorted image.
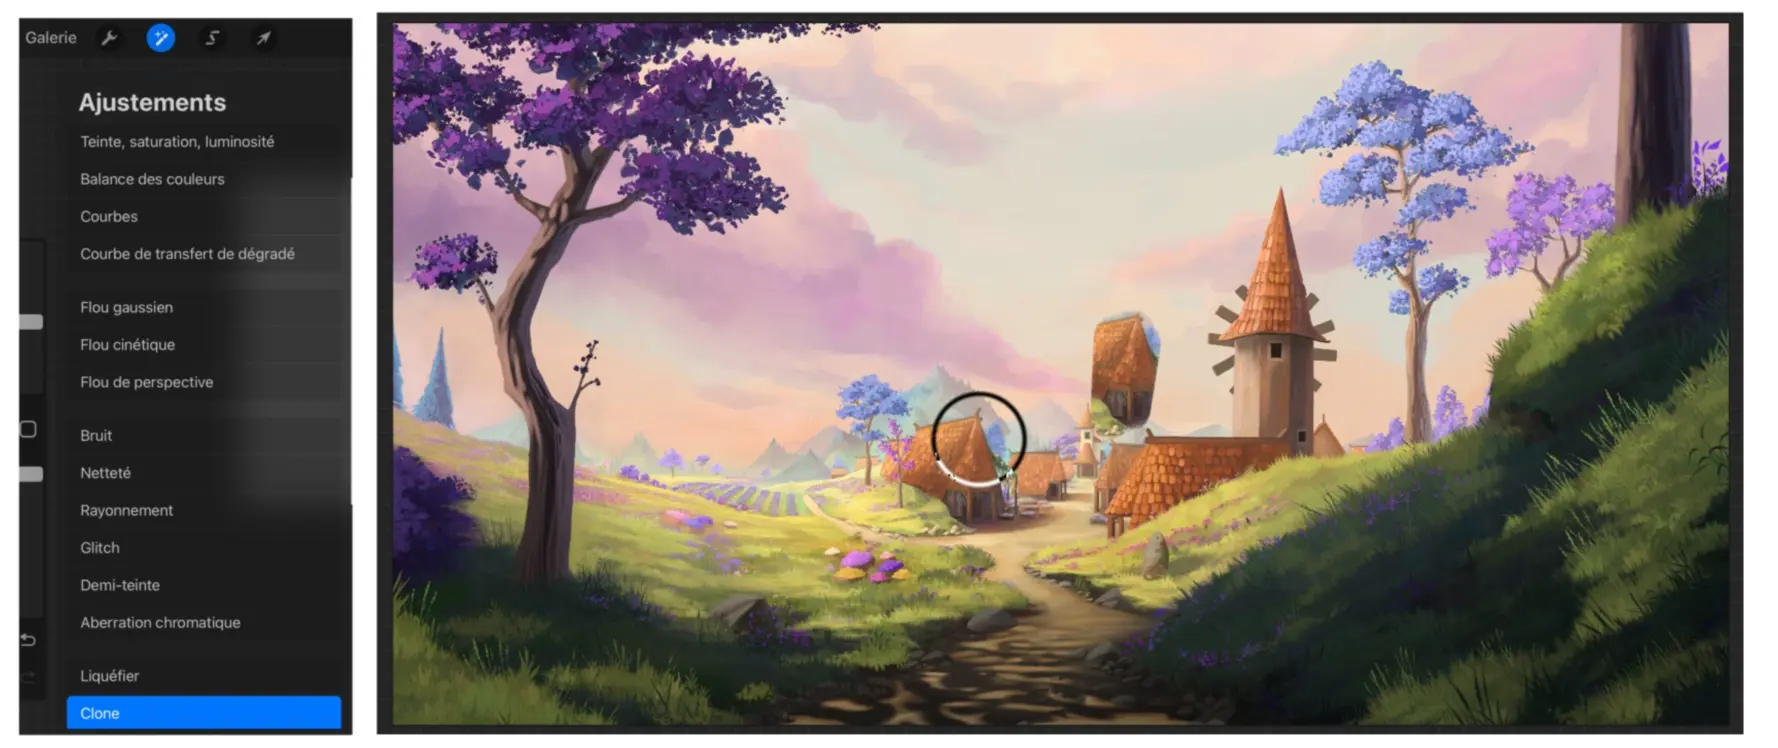
CLONE
It's a tool I haven't used for a long time, yet it is very powerful; simply place the cursor over an area and the programme will automatically paint it. In the example below, it is not very convincing, however, when you want to create textures (such as grass, fur, scales...) it can become very useful. It's worth a try, but don't overdo it!
THE SELECTION MENU ON PROCREATE
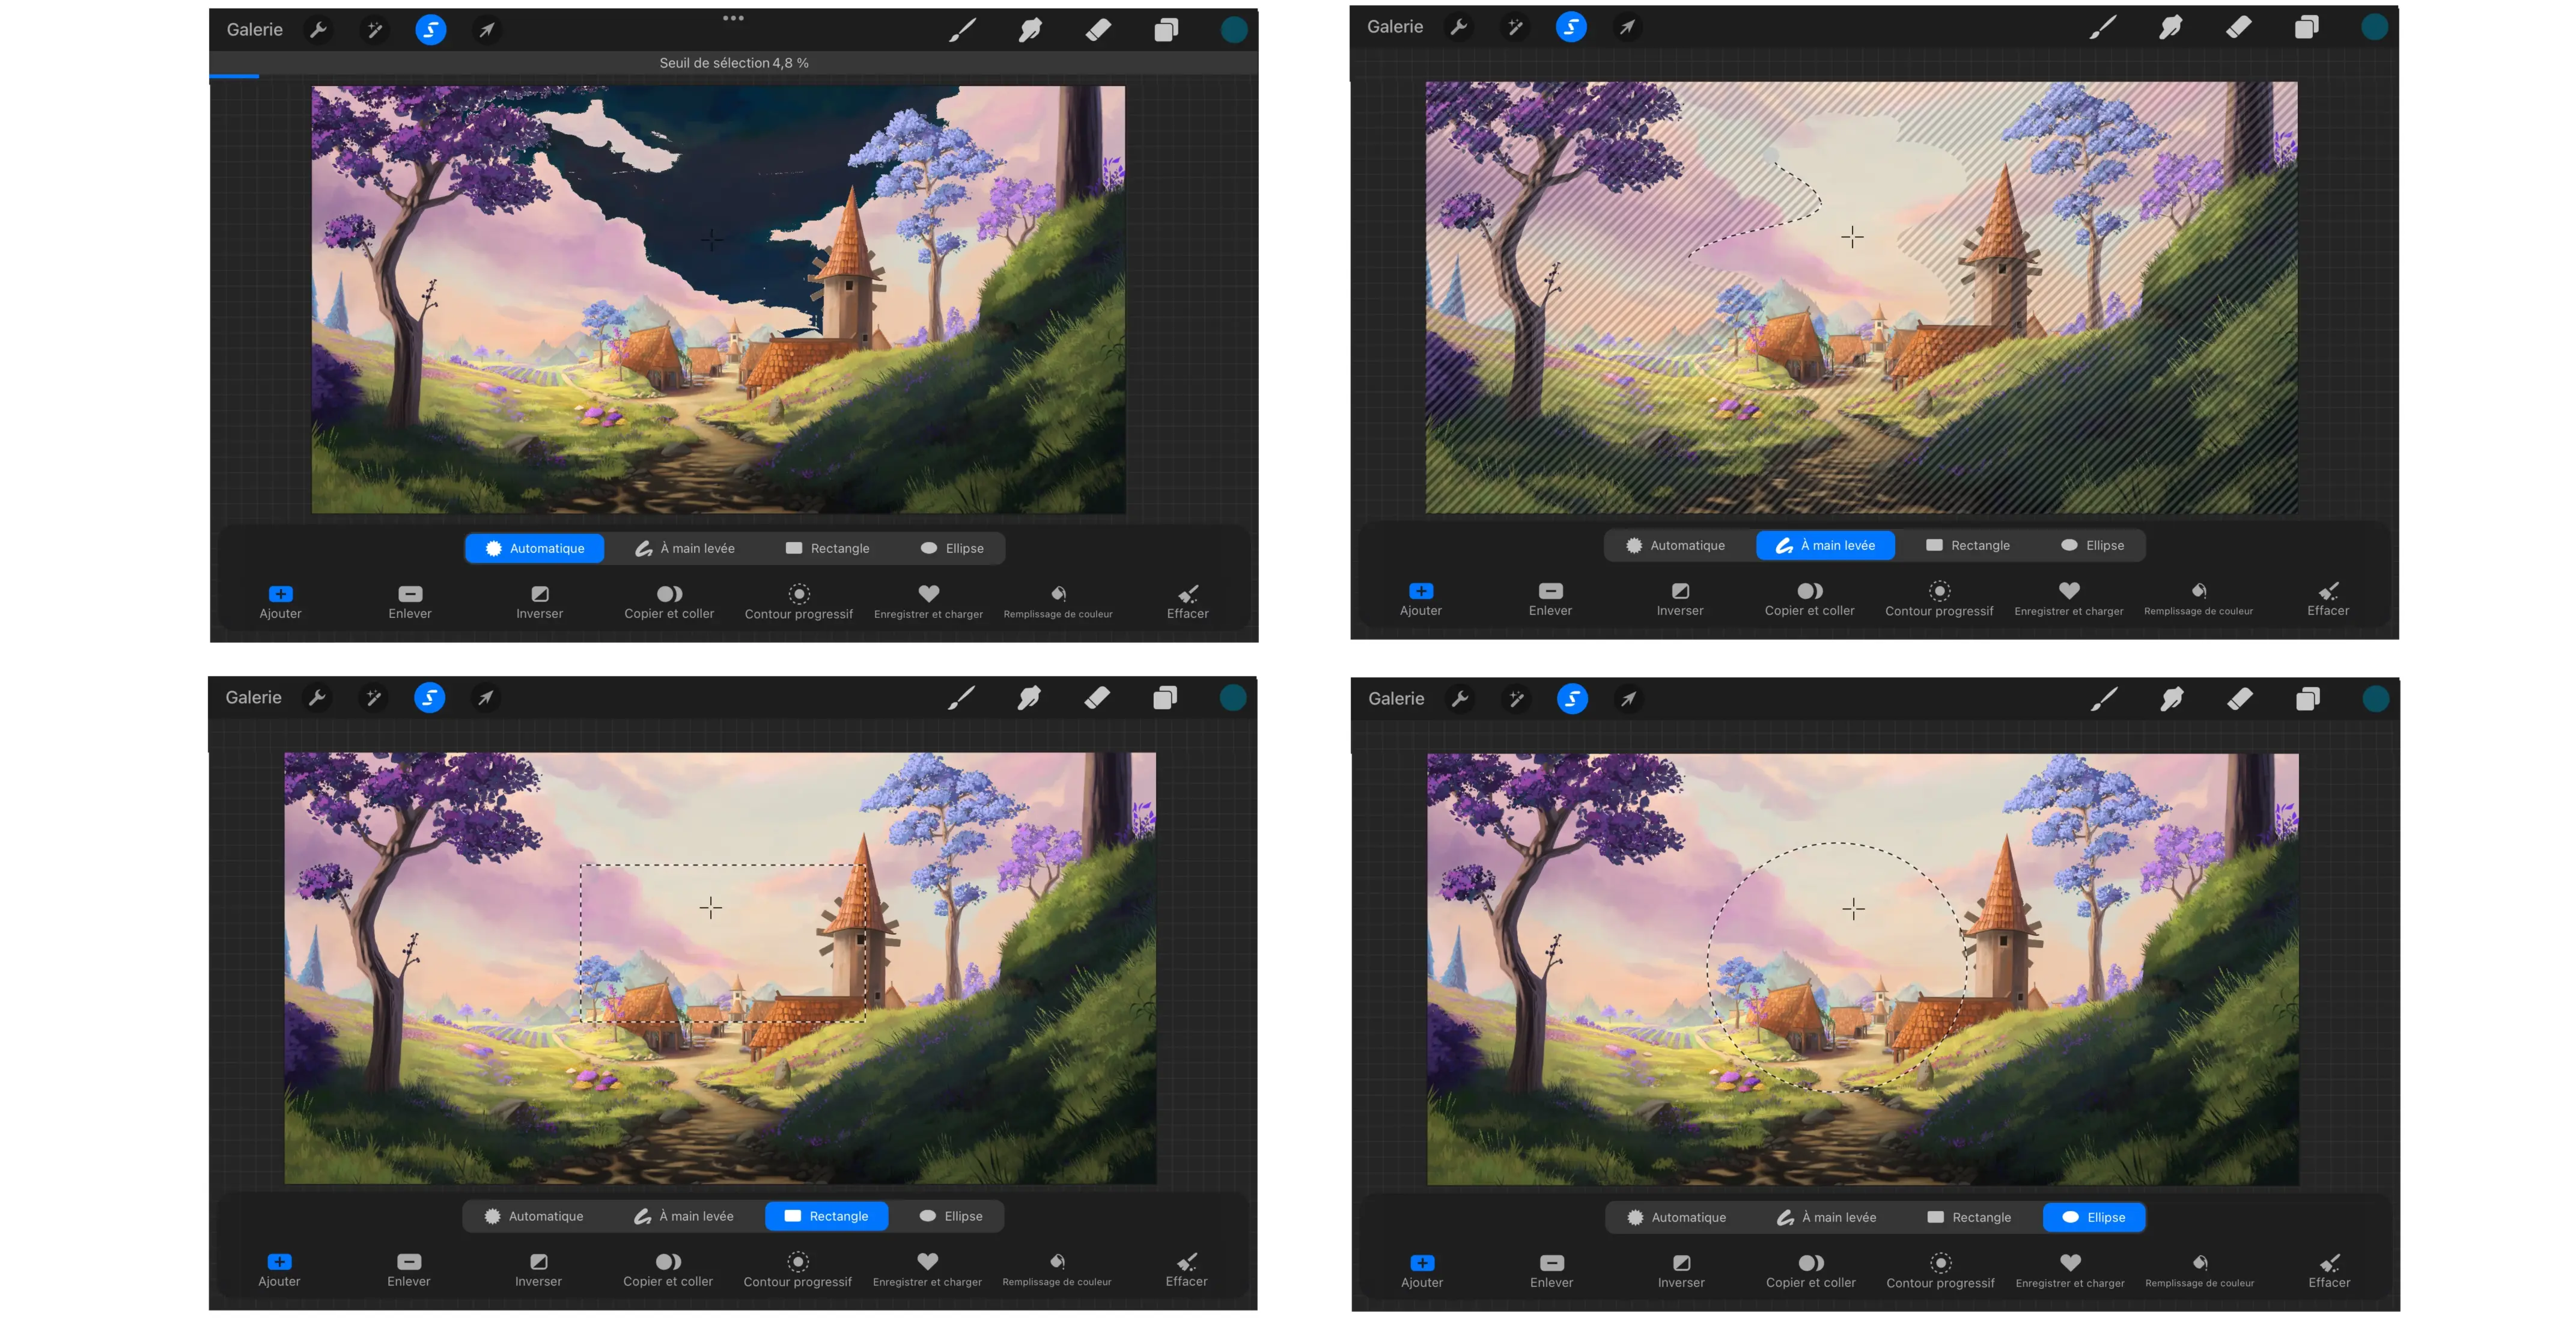
It is undoubtedly the most useful menu, along with the warp menu, and provides access to four different selection tools:
Automatic: this selection allows you to automatically select (as the name implies) all colors in similar shades. You can adjust the sensitivity by pressing and holding your finger down and then sliding it from left to right;
Freehand: it's the most useful selection tool, it allows you to clip around the area you want with a sort of lasso; it's a bit tricky to handle at first but it allows for great precision;
Rectangle: this tool selects everything in a rectangle (or a square by pressing with a finger of the other hand when tracing it) However, I find this tool impractical because you cannot move the selection, so you must perfectly select everything of interest, which can sometimes be more complex than using the freehand tool;
Ellipse: it's exactly the same principle as the rectangle tool but with an ellipse.
BRUSHES, FINGERS AND ERASERS
Here at last is the section of tools that will be most useful to you on a daily basis. Procreate offers the same library of brushes, whether brush, finger or eraser, which is very interesting when you want to achieve a consistent look in your illustrations.
Procreate also offers the possibility of easily downloading and installing many brushes, as well as customising existing ones; there is a lot of fun to be had and finding the brushes you like best.
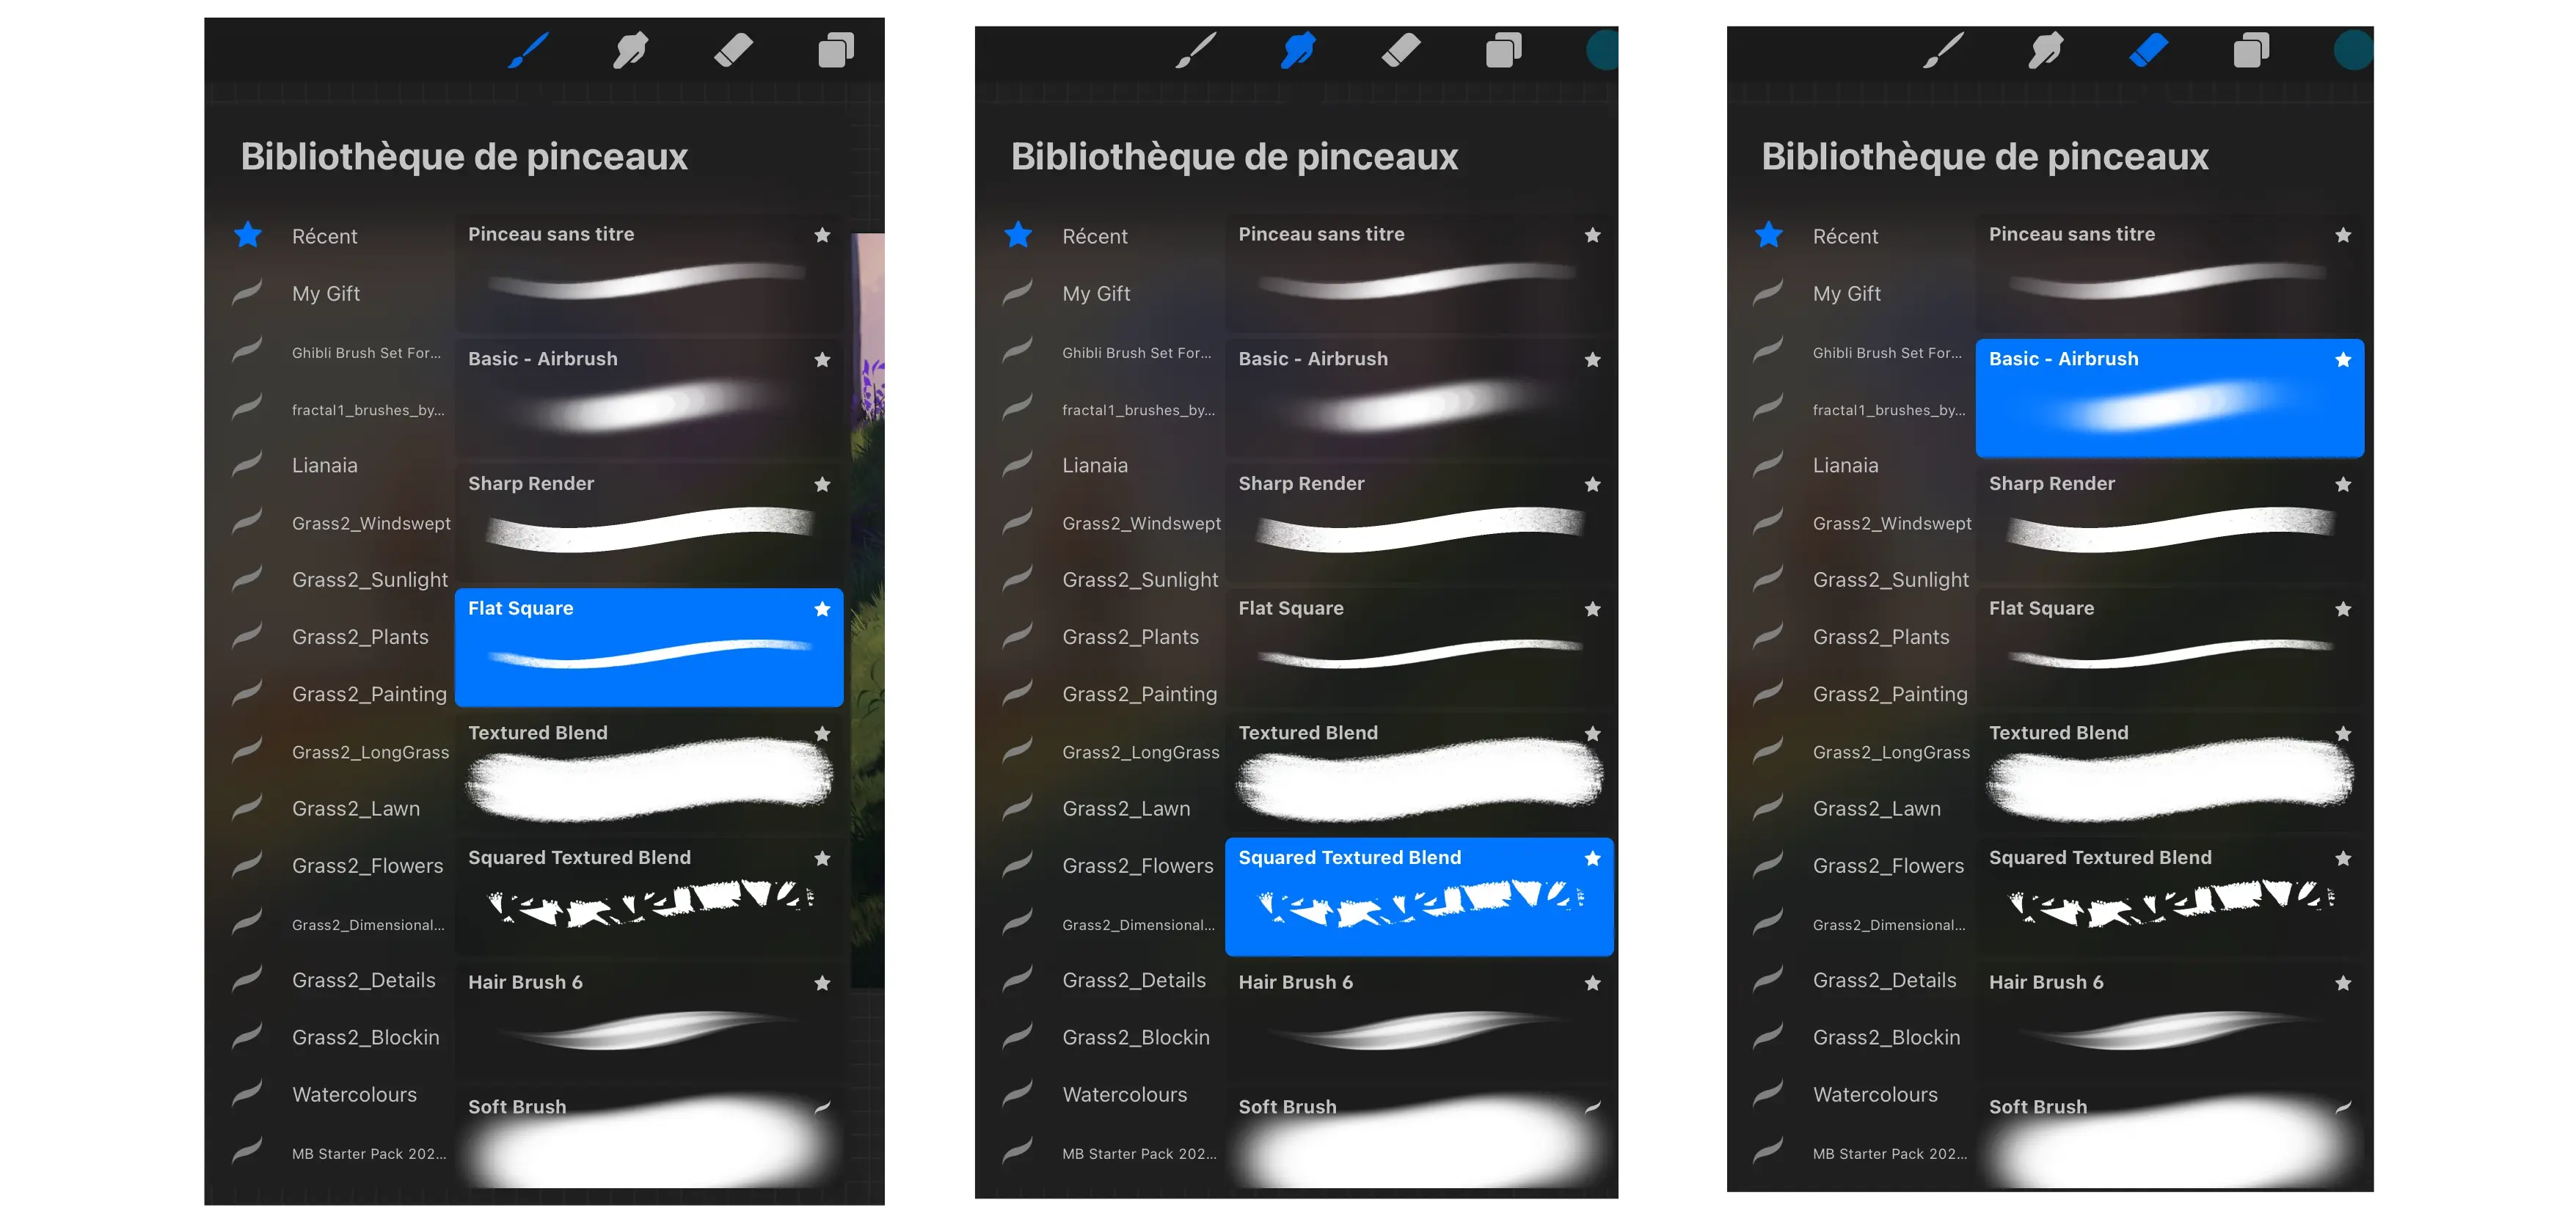
The brush tool: this is the tool for painting, it is used all the time;
The finger tool: a bit more complicated to use, it’s a tool for mixing colours;
The eraser tool: it is all in the name, it is for erasing.
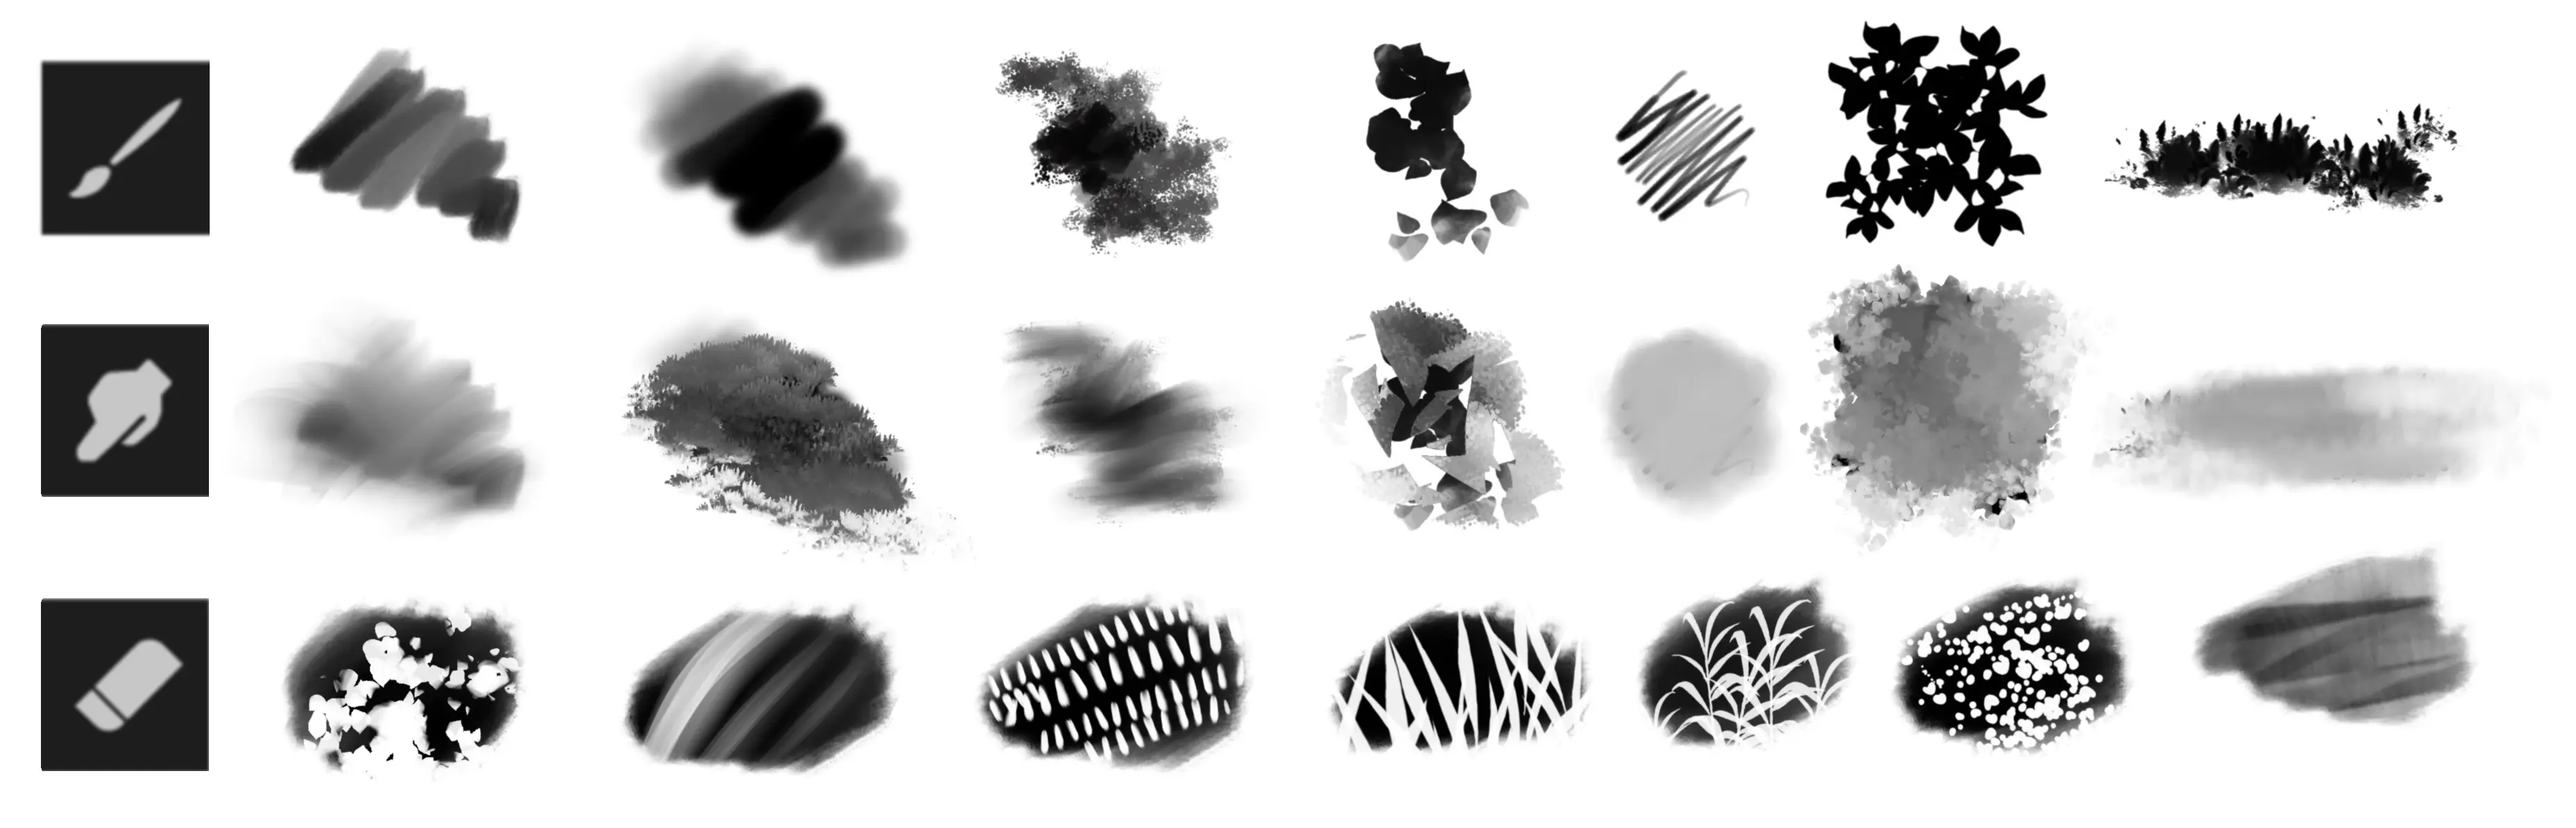
Here are some brush examples for each of the different tools.
HOW TO USE LAYERS ON PROCREATE?
Layers are THE main advantage of digital drawing, as they allow you to draw on several different layers (transparent, except for the coloured ones) and thus separate the various elements from each other, modifying them without affecting other...
Procreate offers a very intuitive and really effective layer management system; the only problem is that, depending on the power of the iPad and the file size, the number of layers is limited, which can sometimes be quite troublesome.
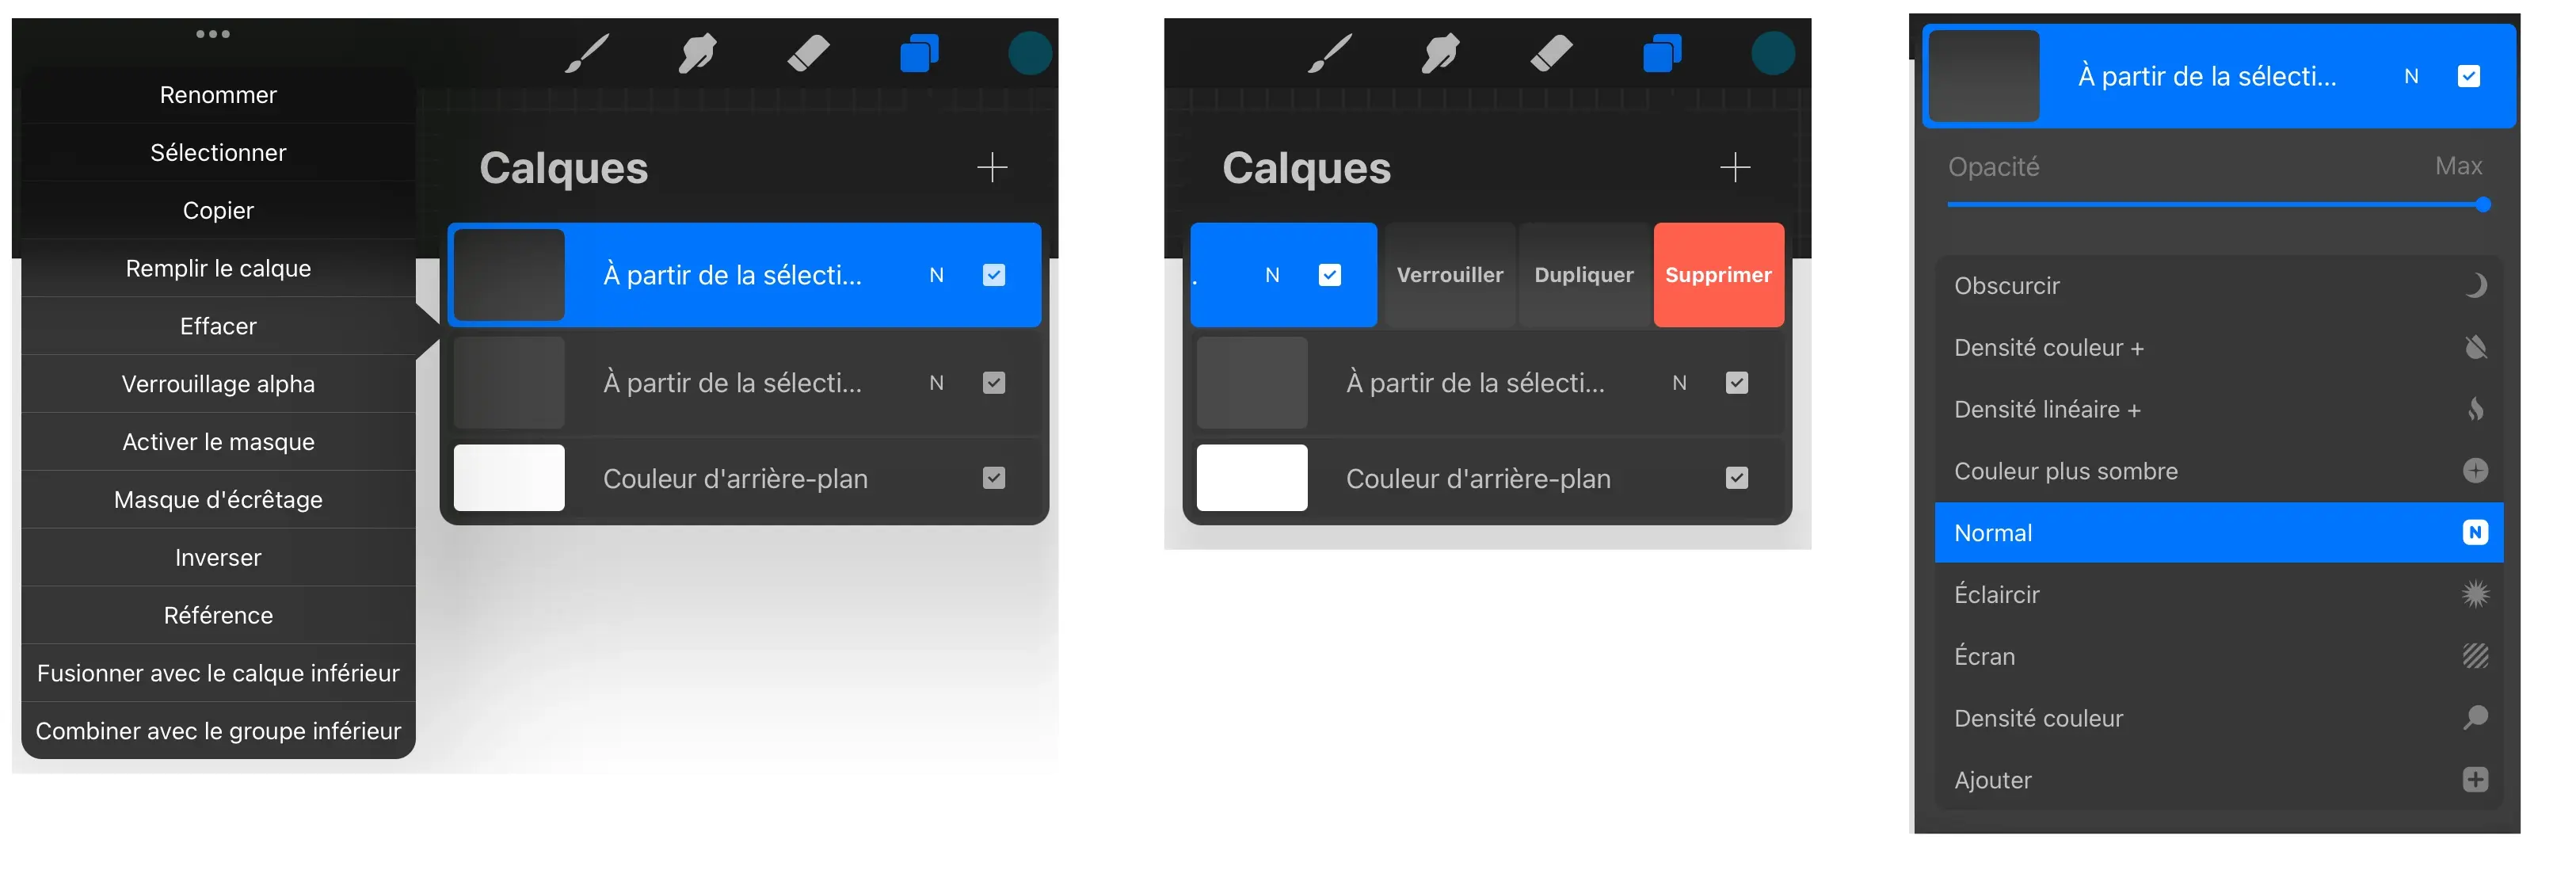
When you click on a layer, a panel appears on the left offering many options (copy, fill the layer...).
When you drag a layer to the left, you have the most basic options (lock, duplicate, delete)
When you press the small N on the right, it opens the layer merge options, you find all the options present in other software like Photoshop.
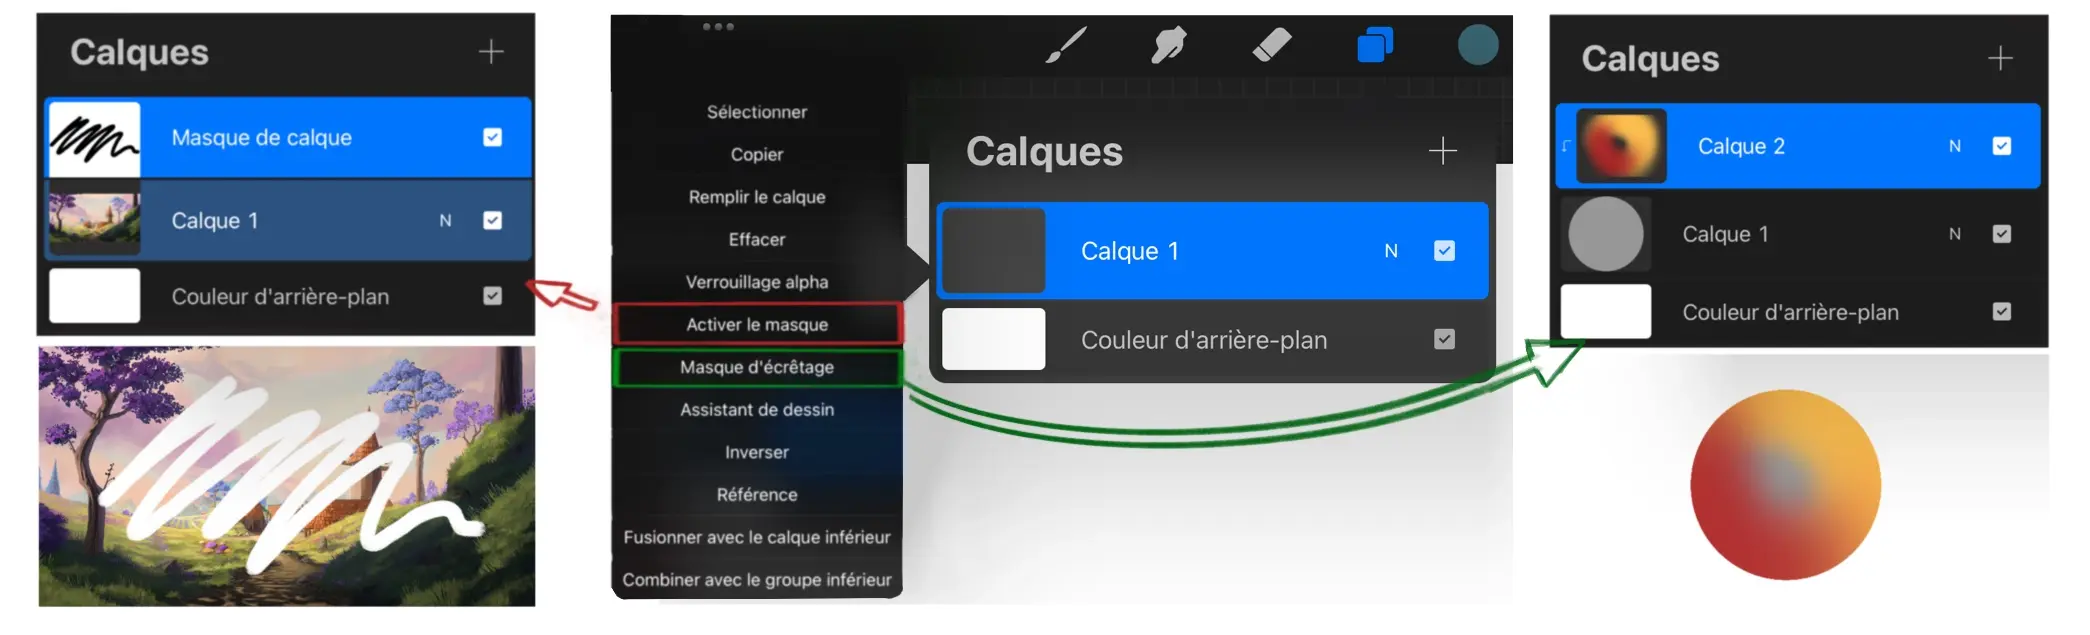
THE MASKS
When you click on a layer, the two most interesting tools are the mask and the clipping mask.
The mask (left): will create a white mask connected to the layer on which it was created. You will only be able to draw in shades of grey on it. Everything black will disappear, everything white will be visible. It is very practical for experimenting or incorporating elements, because it is less definitive than the eraser.
Clipping mask (right): it is used for colouring without exceeding. The image below is used as the area to be coloured, the upper image (the clipping mask) will not go beyond the contours of the basic shape, truly indispensable in everyday life!
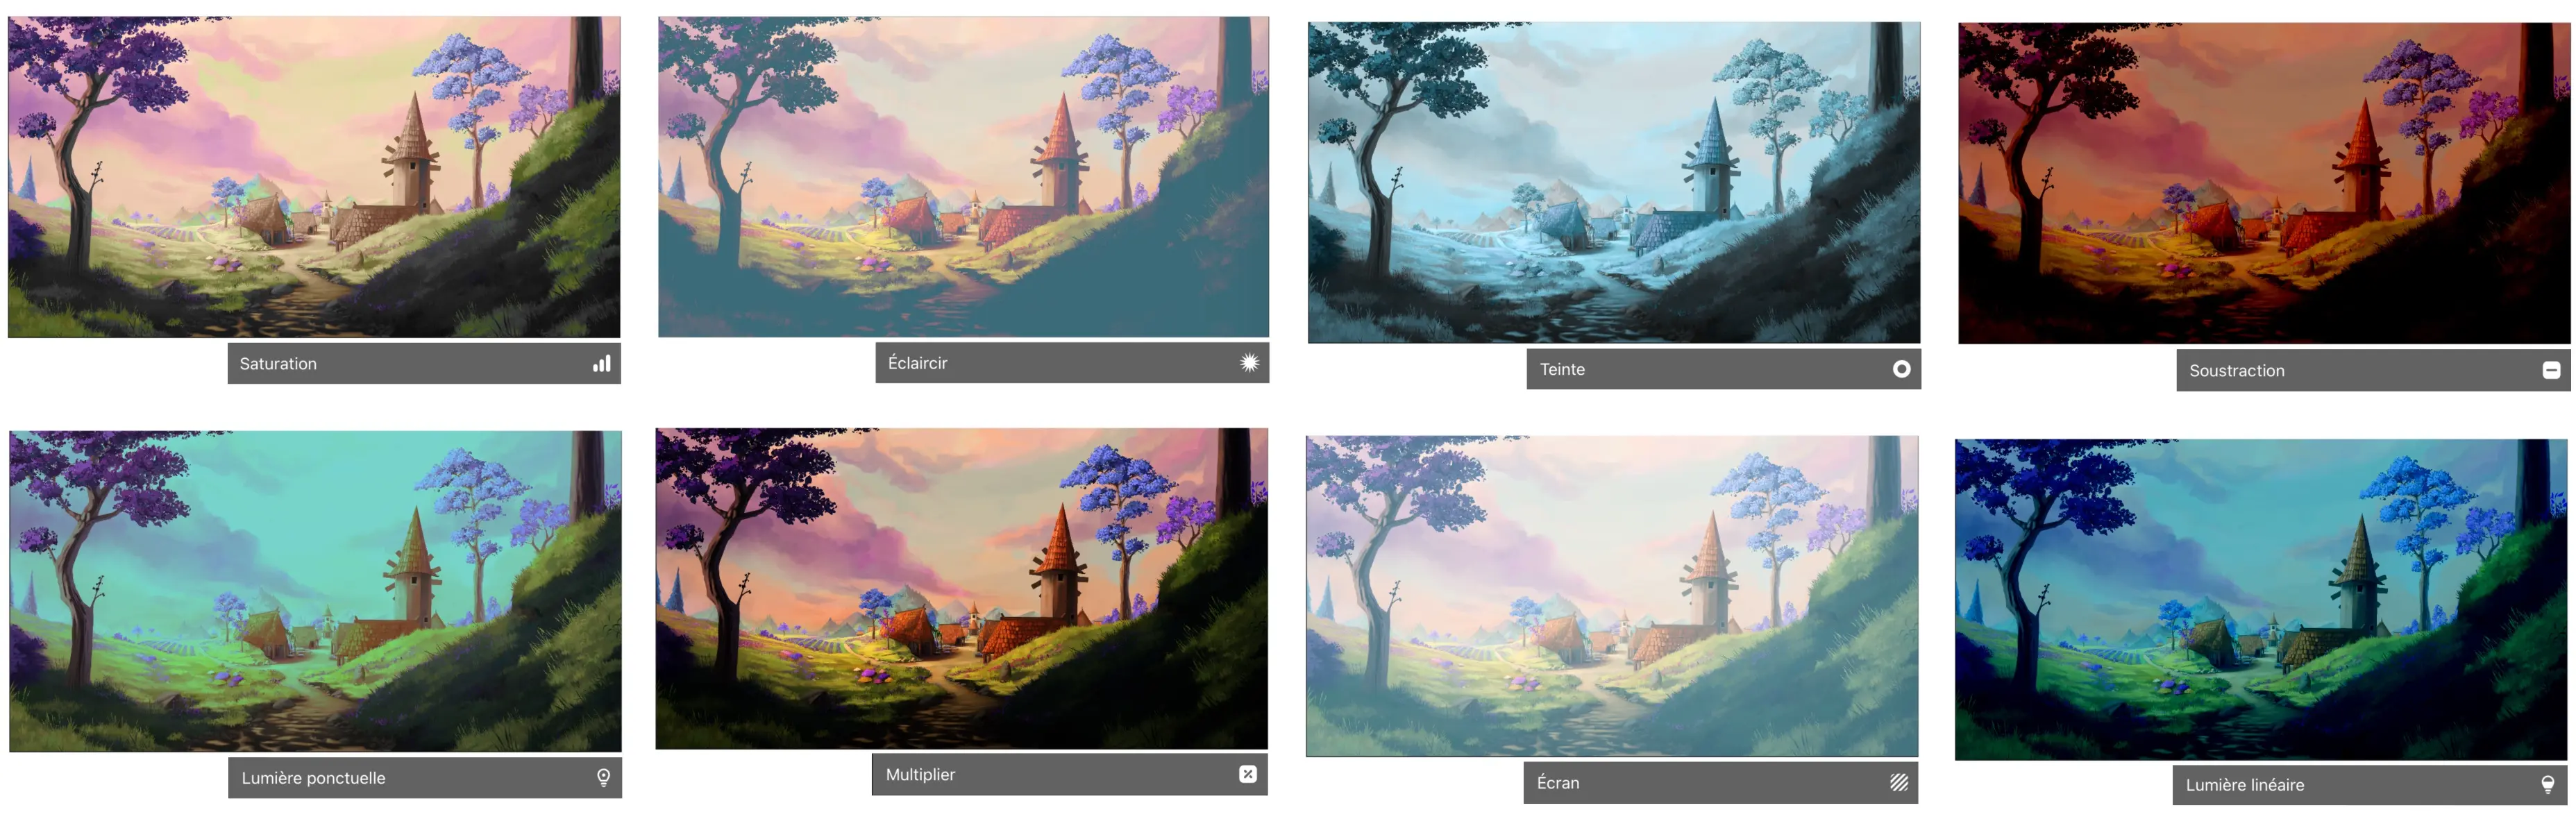
BLEND MODES
This tool allows you to modify the way layers (and especially colours) will interact with each other. There are many of them, I recommend that you look at how they interact depending on the drawings, you will surely find the ones you like the most.
Here is an example below, I have placed the illustration of the village on the first layer, and a solid blue colour on the second layer. I changed the blending mode of the latter, you can see that depending on the blending modes the results are very different.
The most popular blend modes are multiply, overlay, color burn, add, and soft light (they are not all present in the examples below)
THE COLOURS FOR DRAWING
The last useful tab on a daily basis is the colour tab, which allows you to choose the colour you want to use.
You can choose from 5 different colour panels, there's really no right or wrong choice, it's as you prefer. I use panel 2 (classic) because I've always been used to it but they all work very well, it's up to you to choose!

HOW TO MAKE A DRAWING WITH PROCREATE?
After all the theory, it is time to move on to practice; I suggest making a simple illustration to get a good start with Procreate.
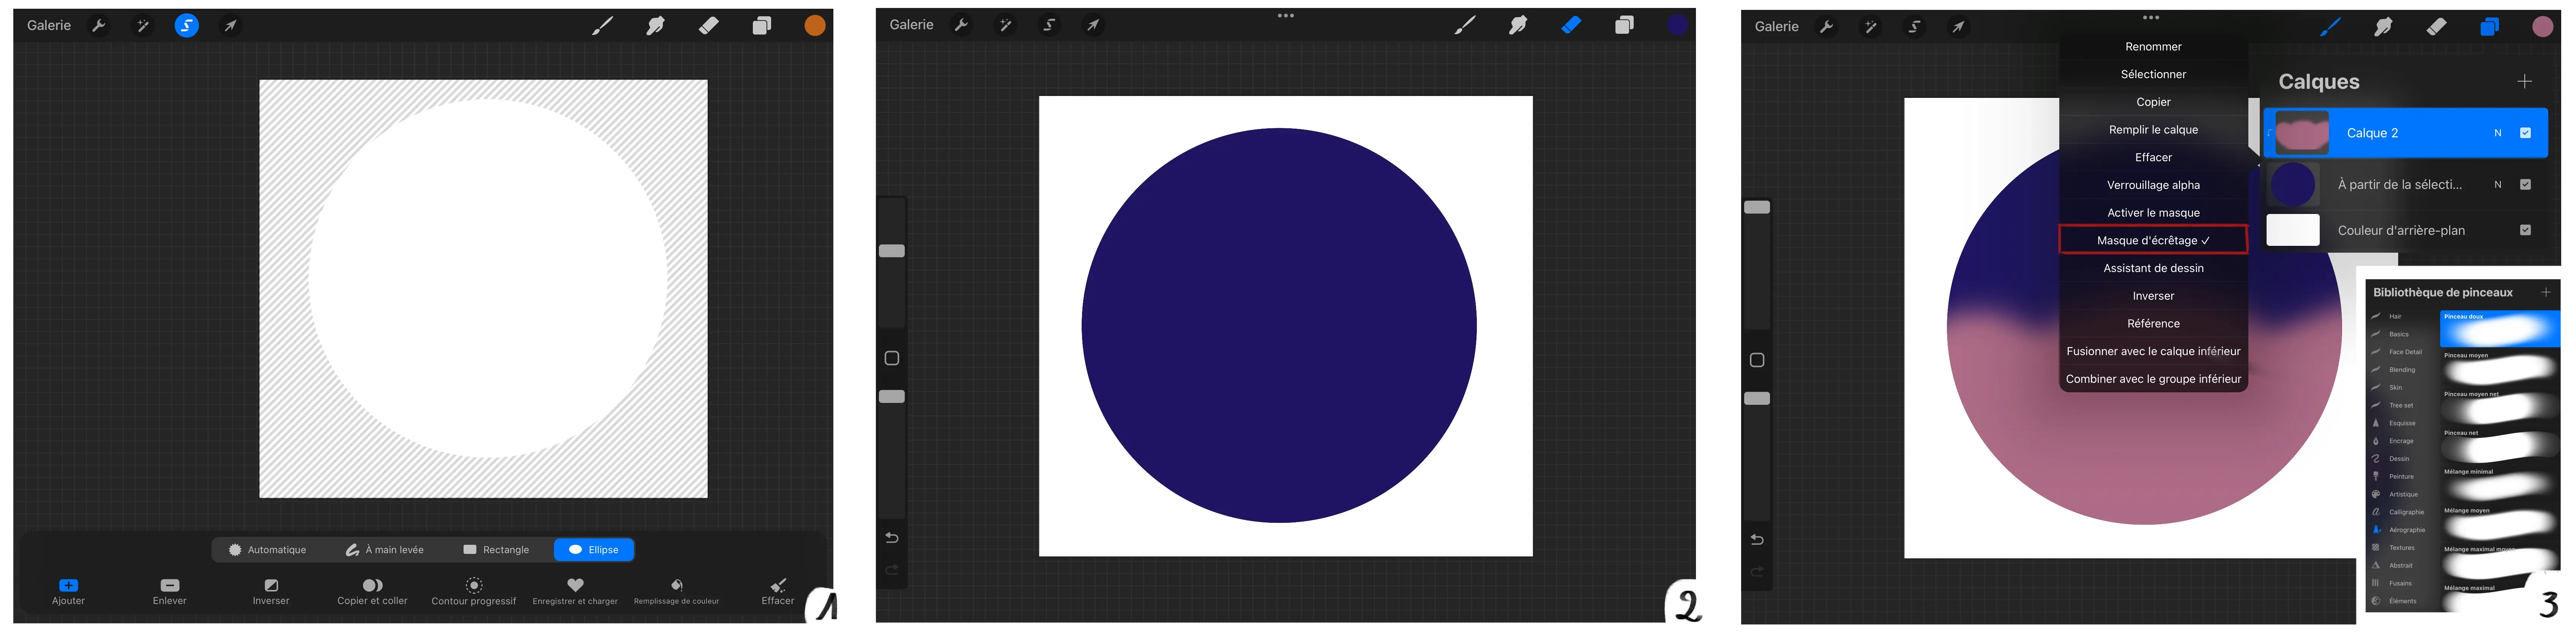
1 - I begin by using the selection tool, create a perfect circle by pressing with one finger of one hand and tracing it with the other.
2 - I select a midnight blue colour, click on the colour circle in the top right-hand corner and drop the colour into the selection to colour it in.
3 - I create a new layer above the first one, set it as a clipping mask and fill it with a slightly pink colour.
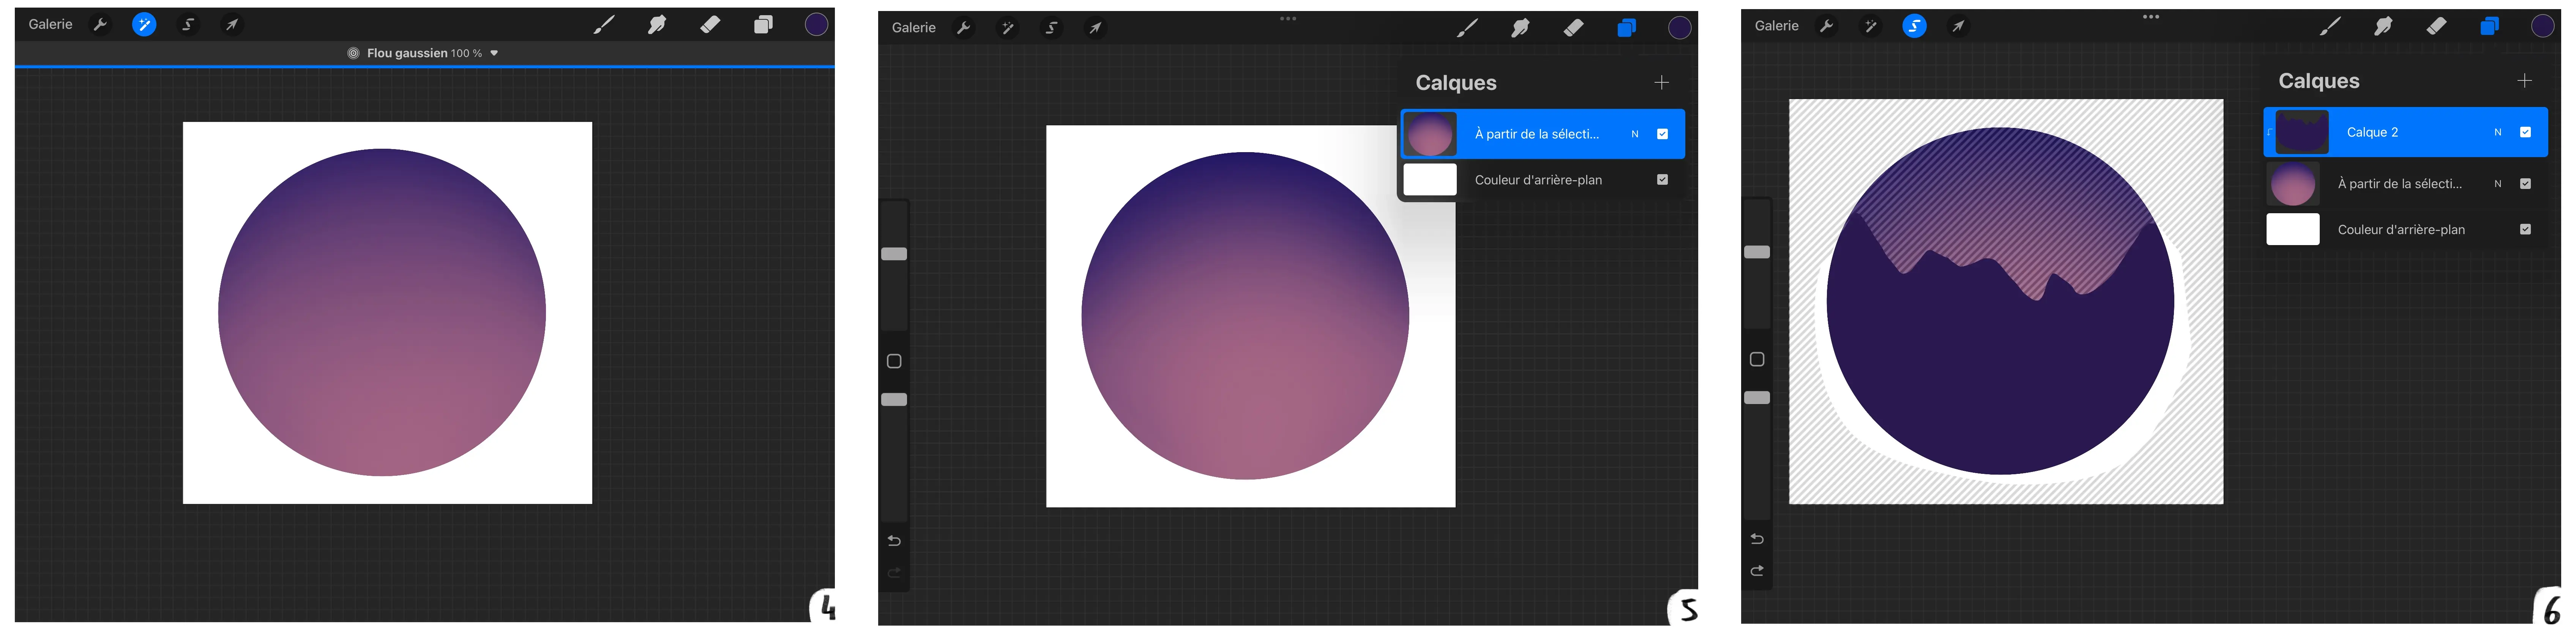
4 - I just applied a 100% Gaussian blur to the pink layer.
5 - I merge the two layers. To do this, I pinch them together.
6 - On a new layer, I use the freehand selection tool to draw mountain shapes on the top third of the image, then fill the selection with a midnight blue (the same as at the beginning) and set the layer to clipping mask mode.
7 - I used the soft brush from the airbrush category (default) and added a fog effect to the base of the mountains in light purple.
8 - I create a new layer and draw the snow on the mountains in gray.
9 - I create a new layer that I set as a clipping mask on the snow layer, and add some light blue to the bottom left of the snow.
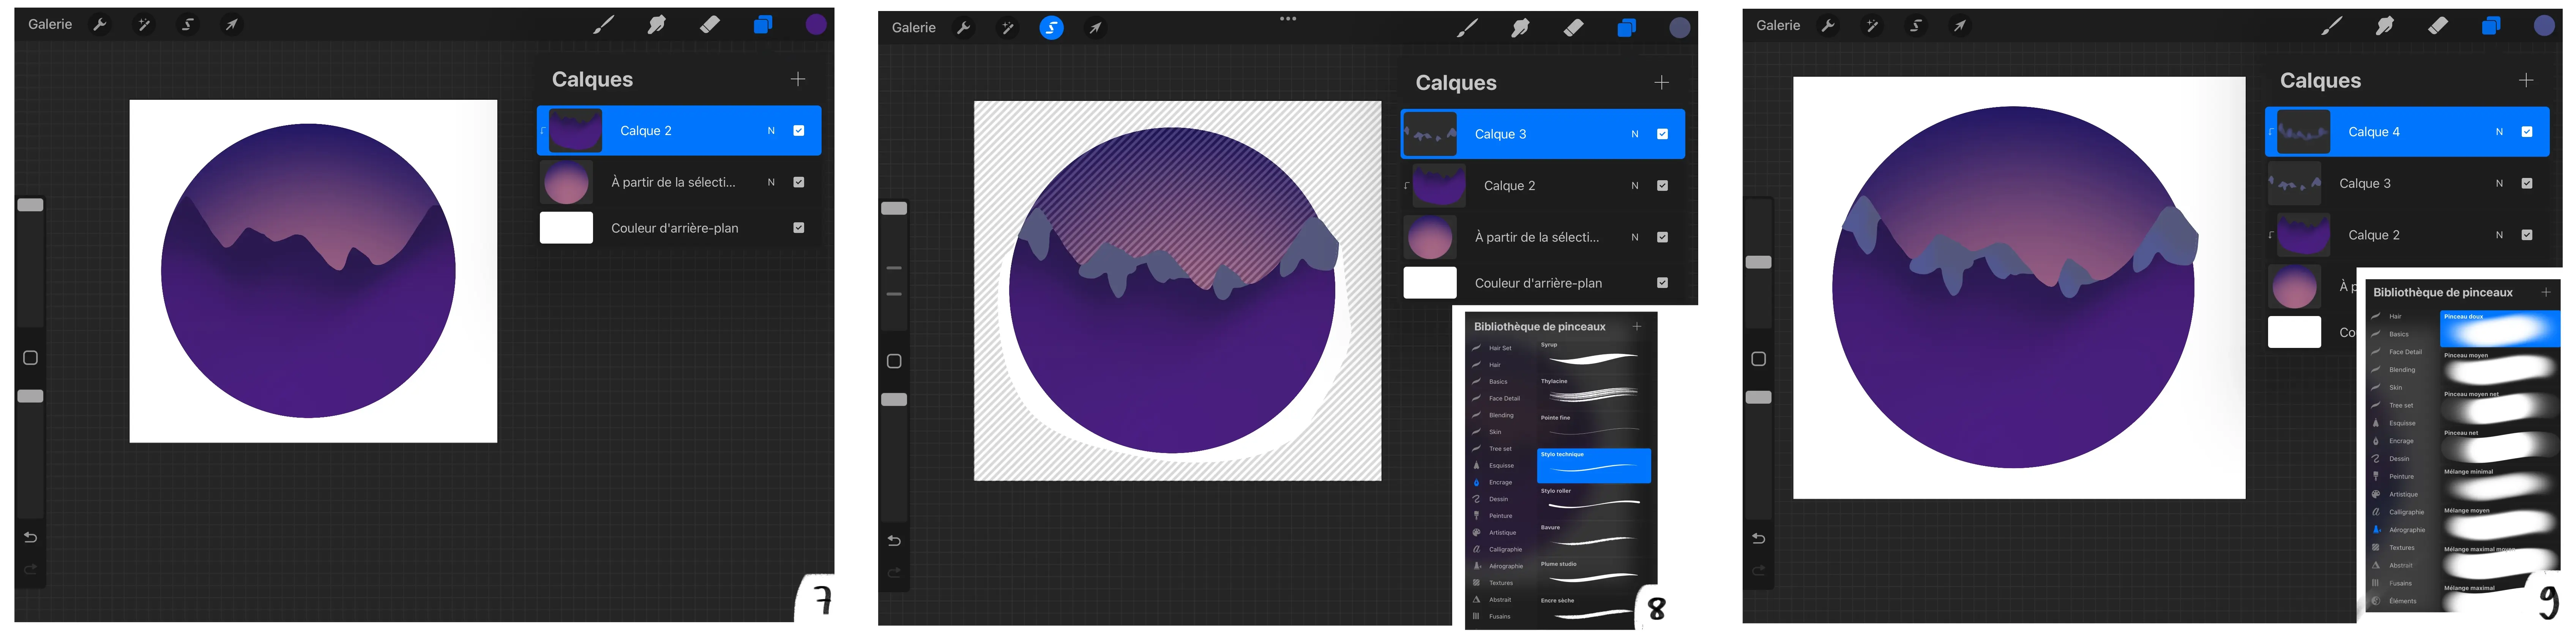
10 - I add another new layer in clipping mask mode and let in some light with an orange.
11 - I merge all the snow layers and put this new merged layer into a clipping mask.
12 - I reused the freehand selection tool and recreated some mountains which I colored dark blue.
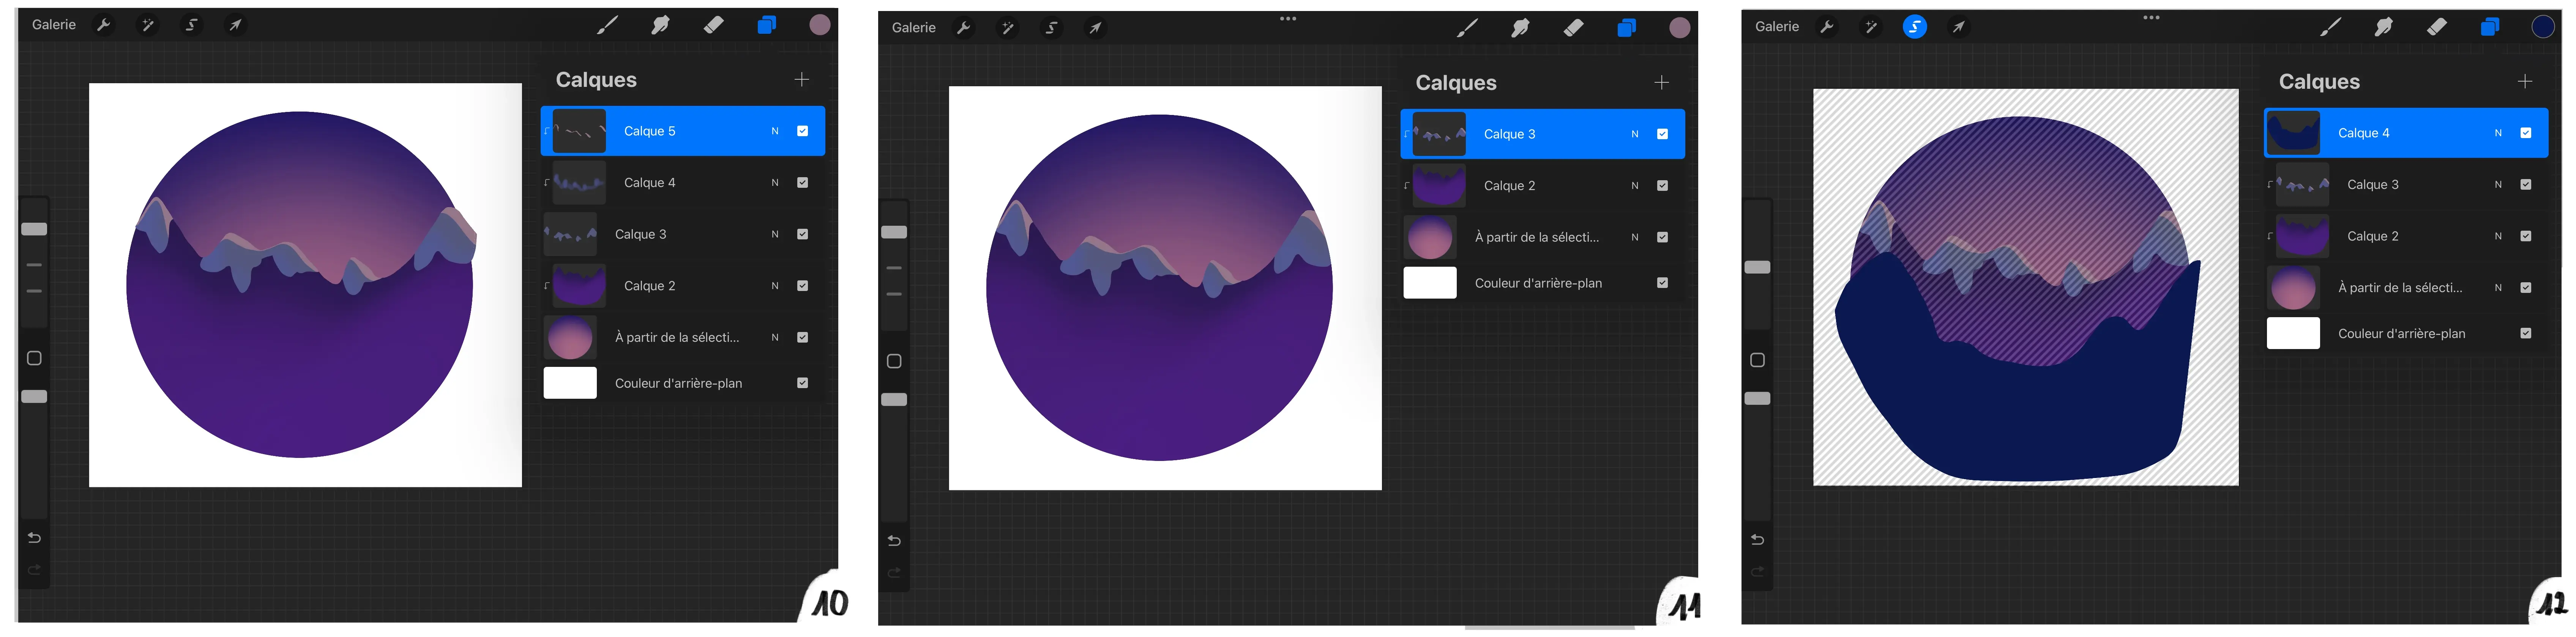
13 - I create a layer in clipping mask mode and add a fog effect with light purple.
14 - On a new layer, using a clipping mask, I add snow and reflections.
15 - I merge all the background layers together.
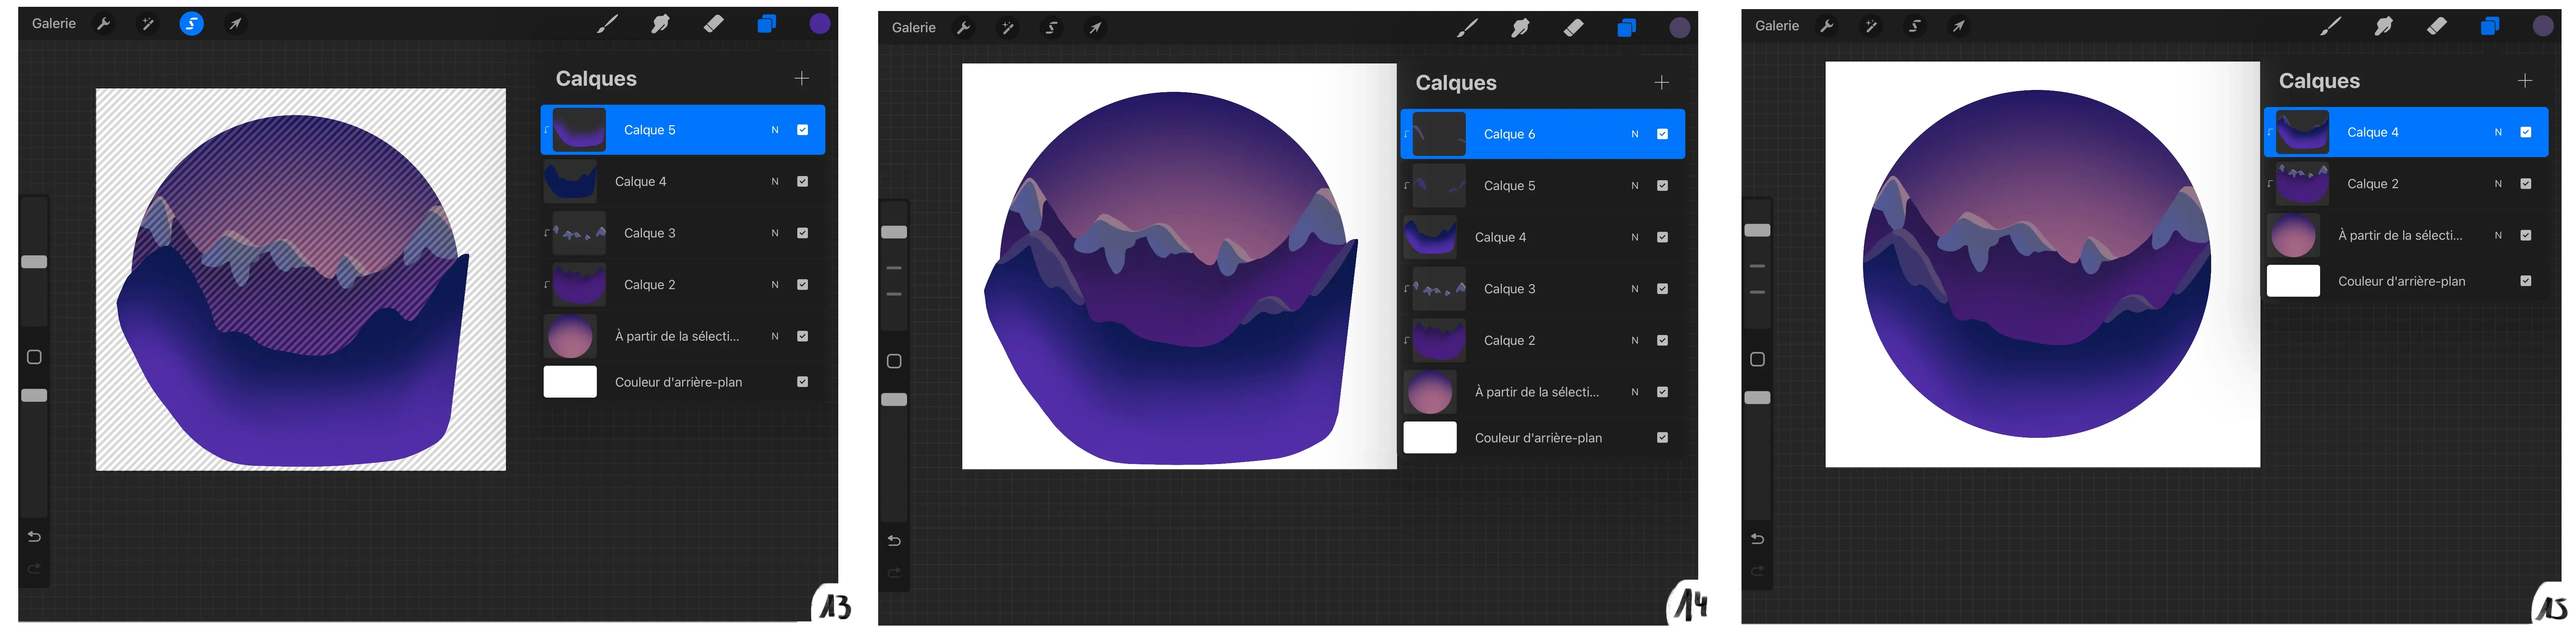
16 - I add fir trees using custom brushes I have created; it is possible to draw outlines of fir trees (or even triangles).
17 - On a new layer, using clipping mask, I use the freehand selection tool, fill the selection with a dark blue and then add reflections using the soft brush from the airbrush category.
18 - I repeat the operation.
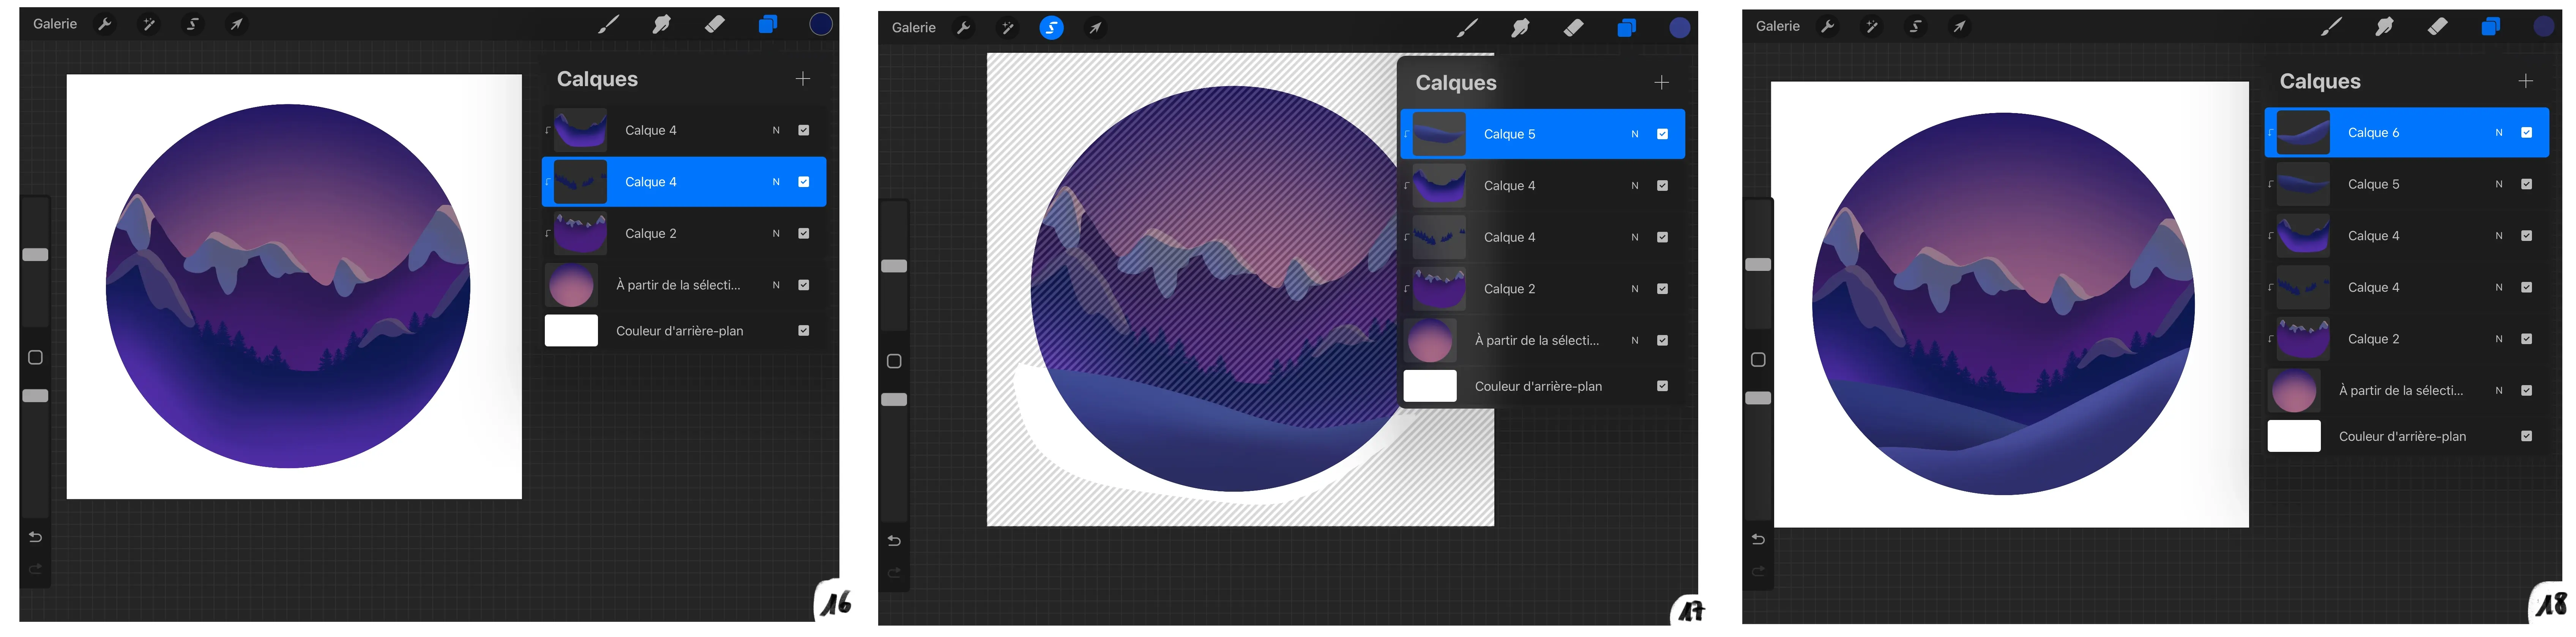
19 - I will repeat step 17 again.
20 - On a new layer, I choose a blue gray and create zigzag roads between the hills.
21 - I create a new clipping mask layer, set it to 40% multiplication mode and then shade the roads following the shadow I had already created on each hill.
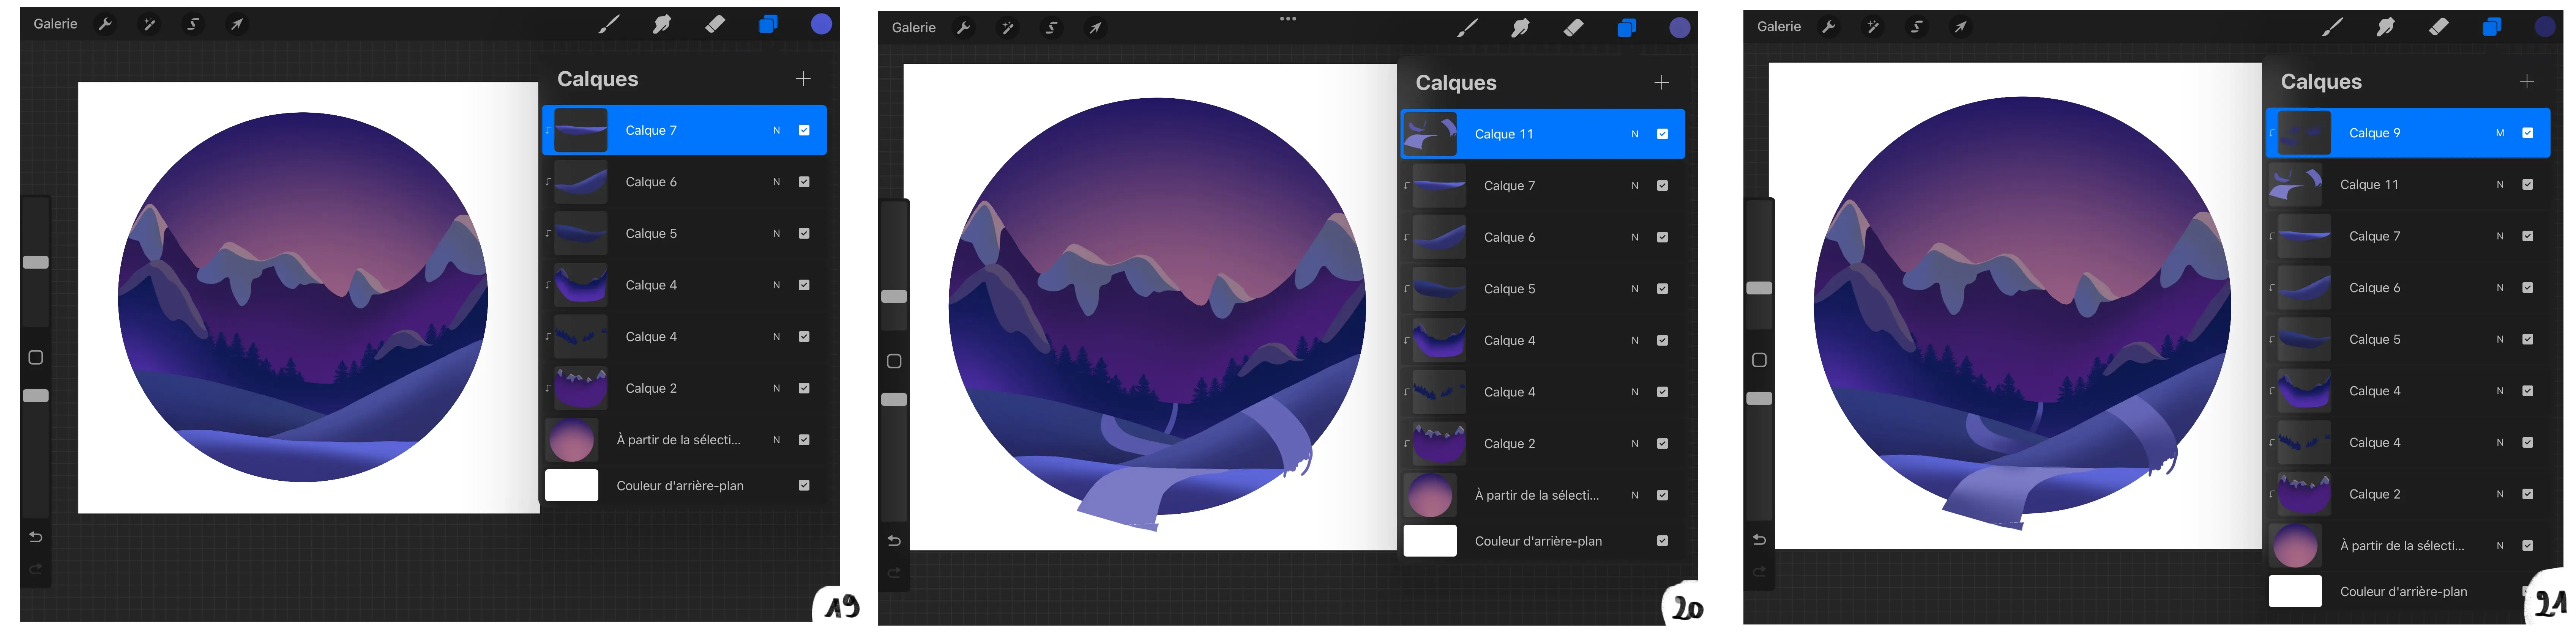
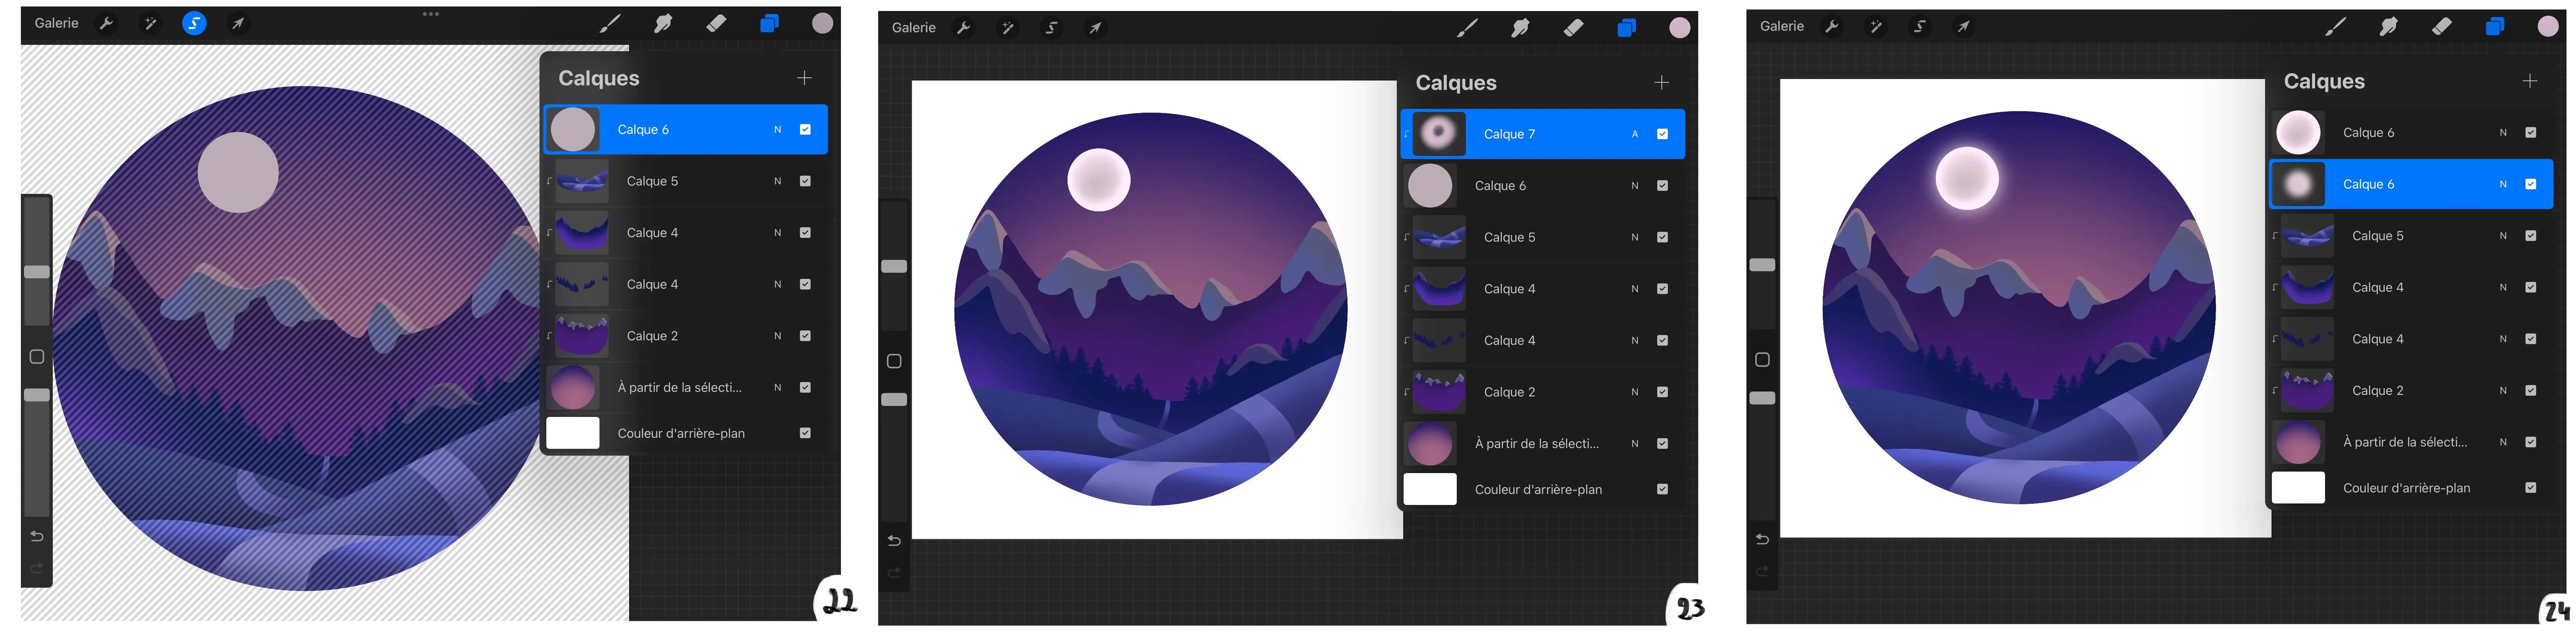
22 - I merge the shading and the road, I change the layer to a clipping mask and then merge it with all the hill layers. Next, I use the selection tool and create a circle, which I fill with beige, on a new layer.
23 - I create a new layer, in clipping mask mode, and use the soft brush from the airbrush category to create reflections around the moon.
24 - I merge these two layers then duplicate them. I am using Gaussian blur (about 20%/30%) on the bottom layer to create the moonlight.
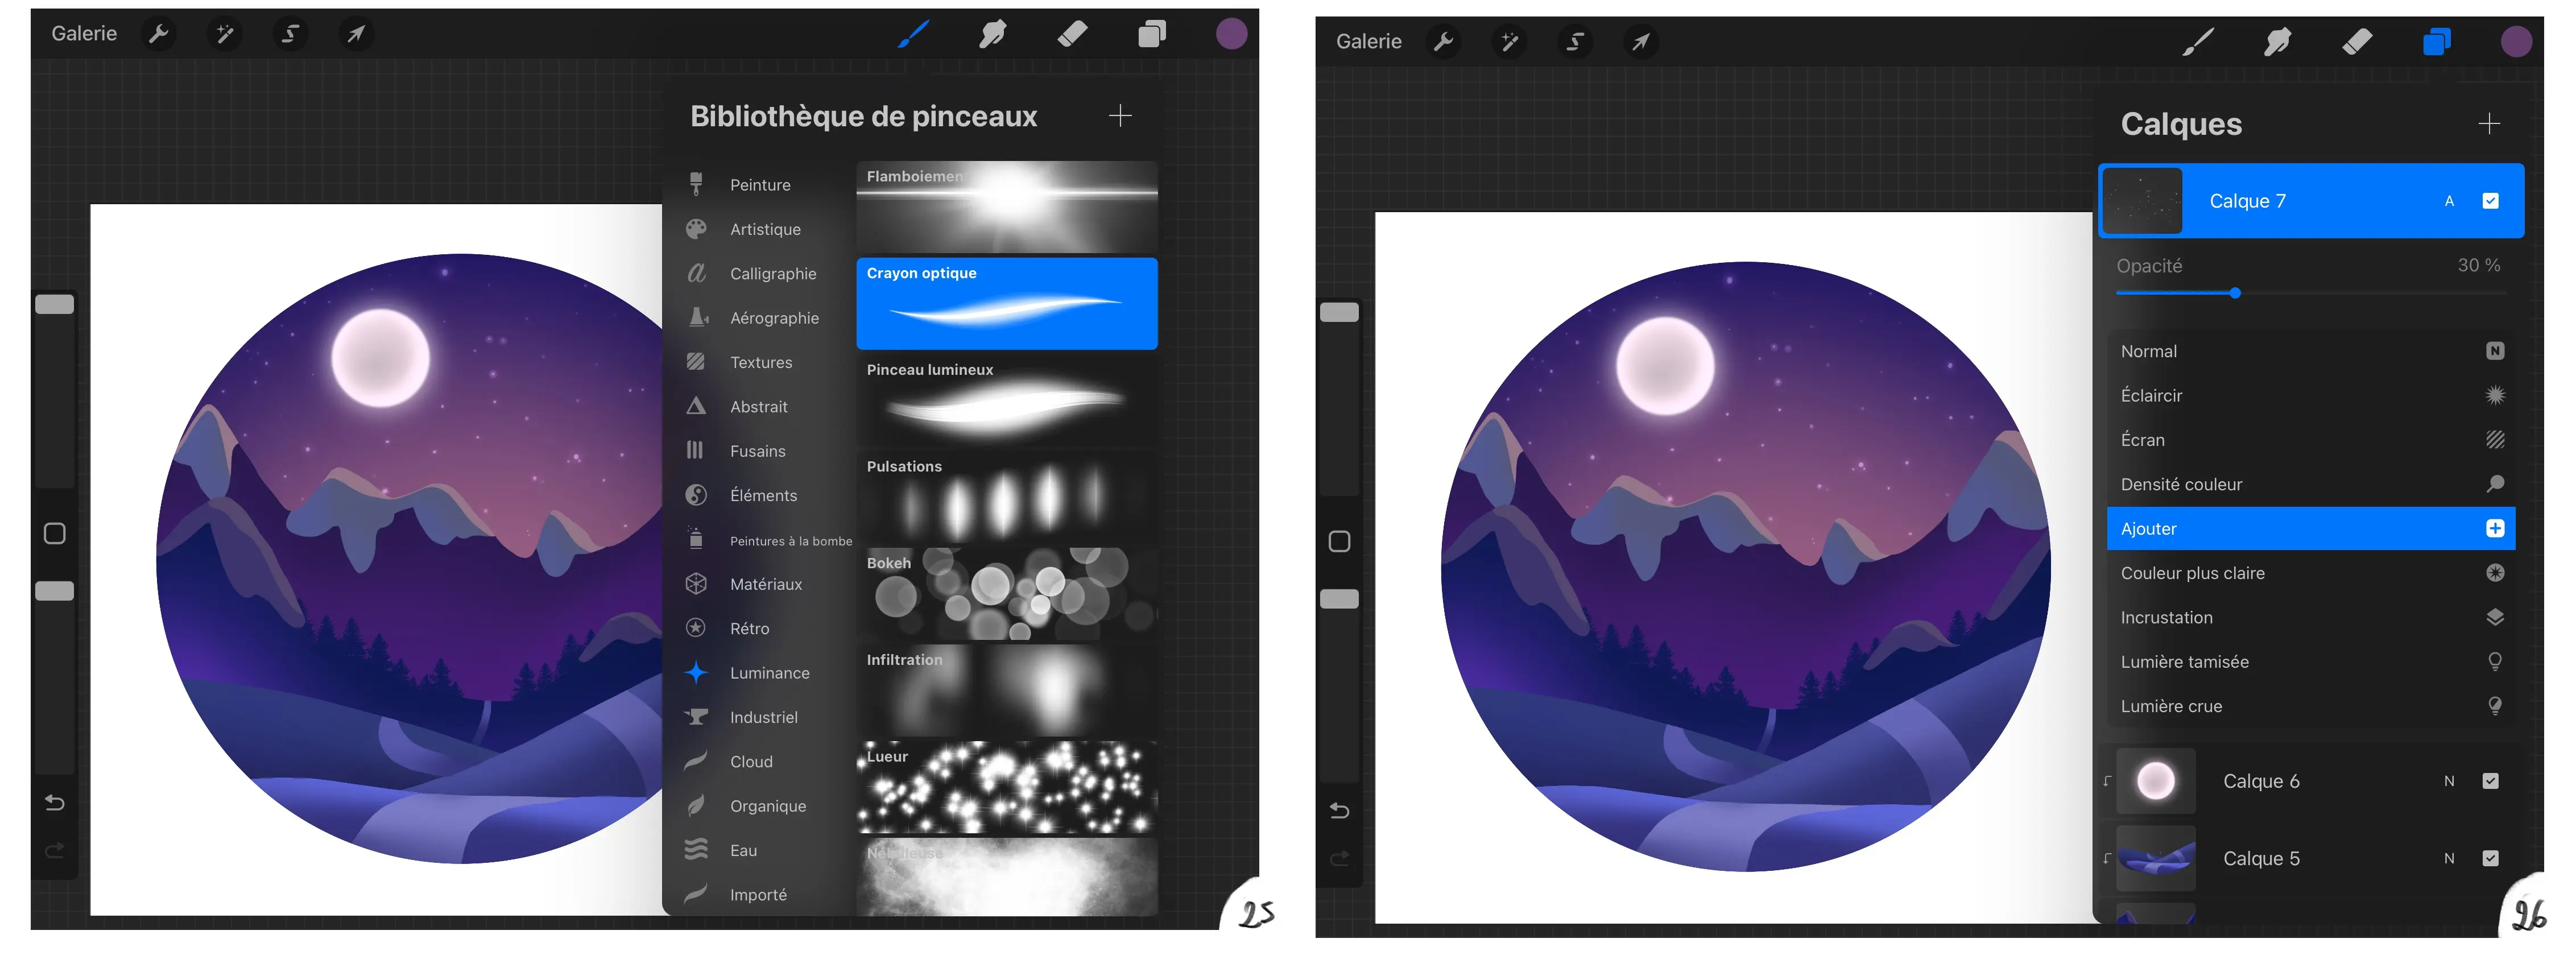
25 - I use the luminance category stylus and create light spots of different sizes to create stars.
26 - I set the layer to additional mode and reduce it to 30% opacity. I check everything and move on to the final details and light retouching.
There you go! Your illustration on Procreate is finished! 😍

I hope you enjoyed this article about Procreate and that it inspires you to continue exploring this amazing software! You will see, the possibilities are amazing!
Discussion
No comments yet.