How to Draw a Hat

Panama, trilby, capeline… so many words to name a hat! Let's focus on this timeless fashion accessory whose shapes have evolved over time. More than just utilitarian, this accessory was once used to show one's social status... Nowadays, it's still used to protect from the weather but especially for its aesthetics as it adds pep to an outfit!
While some styles, such as the top hat, have disappeared from our wardrobes, others, like the pork pie hat or the beret are making a big comeback.
THE DIFFERENT TYPES OF HATS
This accessory has a vocabulary of its own. In this article, I will sometimes use terms such as:
➜ cap ;for the part that covers and surrounds the head,
➜ edge ;for the hat brims,
➜ gallon ;for the fabric ribbon that surrounds the dome,
➜ felt ;a durable animal fiber fabric, which is commonly used for making hats,
➜ crown :the top of the hat.
In doing my research, I realized that there are many forms of crowns: diamond-shaped (appearing as a small diamond), teardrop-shaped, central fold, etc. I will review some of them so that you can recognize them in turn!
"How to draw a hat"... that’s a rather broad topic. I chose to draw a few iconic hat shapes, feel free to use the basics discussed in this article to create your own hats!
Without further ado, let's see how to draw…
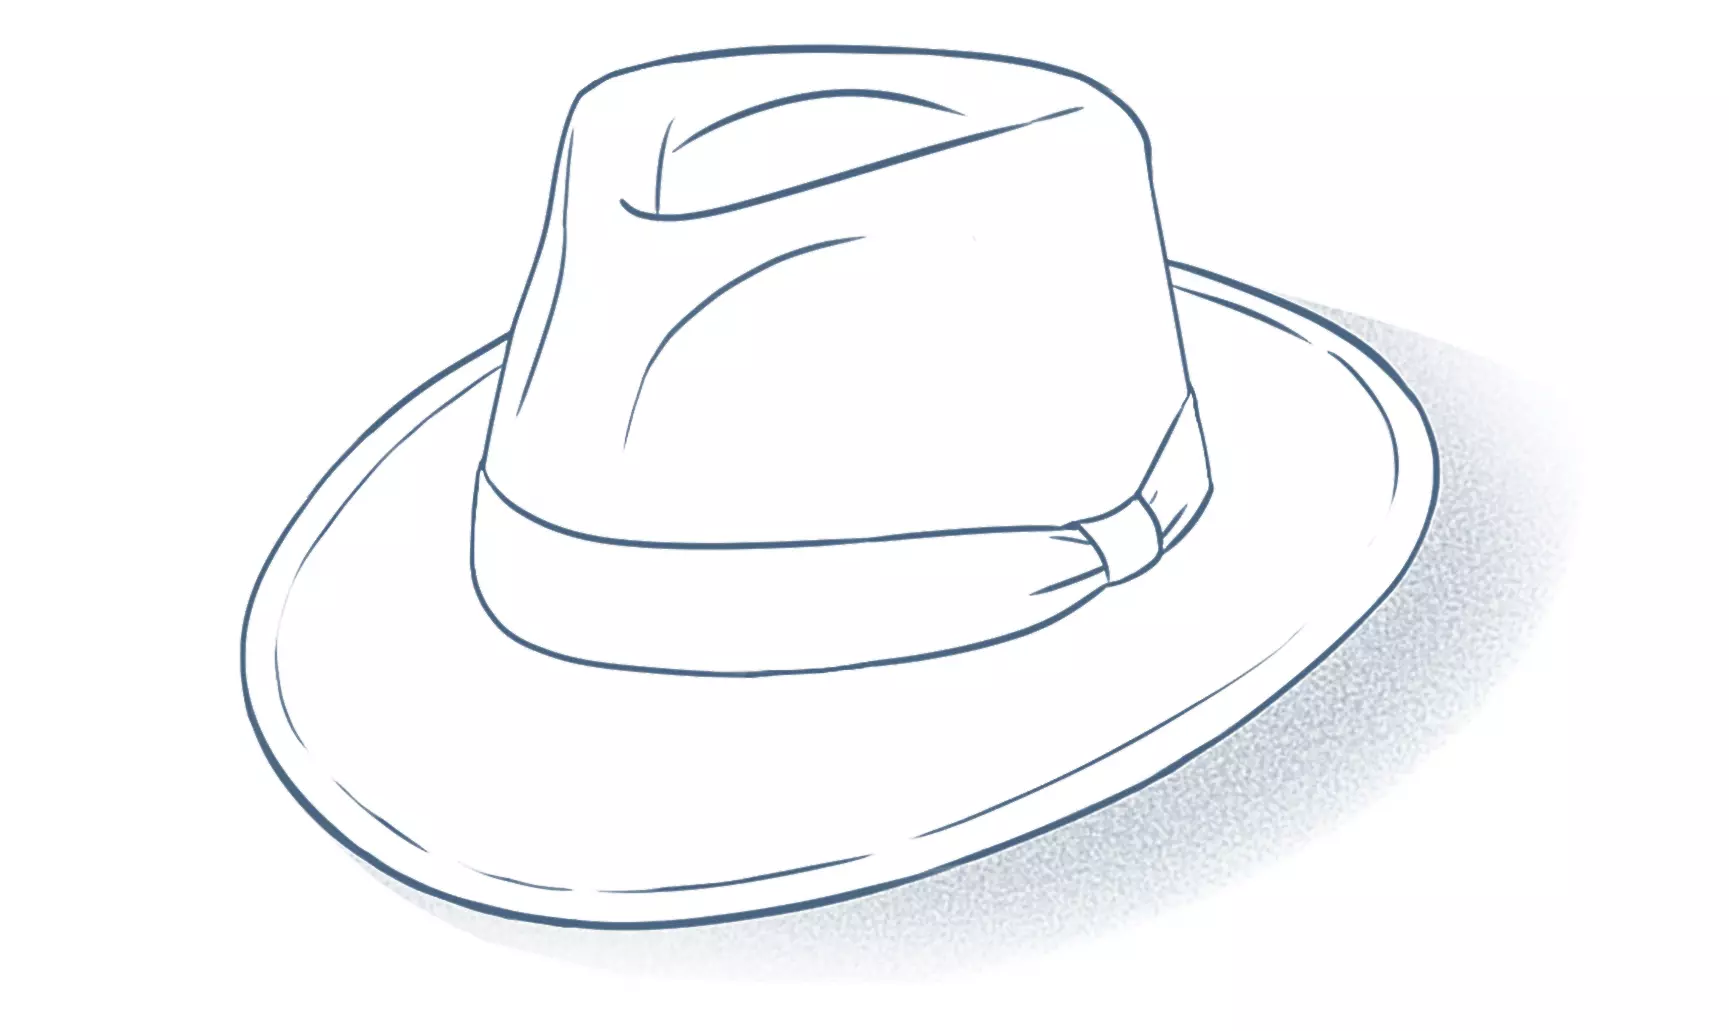
DRAW THE FEDORA
This first felt hat has a quintessentially classic design. When it was created, it was worn by men, but today it is also a very popular hat among women. Its line is elegant, and its crown is teardrop-shaped.
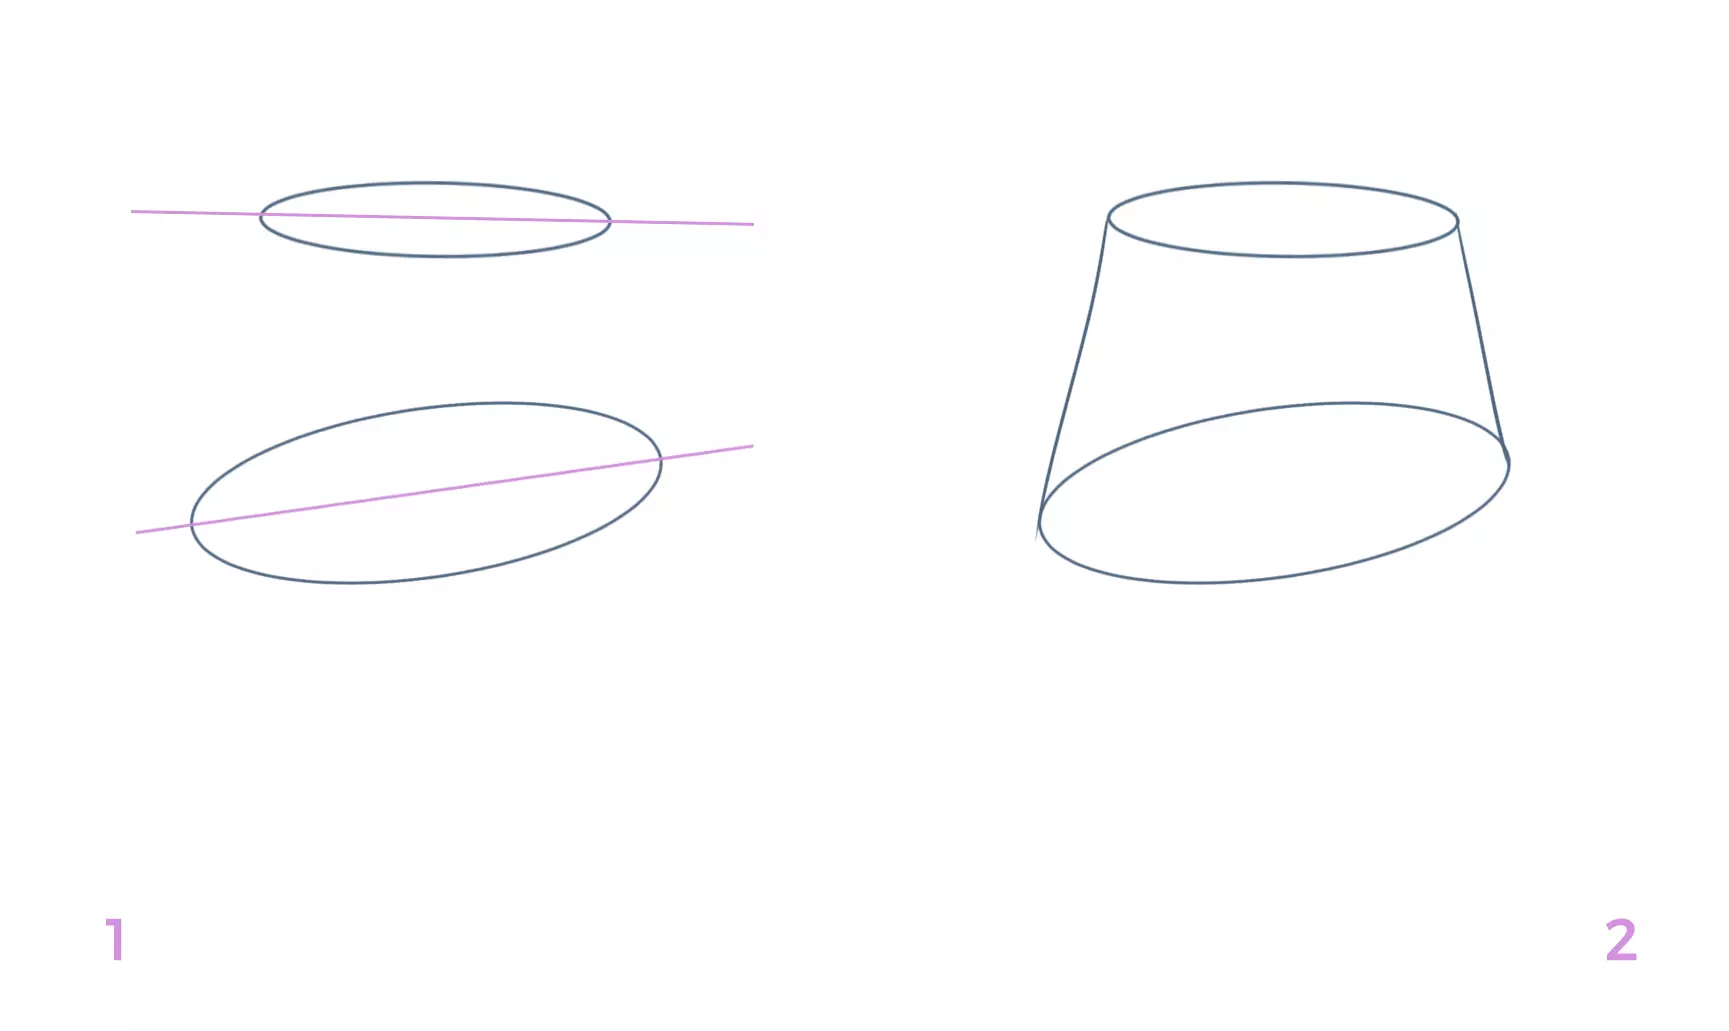
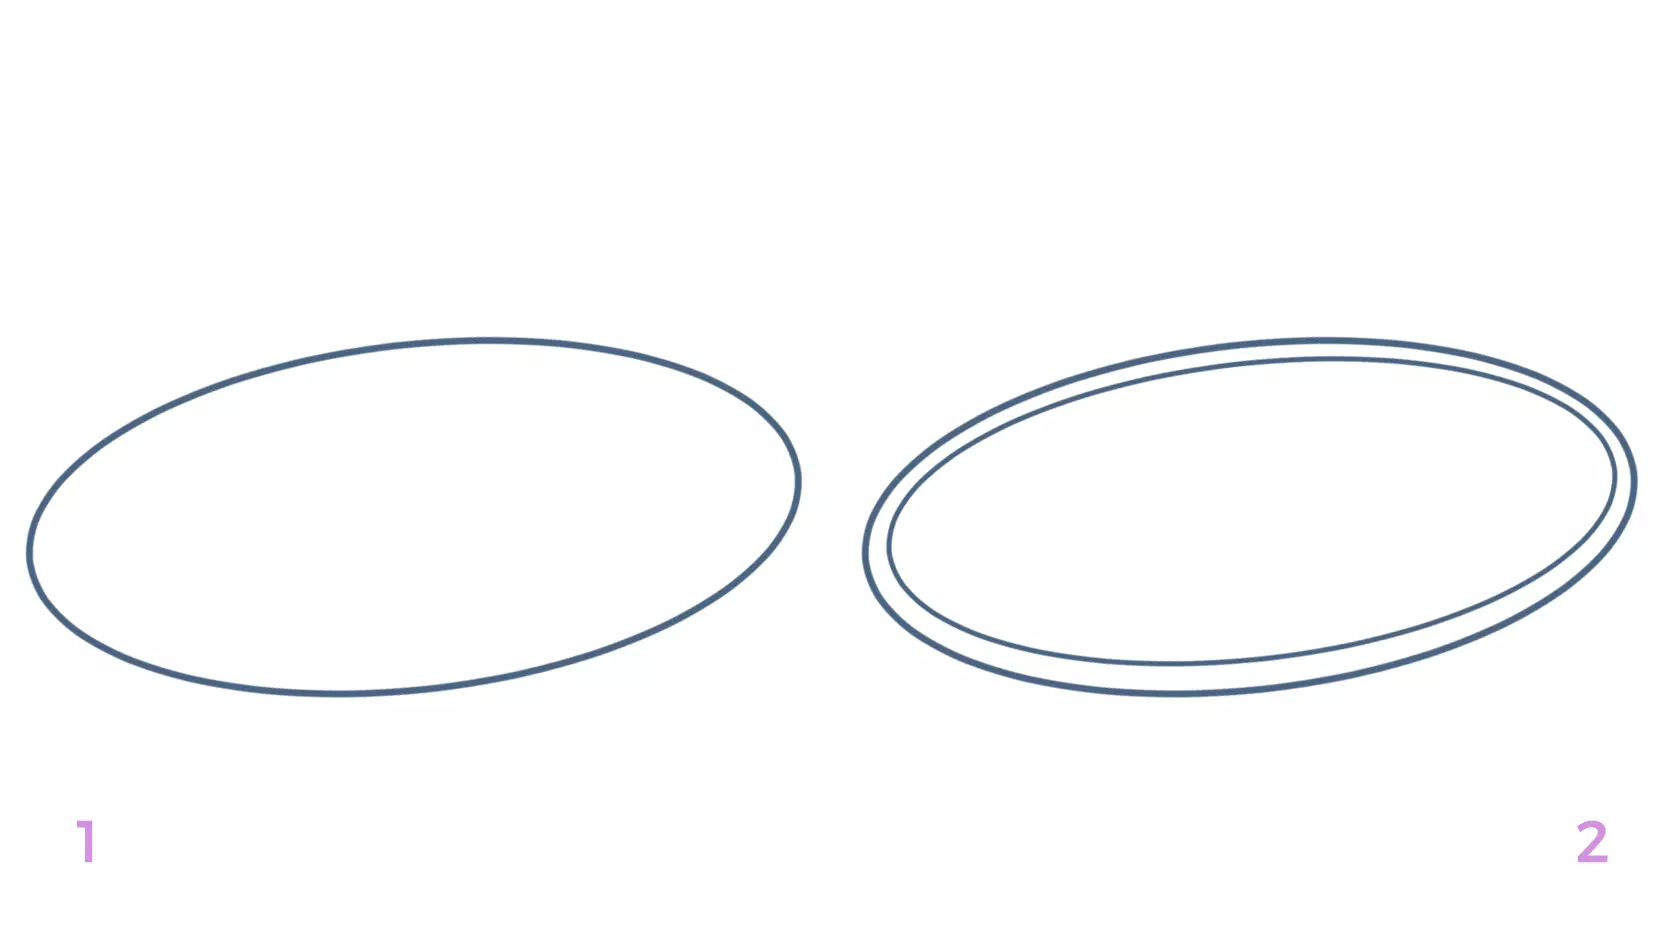
1/I draw two non-parallel axes: the upper one slightly sloping to the right, and the lower one sloping more sharply to the left. I center an ellipse on each axis. The upper ellipse is less visible and smaller than the lower one.
2/2I connect the edges of the ellipses with two straight lines. These are my construction lines for the Fedora's crown. It can be noted that the front of the hat is slightly higher than the back.
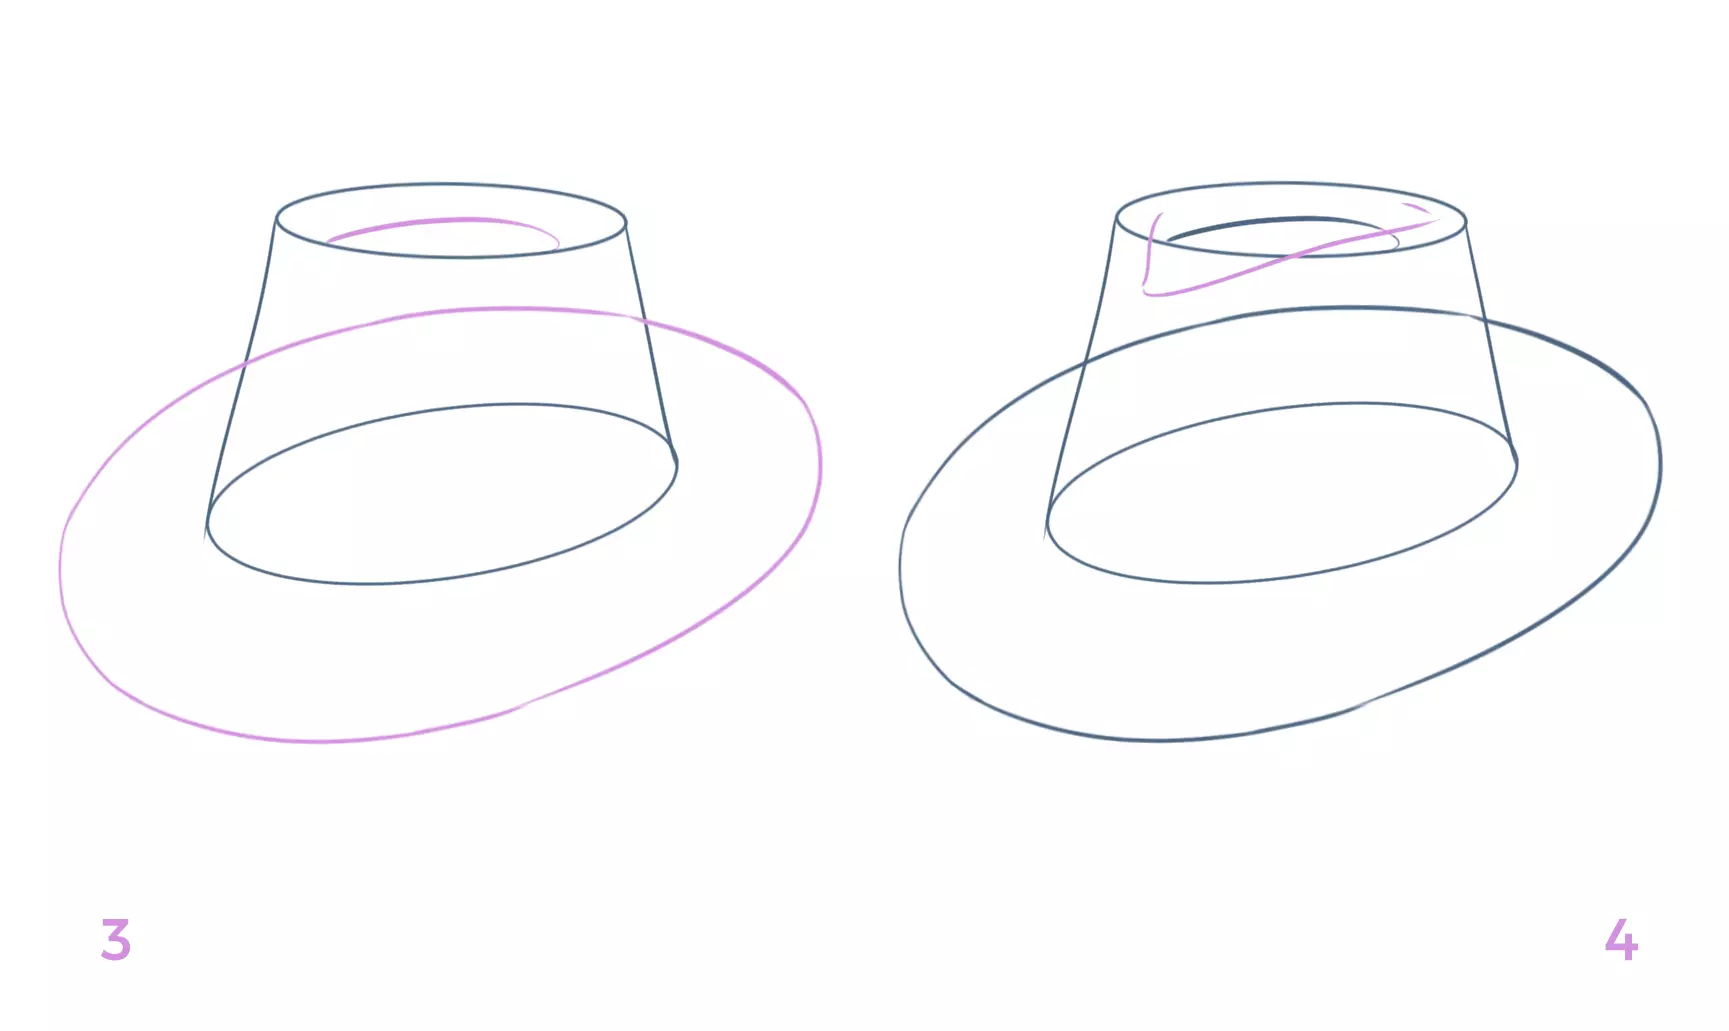
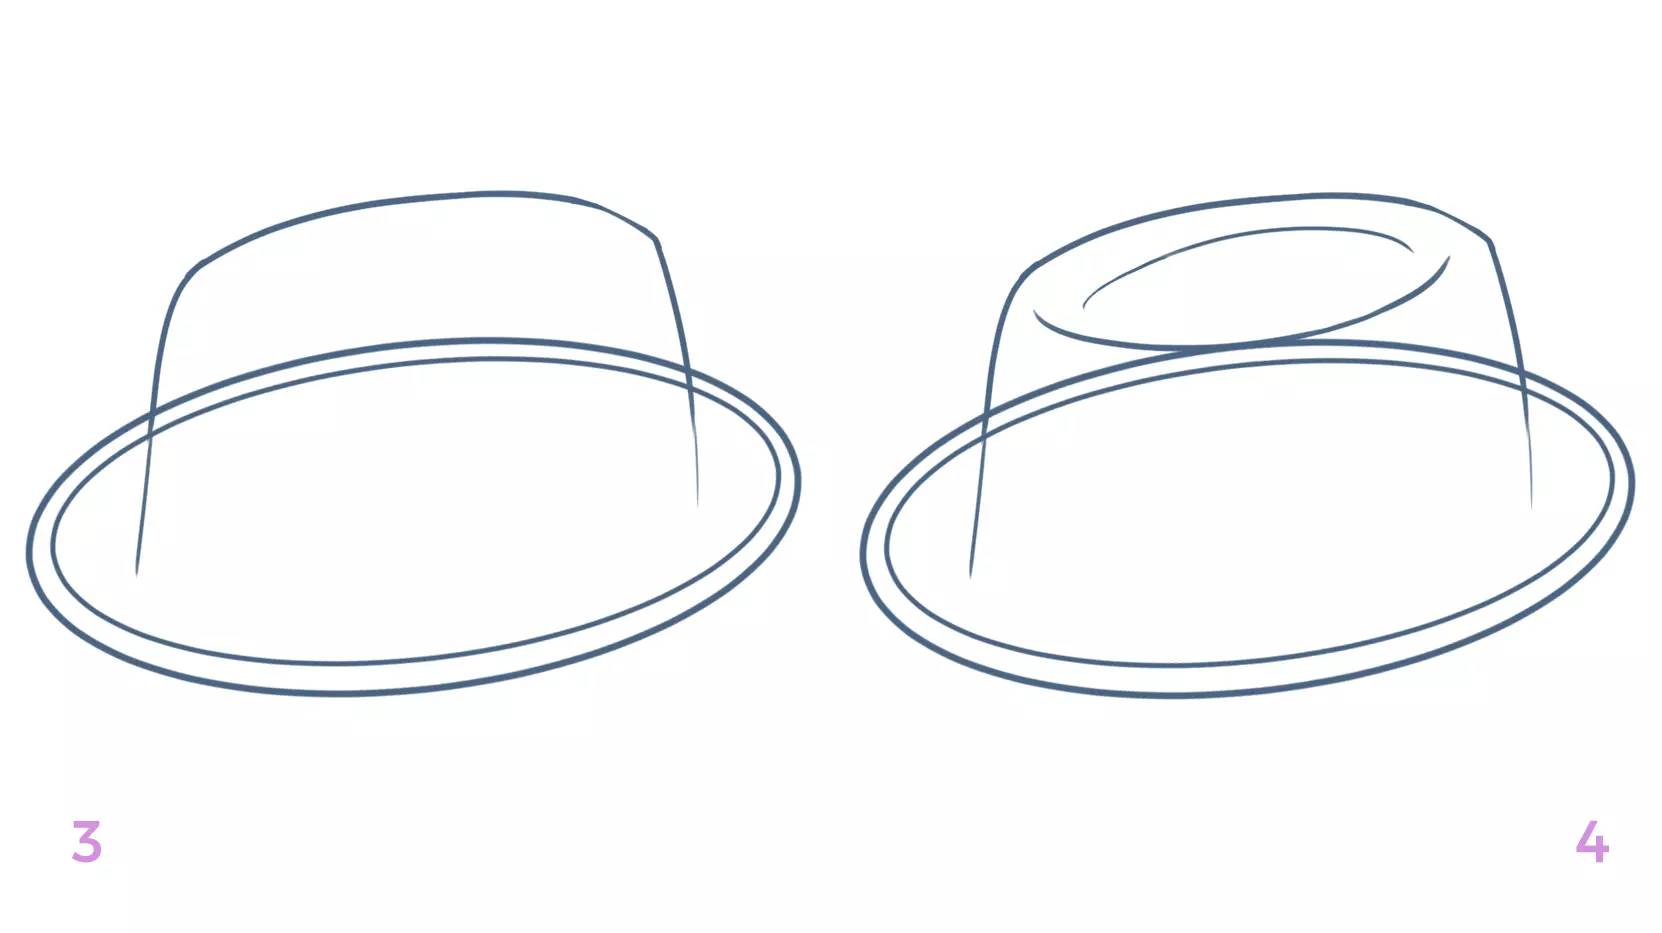
3/3I start the bottom of the water droplet shape by drawing an arc in the ellipse of the crown. I draw the hat's borders in an imperfect ellipse: they are wider at the front.
What specific content would you like me to translate from French to English? If you could provide more context or details, that would be helpful.I finish shaping my water droplet by tracing the top of it.
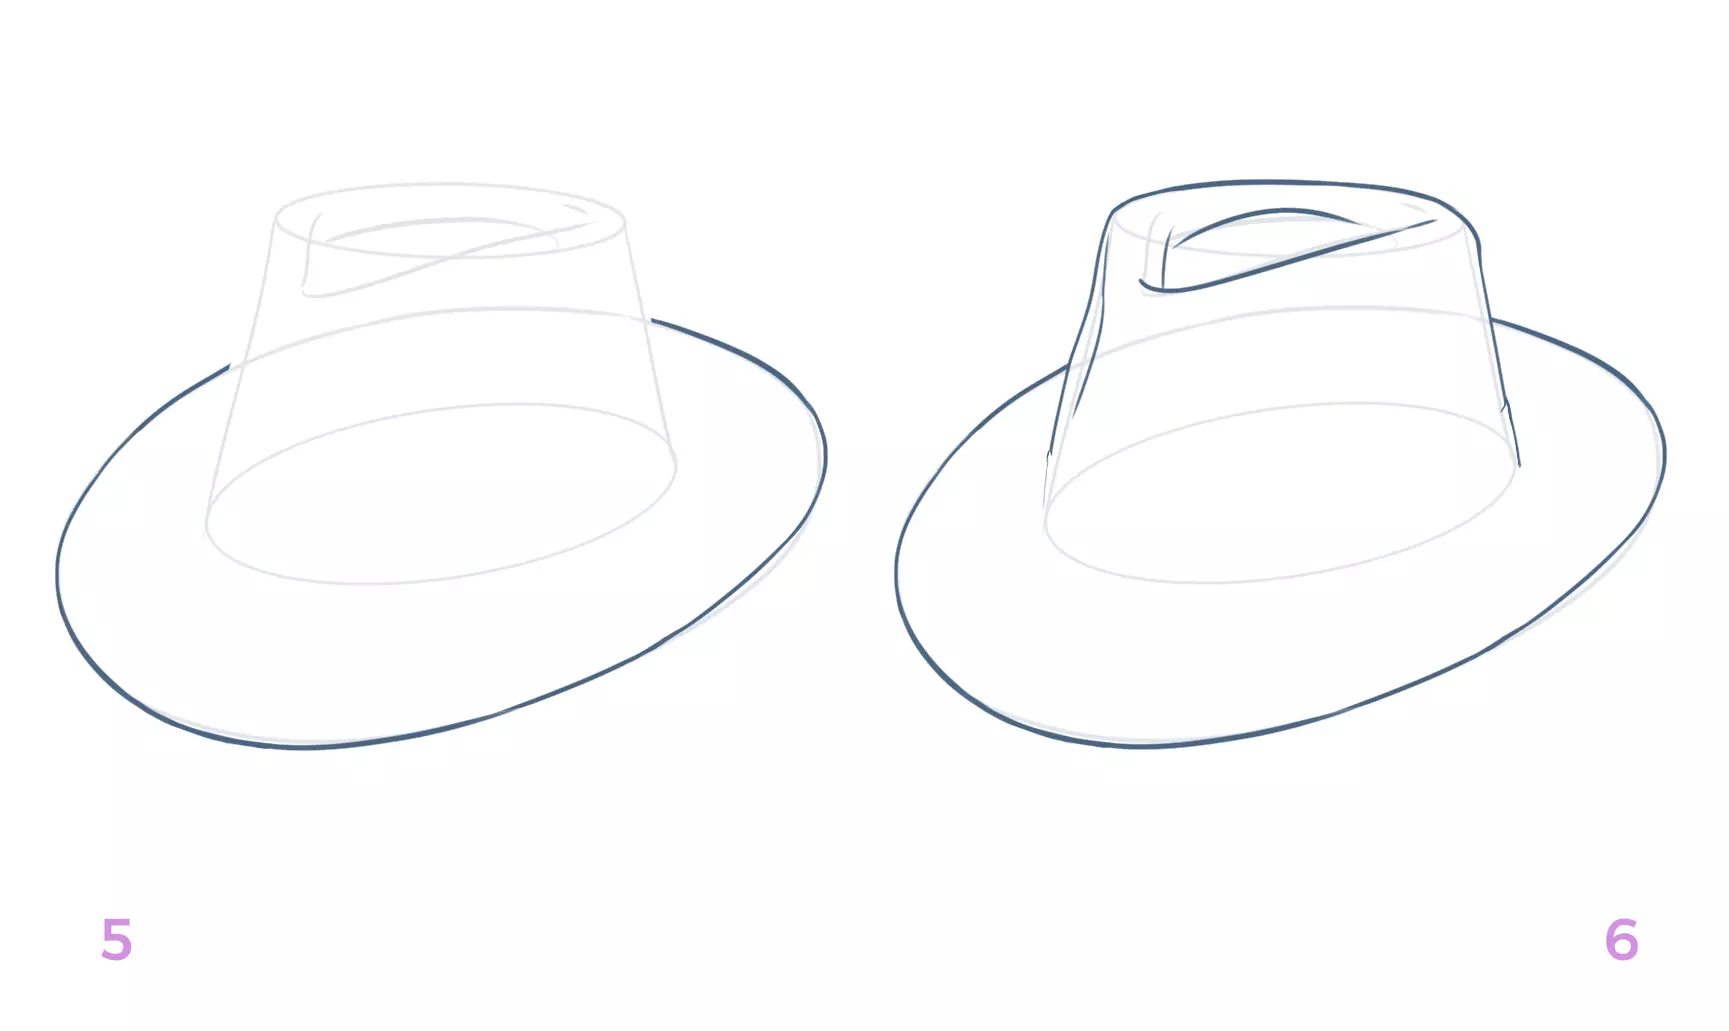
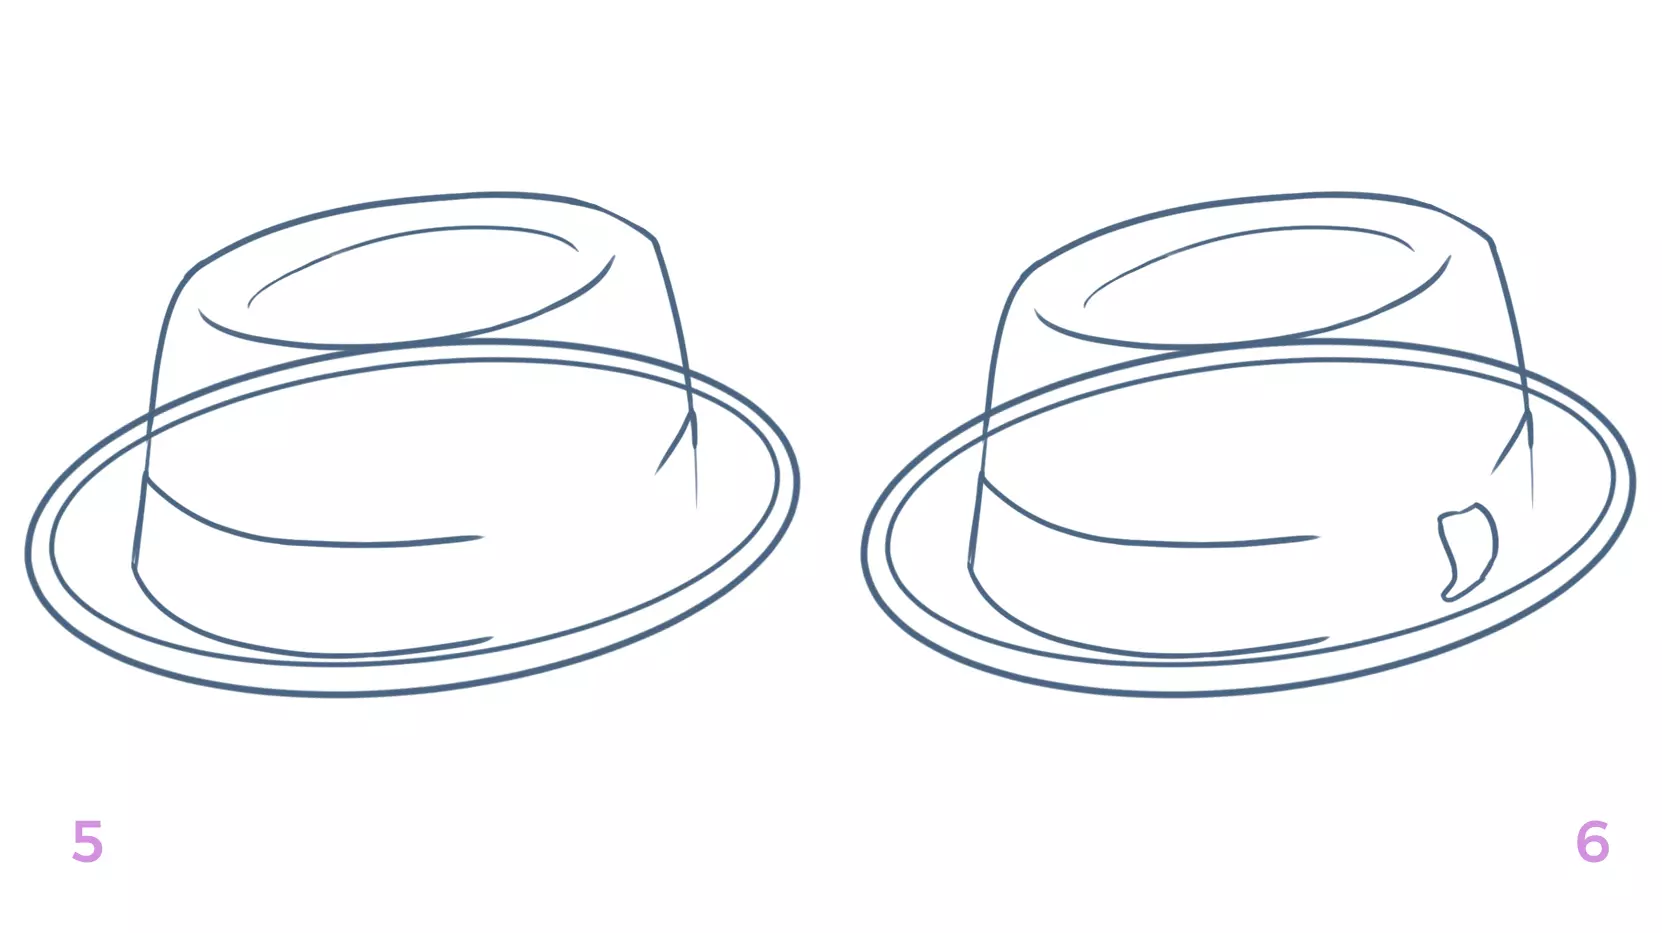
5/5I lower the opacity of the construction lines in order to clean up the drawing while keeping the structure visible: I start with the edges of the hat.
6/6I give life to the hat by giving it thickness and shape. We see the top of the hat appear; the "teardrop" crown.
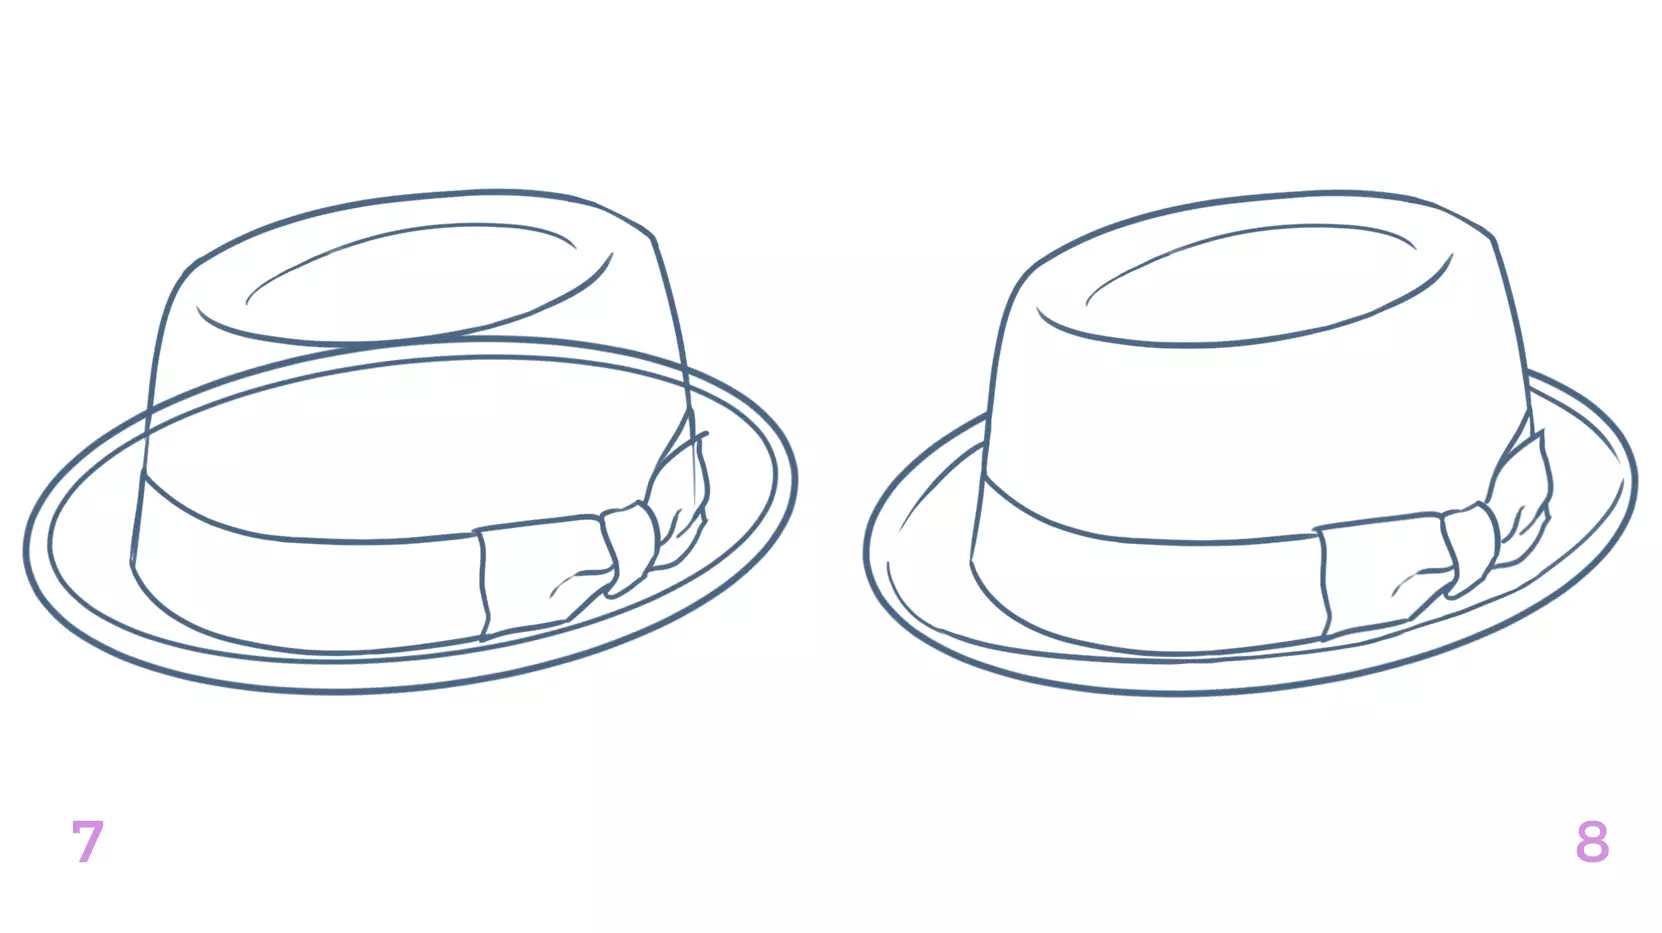
7/7I'm adding a medium-sized trim, attached with a discreet knot.
8/8I detail the shape of the hat with a fine line on the front of the crown, and I draw the inside of the hat's brim.
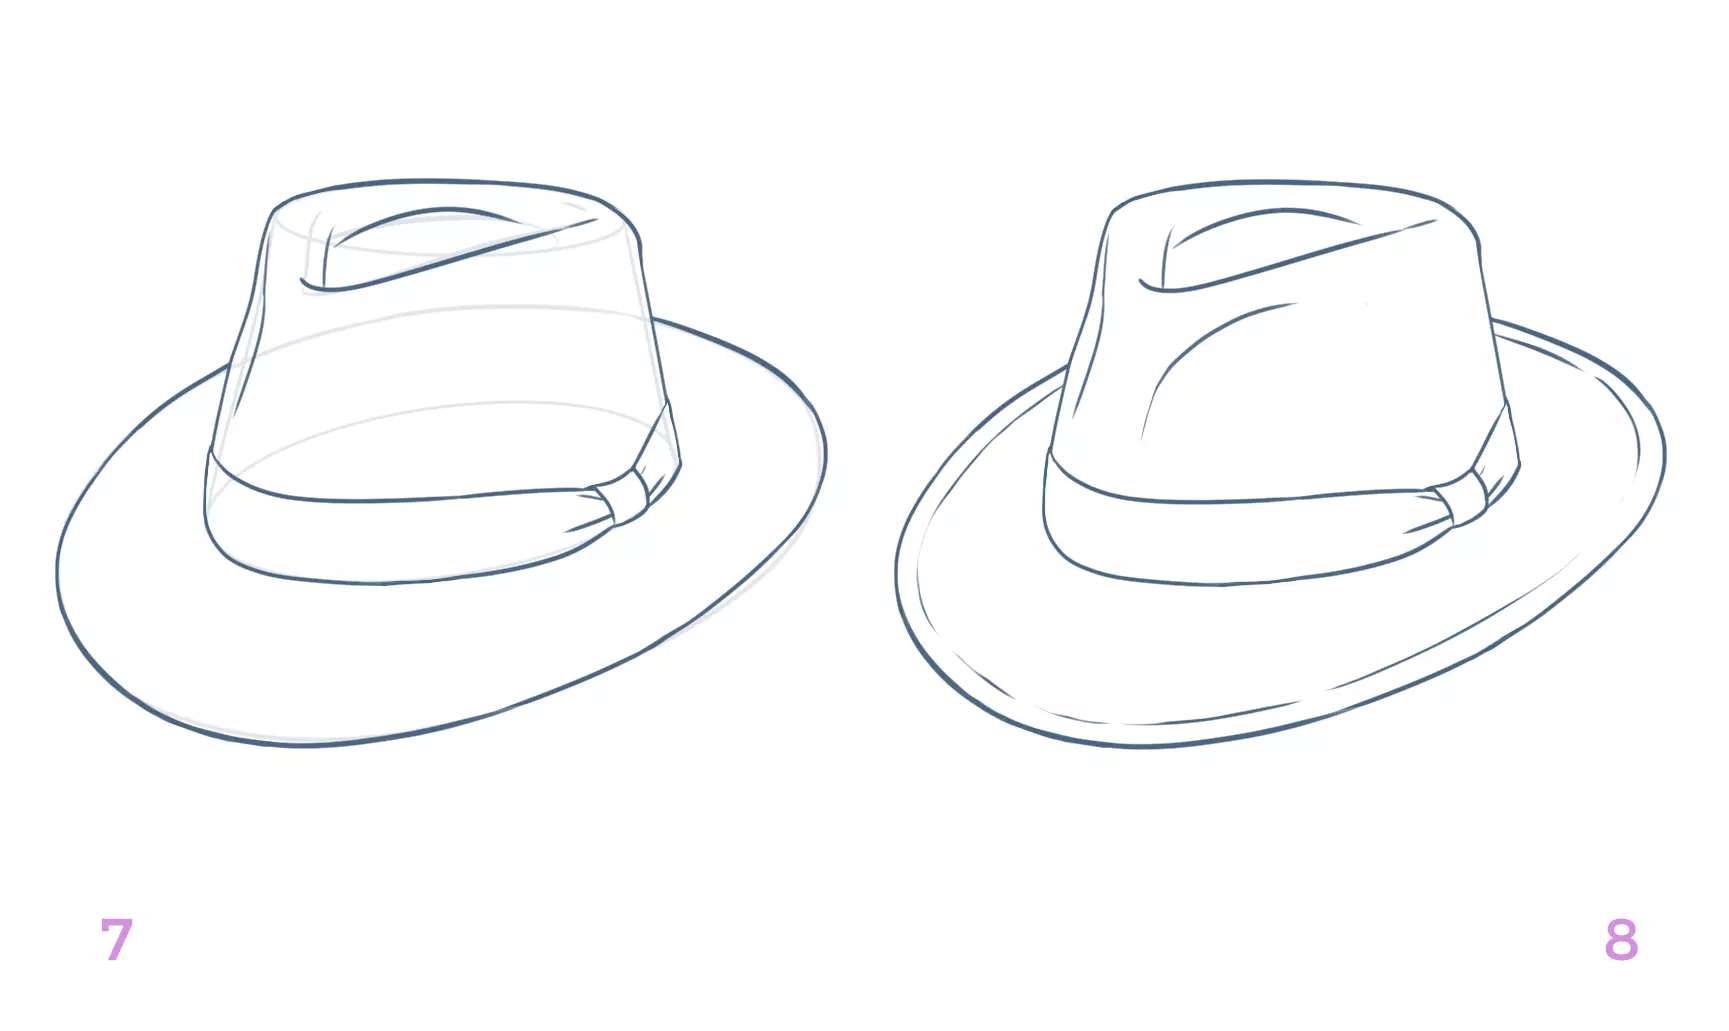
The fedora is finished!
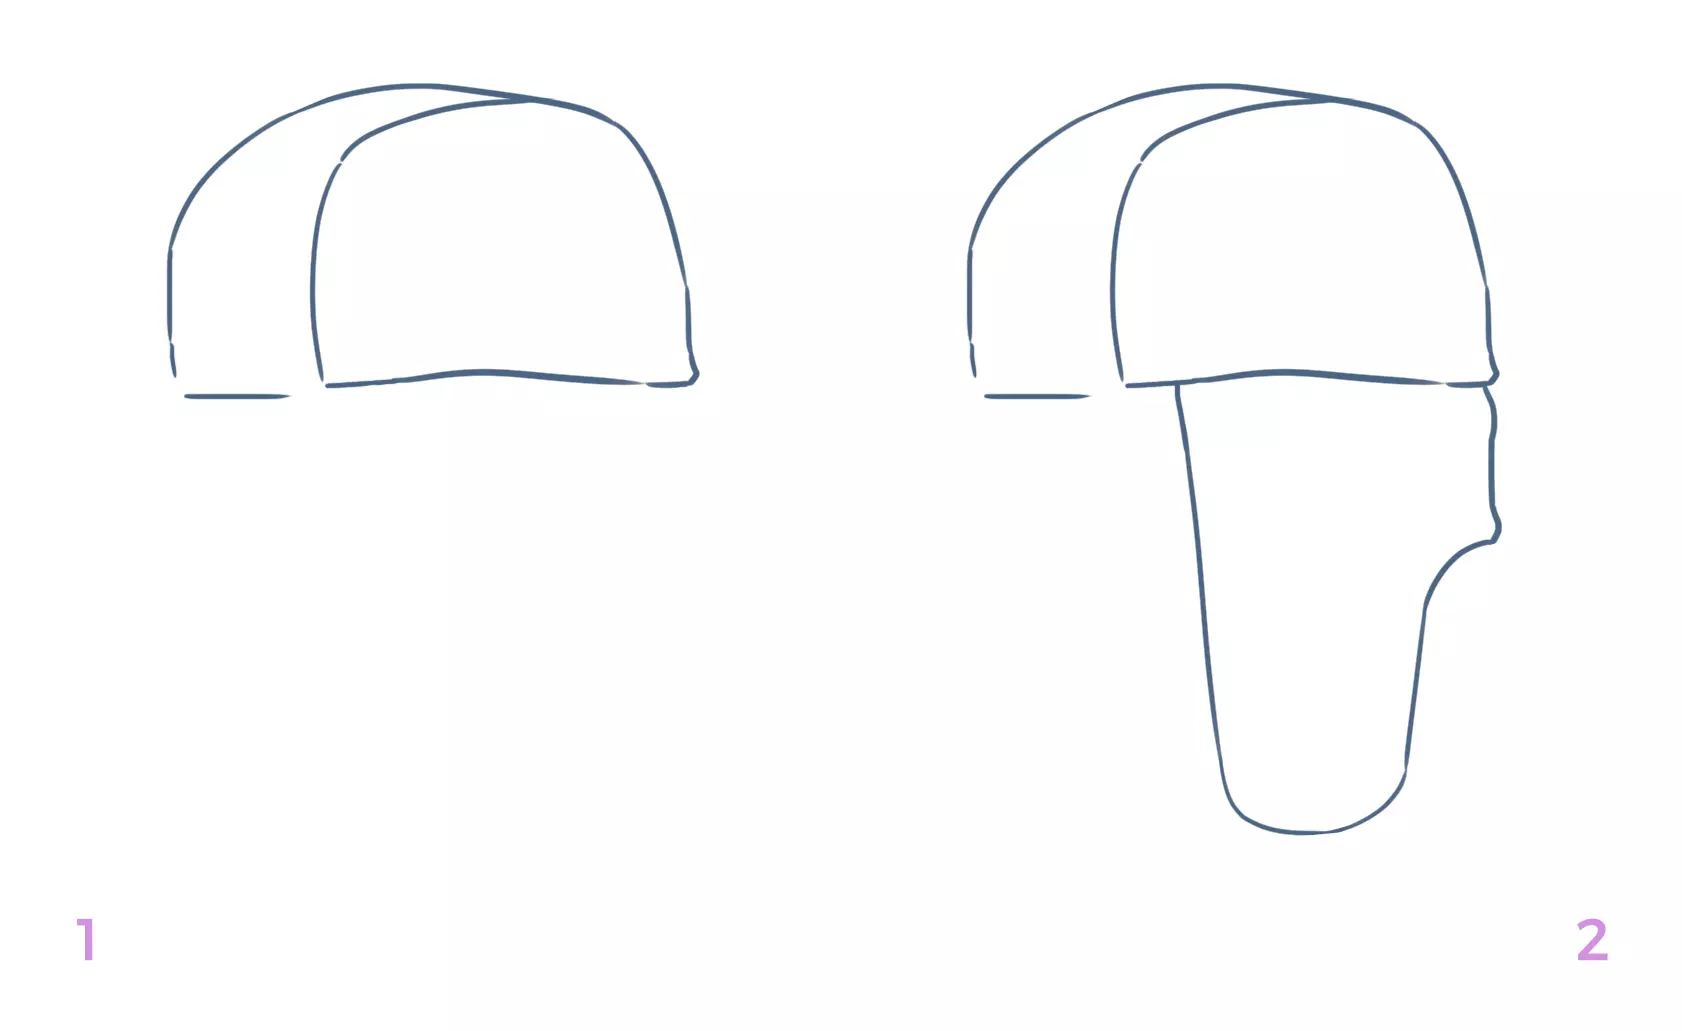
DRAW A CHAPKA
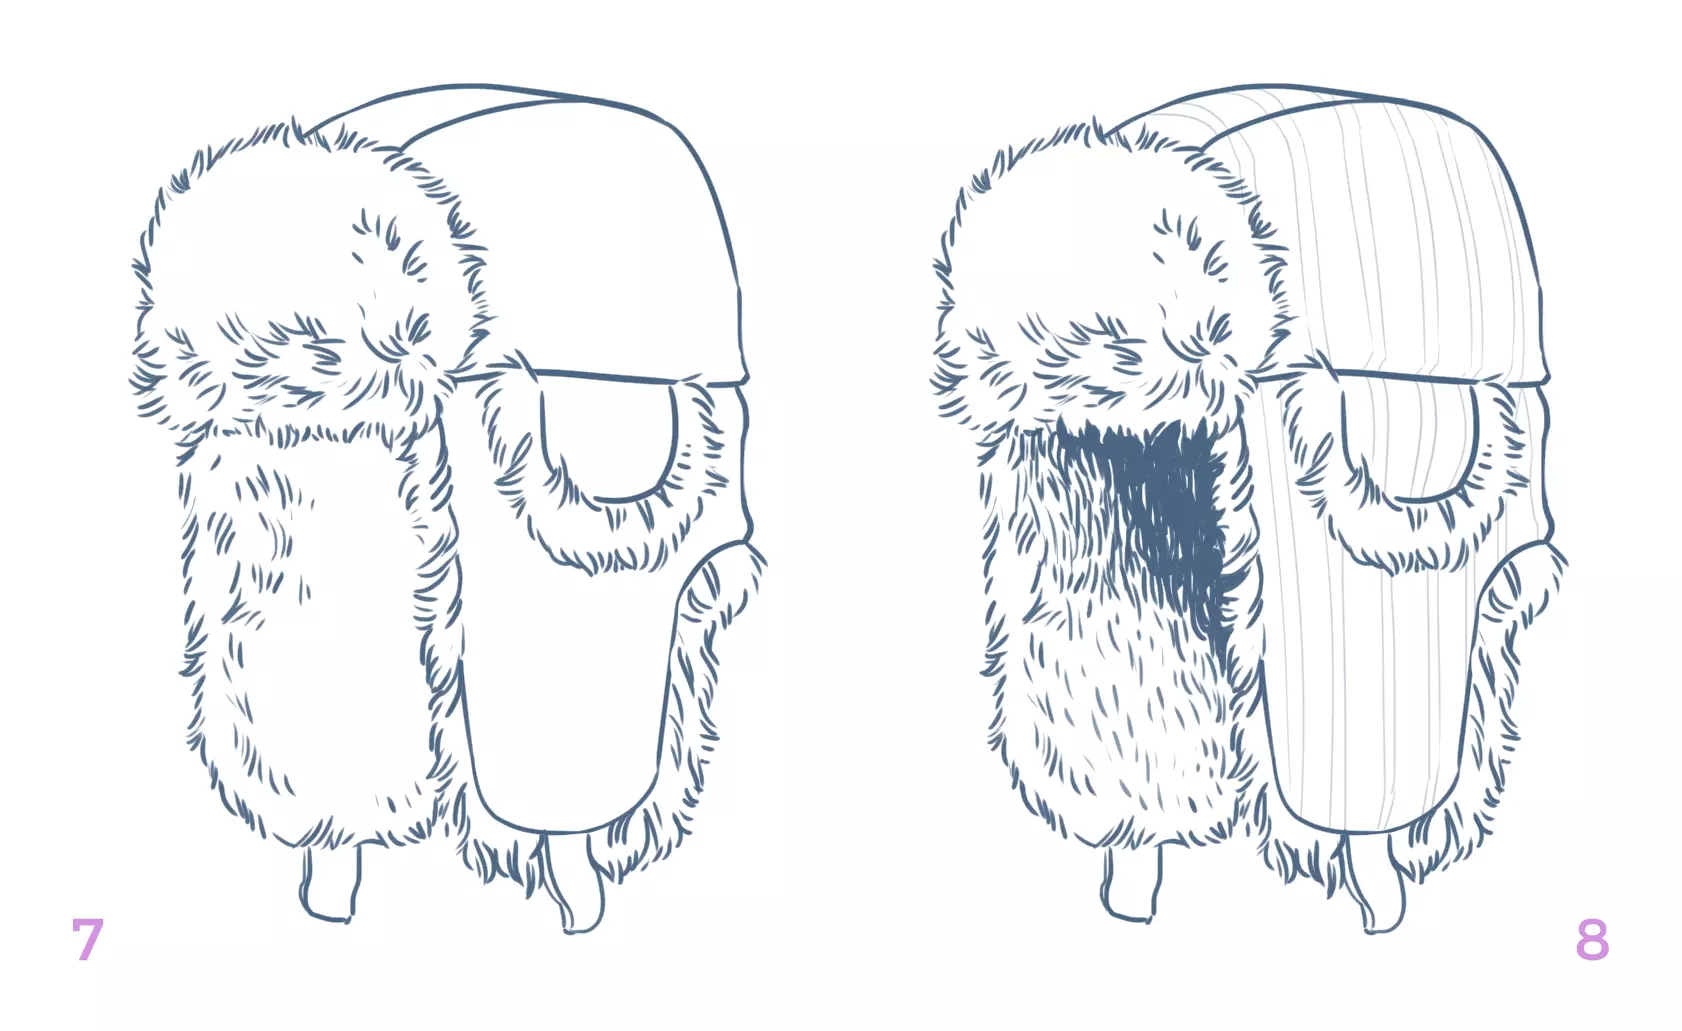
The term "chapka" is borrowed from Russian and Scandinavian countries and simply means "hat". It is a winter headgear often associated with trappers. It is made of fabric, wool, fur with foldable parts... Everything to keep the head and ears warm!
1/I draw the top of the hat with slightly irregular lines to indicate that the fabric is thick, padded (since it is made of fur inside). Its shape is therefore not as "smooth" as the previous hat.
2/2I'm drawing the part that covers the ears: long at the front and shorter at the back.
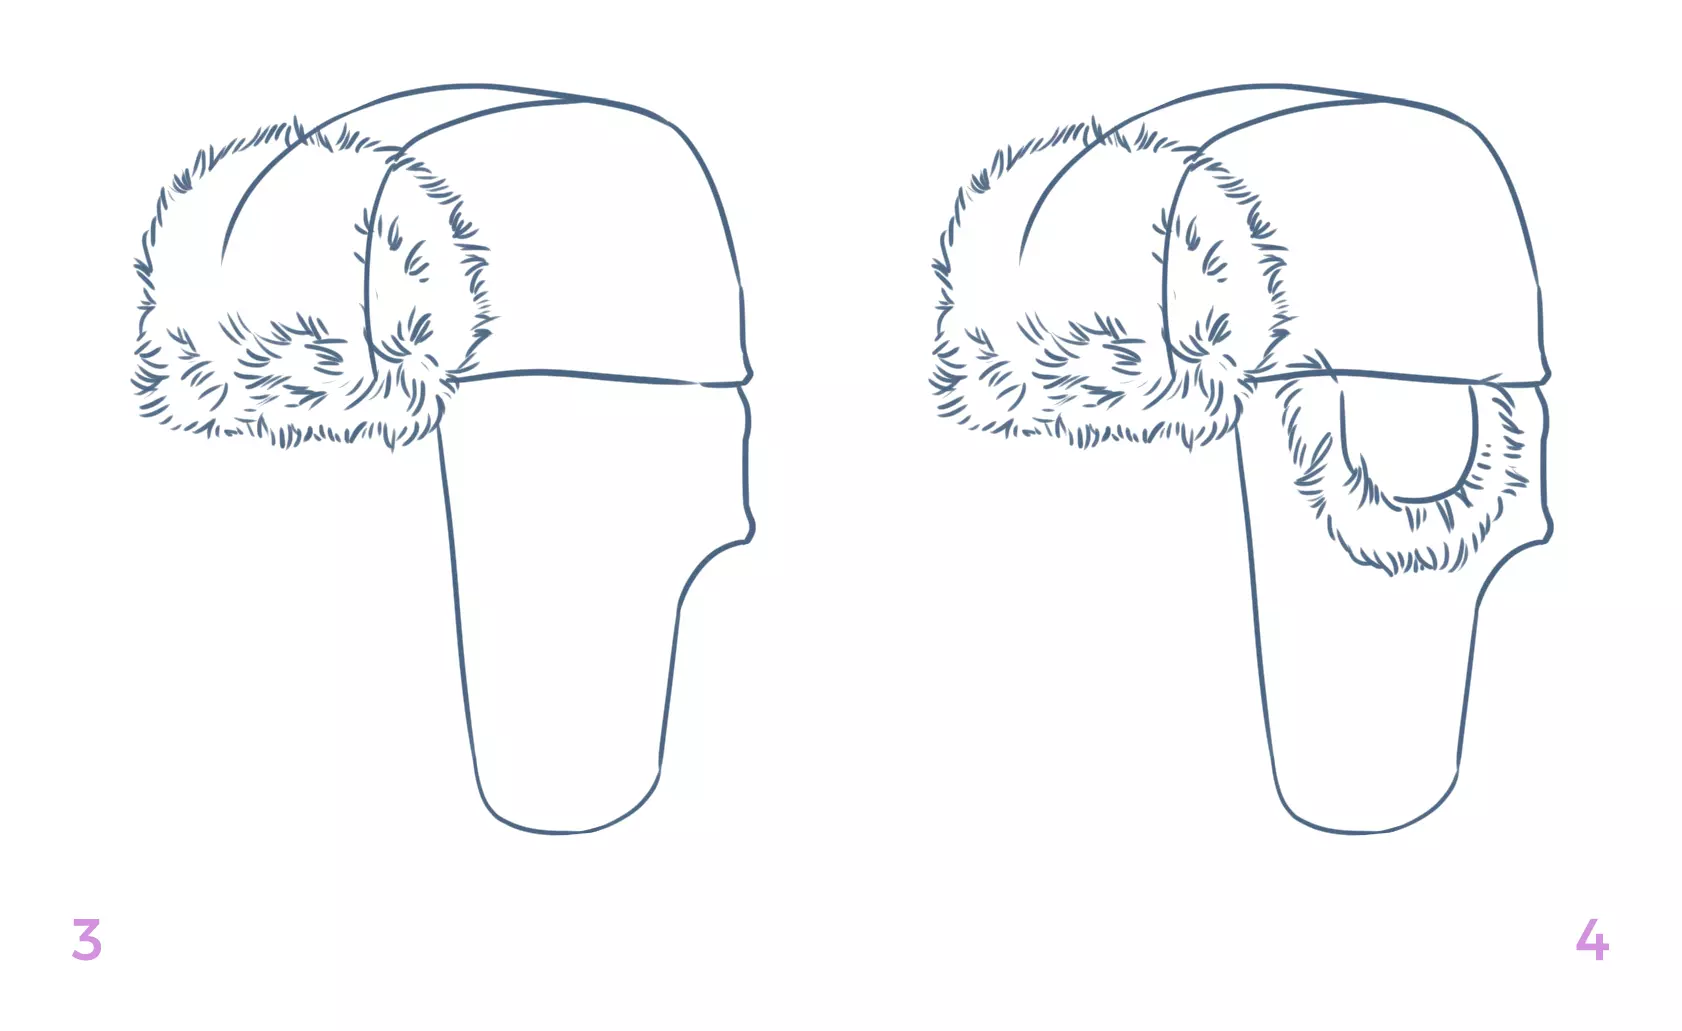
3/With a series of small strokes, I represent the fur that covers the forehead, at the front of the hat. It is thick and dense.
4/4I detail the part that covers the ears by adding a piece of fabric surrounded by fur. It generally does not extend lower than halfway down this part of the drawing. Imagine it at ear level.
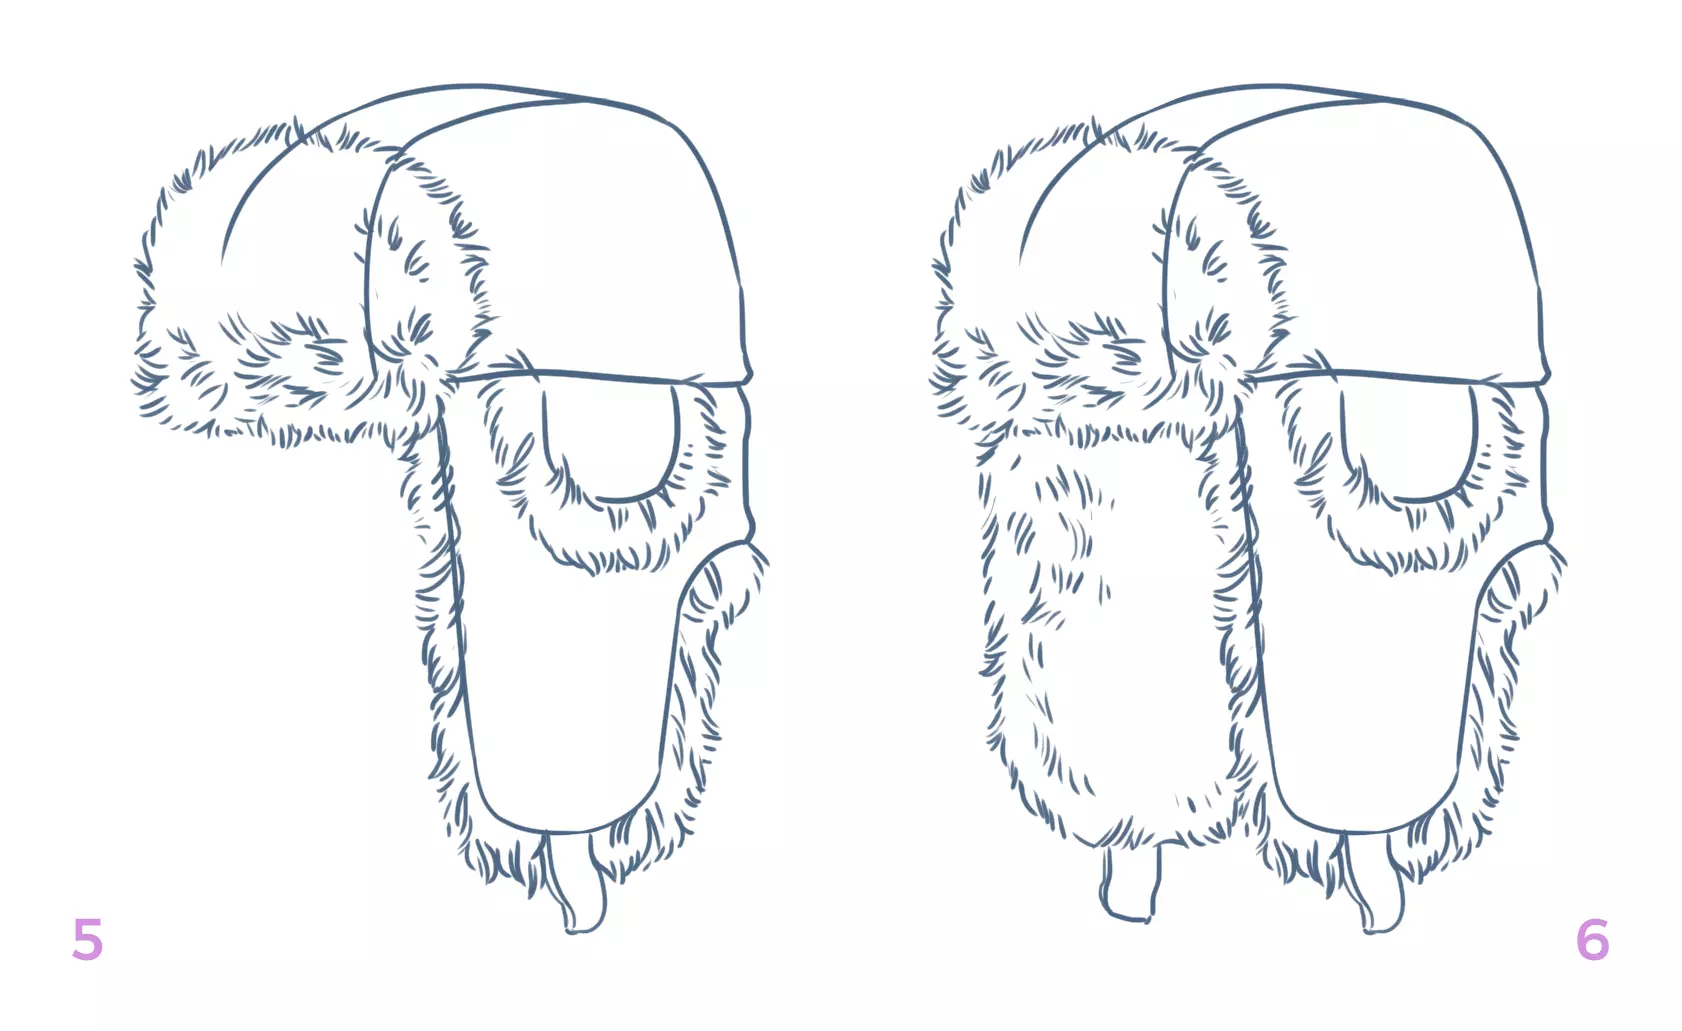
5/5I'm drawing the fur that sticks out from the right side of the hat and adding the hat's hook.
6/6I am finishing my chapka by mirroring the part that covers the ears. Since it's seen from the inside, only the fur is drawn.
7/7I erase the unnecessary construction lines.
8/8I shade the inside of the hat and add a pattern to the outer fabric.
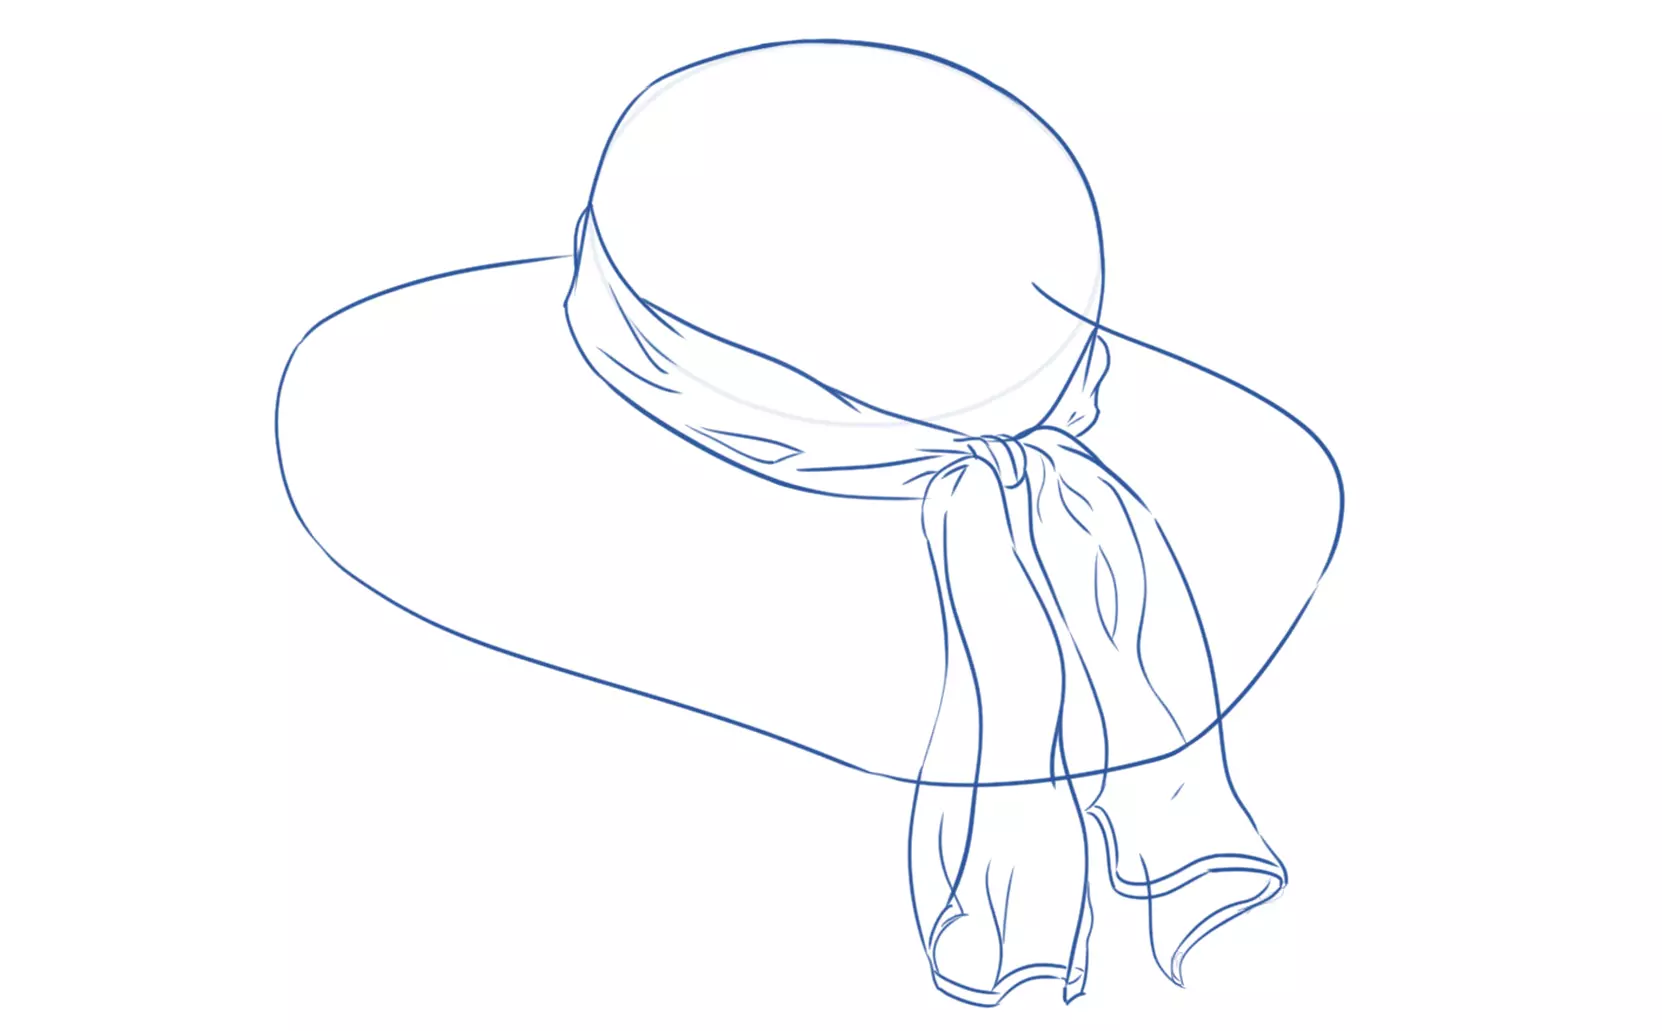
DRAW A WIDE-BRIMMED HAT
Whether it's made of straw, felt, or fabric, the bohemian look of the wide-brimmed hat is charming! Its crown is rounded and its edges are wide and flexible. It is a typically feminine accessory that is perfect for summer.
For this example, we will wrap the cap with a light, flowing, and transparent scarf.
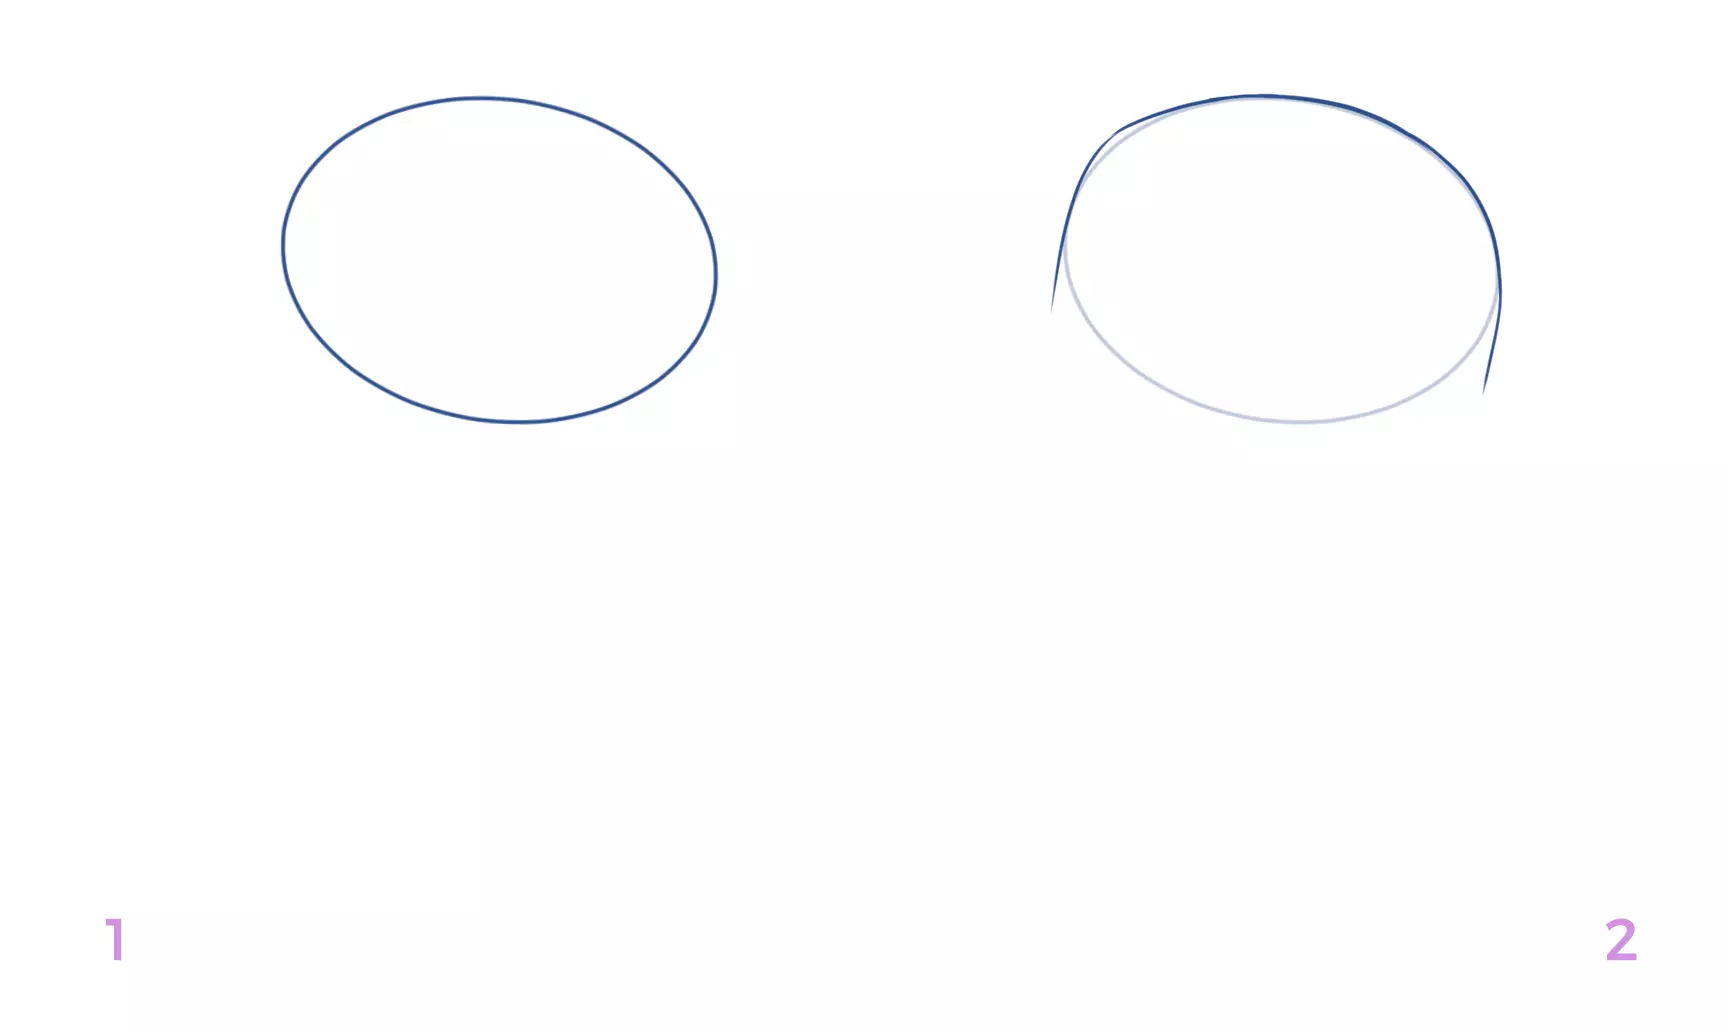
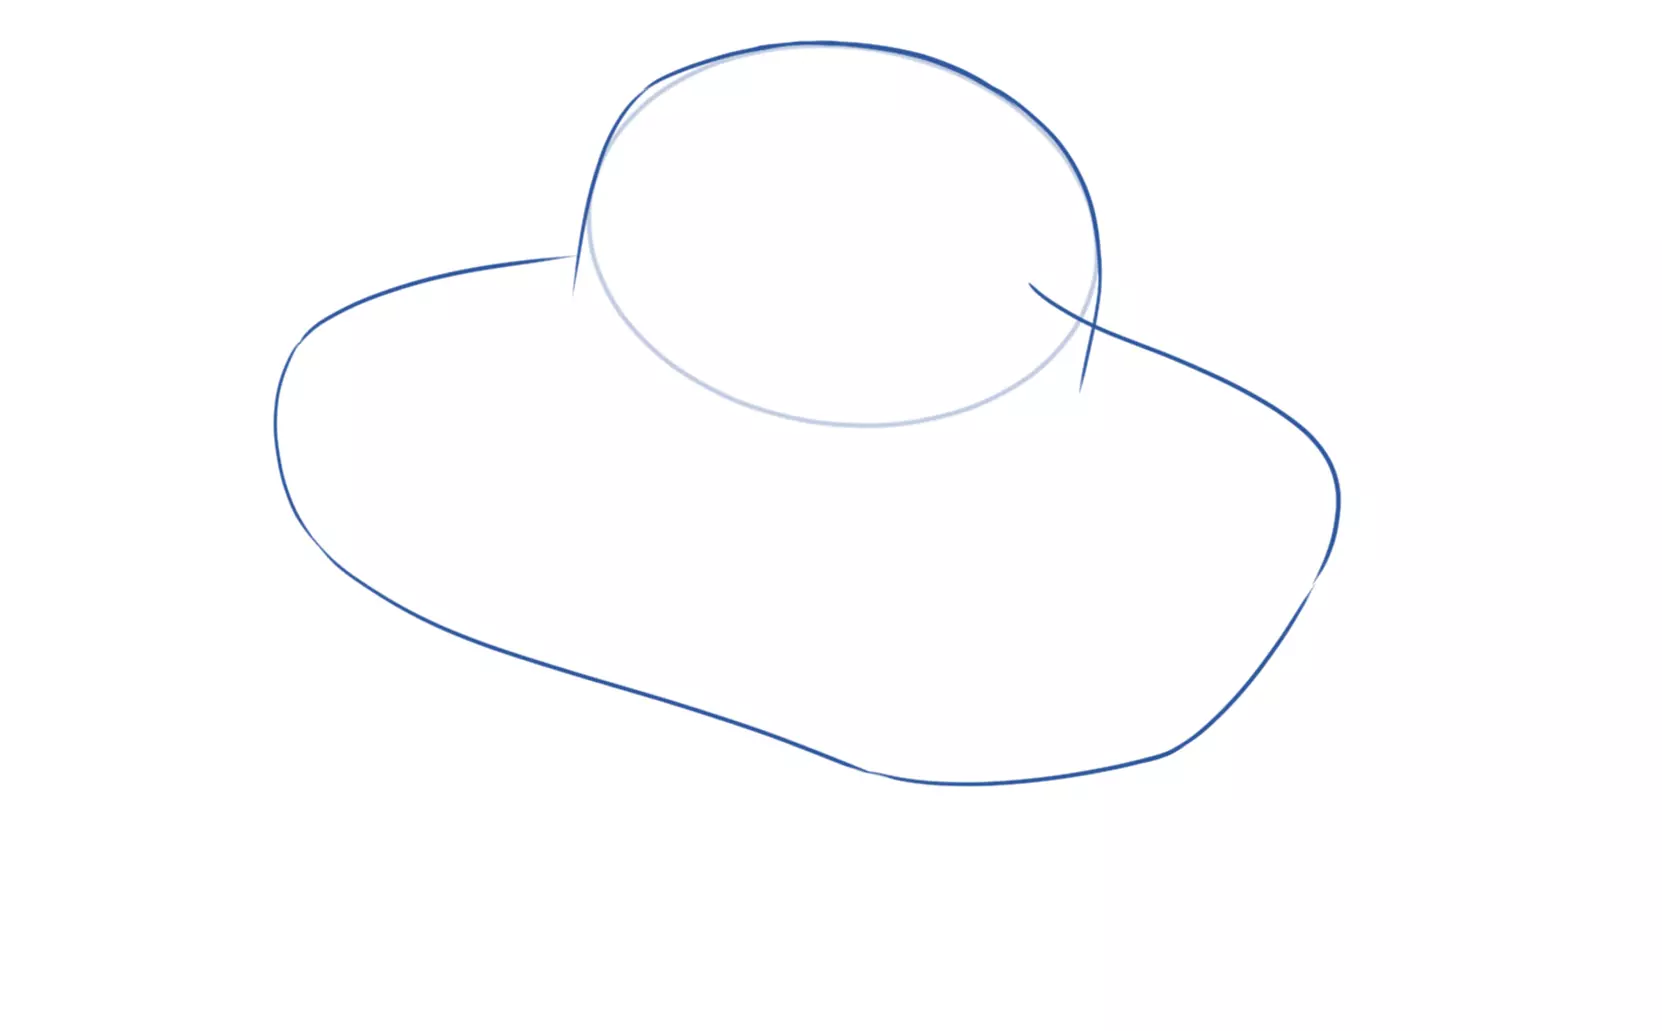
1/I'm drawing a wide ellipse.
2/2Following this marker, I trace the cap and the band of the hat.
3/3I draw the edges of the wide-brimmed hat with soft curved lines.
4/4Using the ellipse as a reference, I draw a wide scarf at the base of the dome. It will end in a knot, so I start this movement now by tightening the scarf downwards rather than following the curve of the ellipse.
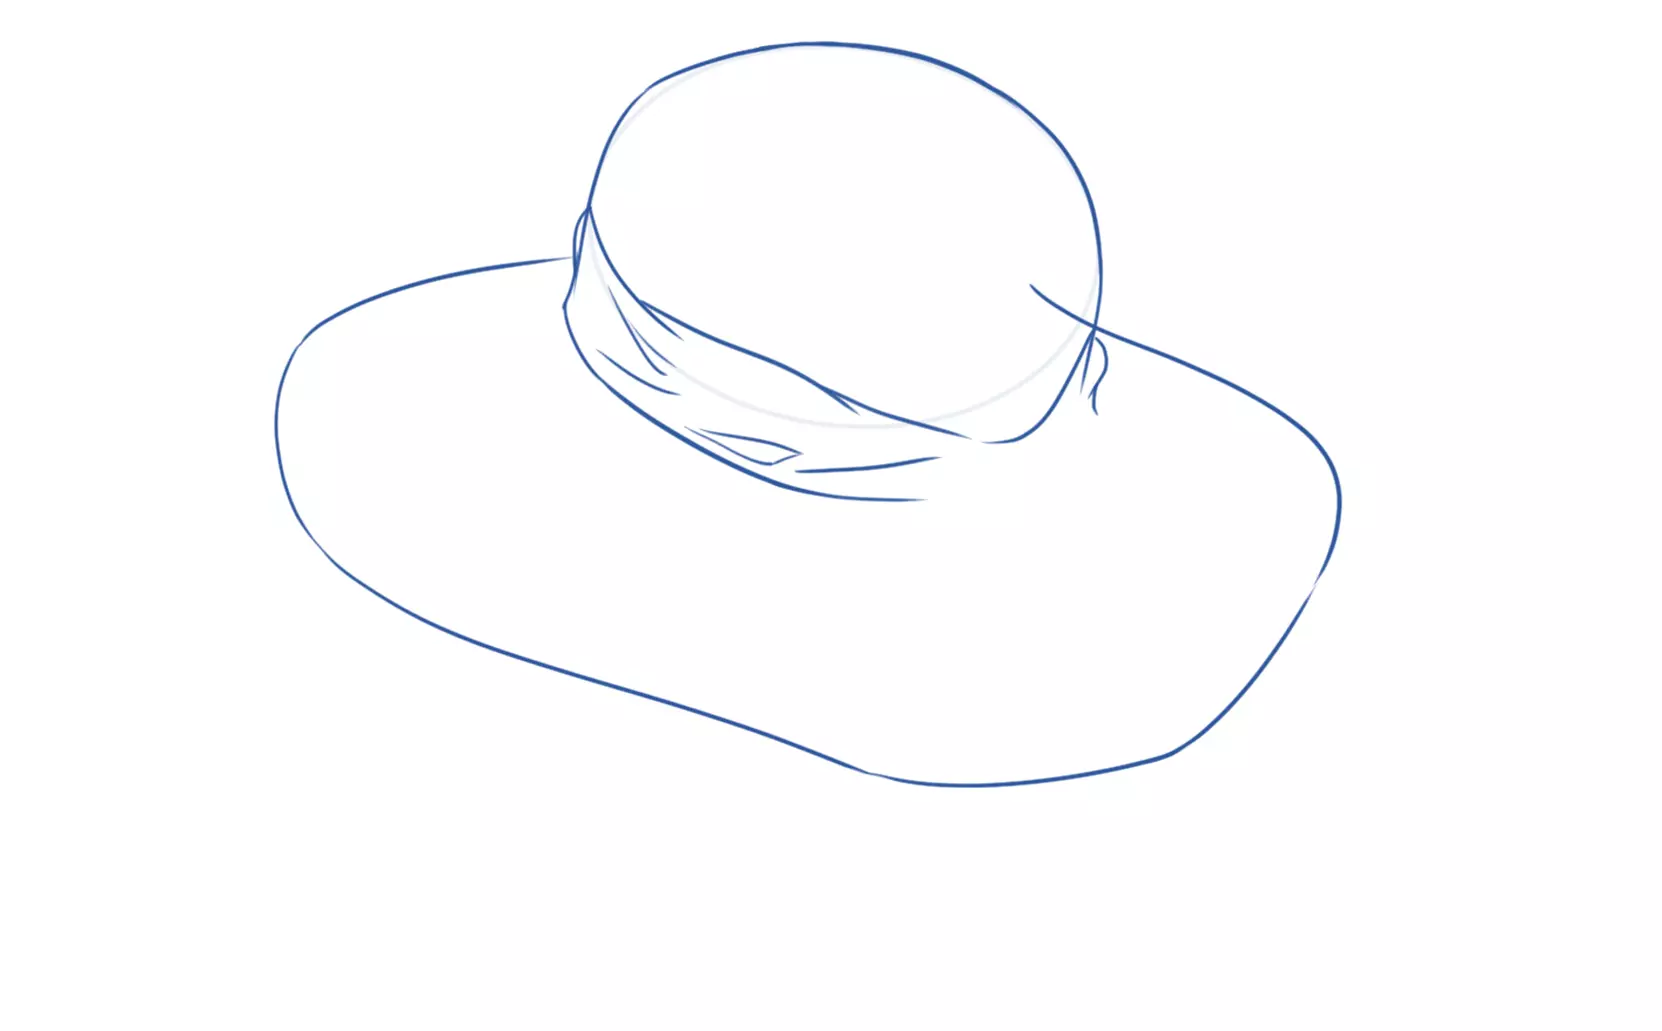
5/5I draw the knot and veil of the transparent scarf. To give it a fluid look, I draw fine wavy lines along the scarf.
6/6I'm erasing the construction lines. To show that the scarf is transparent, I leave the edge of the hat half visible underneath it.
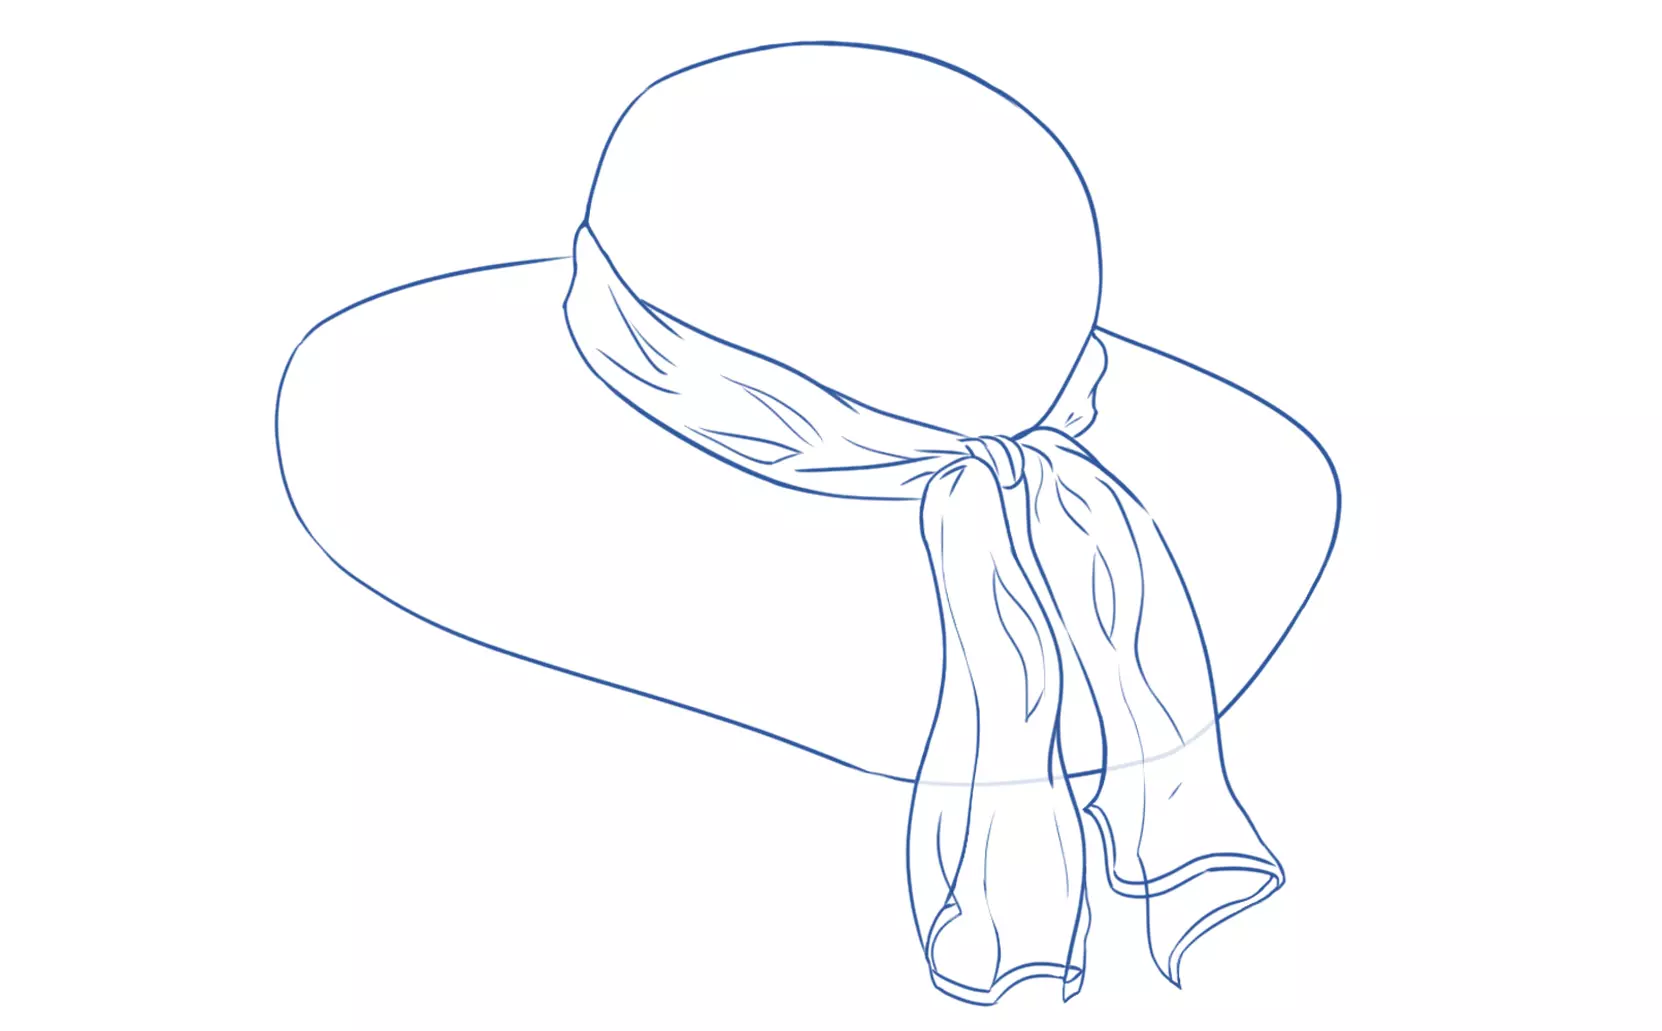
7/7I shade the scarf, emphasizing the hollows and folds of the fabric. You can also apply a pattern to it.

8/8I'm drawing the shadow of the scarf on the hat.
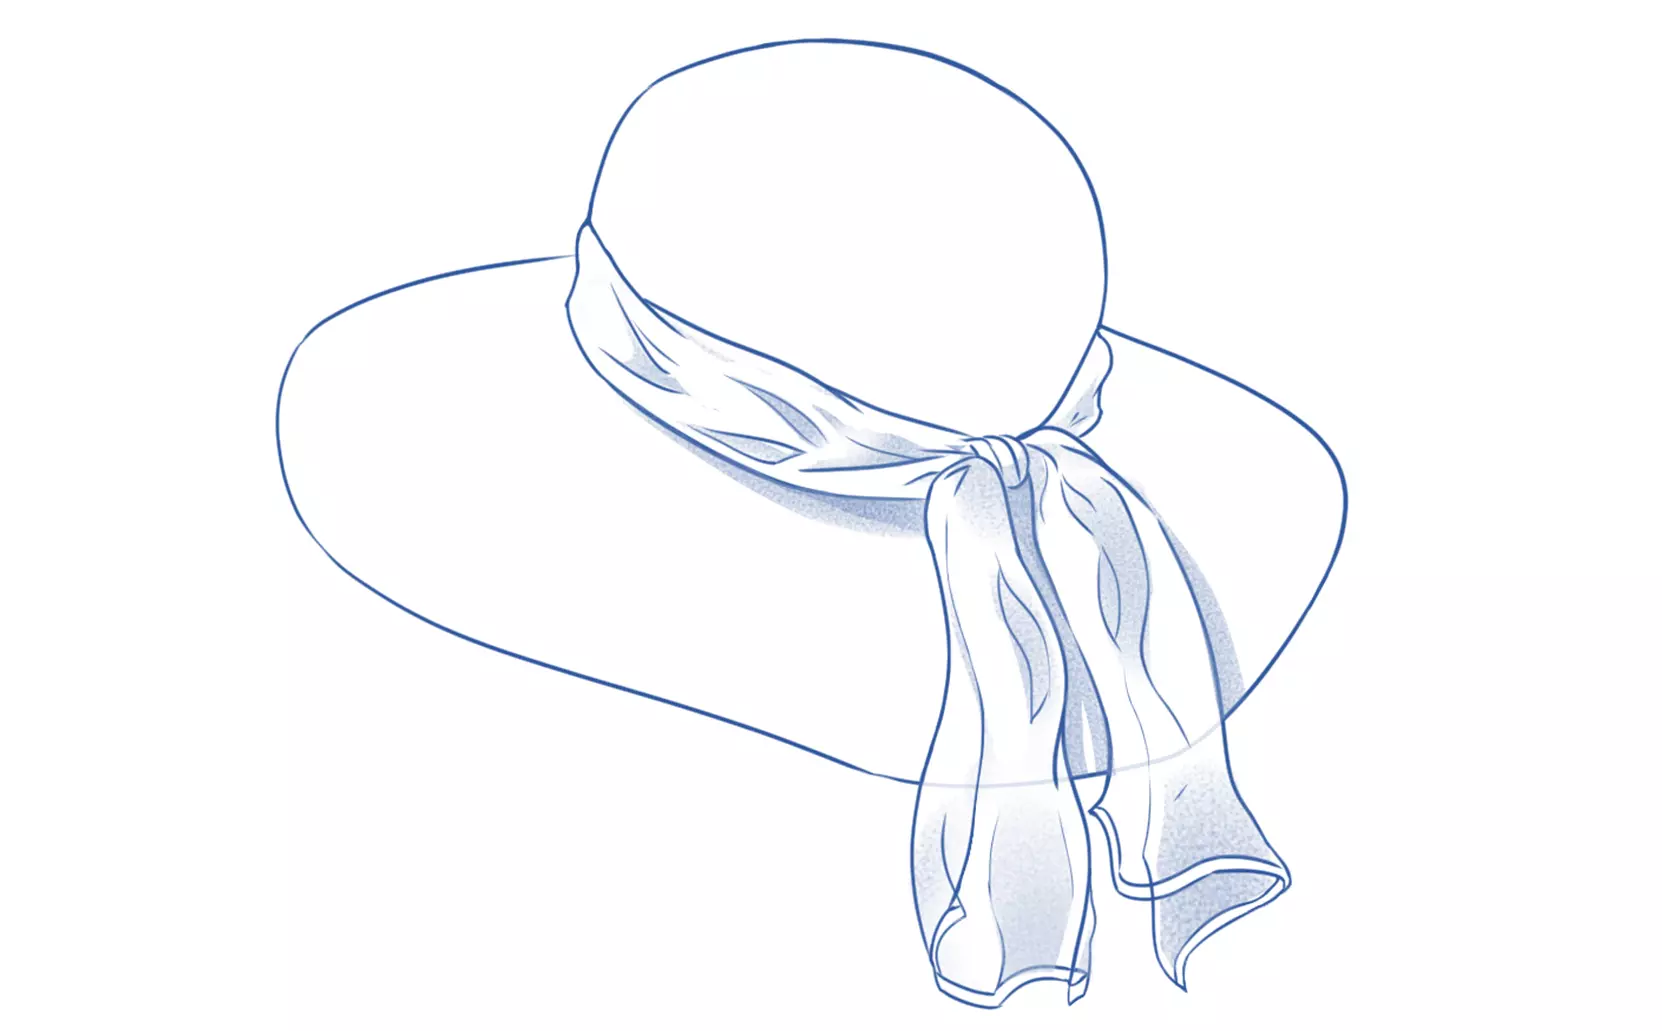
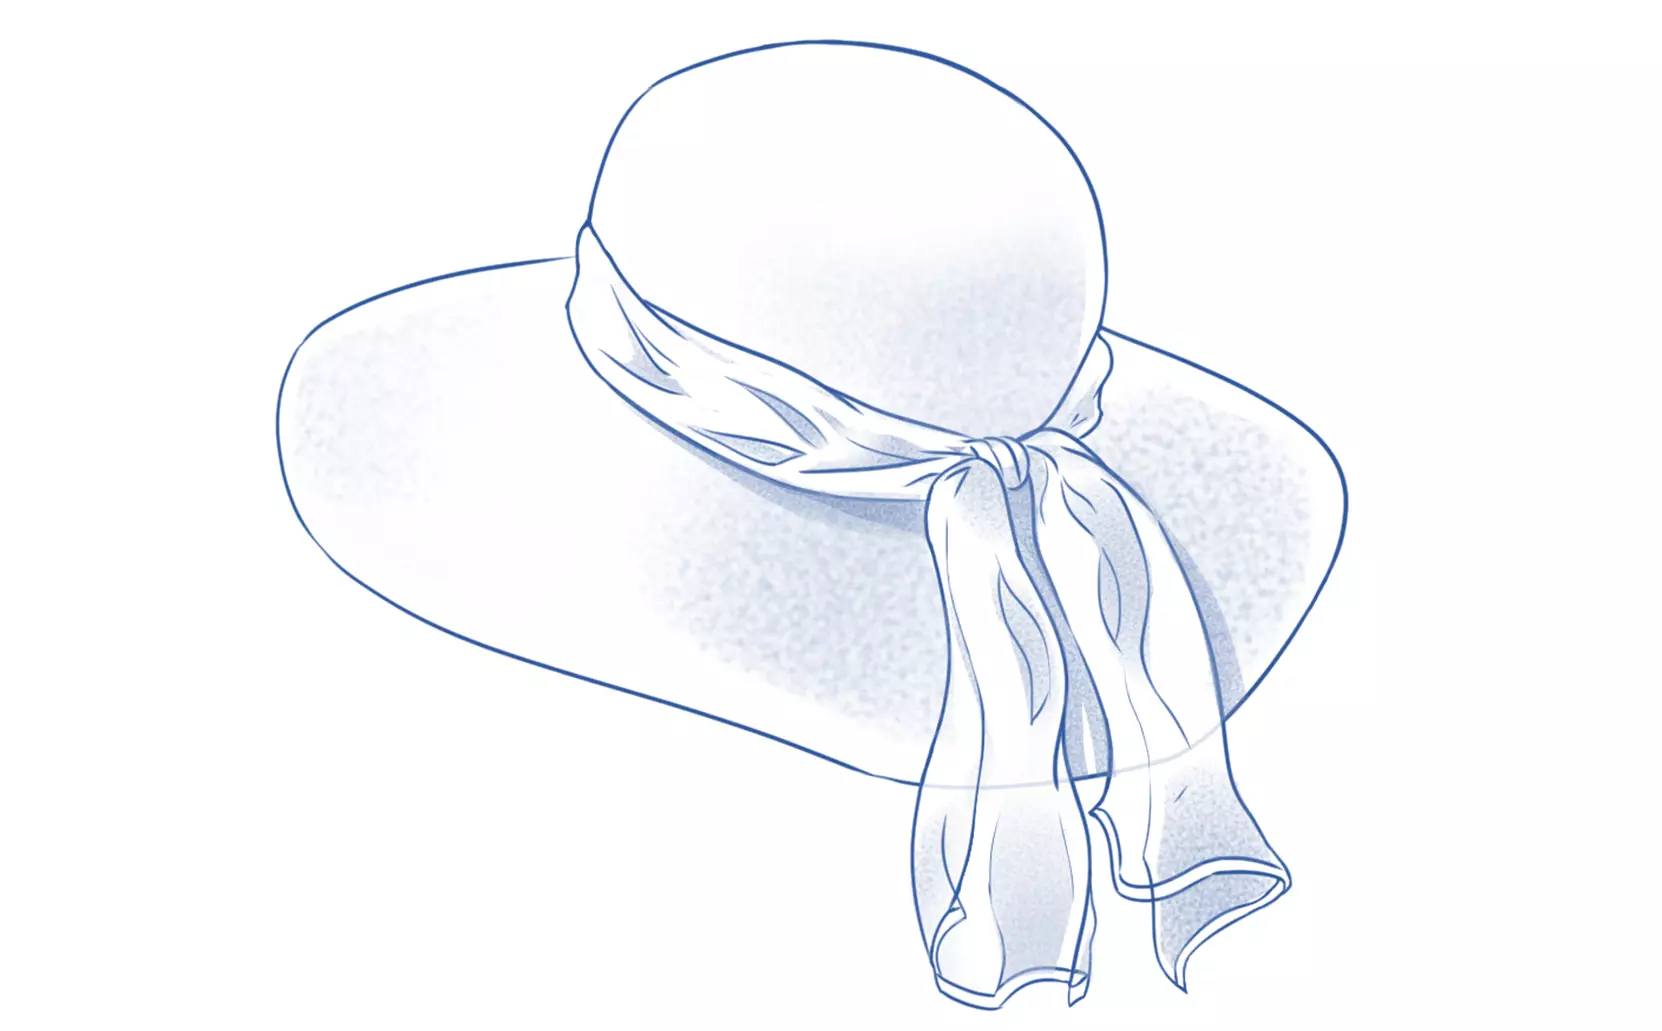
9/I place some light shadows on the hat following the edges' movement. You can detail the hat's fabric as you like.
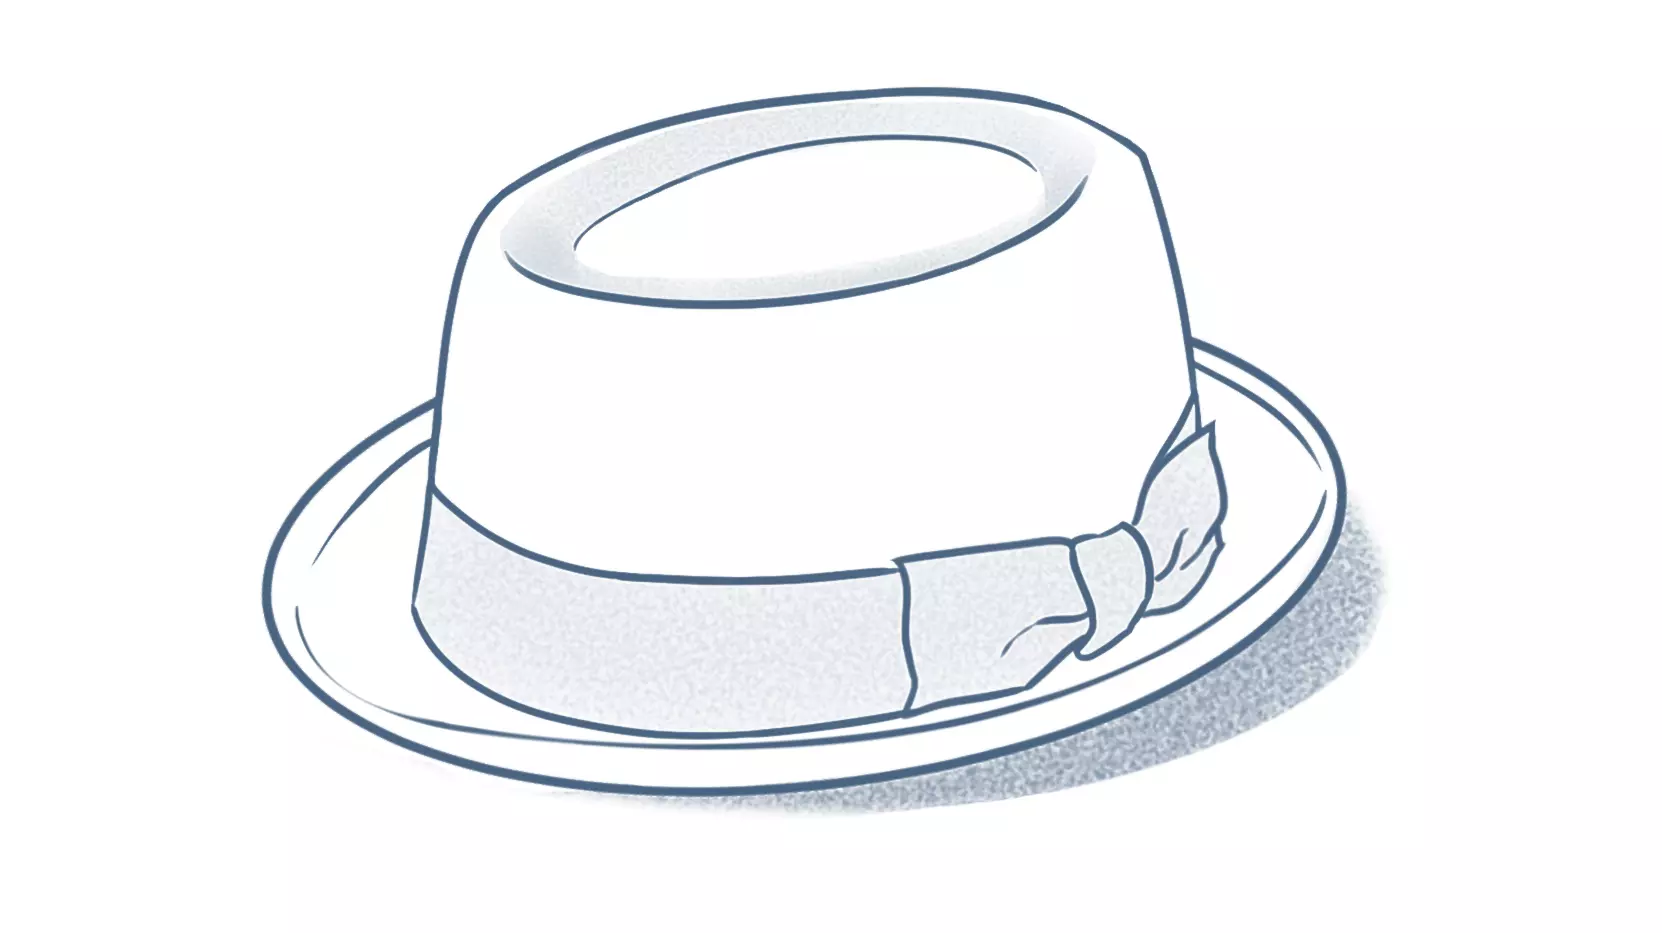
DRAW A PORK PIE
The pork pie is a small hat from the 30s that is coming back into fashion today. It is often associated with jazz musicians... as they were the ones who reappropriated it in the 50s. In the past, it was worn with a small feather attached to its band.
The one we are going to draw has a round, hollowed-out crown. For this type of hat, feel free to draw an even lower cap than shown below, as they are usually very short. The ribbon, however, is always associated with this type of hat.
1/I am drawing a medium-sized ellipse.
2/2In this ellipse, I draw a second one just slightly smaller for the border.
3/3I'm drawing the outlines of the hat; the top is slightly rounded and the vertical lines of the crown are barely turned inwards at its peak.
4/4I draw the rounded hollow crown; a wide arc open upwards, and a smaller one open downwards. The two do not meet.
5/5I start drawing the ribbon, leaving space for a large bow.
6/6I am drawing the center of the knot.
7/7I'm finishing up the knot.
8/8I erase the superfluous lines and refine others, like the edge of the border to make it look less geometric.
9/9I shade the ribbon.
10/10I place a slight shadow.
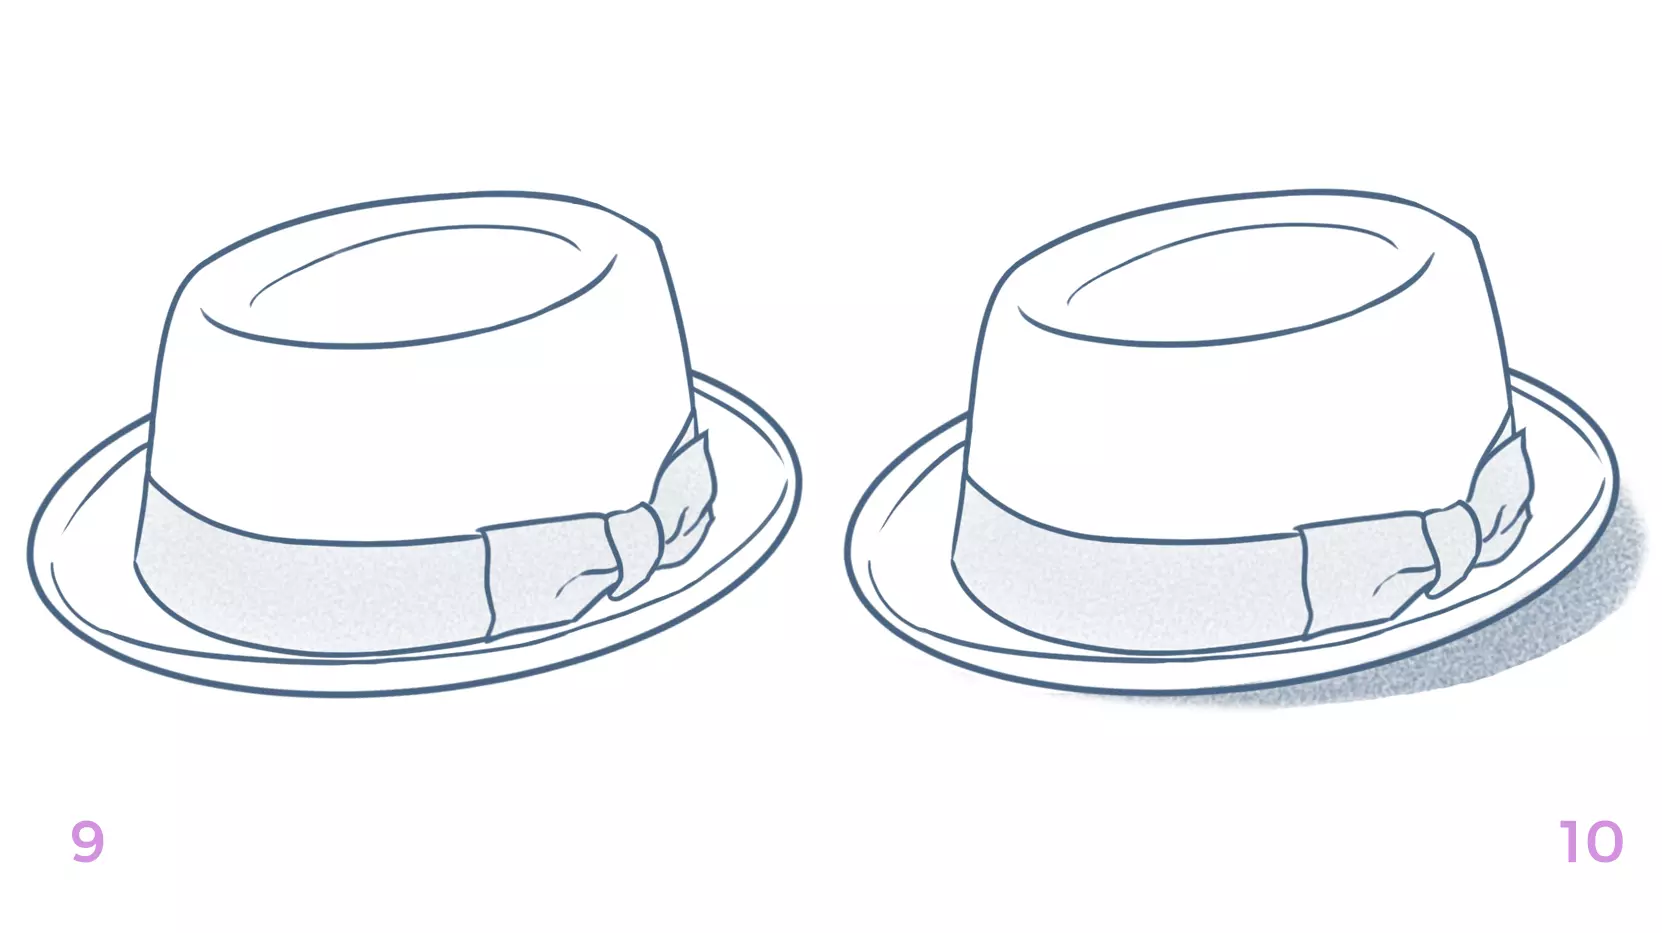
Finally, one can represent the particular shape of the crown by shading the hollow at the top of the hat.
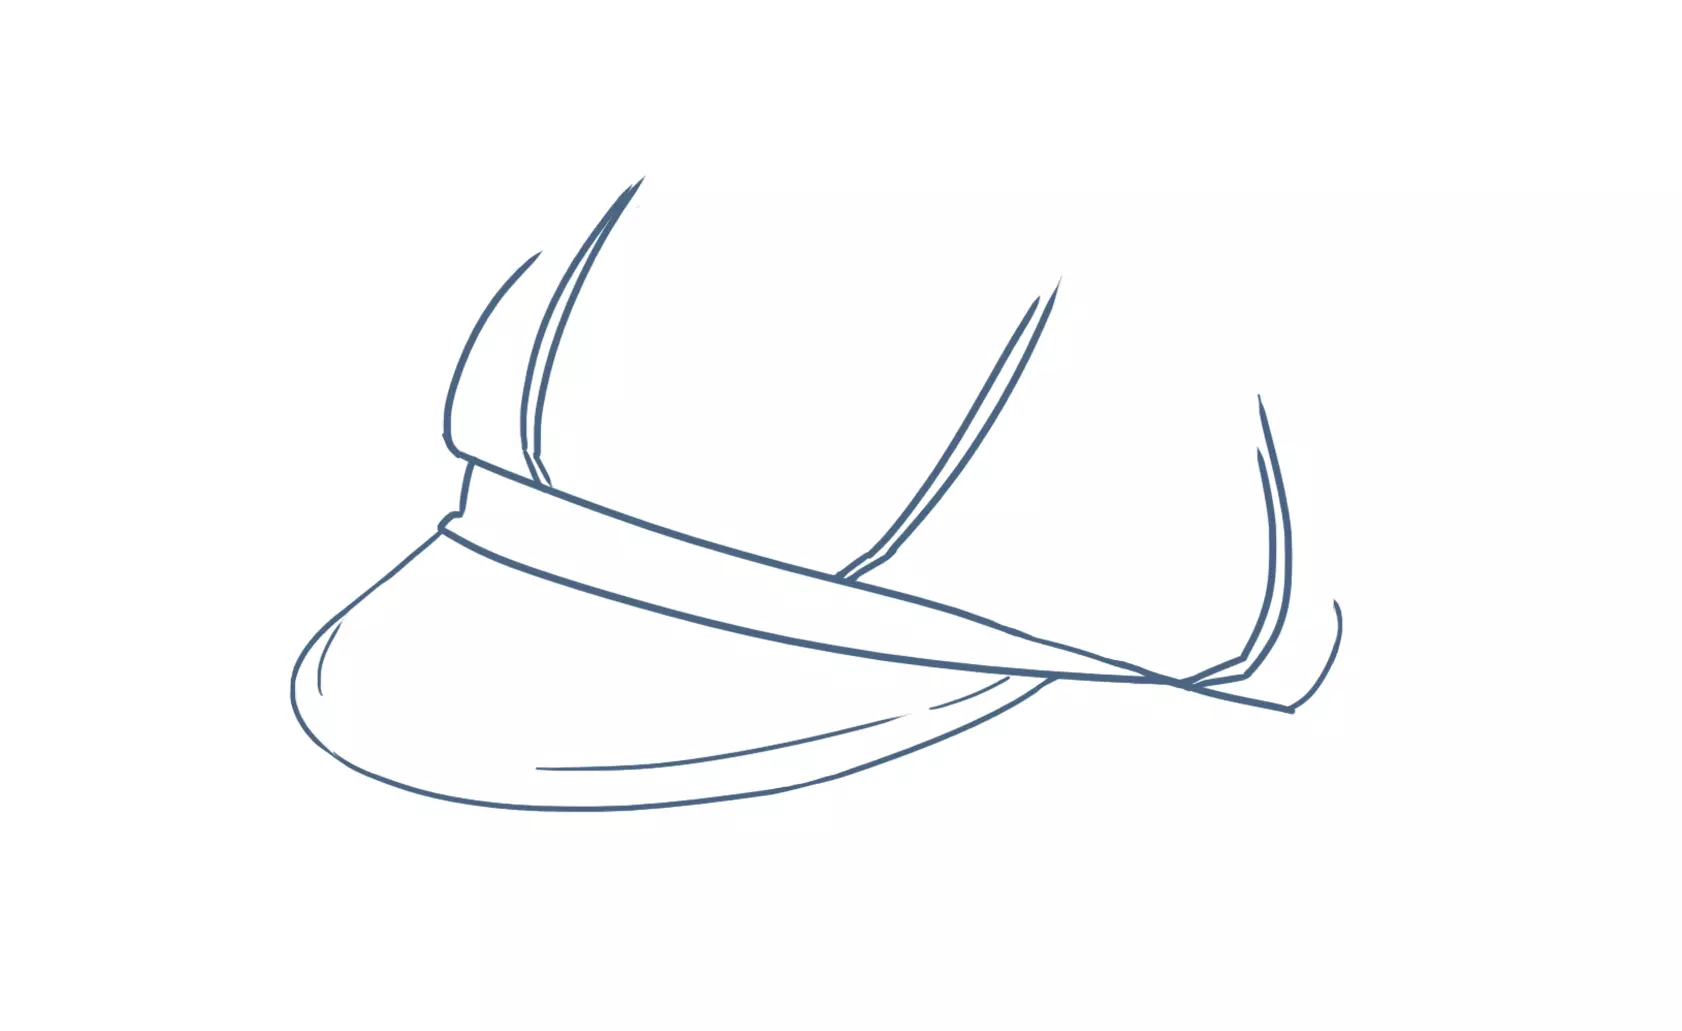
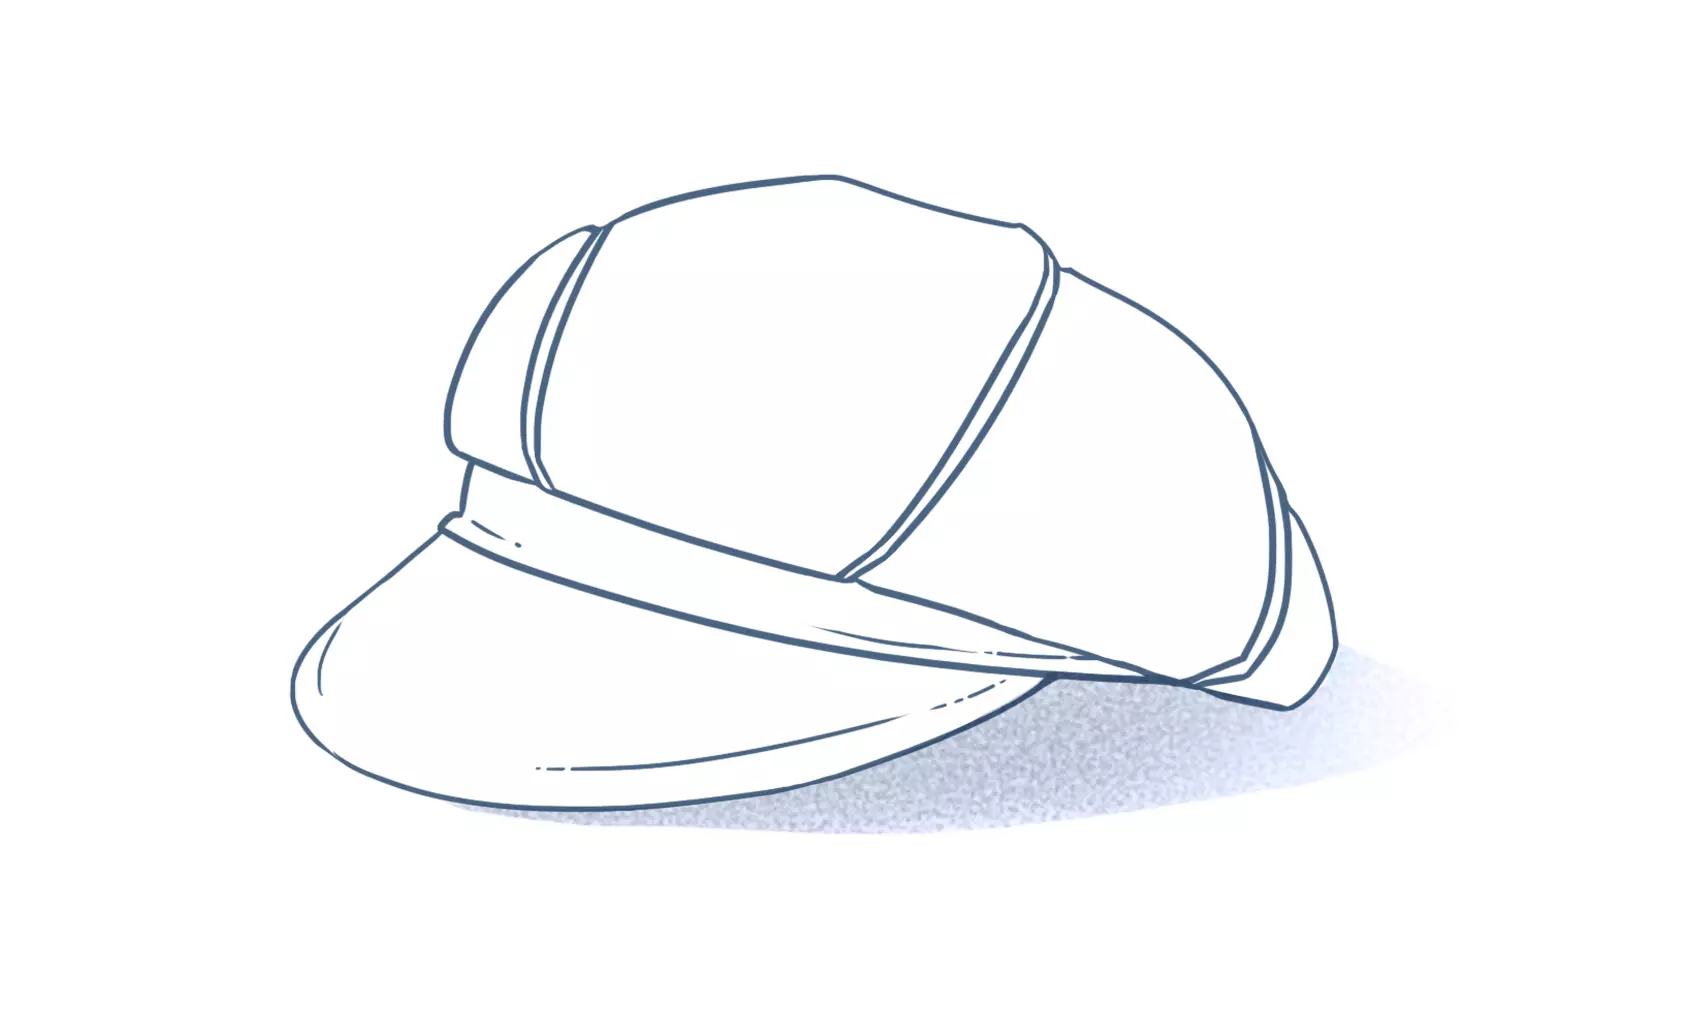
DRAW THE NEWSBOY CAP
This style of cap is named after the famous character from Victor Hugo's Les Misérables. It is also called an Irish cap or Poulbot, in reference to street children; the "newsboys", i.e., the little newspaper sellers.
This hat has a domed shape that drops slightly.
1/I draw two fuchsia axes as reference, and a slightly flattened ellipse for the crescent moon-shaped visor.
2/2I base myself on these construction lines to draw the visor and its details.
3/3I begin the lines that represent each part of the cap sewn together. Follow the direction of the arrows to draw the continuation of the seams, in a slightly different axis to show the curved side of the hat.
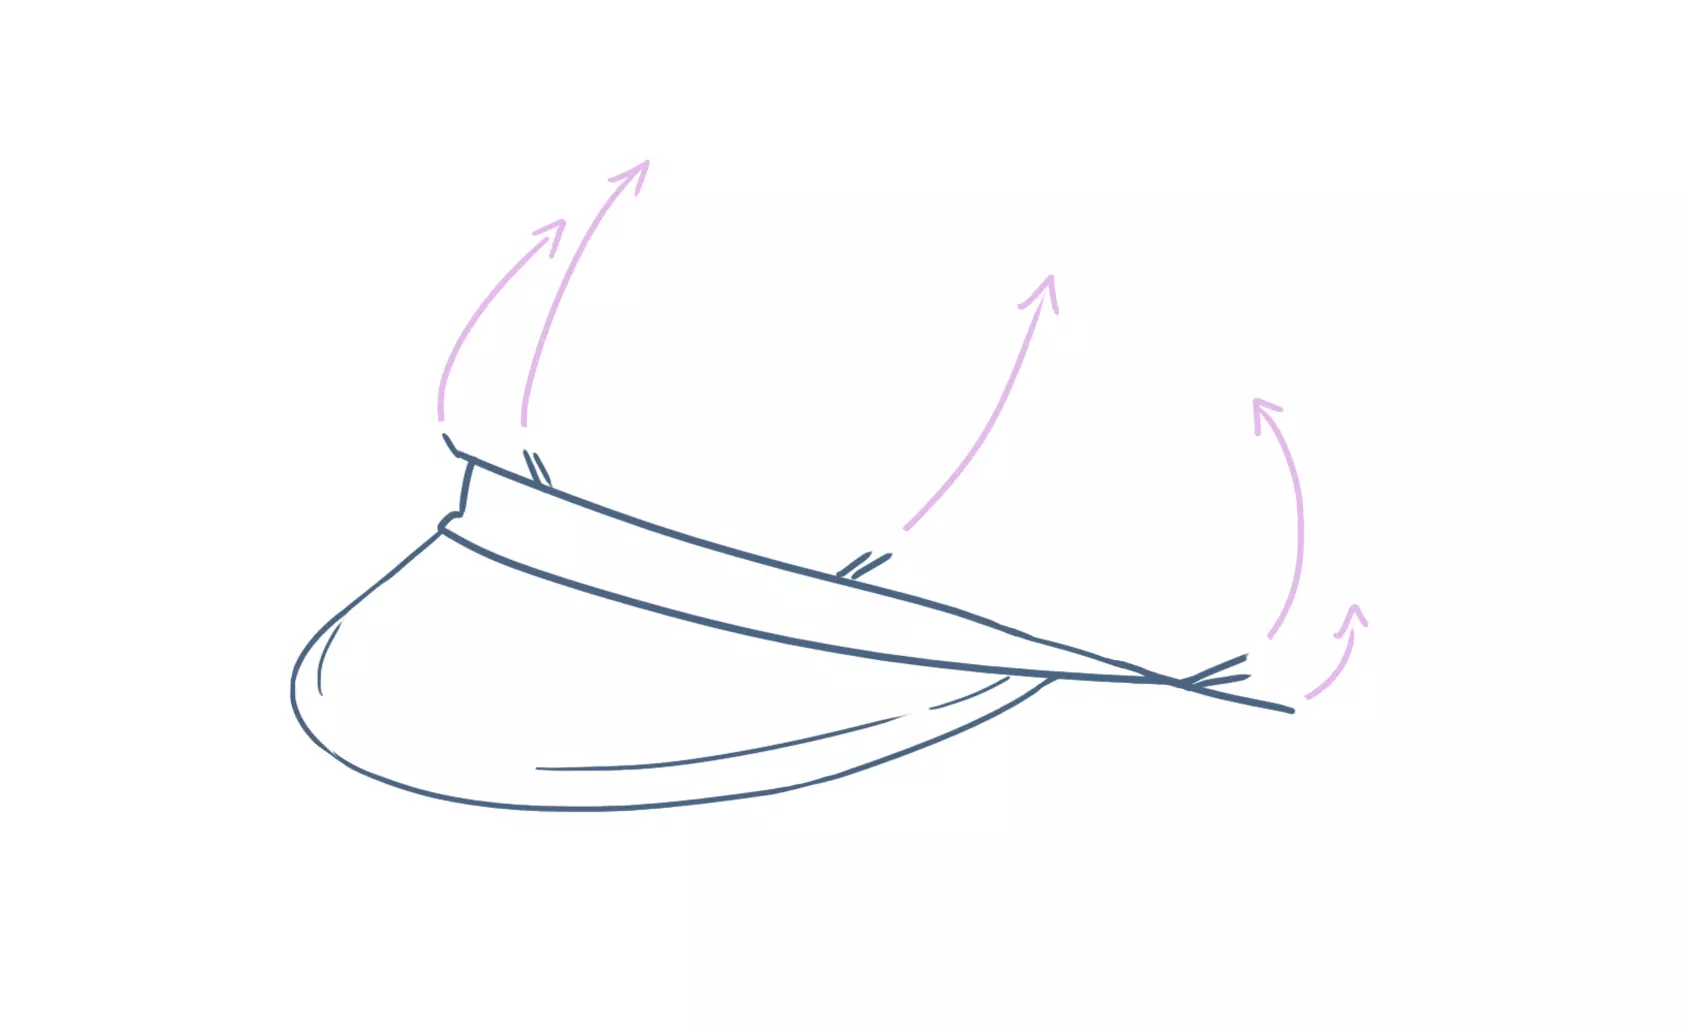
4/4I draw the seams. The middle ones are higher due to perspective effect.
5/5I'm drawing the top of the cap, mimicking the movement of the fabric, imagining that each part meets at a central point at the top of the cap.
6/6I erase the unnecessary lines and draw the cast shadow.
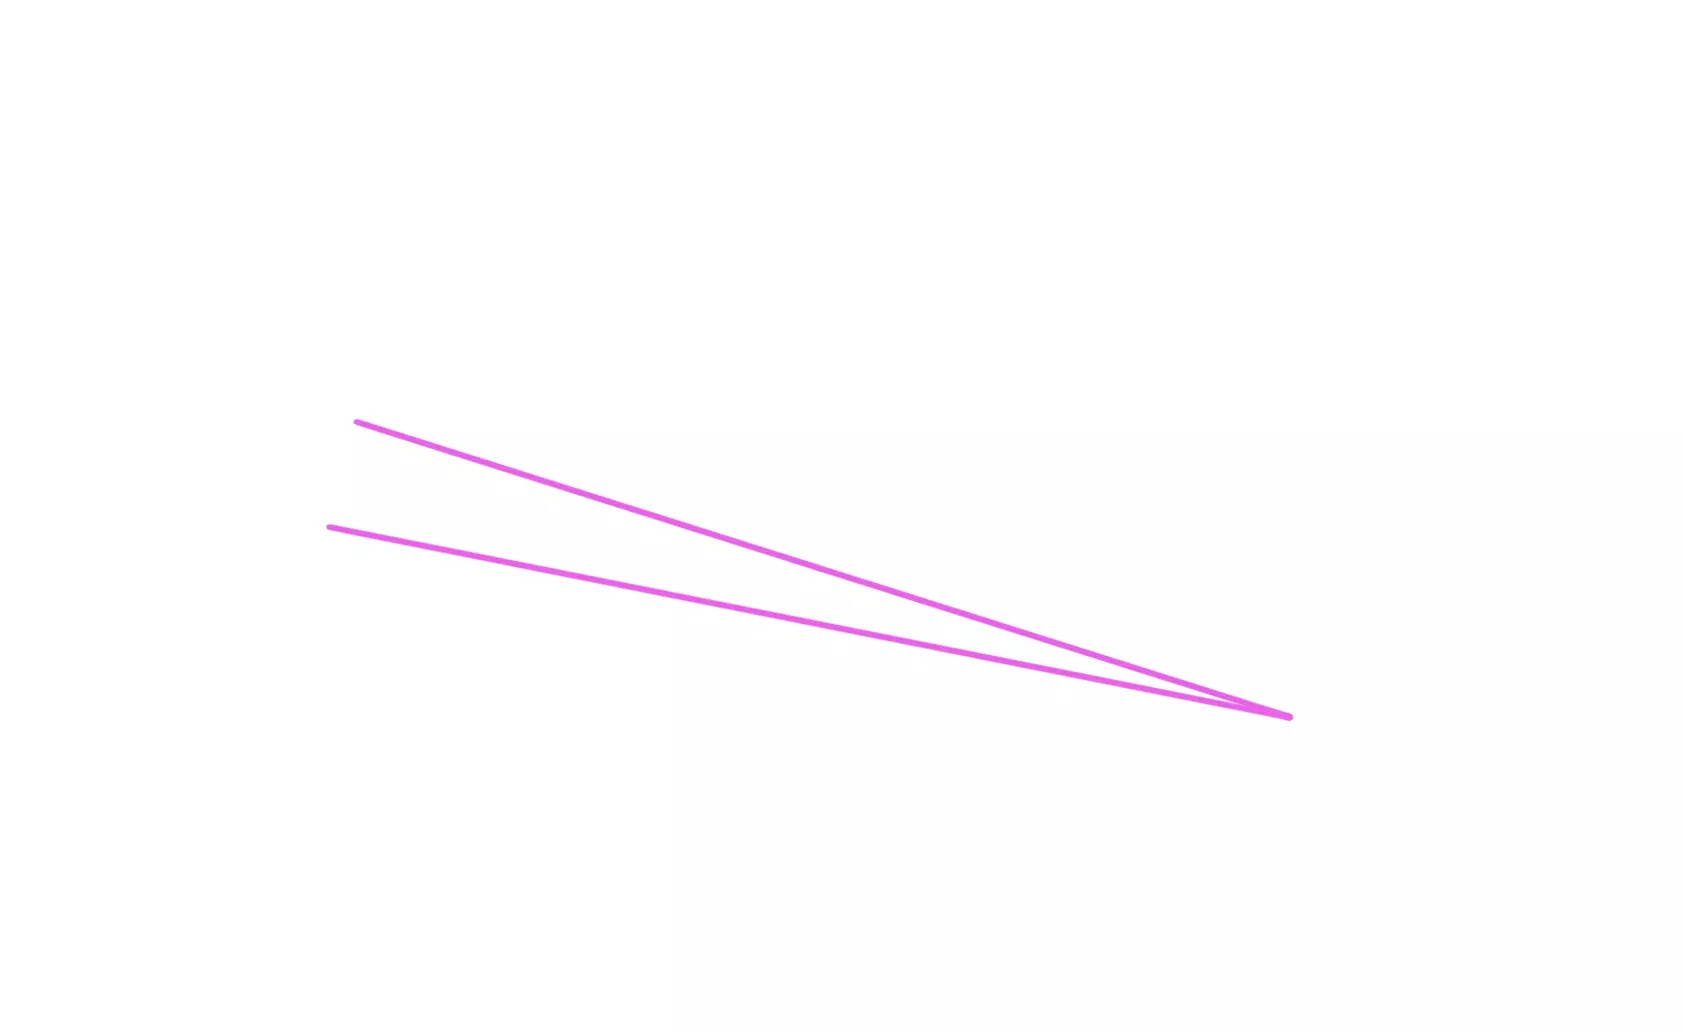
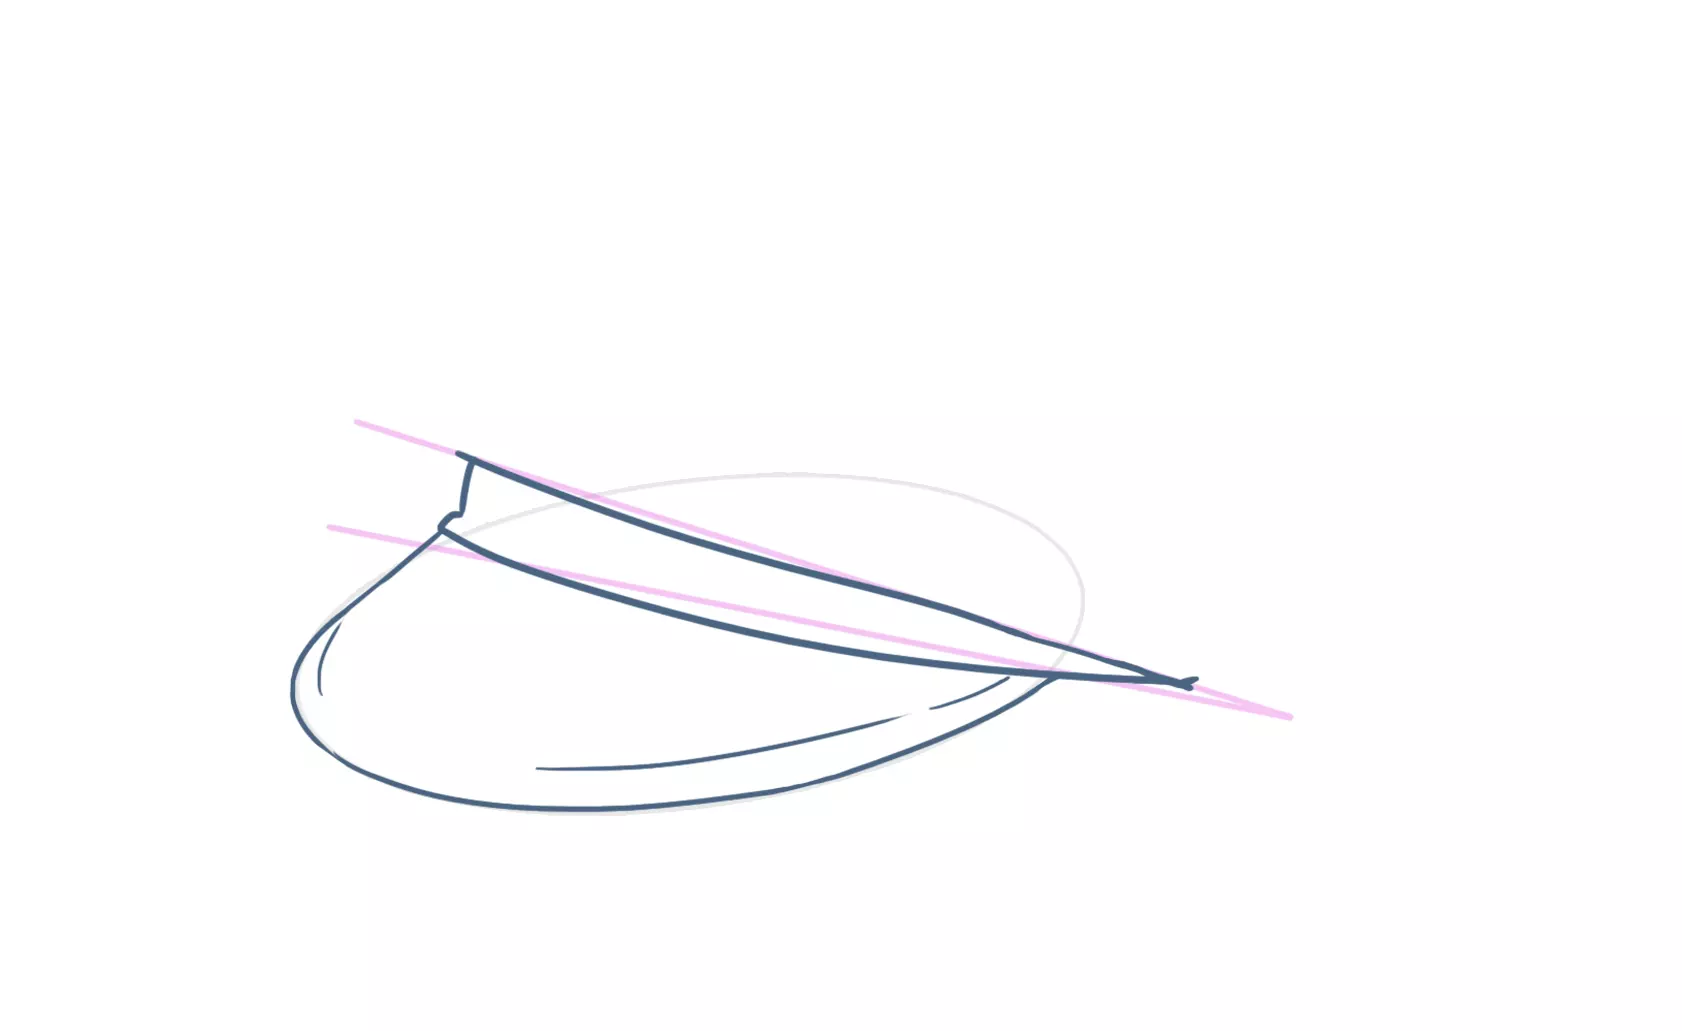
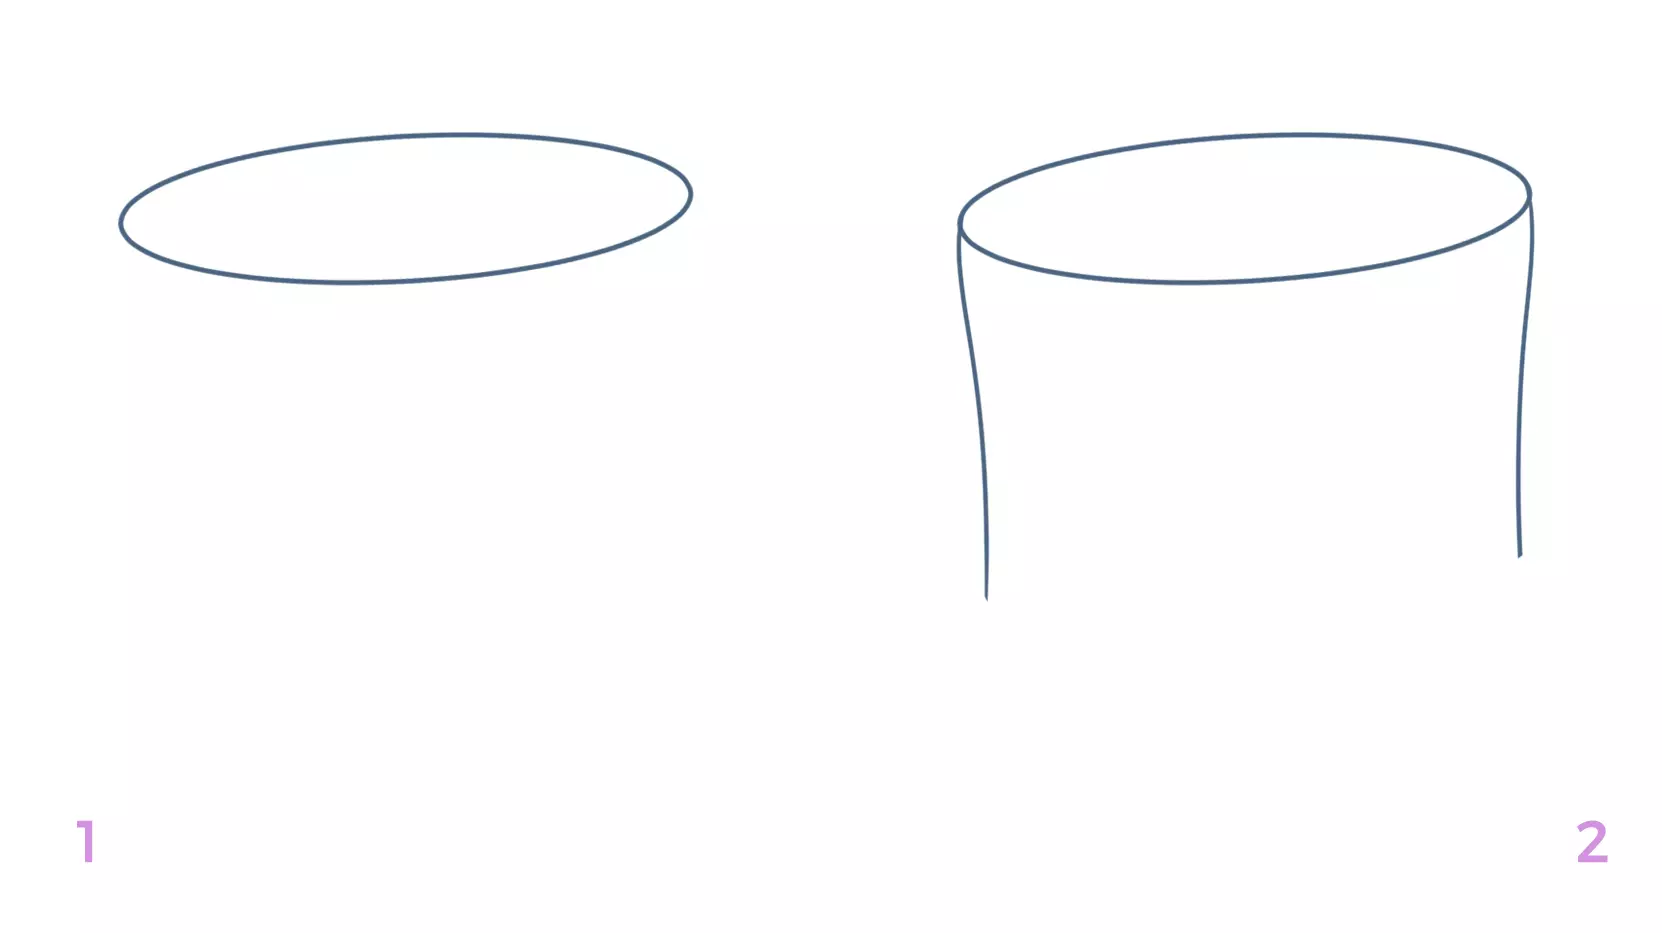
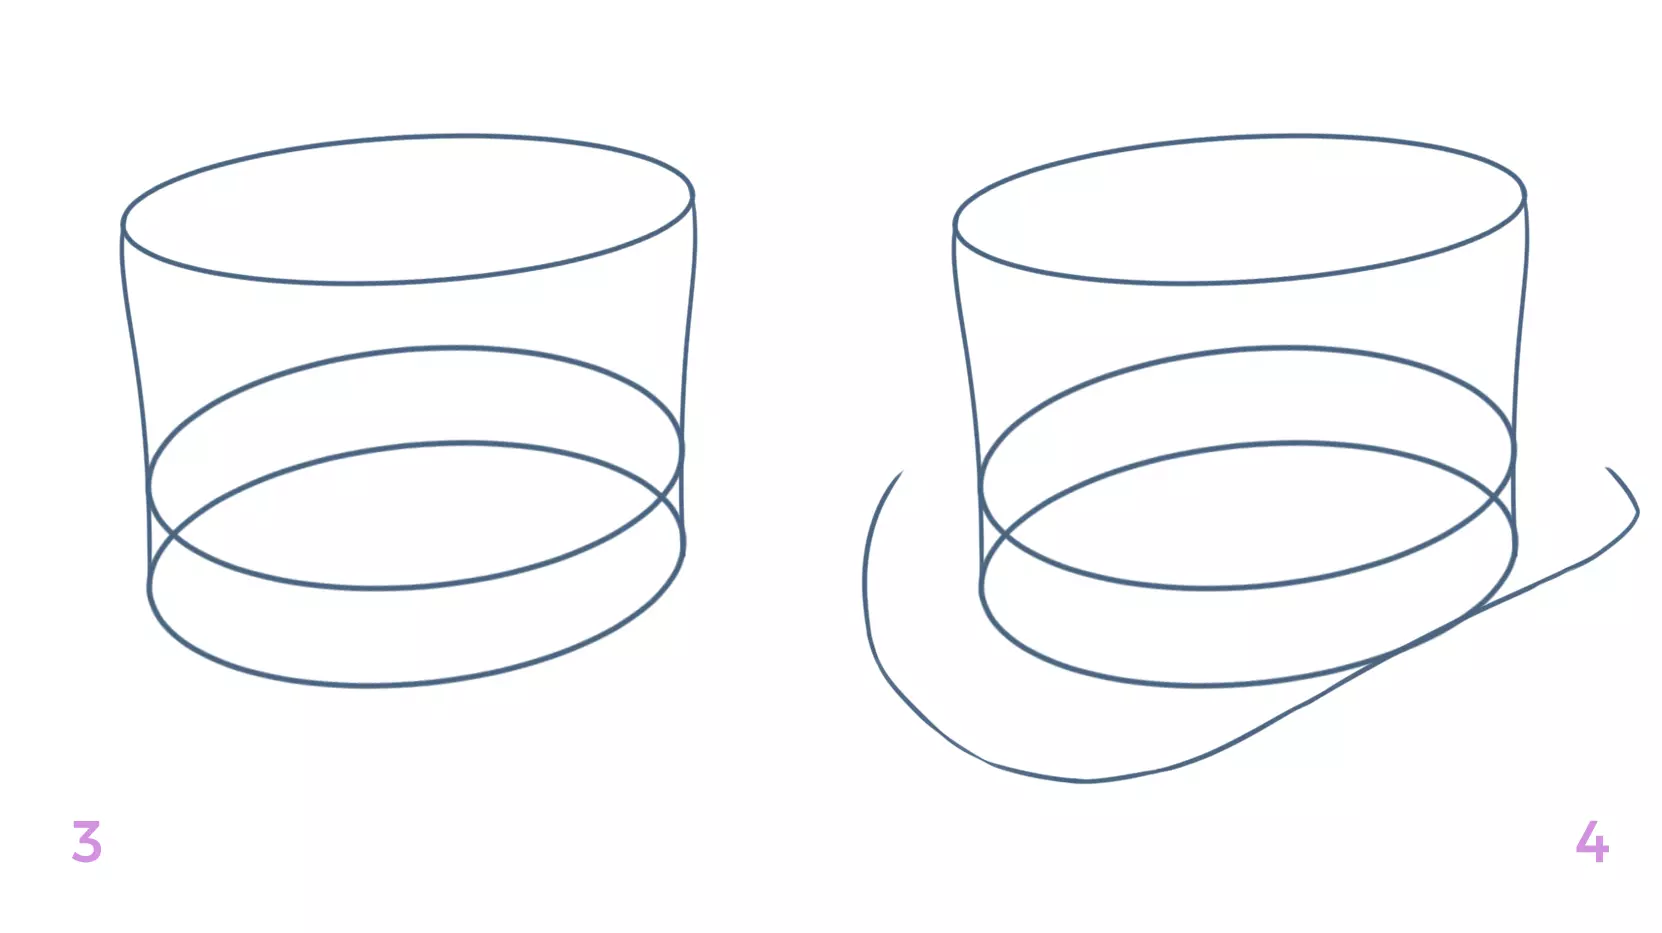
DRAWING A TOP HAT
This hat originates from Florence. It was once worn with a tailcoat; it was proof of the social status of the man wearing it.
The top hat is generally made of silk, its crown is cylindrical and tall, contrasting with quite small brims.
1/To begin, I draw an ellipse.
2/2From the ends of this ellipse, I descend the edges of the cap with two curved lines that taper slightly. (You can choose to draw them even longer than in my example for a very tall top hat.)
3/3To draw the ribbon, I place two ellipses of the same size at the base of the hat.
4/4I'm starting the drawing of the border. These hats have brims that go up on the right and left; to depict this, the right edge of the top hat touches the ellipse of the ribbon.
5/5I'm drawing the thickness of the borders; it's quite significant on this type of hats. I'm trying to suggest the curved aspect of the border on the left side as well.
6/6All that's left is the underside of the hat which I draw with a simple curve.
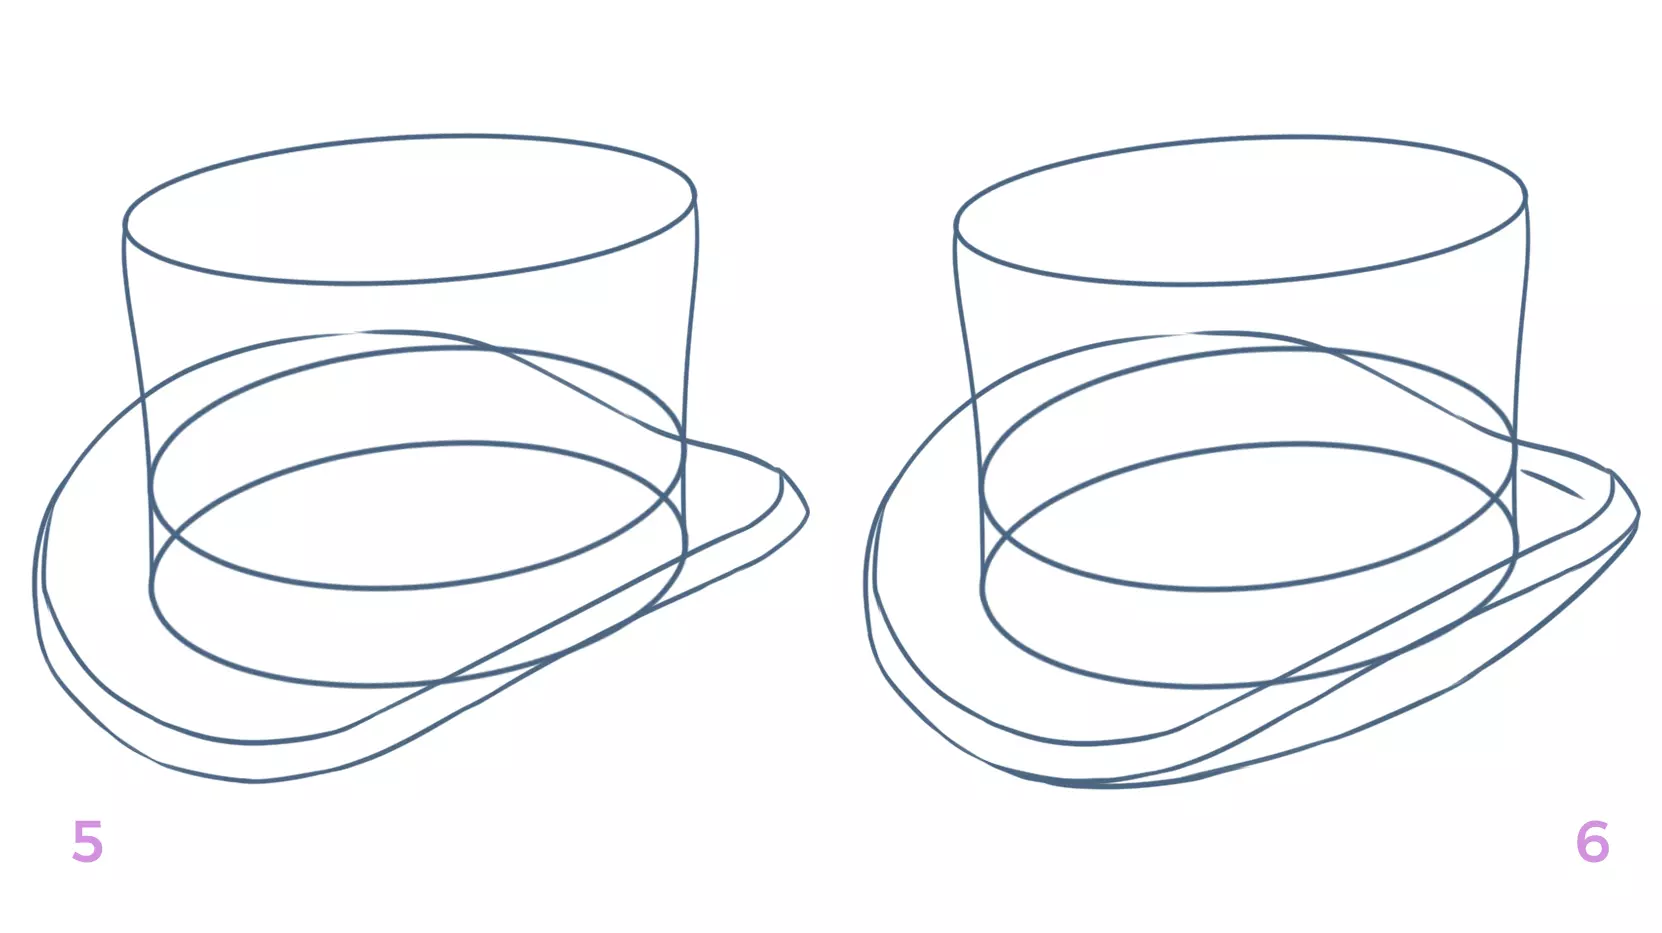
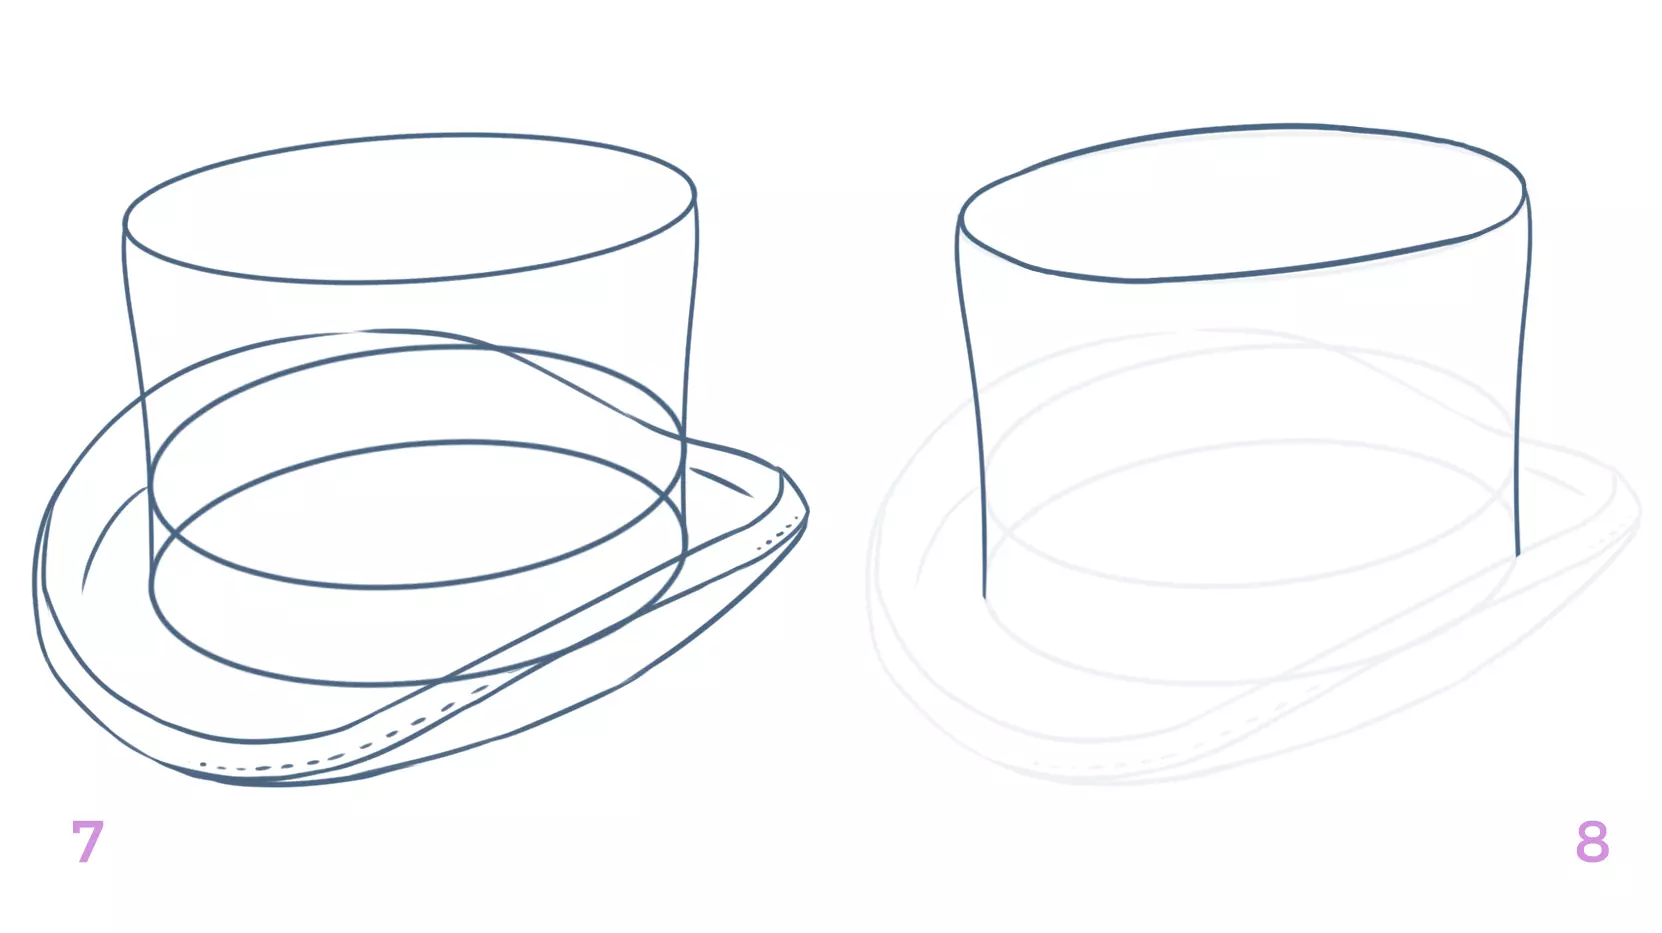
7/7I'm adding the stitch details.
8/8I lower the opacity of the construction lines to clean up my drawing, starting from the top of the hat. Then, I redraw the ellipse to give it a less stiff and more artisanal look.
9/9I am cleaning up the hat's borders, refining some lines.
10/10I am drawing the bottom of the ribbon and the bow tie to decorate the hat.

11/11I'm finalizing the ribbon and its details.
12/12I erase all the construction lines.
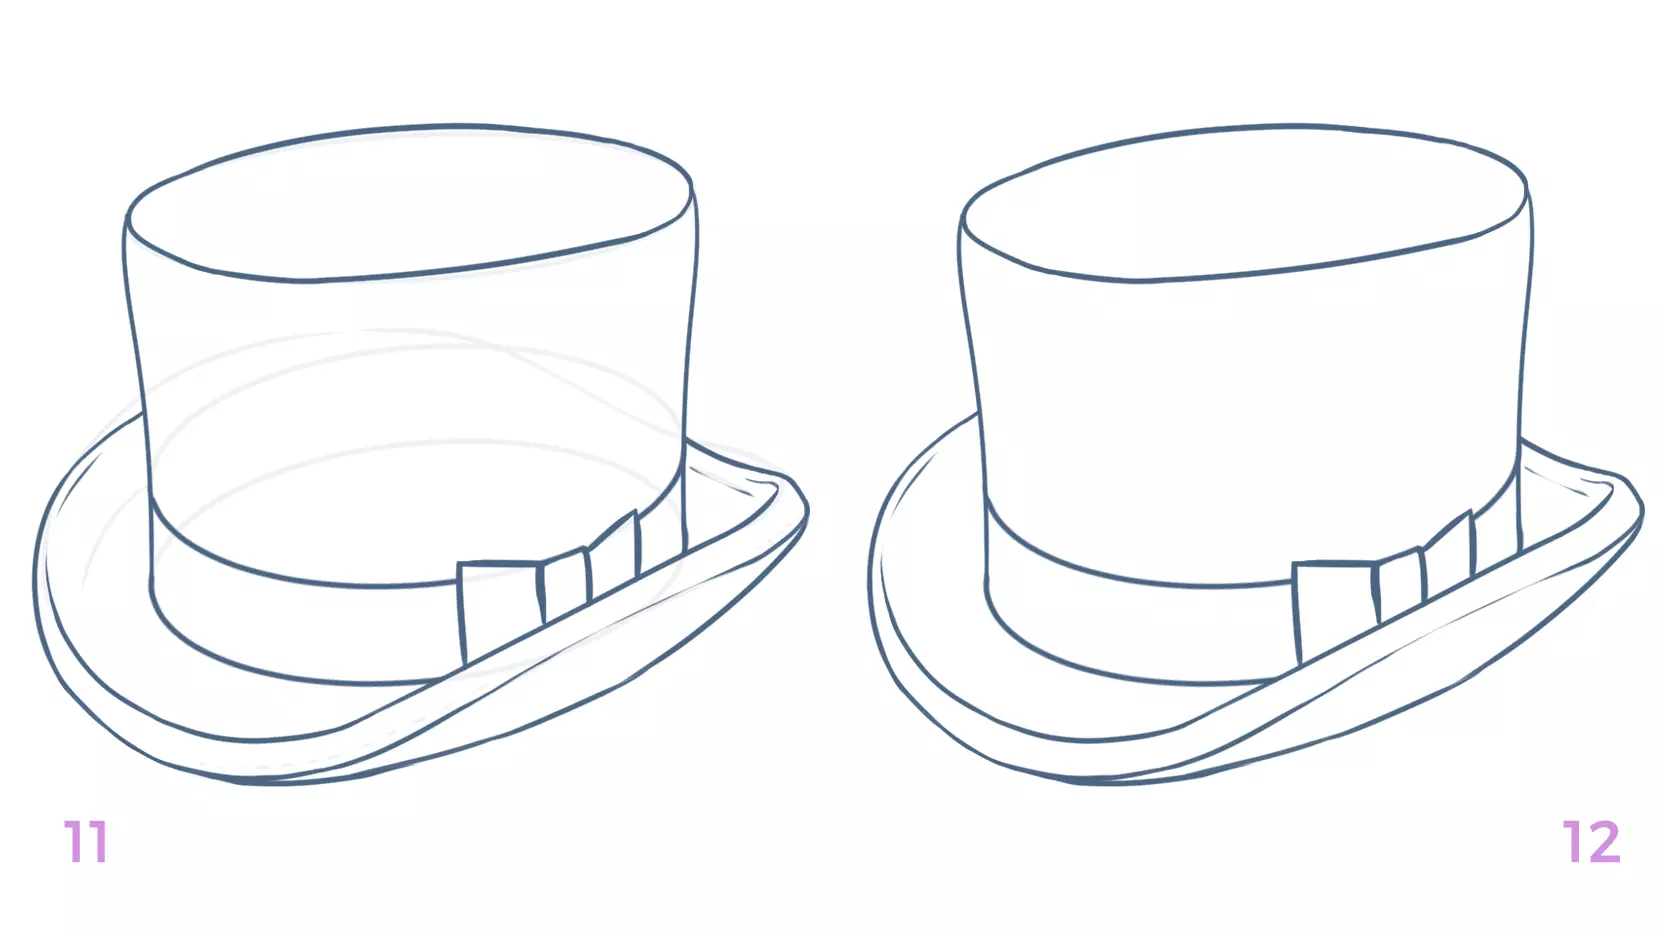
Ta-da! My top hat is finished.

I haven't colored any of these hats so that you can create your own color palettes... beyond those traditionally associated with them!
Illustrator and writer:Vincyane
Discussion
Good evening and thank you Liam for these wonderful hats, they can always come in handy.
Thank you very much, that's very helpful to me
Thank you, I really enjoyed redrawing these hats.
Basketball Random is not just an entertaining game, but also a great way to relax and connect with friends, where players can participate in thrilling basketball matches with unique rules and mechanics. https://basketball-random.io/