How to Draw a Neck
At first glance, drawing a neck seems quite simple. However, it is important to study its bone and muscle structure in depth to learn how to draw it without even needing a photo reference!
When drawing a neck, several criteria need to be considered: the age of the person, their body type, their weight, and their gender. Accordingly, adjustments are made to the neck's size (in length and width), its musculature, and skin tone.
ANATOMY
The neck connects our head to the thorax, it is traversed by the esophagus, pharynx, larynx, and trachea. On either side, it is crossed by several veins and arteries including the carotid.
It also includes the submandibular glands, the cervical spine, and the hyoid bone. The hyoid bone, followed by the cartilages of the larynx and the trachea, form a continuity.
THE BONES OF THE NECK
The neck has the smallest bones of our spine; the cervical vertebrae, numbered from C1 to C7. The first vertebra (C1), also known as the atlas, carries the skull and is the widest of the cervical vertebrae. This part of the spine is called the cervical spine. This chain of bones is slightly curved as can be seen in this side view:
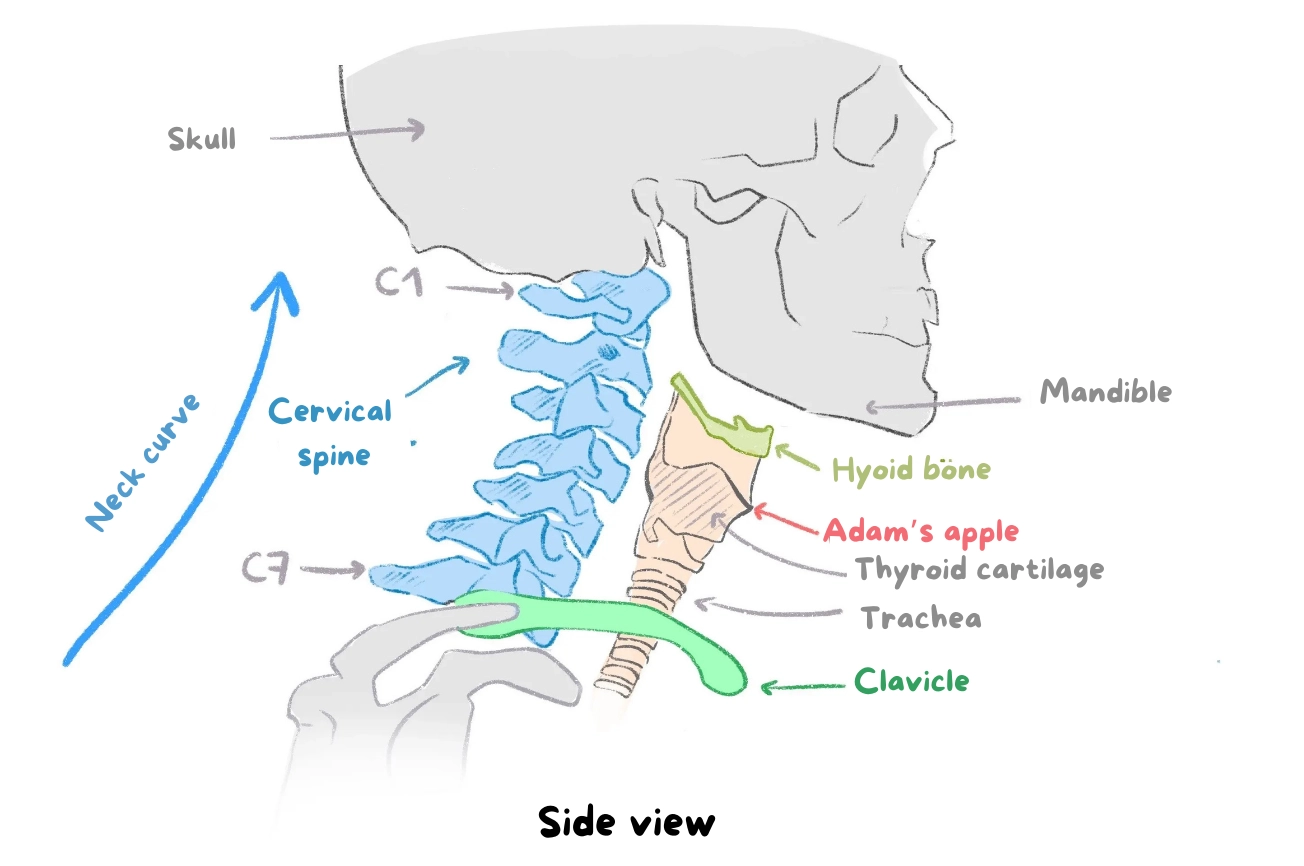
The Adam's apple, more prominent in men than in women, serves to protect the vocal cords: it is in fact one of the largest rings of cartilage in the larynx (in orange). It is the protuberance formed by the thyroid cartilage.
The bones that are also important when drawing the neck are the collarbones. They are not part of the neck but are essential for drawing it. They are slightly curved and start higher, resting on the shoulder blades, and fall lower, at the base of the sternum.
THE NECK MUSCLES
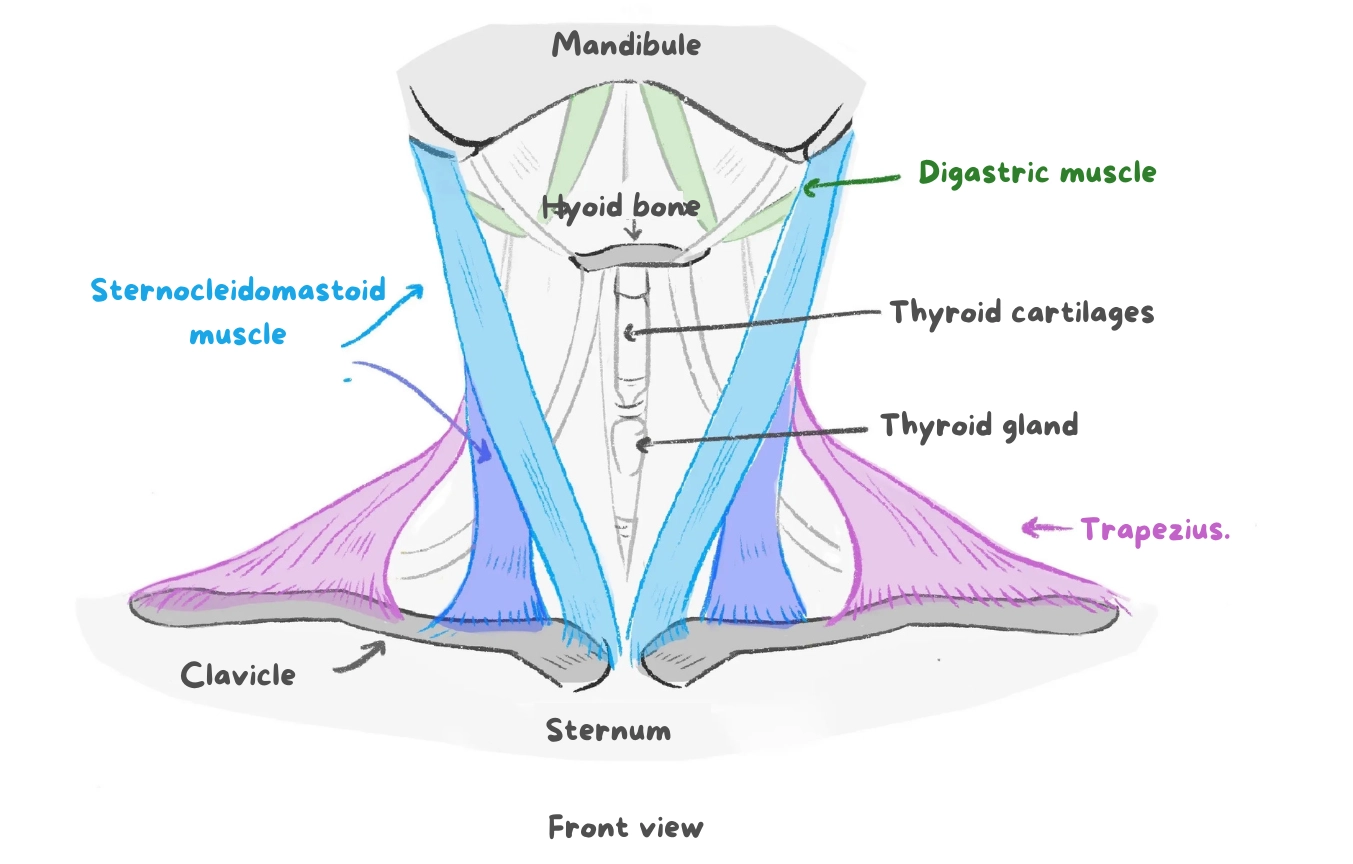
Let's now look at this front view drawing, where the person is tilting their head back so that we can see the underside of the jaw:
Many muscles exist in the neck.
We can, however, primarily focus on these two muscles: the trapezius and the sternocleidomastoid muscles because they are the most visible.
From the front, the sternocleidomastoid muscles form these two thick, symmetrical, and oblique lines (which I will draw in blue for the entire tutorial). They connect the skull (just below and behind the ear) to the inner ends of the clavicles at the top of the sternum.
The trapezius muscles attach on the outer part of the clavicles. They are visible even from the front (I'll draw them in pink for the rest of the tutorial).
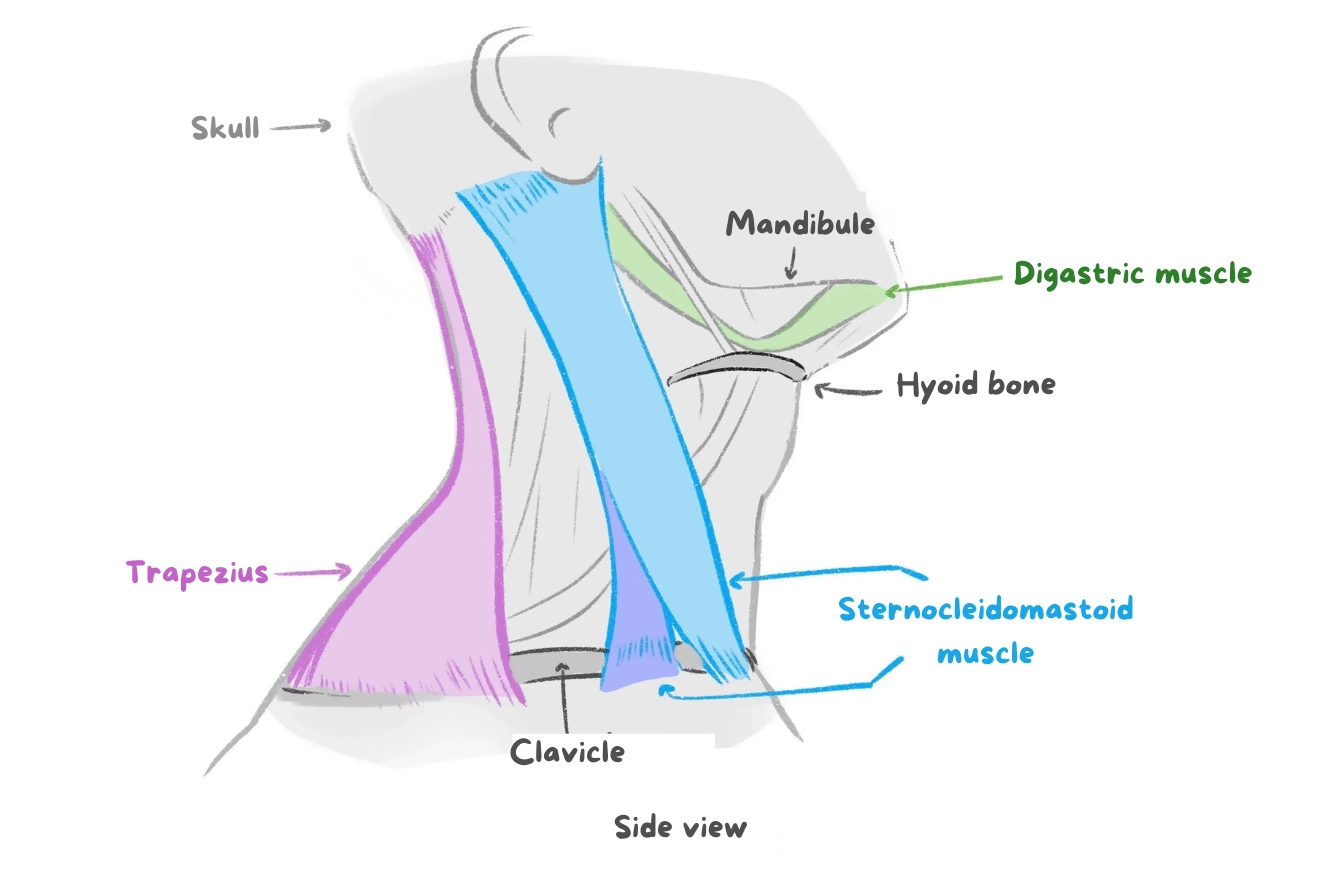
On the side, we notice that the trapezius muscles attach to the base of the skull, just like the sternocleidomastoid muscles.
From this angle, one notices a slight curve under the jaw that meets the hyoid bone, and under this same bone, the Adam's apple forms a small protuberance, then forms a line to the centre of the clavicles.
On the side of the neck, the more muscular the trapezius muscles are, the more pronounced the curve will be.
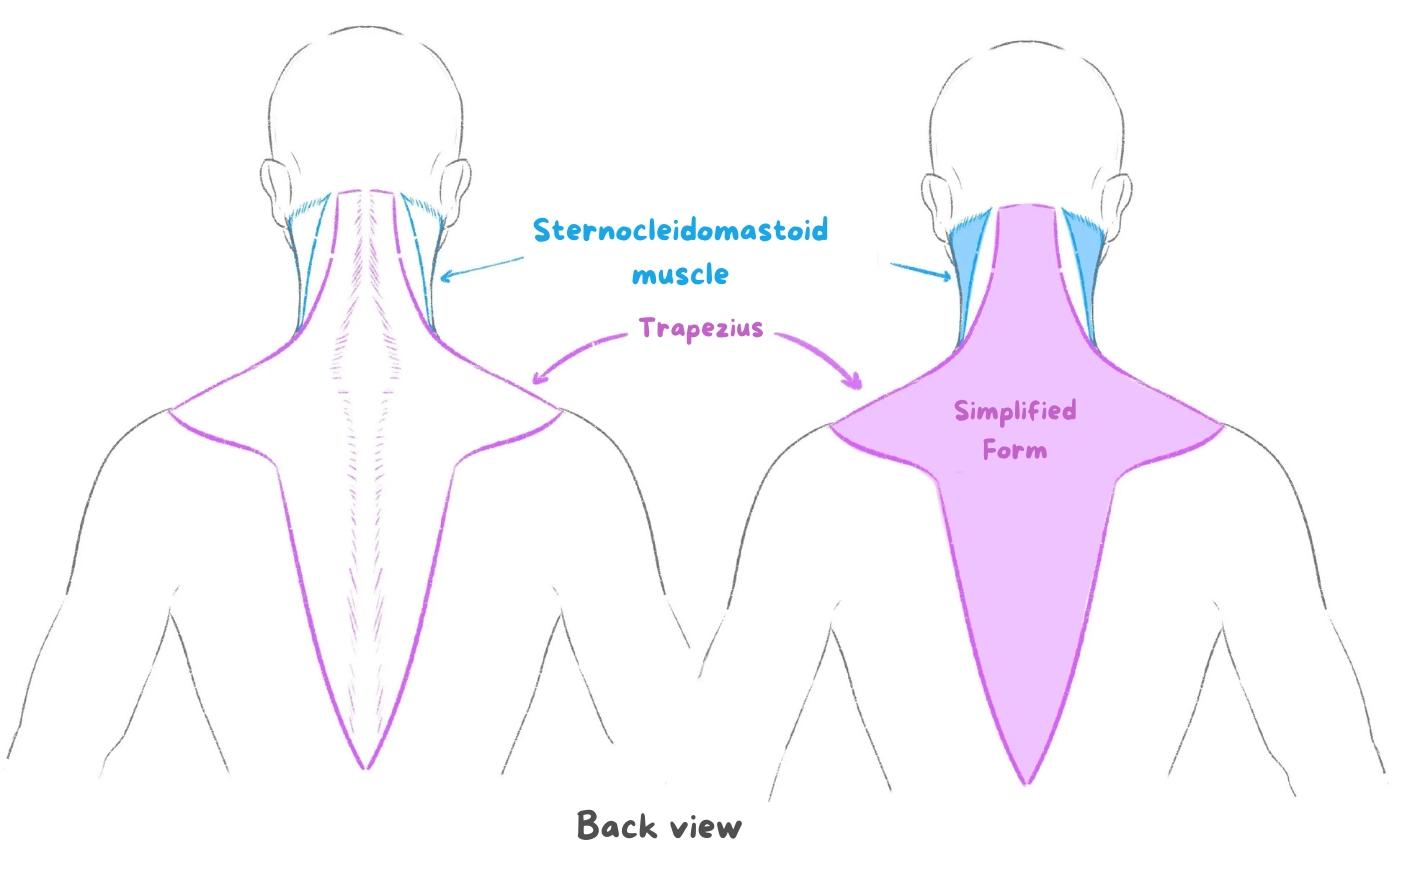
From behind, the muscles of interest are the trapezius muscles: they consist of the upper bundle (located on the nape), the middle bundle (at the shoulder level), and the lower bundle. They can be simplified to this pink shape.
We also notice that the muscles drawn in blue are visible, under the ears, at the base of the skull.
DRAWING A NECK IN PROFILE
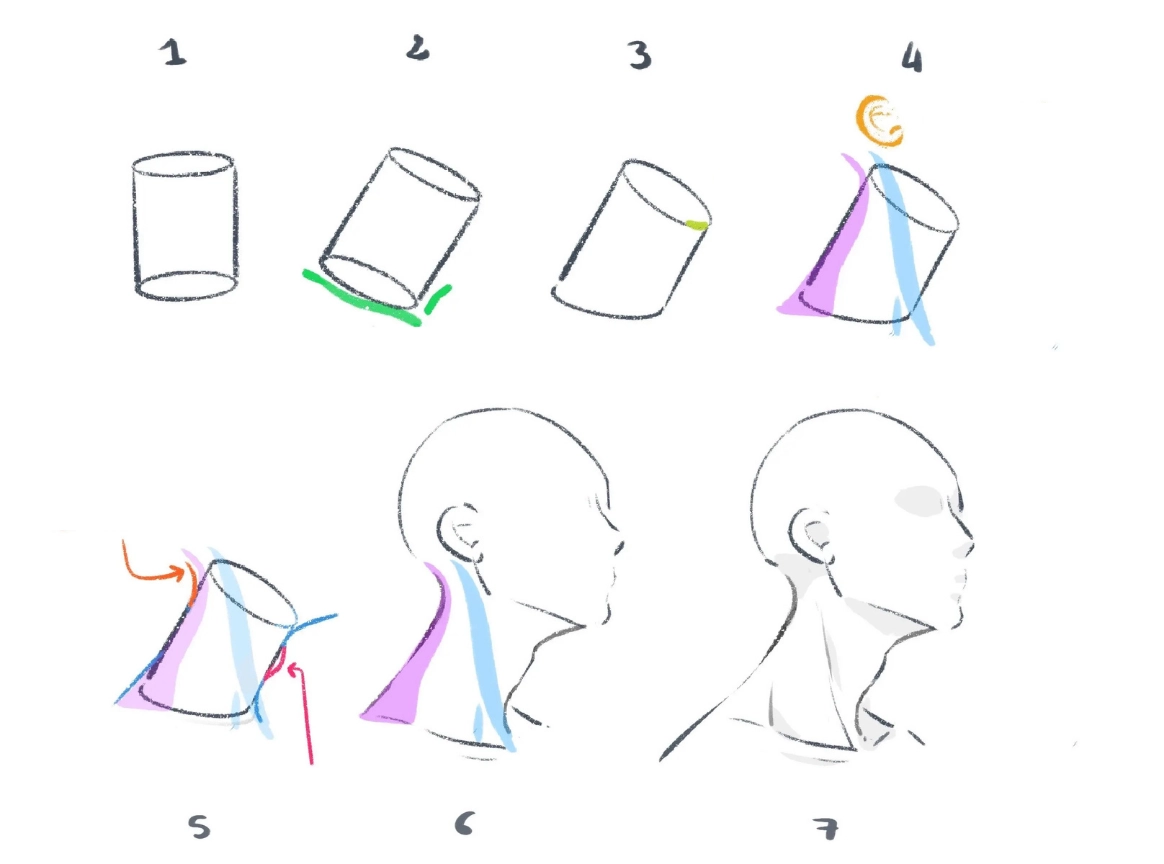
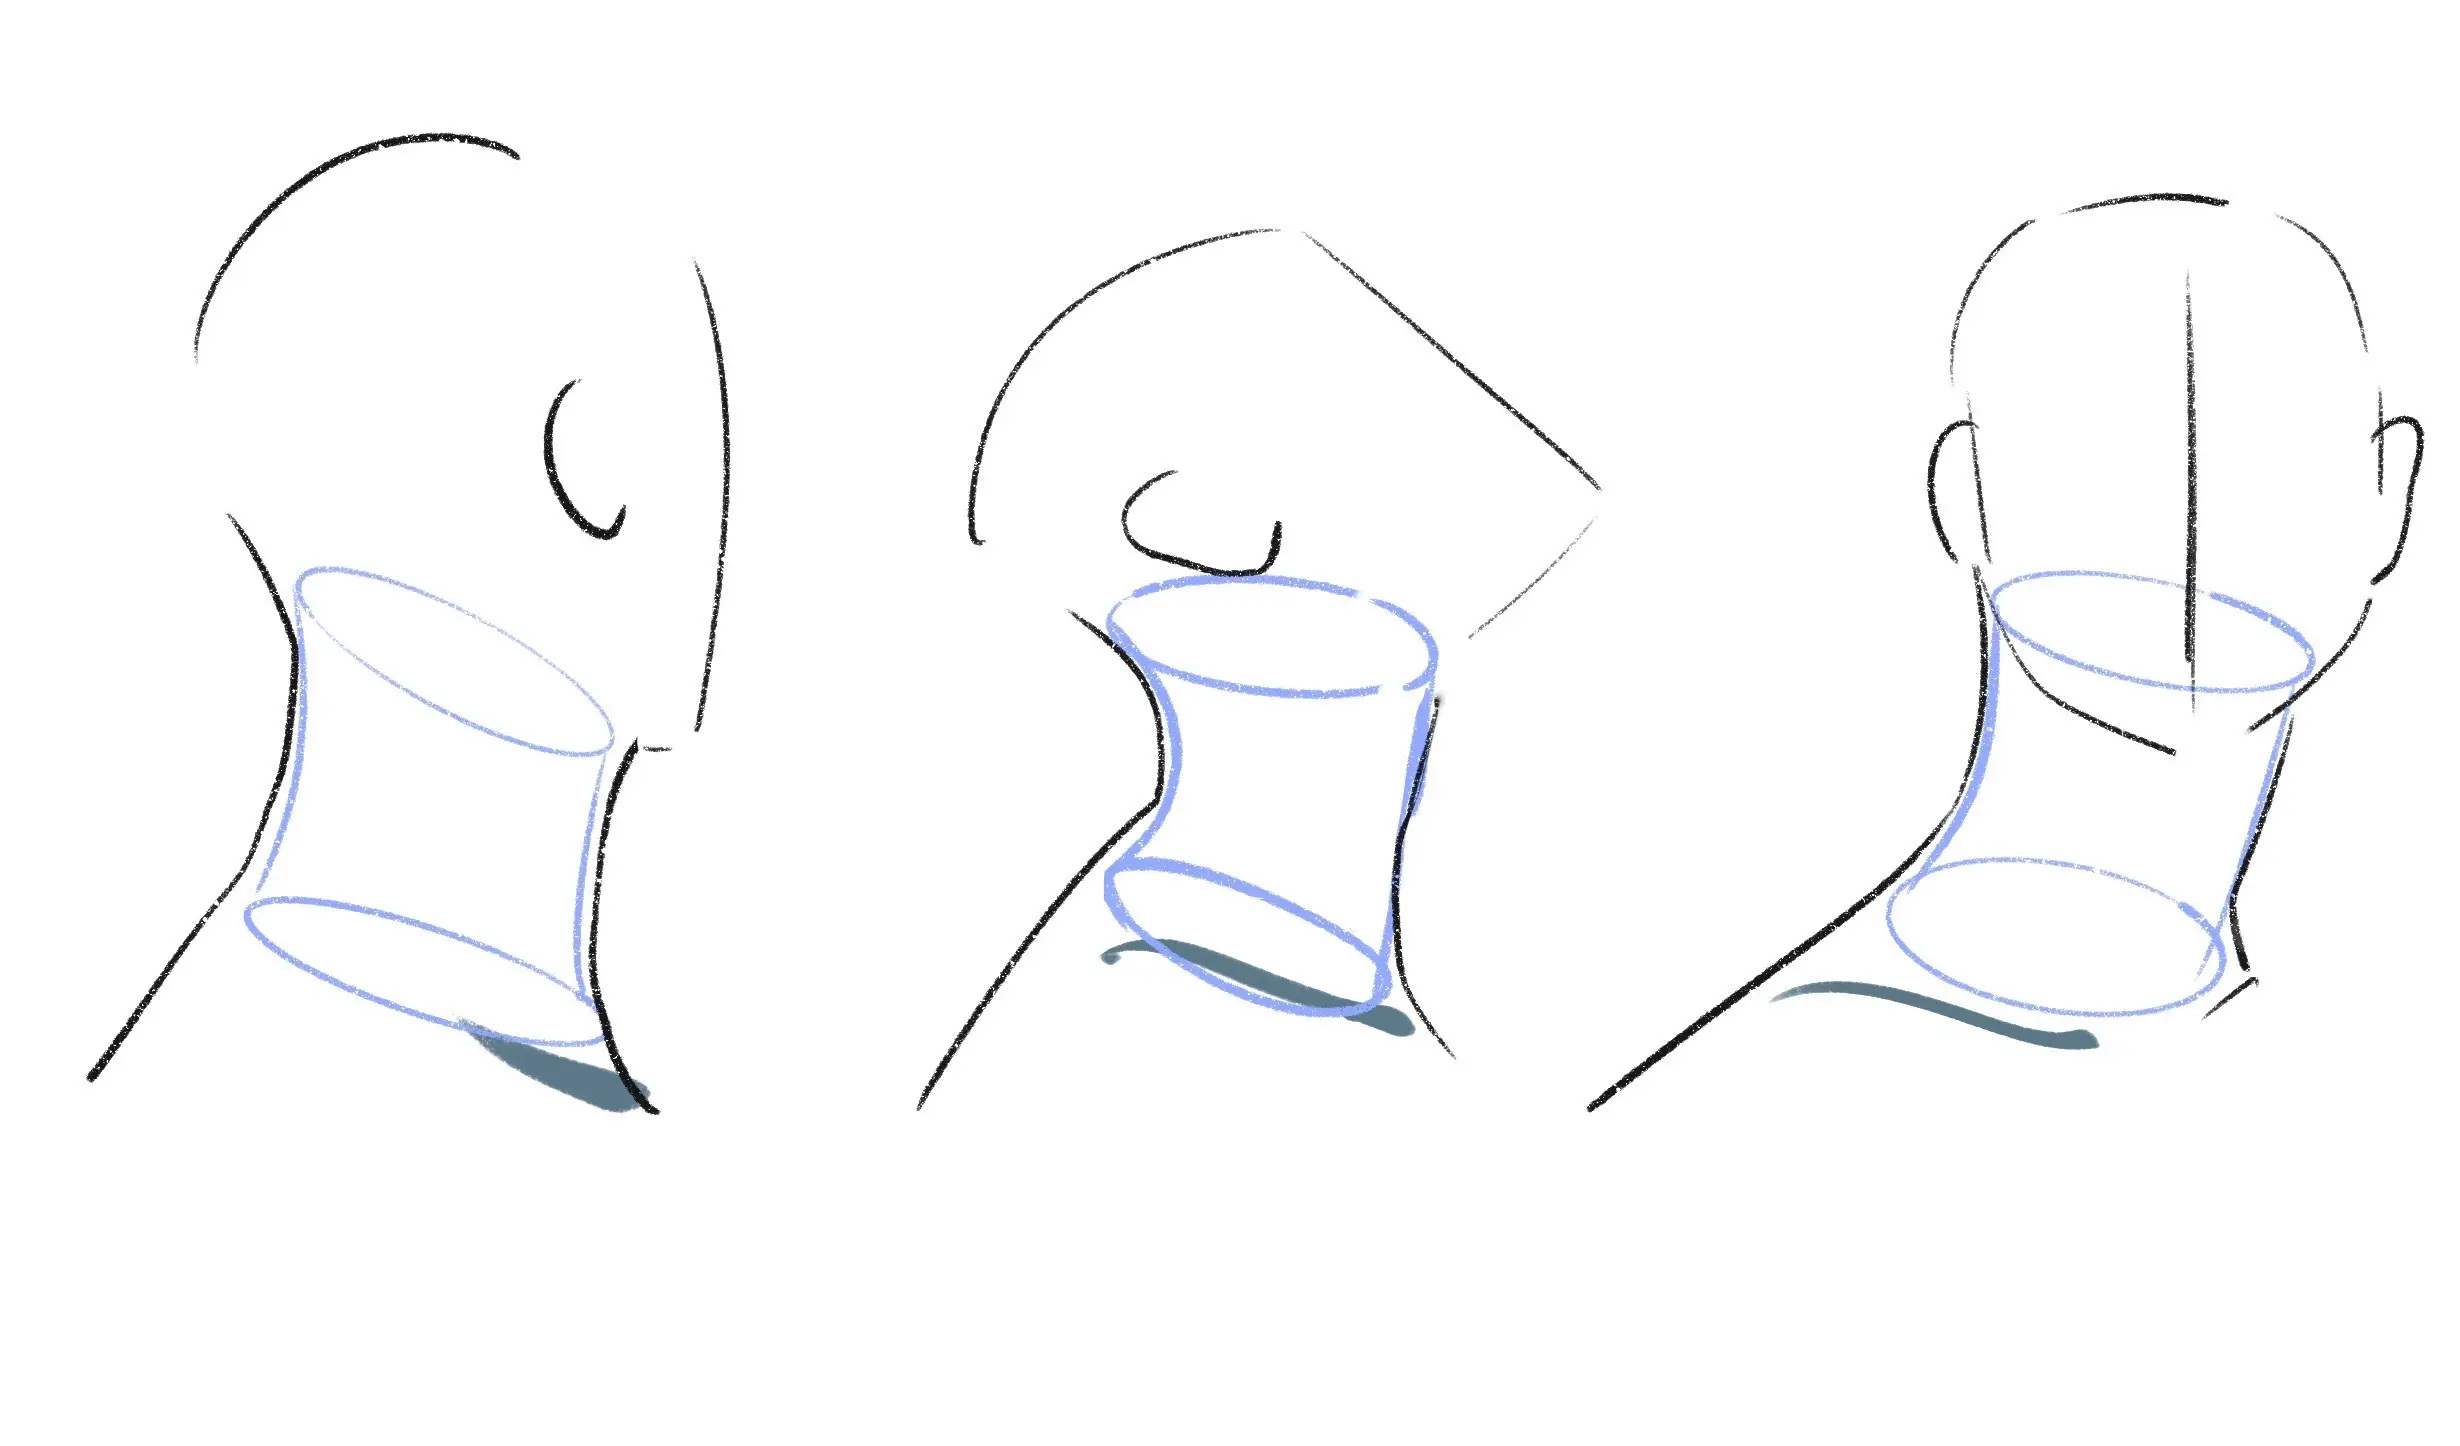
1 / The basis of the drawing is a cylindrical shape. Depending on the person, the size of the neck will vary. Adults have a much longer neck than children.
2/ At the bottom of this cylinder, I imagine the collarbones, and at the top, the skull. As seen in the side view of the cervical spine further up in the tutorial, the neck is not completely straight but can be simplified by a slightly misaligned cylinder for this side view.
3/ This cylinder is longer at the back than at the front; our reference point for the upper part of the cylinder, on the right, is the hyoid bone.
4/ I position the two main muscles: the trapezius in pink and the sternocleidomastoid in blue. The trapezius muscles curve slightly at the bottom of my cylinder, and the muscles meet at the top behind the ear. The ears can be taken as another point of reference. We imagine them placed just a bit above and on the left side of the cylinder.
5/ Having placed the muscles, I draw the hollow at the base of the skull, the thickness of the trapezius in the back, the skin connecting the chin to the hyoid bone, then, below, the Adam's apple and finally the line of the hollow of the neck between the collarbones.
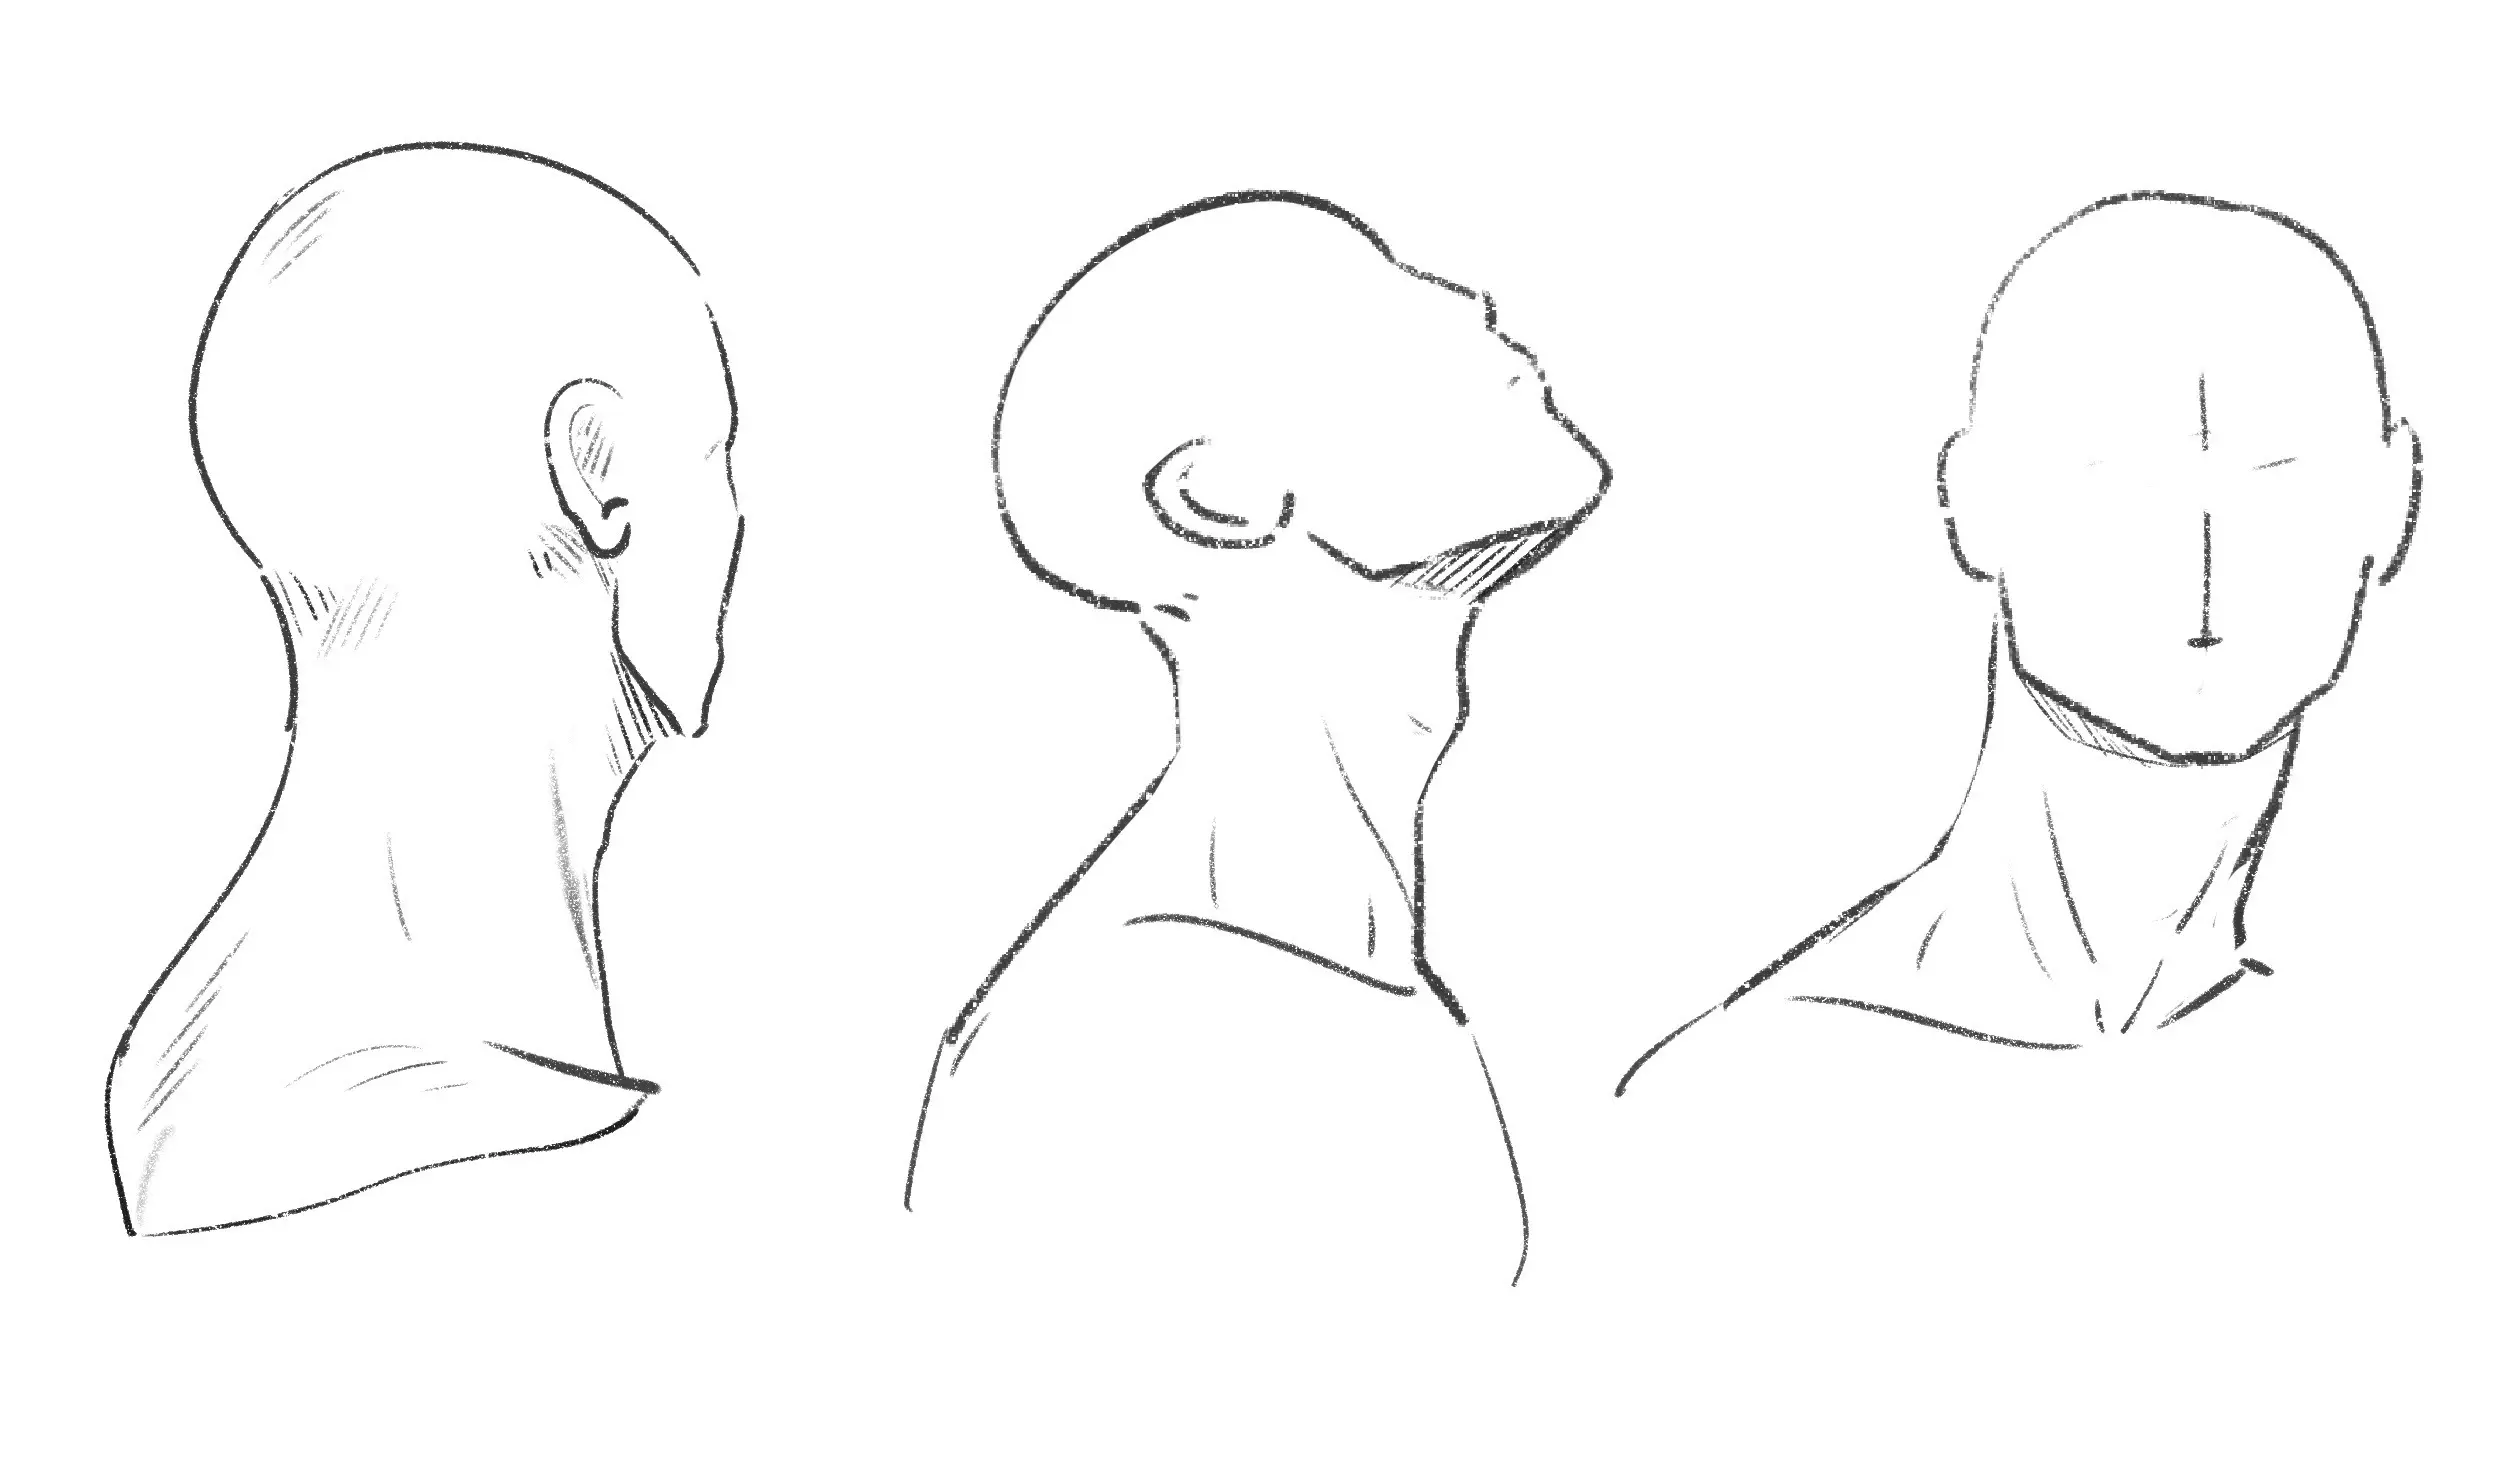
6/ I finish the shape of the character's face.
7/ I can erase the construction lines of the muscles, and simply draw the neck muscles with fine lines where they are most prominent. To place the shadows, it is necessary to consider the angle of the incoming light.
Generally speaking, if the brightness is not excessive, the strongest shadow will be under the jaws, otherwise very soft shadows are preferred for the neck, as the more muscles are marked, the more it will mean that the person is thin, with hollow features, or very muscular according to the rest of the design.
DRAWING A FRONT VIEW NECK
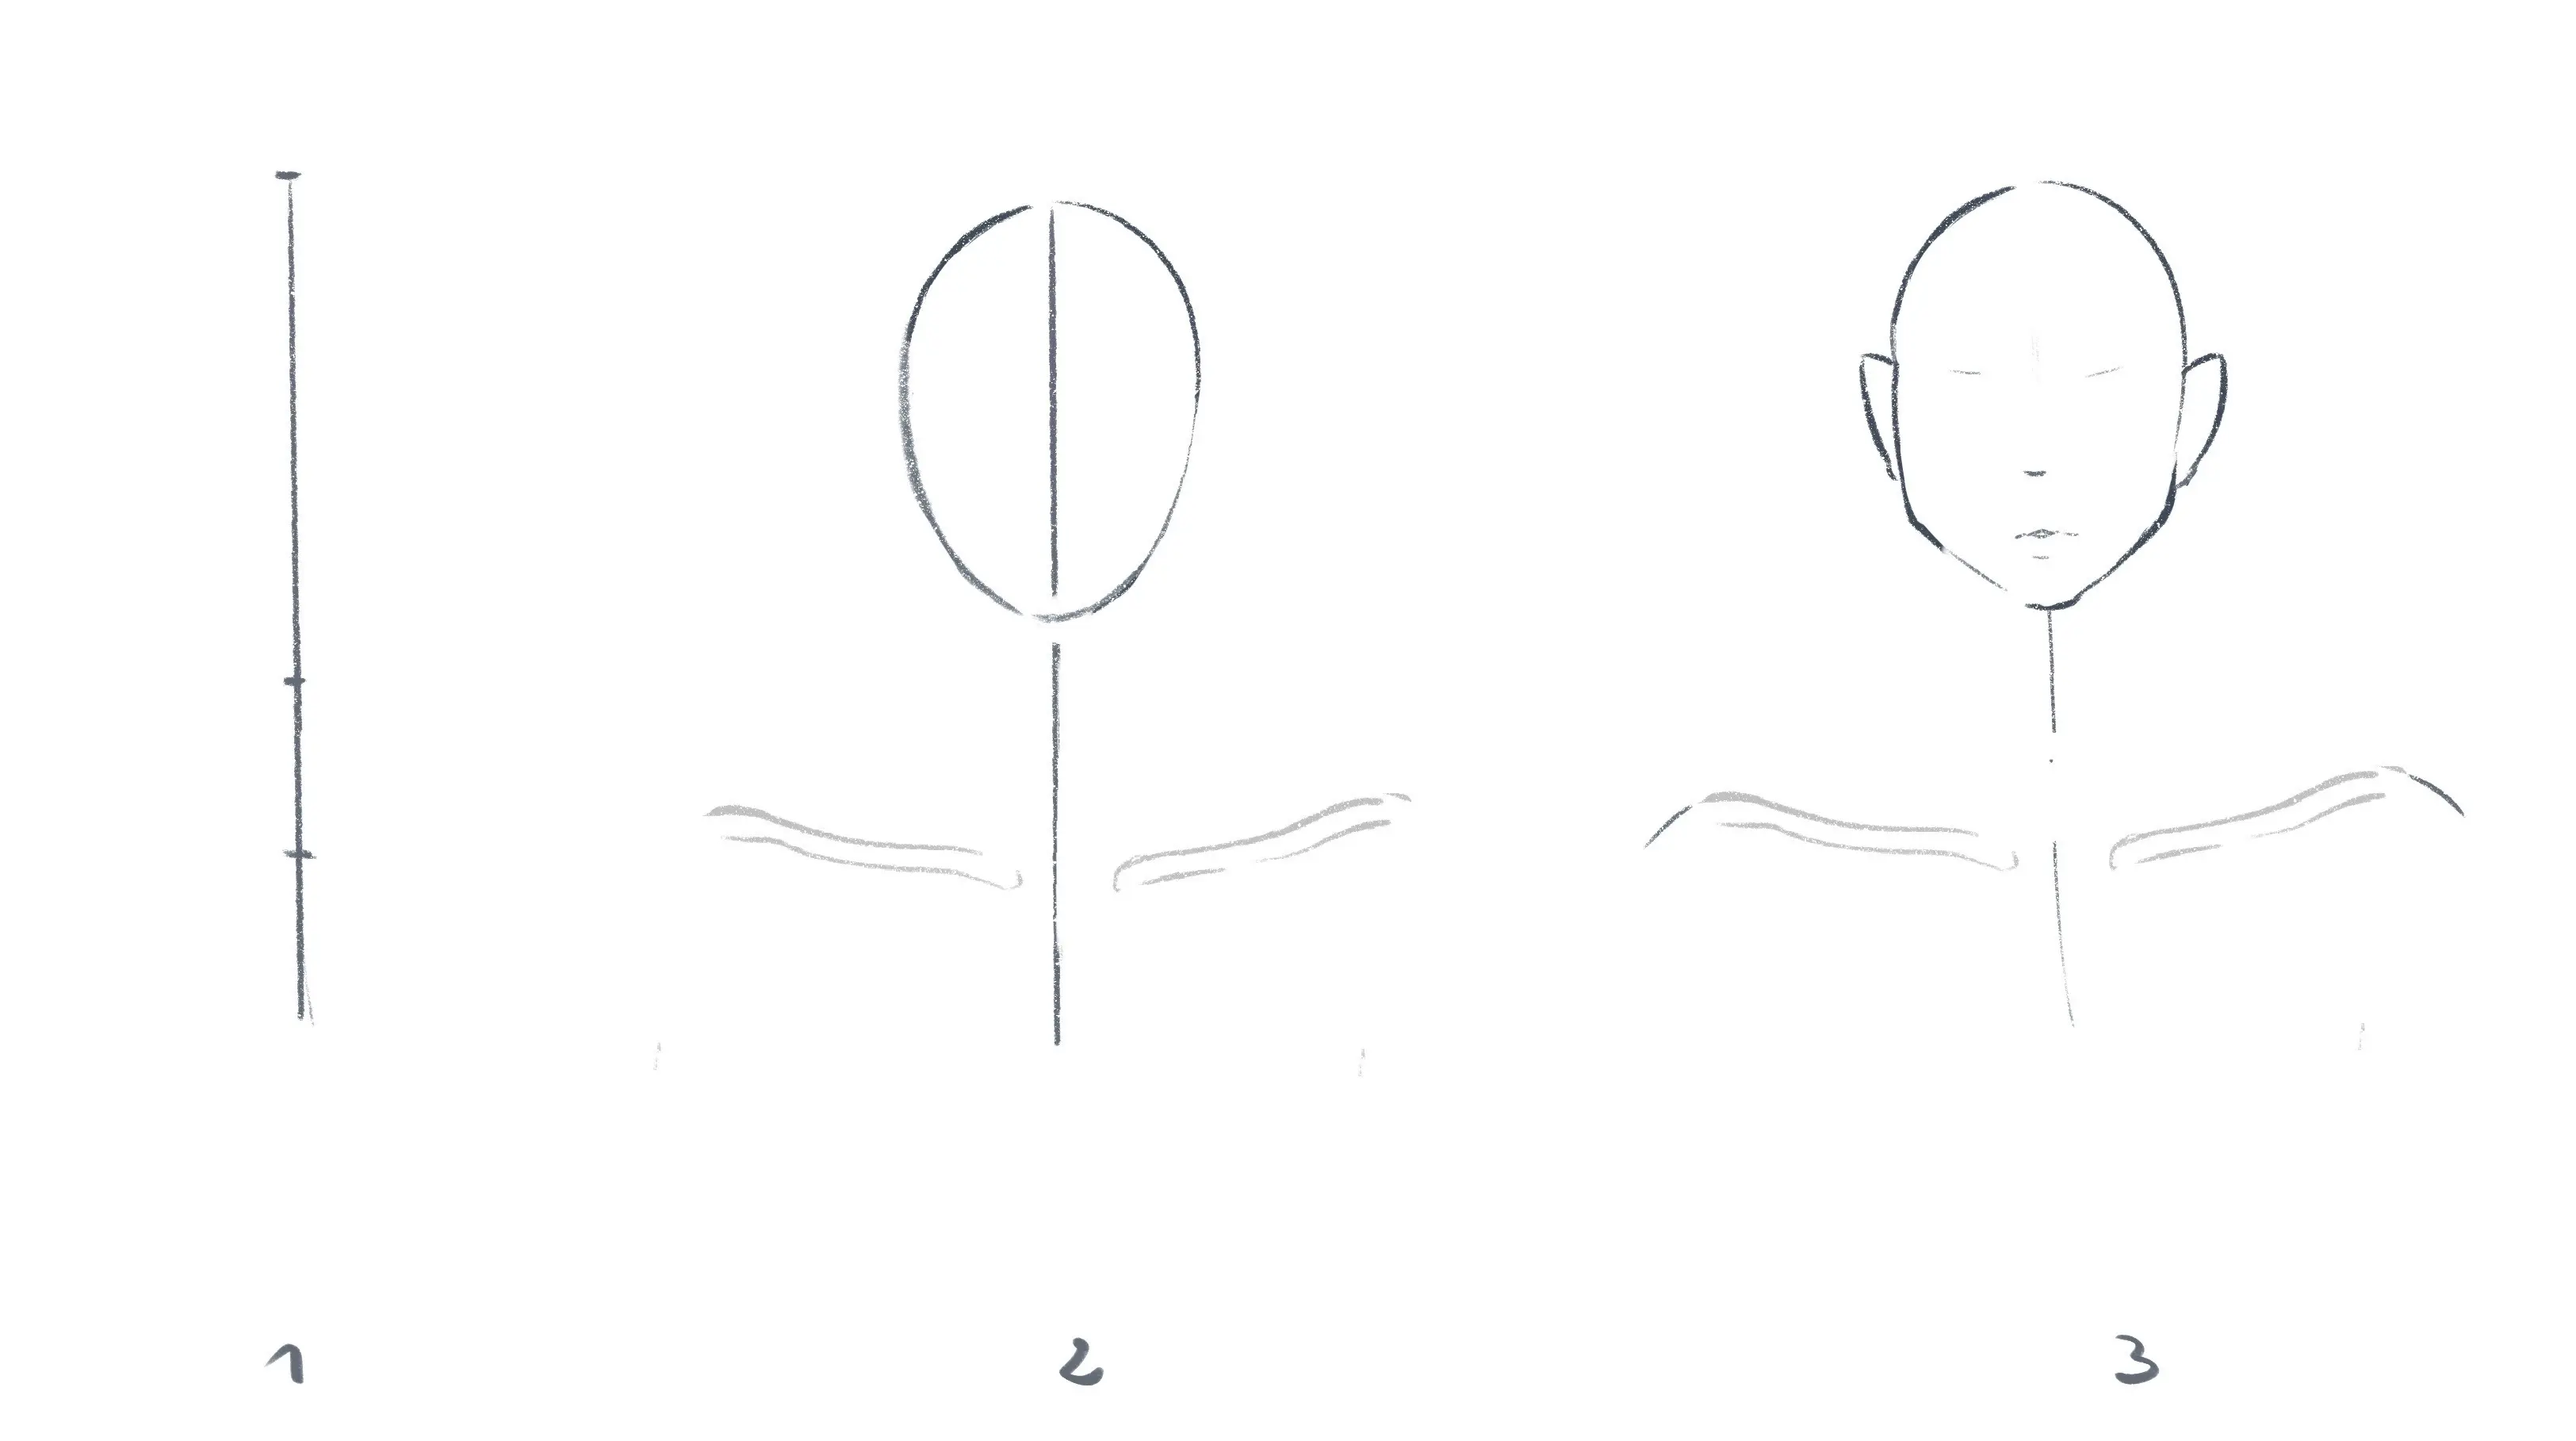
1/ I draw the vertical axis of my character.
2/ I position the head and draw the clavicles. The space between the two defines the size of the neck, which must be less than the height of the face.
3/ I detail the facial features, then the ears which are my reference point.
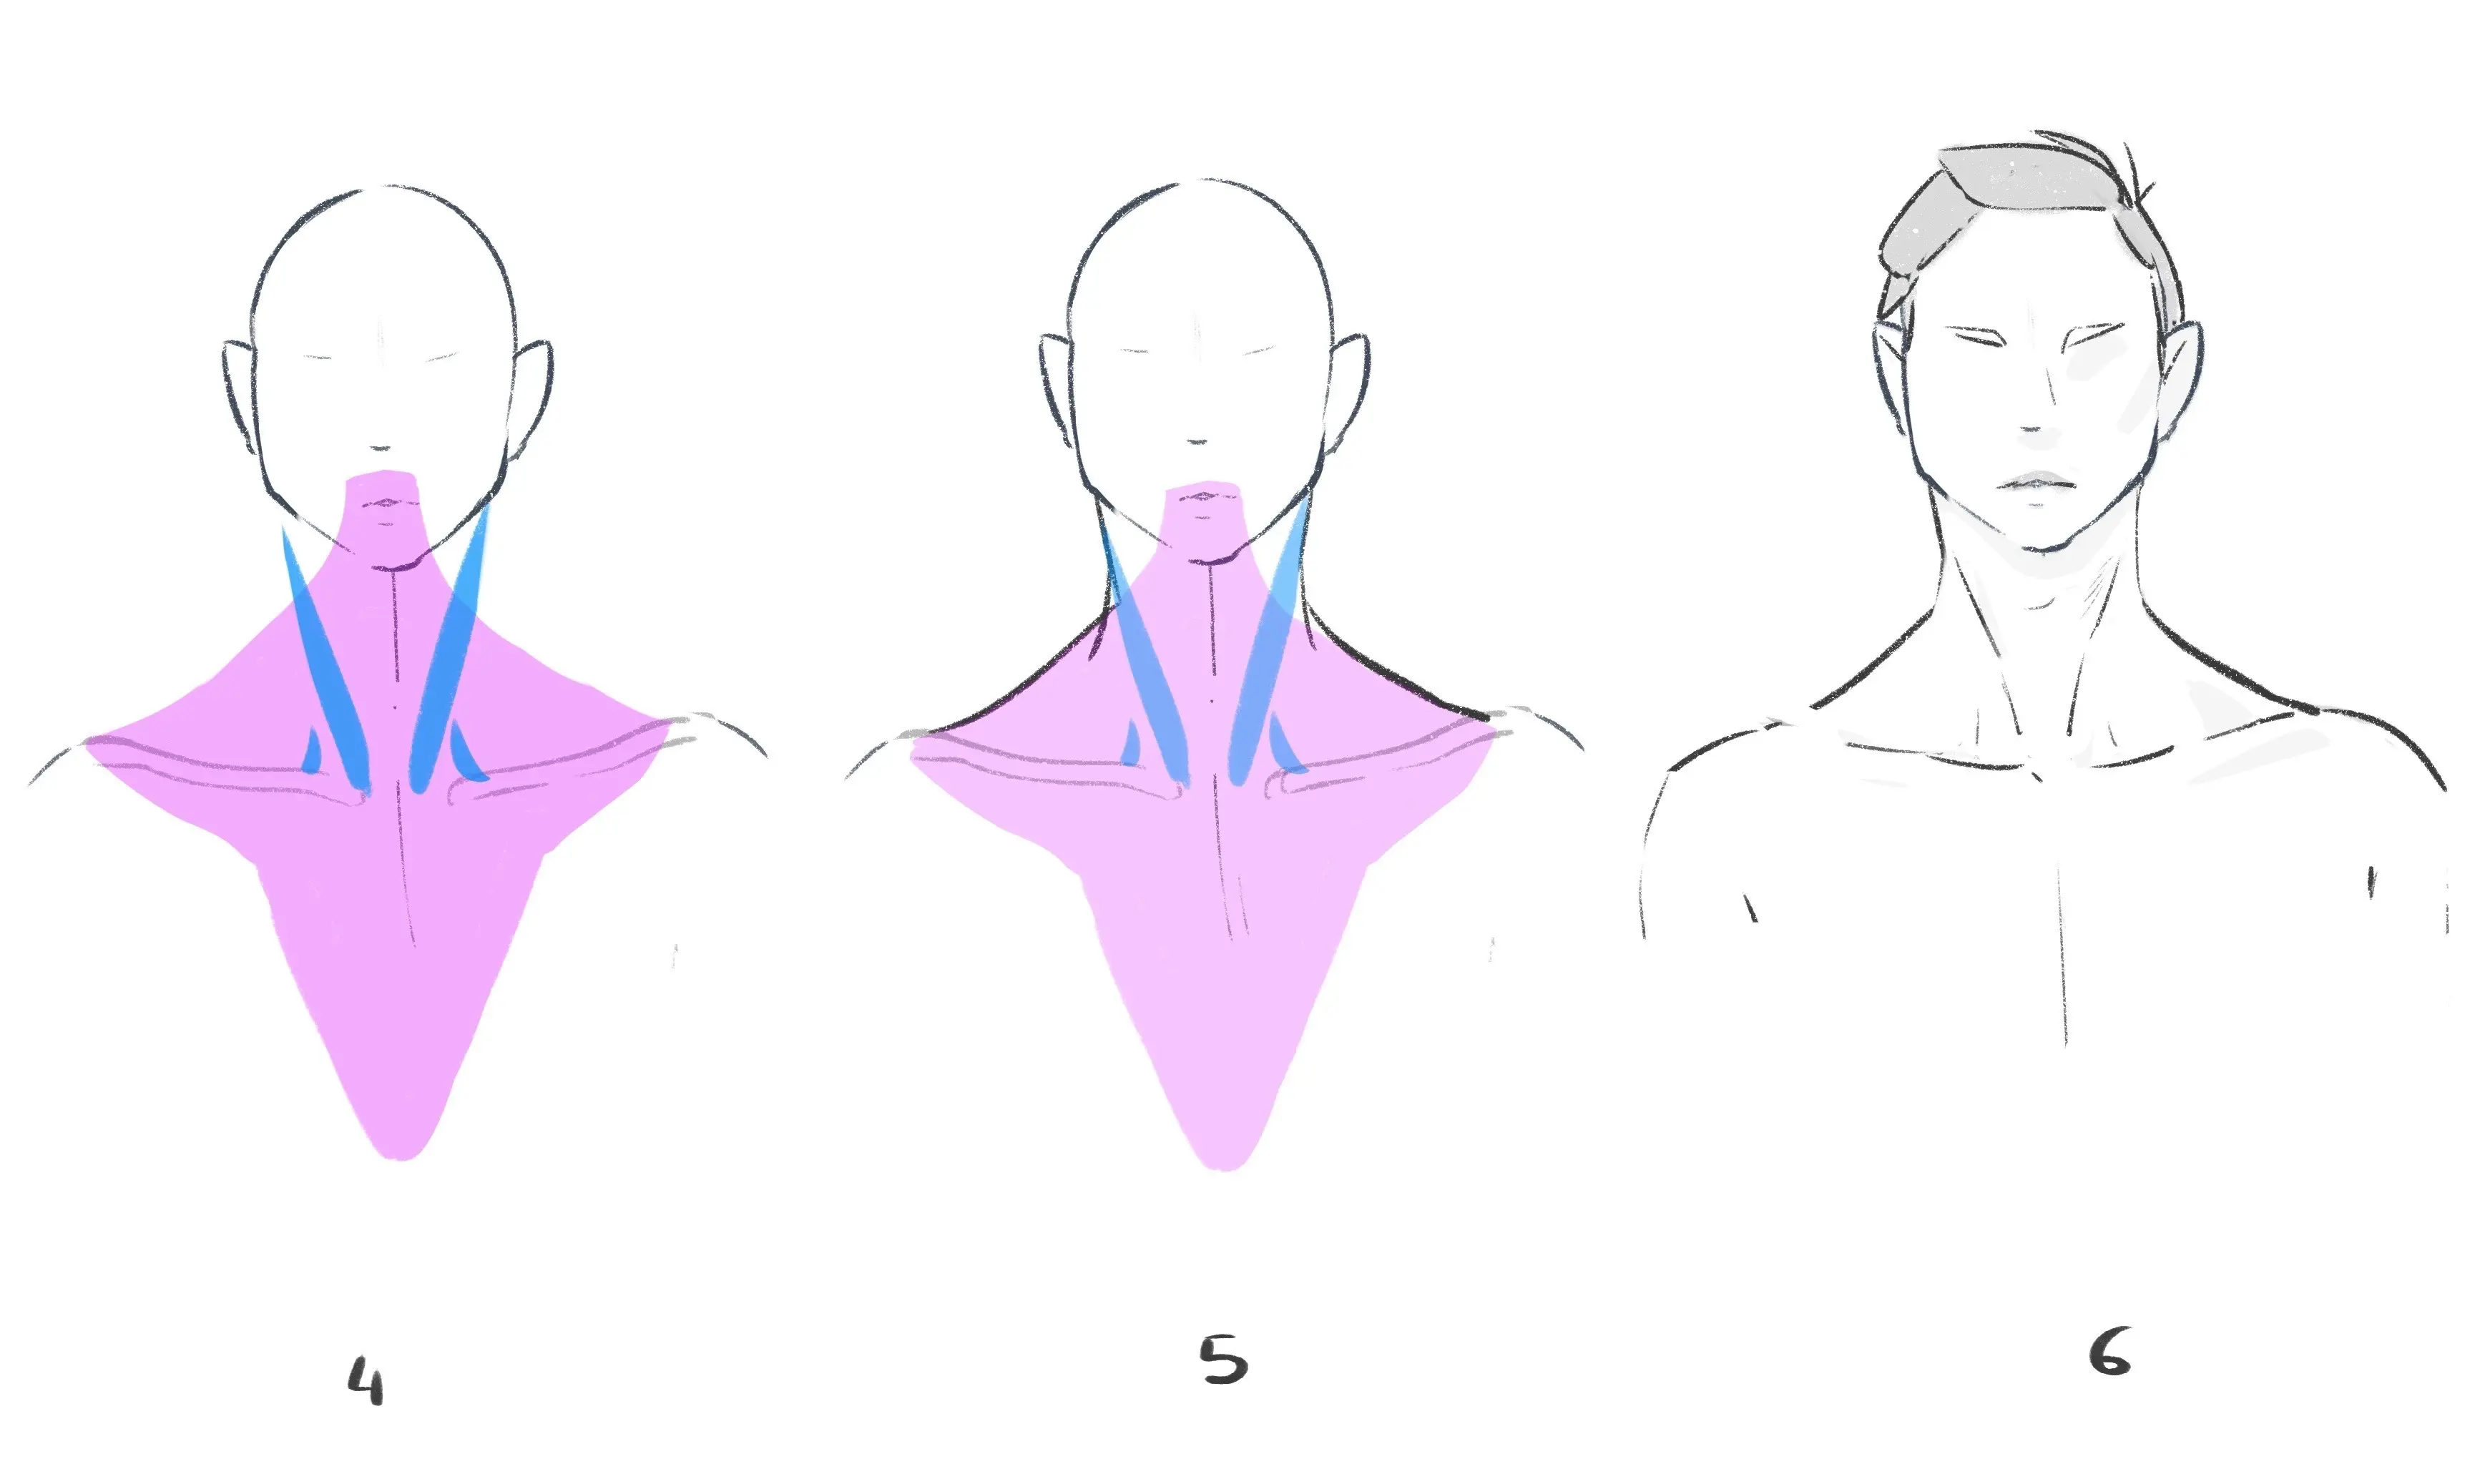
4/ I draw the masses of the two main muscles of the neck. The trapezius muscles help define the final silhouette of the neck. For a man, the neck is generally proportioned in this way: wider and the muscles a little more pronounced. If you are drawing a woman, draw more curved lines with rounder trapeziums and make the width of the neck narrower.
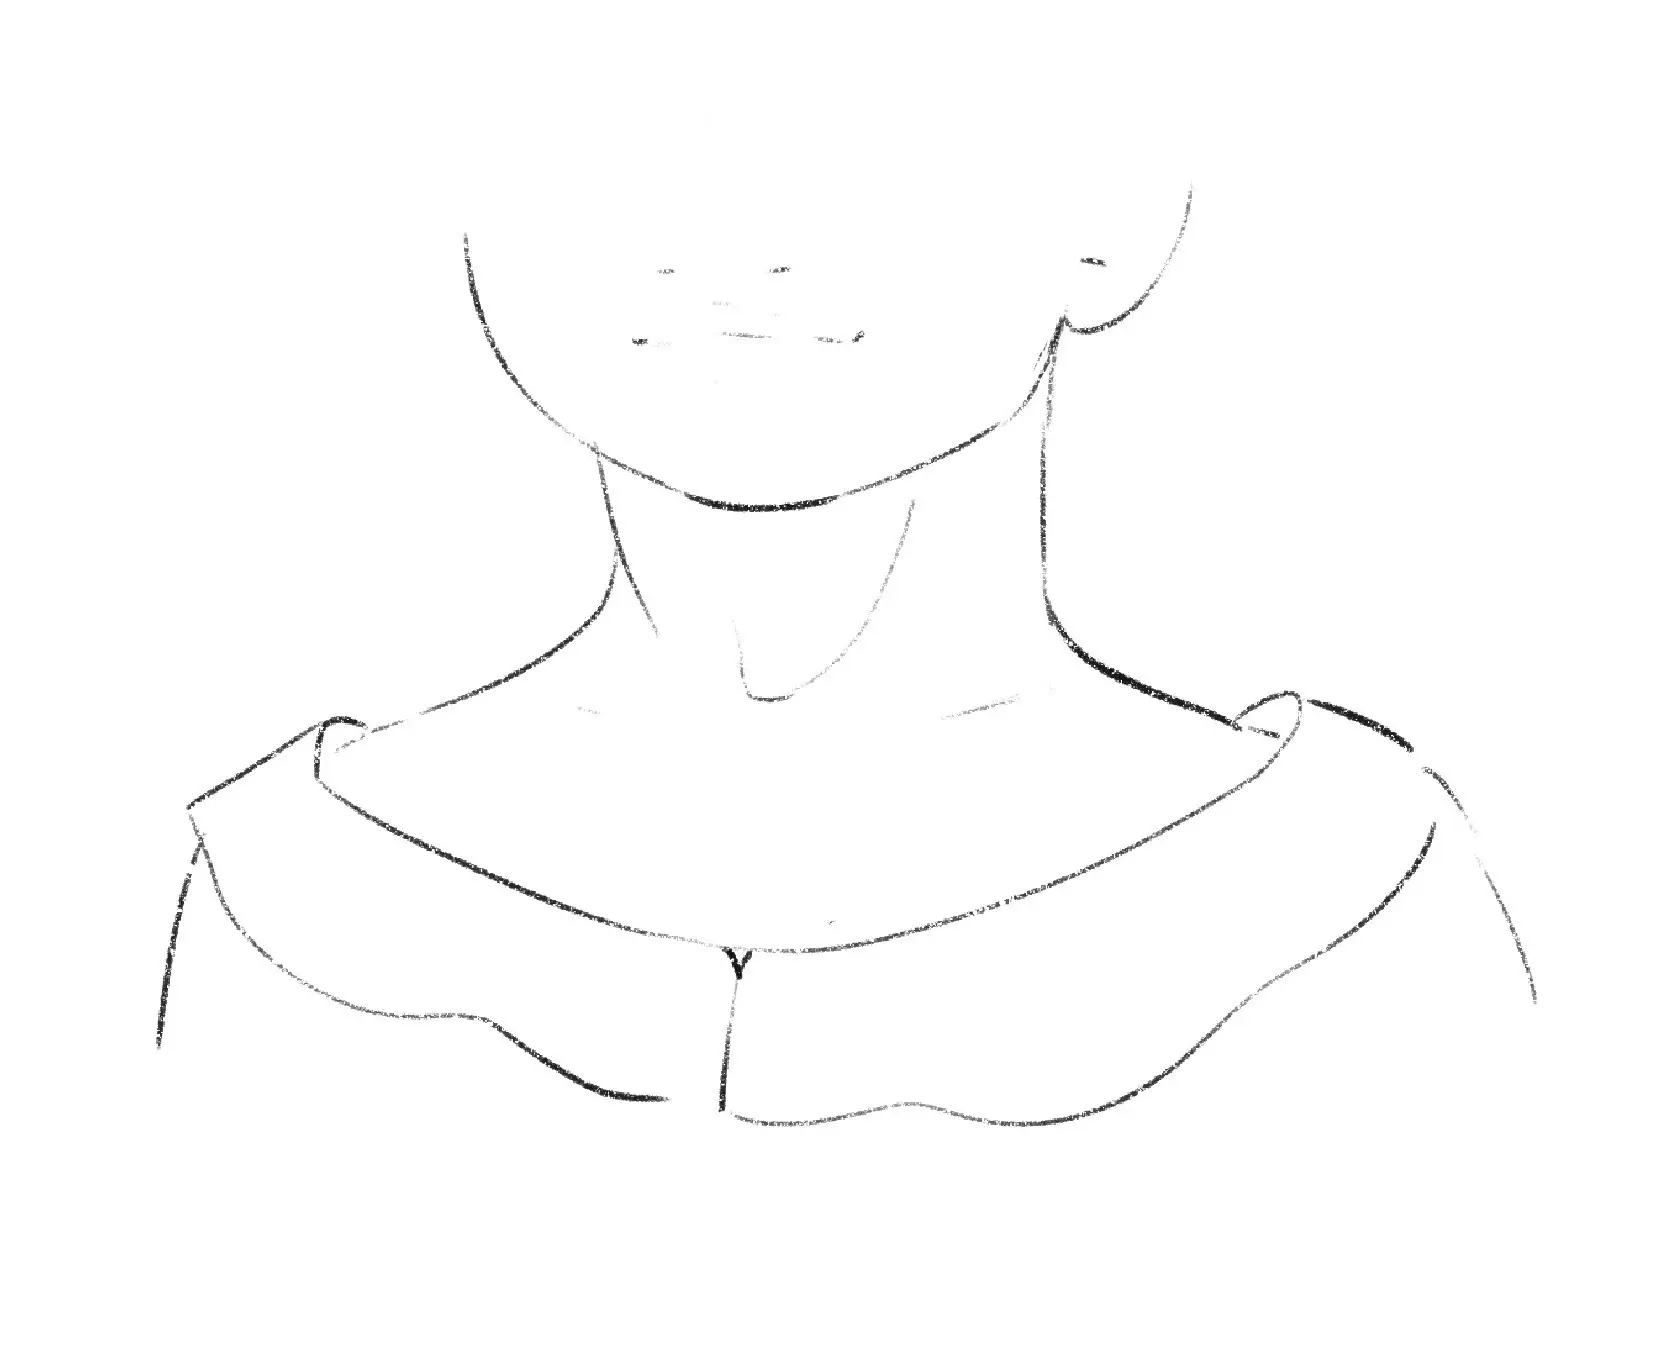
5/ Thanks to the muscles I've placed, I can draw the outline of the neck.
6/ I erase the colours and following the sternocleidomastoids, I trace the lines of the muscles. To finish, with a small stroke, I suggest the Adam's apple.
DRAWING A NECK IN MOTION
I choose to illustrate different positions by placing the skull, ears, and collarbones.
Then, I simplify the neck cylinder with a flared cylindrical volume at the top and bottom, taking the proportions into account.
From left to right, I represent:
- a character from a ¾ back view;
- side profile and looking up;
- with the bust in ¾ view and the face front view.
The attitude of the main muscles can be studied:

When I place my main muscles with coloured masses, I remind myself that:
- the blue ones go from behind the ears to the inner center of the collarbones;
- the rose ones go from the base of the skull to the outer edges of the clavicles and curl forward, they are not only visible from the back.
With these markers, I can draw the lines of the muscles. If the character is male, in the second position the Adam's apple will be even more visible because the neck is stretched.
When the neck is rotated or stretched (as in drawings 2 and 3), the sternocleidomastoid muscles show more pronounced lines. For the trapezius muscles, however, simple hatching or shadows indicate their prominence.
The same goes for the more subtle contours of the neck, it is better to draw soft shadows than to draw too many lines.
THE FEMALE AND MALE NECK
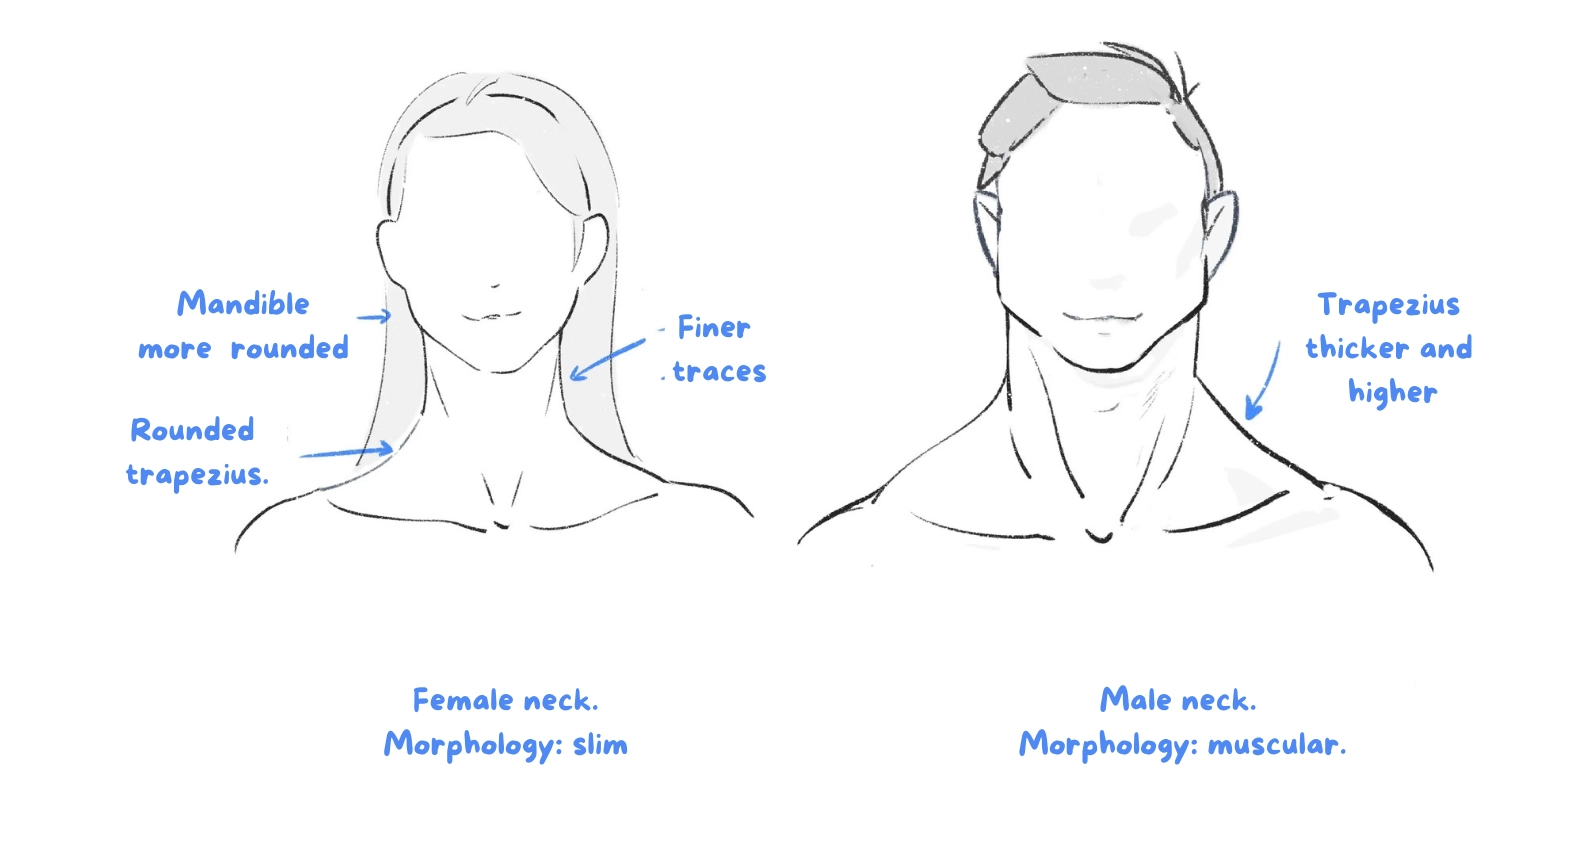
To draw a woman's neck, the same rules as defined above apply, but attention must be paid to the thickness and shape of the trapezius muscles, depending on the character's morphology.
The thinner the drawn character, the more visible the structure of the larynx at the center of the neck will be, and the lines at the base of the clavicles will be more pronounced.
In men, the Adam's apple and larynx are more visible than in women. Their trapezius muscles are generally wider and thicker.
The more muscular a character is, the more pronounced their muscles appear. Taking the example of bodybuilders: the trapezius and sternocleidomastoid muscles are hypertrophied and swollen, they have rounded shapes, and the neck then appears shorter, because it is covered with thick muscles.
To design characters, we'll emphasize these points: a very thin and longer neck for a slender character, a thick and short neck for a stocky or chunky character.
For a corpulent person, the muscles of the neck and clavicles are not defined at all and the neck can be simplified into a slight flared cylinder (slightly indicating the larynx). More volume can be added under the jaws, as this is where fat tends to accumulate most easily. The neck may also appear somewhat shorter because the volume of fat is greater around the shoulders, neck and face.
CHILDREN'S NECK DRAWING
In younger individuals, the neck is much shorter.
The smaller the child, the less visible their neck will be, as it's hidden by the head and less developed.
Babies have a barely visible and very, very short neck.
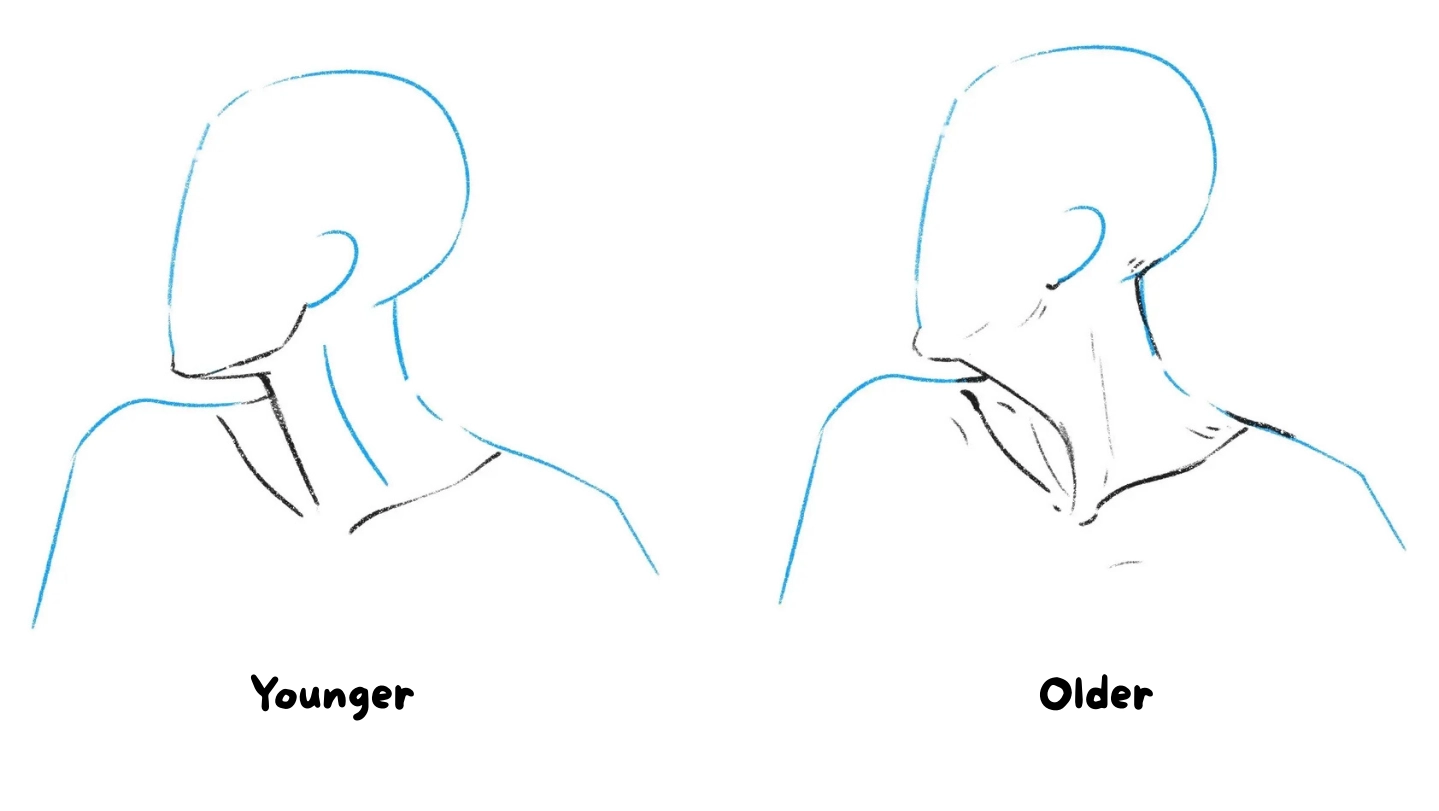
THE NECK OF OLDER PEOPLE

Based on the same silhouette and position, I compare the neck of a young person to the neck of an elderly person. The skin of the neck sags with age due to its lack of tone and the effect of gravity.
The skin hanging from the hyoid bone droops, but the chin is always marked.
The jawline is less defined because the skin has less elasticity, and wrinkles appear there.
You can draw the line of the sternocleidomastoid muscles with small dashes to indicate the irregularity of the skin and to draw wrinkles. From the front, a hollow forms between the two lines of these muscles and there appears to be an excess of skin that creates streaks.
The collarbones are prominent and the skin around seems more hollowed out.
Thank you for following this tutorial!
Discussion
No comments yet.