How to Draw a Skull
As the title of this article indicates, today we're going to learn how to draw a skull, specifically a human skull. We will focus solely on this part, without connecting it to the rest of the skeleton, and without considering its place and graphical variations in different cultures.
The skull is the support structure of the face and largely defines its shape. Nevertheless, observing a face also teaches us about the skull that frames it. I won't go into detail here about the structure of the face and, if you haven't already, I encourage you to watch the free course "Infallible Rules for Successful Faces", especially chapter 2 "the shape of the face" on the website:
https://www.dessindigo.com/drawing-courses/drawing-basics/characters-face
What we must retain here is that the face (by that I mean the eyes, the nose, the mouth, etc.) is located on a plane in front of the skull. Obviously, there are variations in depth on this plane, with the nose being more forward and the eyes set back, but all of this is situated in an area in front of the skull.
Let's start by observing a skull in context.
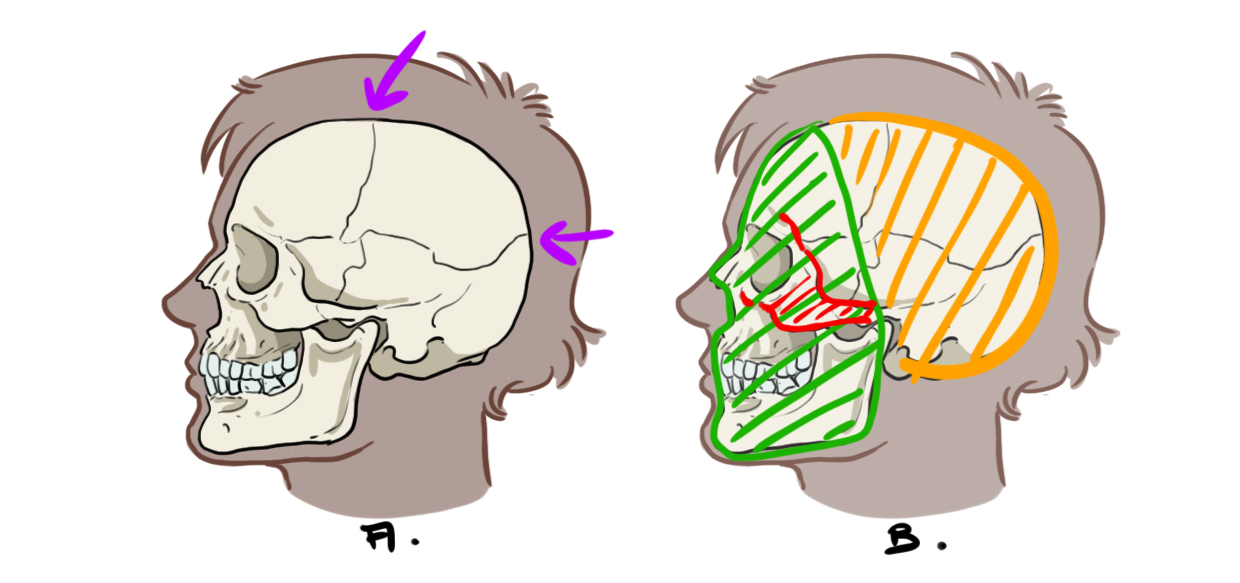
Drawing A:
Here is an initial observation highlighted by the purple arrows: the skull is not made up of a single bone. Although discreet, there are lines at the junction of the segments. To put it simply, you find a vertical line at the level of the temples and a horizontal line that starts behind the eye socket.
Drawing B:
Here we see the idea that the face is on a plane (in green) in front of the skull (in orange). You can also observe that the cranial box is not exactly round, it's somewhat elongated and slightly sloping backwards.
Another element: in red, I indicate a bone that will be very important for the structure of the skull, it encompasses the orbits and protrudes on the sides (on your face, this will be the bone under your eyes, at the top of your cheeks).
STUDY OF THE HUMAN SKULL STRUCTURE FOR DRAWING
Now let's look at a skull from different views, in ¾ back, profile, ¾ front, and front.
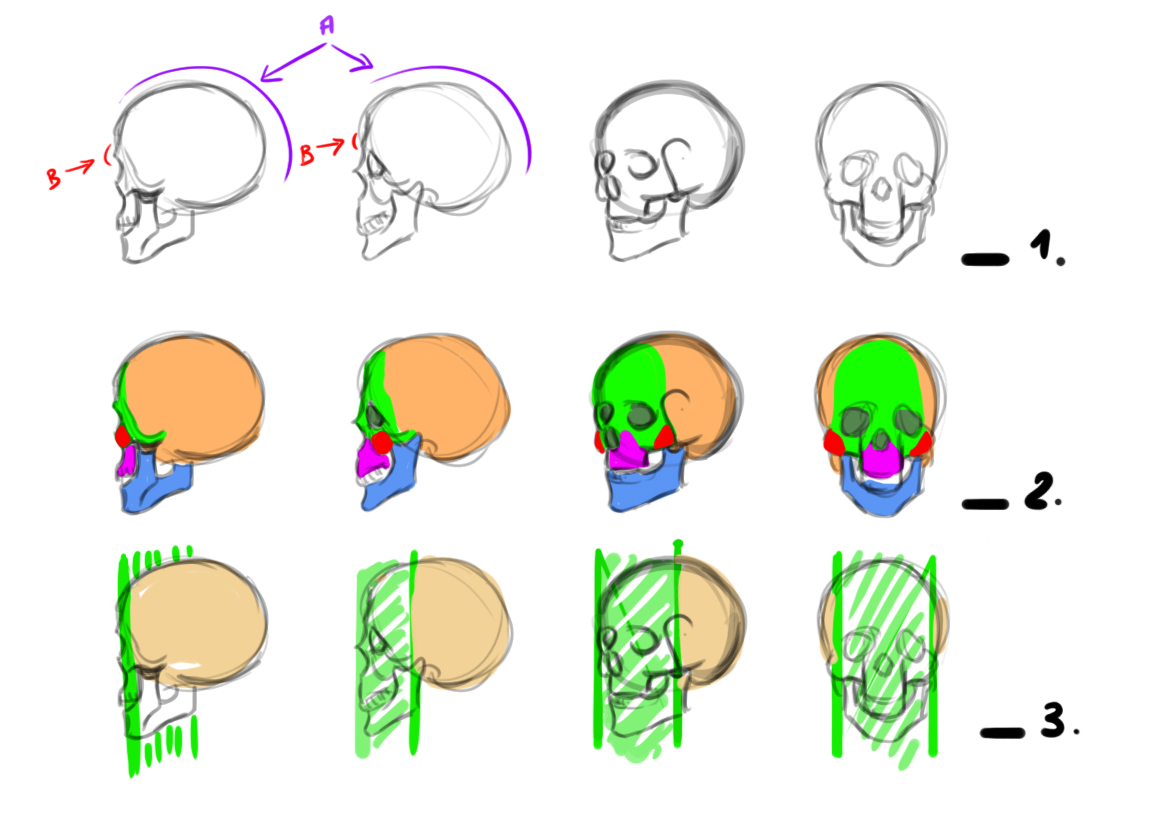
On line [1] I just sketched the skull quickly. You can see (arrow A) that the cranial vault is not perfectly round, it is a bit "flattened". In B you can observe the "bump" of the brow ridge, do not make it too pronounced or it will make your skull look too Paleolithic.
On line [2] I colored the main areas to make them stand out better:
In orange you have the cranial box,
In green, the upper area of the face: forehead and eye sockets, with the angle of the zygomatic bone in red (which you can feel at the top of your cheeks). It is this zygomatic bone that defines the general width of a face.
In pink the area where the upper jaw teeth are implanted. Notice how this area is located beneath the arches but not across the entire width of the skull.
In blue, the lower jaw connected to the skull by a "V"-shaped fork.
On line [3] I am just positioning the face plan in relation to the sphere of the cranial box.
SKULL DRAWING IN PROFILE, FRONT AND 3/4 VIEW
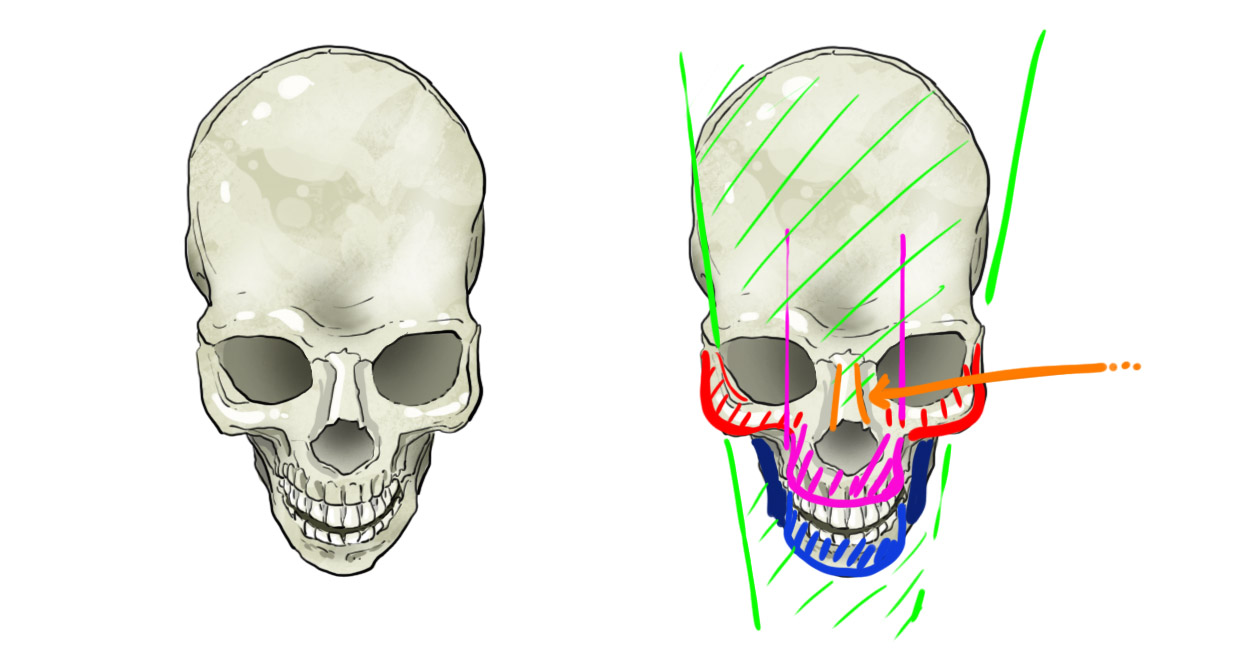
Let's do an analysis on some more detailed drawings.
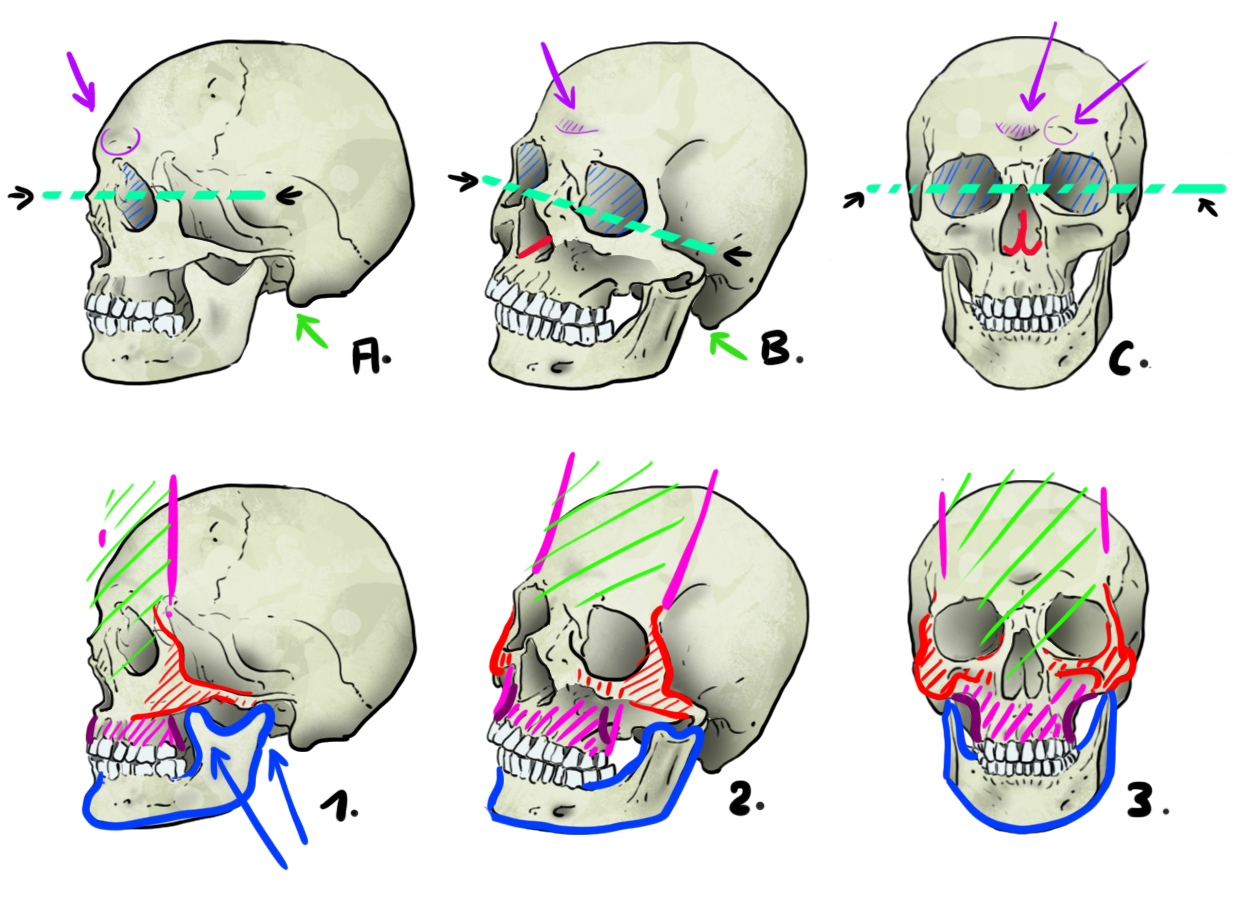
This time we have three views, profile, three-quarter front and frontal. Note in A, B, and C that the top of the nasal cavity is positioned at the bottom of the orbital cavity (turquoise hatched line). The nasal cavity has a relatively simple triangular shape. The purple arrows indicate the small volume of the eyebrows. Very importantly, in C note the shape of the eye sockets. We are not dealing with round holes, but rather with rectangles with rounded corners that slightly droop on the outer edges of the skull.
The green arrow points to the bottom of the skull which tends to not be a smooth curve. In red, we see the inner edge of the nose.
In drawings 1, 2, and 3, I revisit the main front volumes. In green hatching between the two pink lines, the frontal plane, it is noticeable that the edge of the nose is prominent. In red, the entire zygomatic bone including the edges of the eye sockets that point to the sides. In pink hatching, the block with the upper teeth and in blue the lower jaw. The blue arrows in 1 highlight the "V" shape of the bone at the attachment.
TOP AND BOTTOM VIEW OF SKULL DRAWING
Let's have a quick look at two less usual viewpoints, from above and from below.
It should be noted that the structure of the skull underneath is quite complex. If you choose this viewpoint and wish to create a realistic drawing, I strongly advise you to study this area in detail.
In orange, it is noted that the block of the upper jaw is well rounded and "forward". The pink arrows indicate the angle of the zygomatic bone.
For the top view, we find (blue arrows) the lines of junctions of the skull plates and we also note that the cranial box is not exactly round.
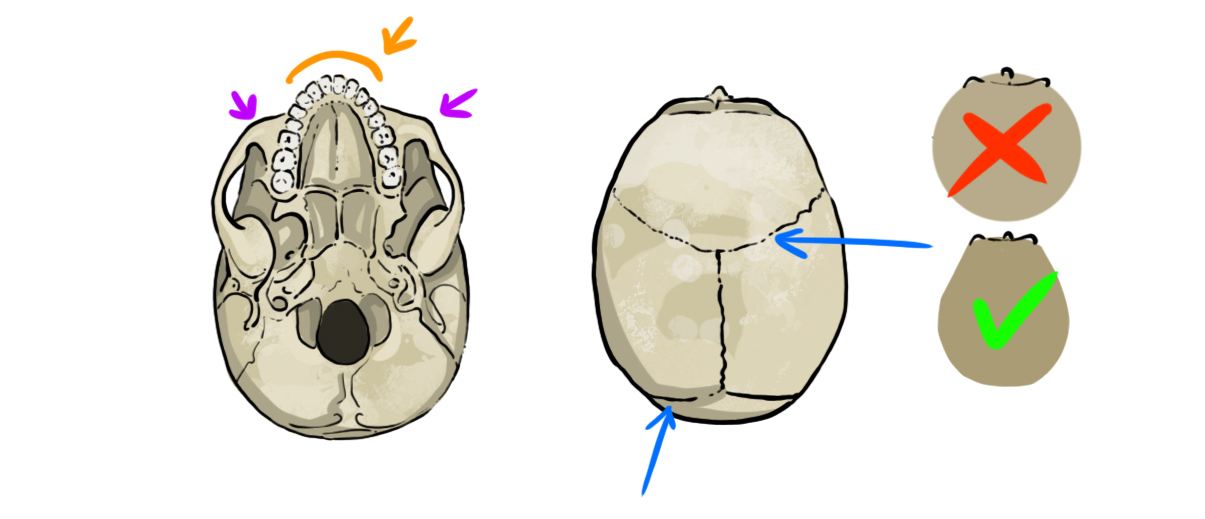
To conclude another slightly complicated perspective, a bird's-eye view. Here we see the plane (in green) of the face and the angular shape of the zygomatic bone (in red). In pink and blue respectively we see the upper and lower jaws. In orange, this perspective clearly shows the projection of the nose bridge.
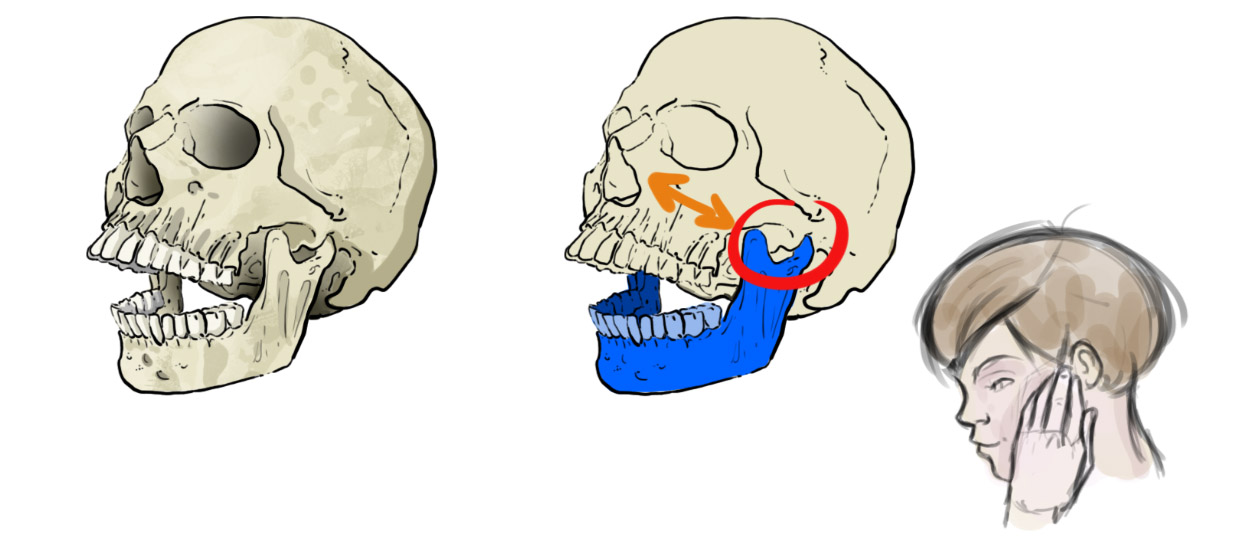
THE MOVEMENT OF THE SKULL'S JAW
So what can be handy is that you have a personal model of a human skull at home, and you can test the mobility of the lower jaw compared to the rest of the structure by yourself. No really, it's useful...
Jokes aside, you just need to realize that the axis of rotation of the lower jaw is actually quite high, at the level of the nostrils. If you place your hand on the edge of your cheek, in front of the ear, you can feel the rotation point of the bone.
THE DRAWING STEP BY STEP
First, we will define our perspective. We are going to draw a skull from a frontal view but in a slight low-angle shot (thus seen a bit from below). The jaws will be open and all this will hold "as if by magic". I say this because this position would not be physically possible without metal fixings (or indeed magic).
In green, the plan of the face, distorted by the low-angle view. I'll quickly make a profile view for you to fully grasp the pose.
Let's start.
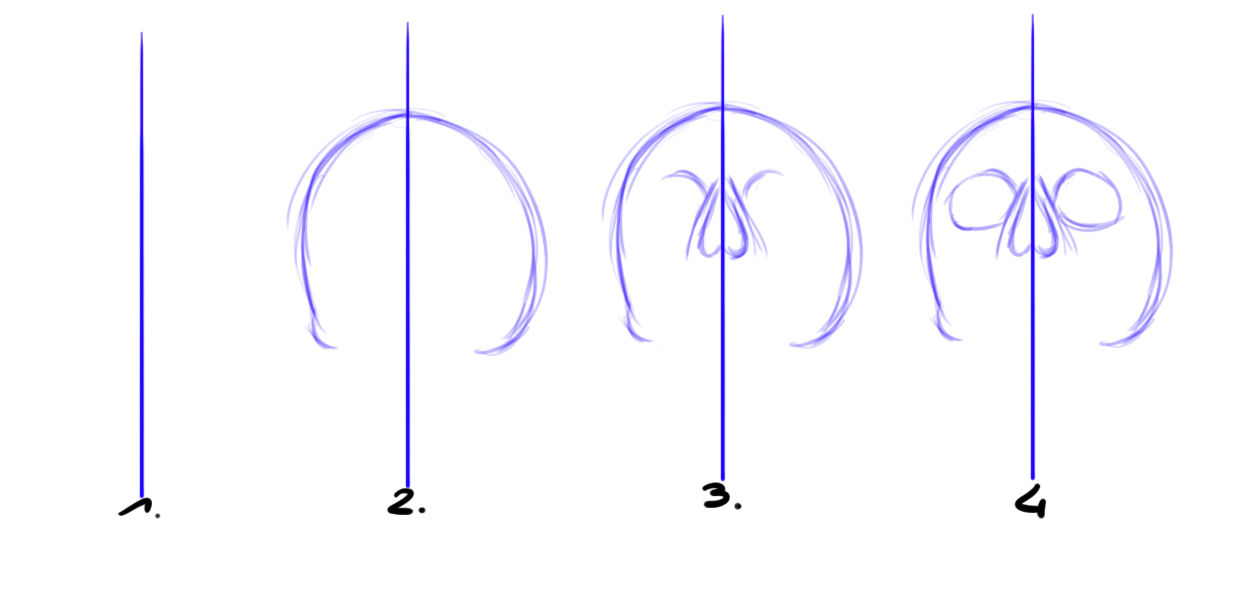
Step 1: Just like the face, the skull is built on symmetry. I place my axis for the center of my construction.
Step 2: I shape the skull avoiding too perfect a round.
Step 3: On my axis, I place the nose with its triangular shape. Given the point of view, the tip of the nose ends up quite high compared to the eye sockets.
Step 4: On either side I draw the eye sockets with their round/rectangle shape.
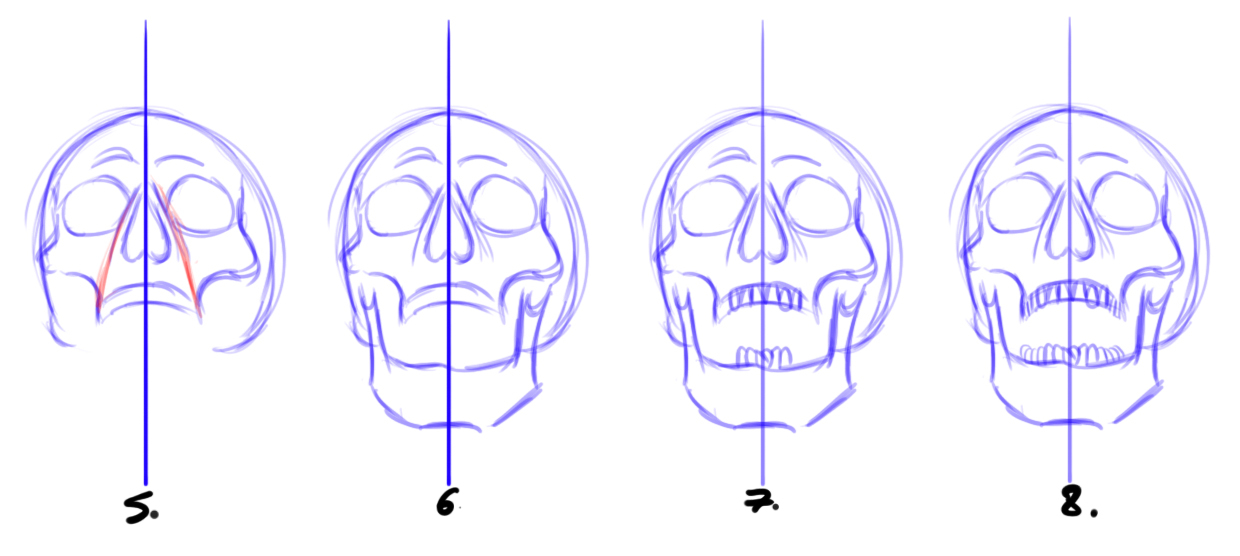
Stage 5: I draw the zygomatic bone which protrudes below the orbits and in continuity with the nose, I outline the upper jaw. I slightly mark the top of the orbits.
Step 6: I'm drawing the lower jaw. Note how the "V" shaped bone seems to float under the zygomatic bone, there are no muscles and flesh to connect all this...
Step 7: I place the first teeth, incisors and canines. Be careful not to make "fangs".
Stage 8: I draw the rest of the teeth.
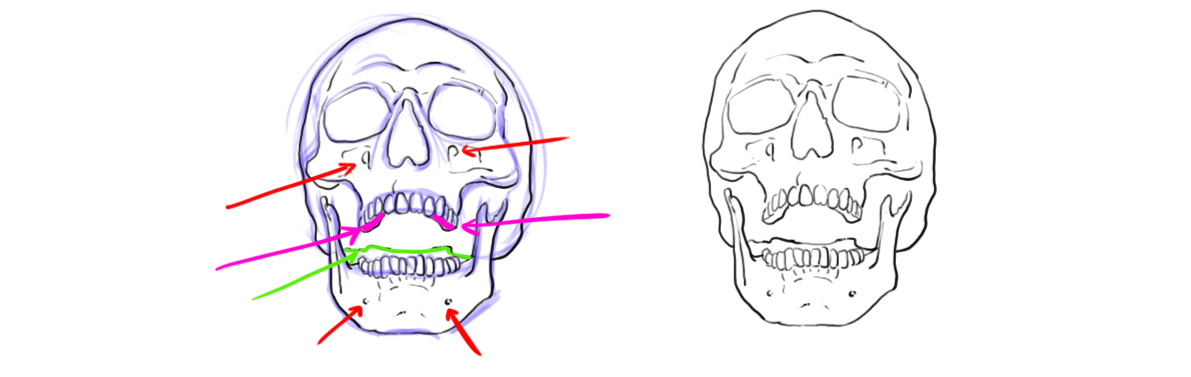
Now I redraw over my construction lines. I add some elements:
Red arrows: there is a quite pronounced "gap" at the level of the sinuses under the eyes, as well as smaller ones in the chin; in pink I draw the underside of the thick teeth (molars); in green I close the skull with an irregular curve.
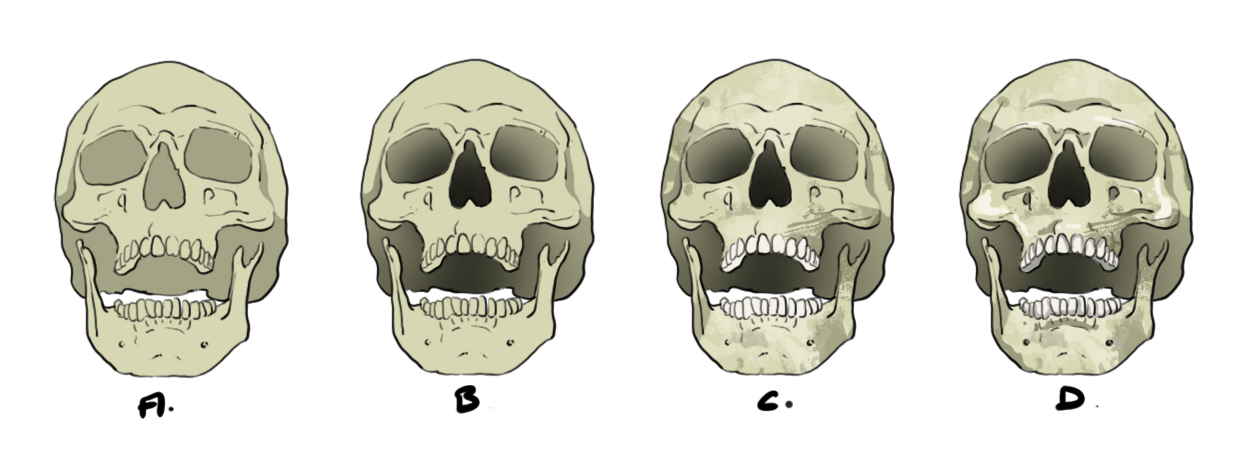
APPLYING COLOR TO THE DRAWING
Now the coloring.
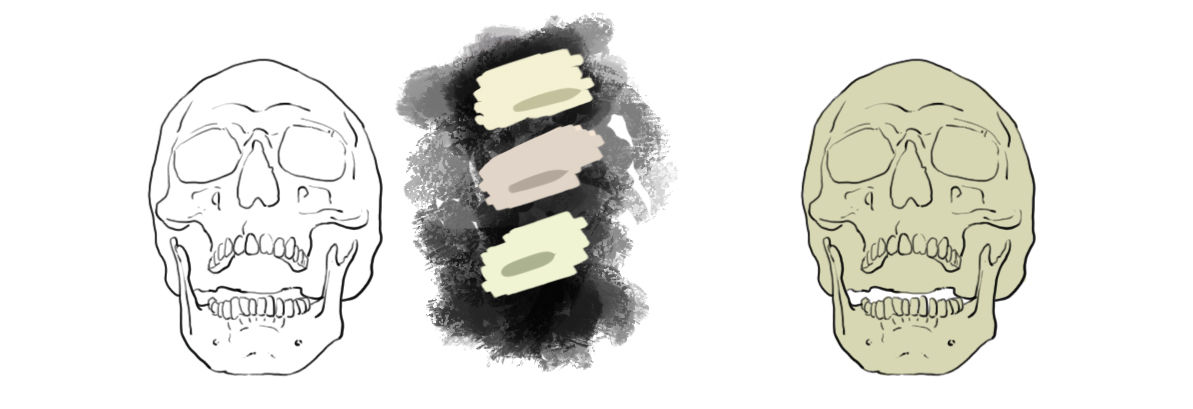
For the bone, as I tell you for many things, avoid using a pure white. You can go for a classic off-white (at the top of the possible flat colors), slightly creamy, or a very light brown (in the middle of the three flat colors), or a white with a slight yellowish/greenish tint (the color at the bottom of the "list").
Obviously, if you work as is the case here on a light background, you will need to slightly darken the selected shade for the drawing to stand out at least minimally.
I opt for a slightly greenish hue.

Step A: I shade in the obvious areas, the eye sockets, the nose, and the underside of the skull.
Step B: I enhance and degrade the shadows.
Step C: I stipple my flat area to break up the overly smooth appearance and give it a slightly worn effect. I color the teeth with a cold white (with a hint of blue) to make them stand out better.
Step D: I shade the teeth and define some details like the "holes" in the bone.
Obviously, depending on the level of realism desired, you can work more on the tracing and coloring step.
Done!
Drawing a skull quickly is quite simple once you have understood its basic structure: a flattened round shape + a jaw/face block in front.
It should also be noted that the eye sockets are not round, that the nasal cavity is a triangle, and that the zygomatic bone is prominent on the sides, under the eyes.
I hope this article will give you a good foundation and, as always, feel free to observe for yourself and experiment!
Discussion
3 comments