Pixel Art
Hello everyone! Today I'm going to teach you the basics of Pixel Art on Photoshop!
But what is pixel art?
It is a style of drawing in small squares that was present in old video games (like old Mario or Pokémon, for example) due to the technical limitations of old consoles, which could only support a limited number of colors (so no smooth gradients) and a low screen resolution (thus few pixels). Consoles have evolved significantly, but this retro style still appeals. Recent successful games continue to leverage this style, invoking players' nostalgia, such as Hyper Light Drifter and Undertale, for example.
The advantage of pixel art is also that you don't have to think about which tool to choose. You don’t overthink it, you have your little squares or nothing! Personally, I find it relaxing to have fewer choices to make. There are various software programs specialized in Pixel Art (Piskel, Aseprite, etc.), but Photoshop is common and very good for it. Moreover, the basics taught in this lesson will be applicable everywhere :)
PIXEL ART ON PHOTOSHOP
-
FILE CREATION
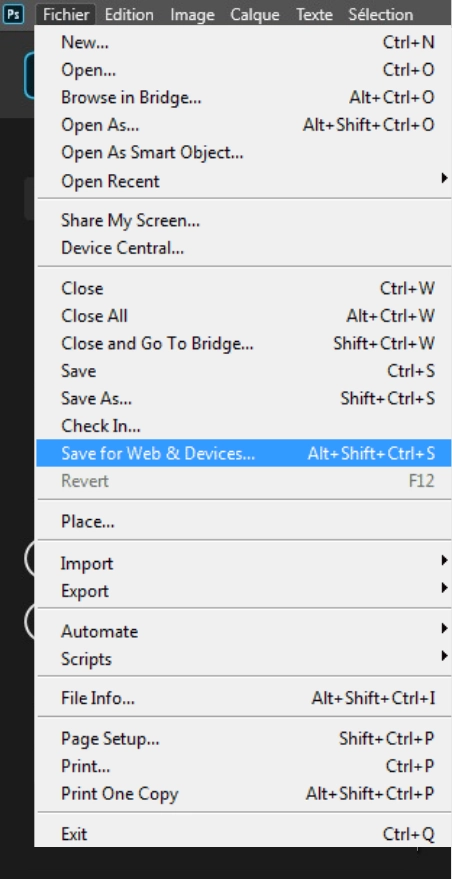
First, we open Photoshop. Do not hesitate to check out our article on how to draw with Photoshop to get more information about this software. Then click on the top left on “File” then “New”:
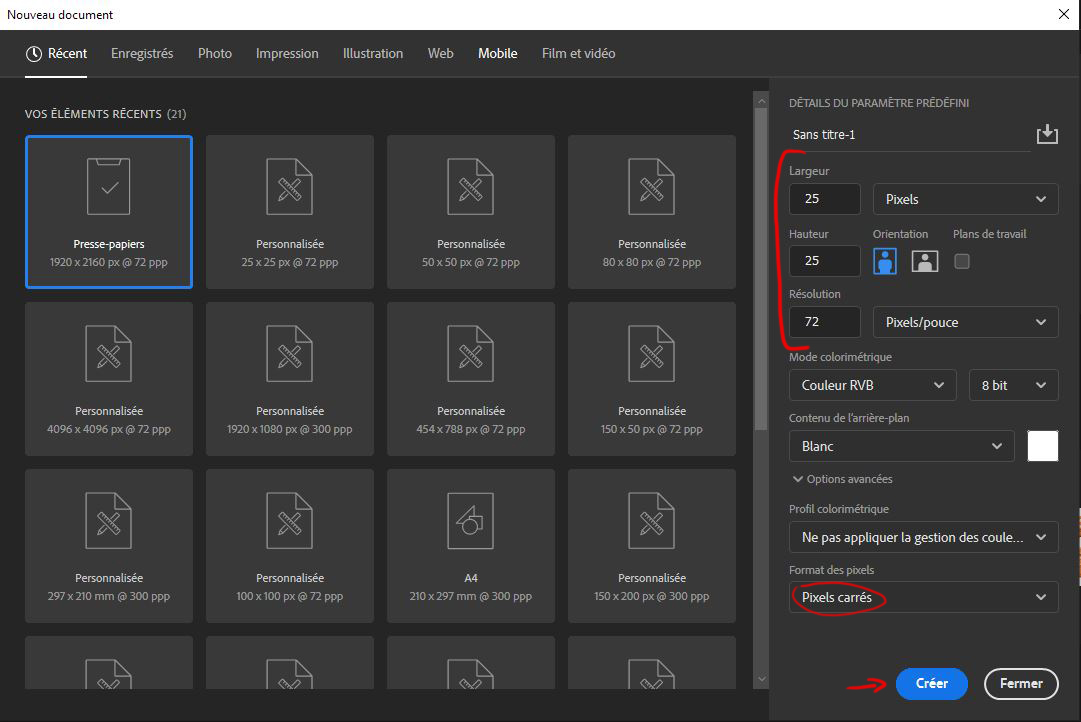
Here we will create a document with a size of 25 x 25 pixels. This size is used for this course, but for your drawings, you can definitely change the dimensions to something larger. There will just be more pixels, which will be smaller, so the drawing will be more precise.
On the contrary, a smaller size will result in larger pixels, thus a less precise drawing. Next, select a resolution of 72 pixels per inch (which is the resolution of computer screens). Make sure the pixels are perfectly square, and click on "Create" to confirm.
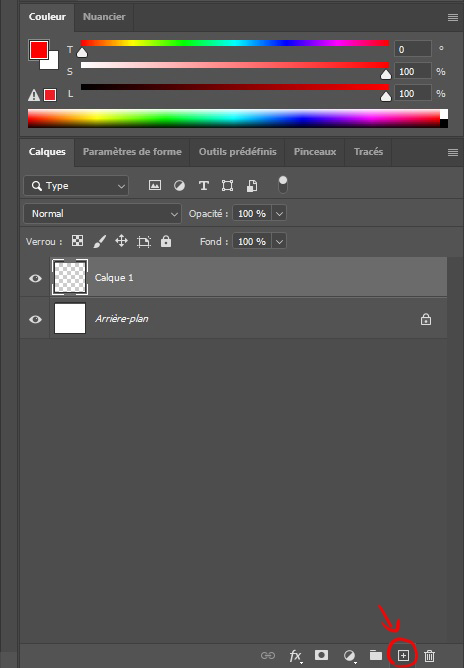
First, we will add a layer above the background. Since there are few pixels on my workspace, I will do everything on this layer for this class. However, it will be entirely possible for those who are comfortable with layers to separate elements onto different layers.
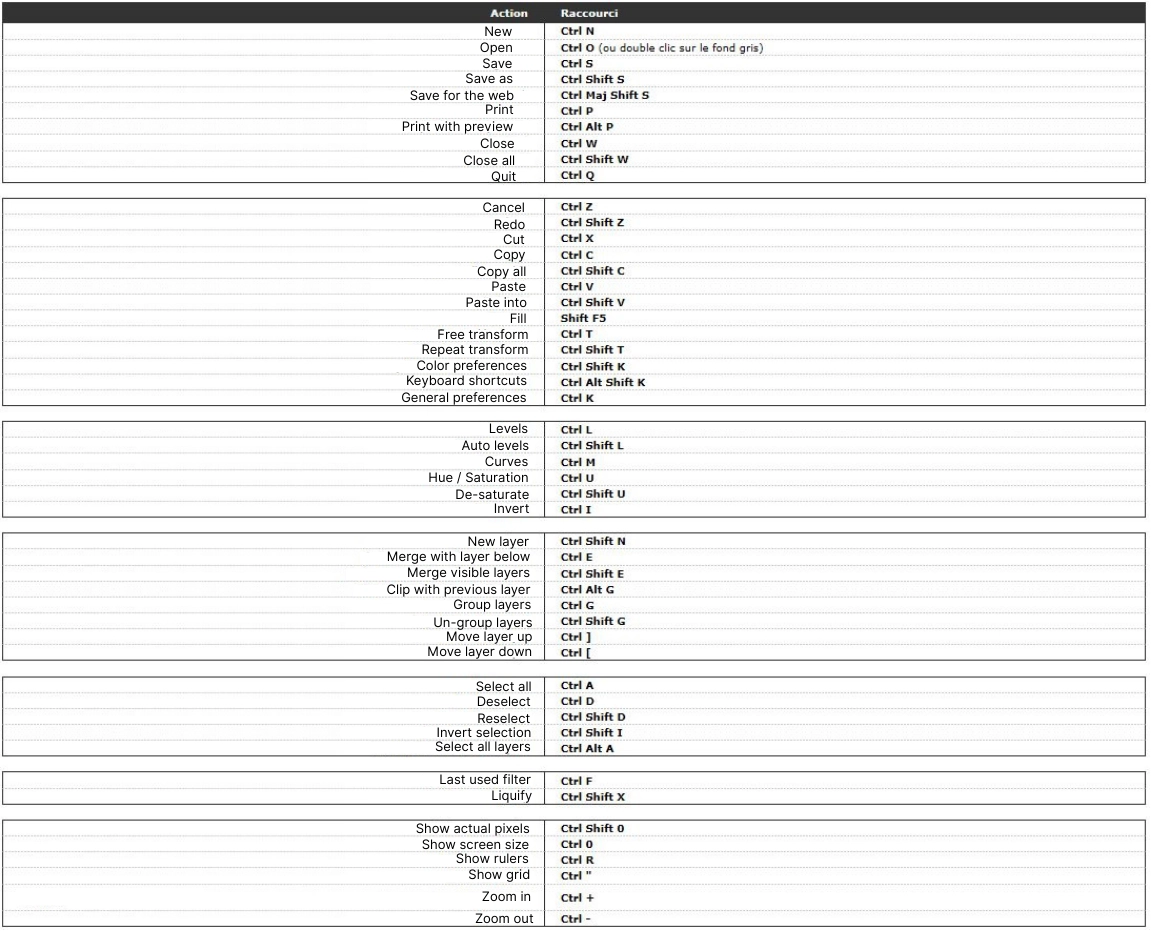
To work comfortably, consider zooming in. Either with "Ctrl" and "+", the zoom tool (small magnifying glass at the bottom left), or the sliding bar of the browser window (those who don't have it can activate it by clicking at the top on "window" then "navigation"). If you see a grid that bothers you when zooming in, you can disable it by clicking at the top on "View," then "show", then "pixel grid." Even if the unzoomed image is very small, don't worry, we can export your pixel art in a larger size at the end while preserving its appearance.
-
CHOOSING THE RIGHT TOOLS
The tool size is set to 1 pixel. You can change this either at the top left under "Edit" and "Image," or by right-clicking above the workspace where you can slide a bar to change the line thickness. But if you use the default brush (found in the toolbar on the left), you'll notice that the line is blurry, which is not suitable for pixel art.
![]()
Pressing and holding the brush brings up the "pencil" option. Click on it. It should always be 1 pixel in size.
![]()
Draw a line, and then it's good, everything is clear!![]()
The eraser needs to be clean as well. So, we click on it in the toolbar on the left. At the top, under "Mode," change "Shape" to "Pencil."
![]()
It erases cleanly! A tip for switching from eraser to pencil easily: the shortcut to access the eraser is "E" and the one to access the pencil is "B."
![]()
-
MAKE NICE LINES
I freehand draw a kind of "C." We notice that steps are forming, which makes the curves less elegant. In pixel art, when a stroke changes direction, it is advisable for pixels to only touch diagonally from corner to corner and not be stuck together, to avoid this step effect and better define the shapes. This is especially important when the number of pixels is low because the steps are more visible.
![]()
I'm marking in pink the pixels that will disappear so you can clearly see the excess ones.
![]()
I erase with the eraser and voilà! It's much more elegant.
![]()
-
SHAPE TIPS
4.1. SYMMETRY
When pixels are large, shapes are quickly distorted if you don't pay attention to symmetry, i.e. when a shape is the same on each side. You can do it by hand by making sure to place the same number of pixels on each side and at the same height, but you can also use the symmetry tool at the top when you are using the pencil or eraser.
![]()
We validate the axis on which we want symmetry; here it is the vertical axis. It can be resized by dragging the small squares.
![]()
I drew a curve by hand and the symmetry was automatically created. It's very handy :) When we're done, click again on the symmetry button and click on "symmetry disabled."
![]()
4.2. BASIC SHAPES
You can easily draw straight lines by just using the pencil. Just click at the start point, hold shift, and click at the end point of the line.
![]()
Here I have made you some examples of circles by hand. You can then fill the shapes with colors by selecting your color on the right and using the paint bucket tool on the toolbar on the left (shortcut "G"). Click on the shape to be filled (which must be closed), and you're done!
![]()
We can also use the shape tools on the toolbar. We can make circles, rectangles, or lines without any problem. Be sure to be in "Pixels" mode on top (between "Edit" and "Image").
![]()
4.3. THE GRADIENTS
In pixel art, you cannot create smooth gradients; you have to simulate them by creating patterns of increasingly spaced pixels. There are many possible patterns. Here are a few examples.
This is called "dithering" in English, and you can find plenty of different examples by searching on the internet. I'll provide you with some examples, starting from the basics, then a simple example and two more elaborate ones.
![]()
![]()
![]()
![]()
DRAWING A PIXEL ART HEART STEP BY STEP
We are now going to create a simple pixel art image step by step, to put into practice the principles previously seen. The idea is to make a demon heart.
We'll start with the shape of the heart. We take the pencil tool and activate the vertical symmetry tool. We resize it and then freehand draw half of the heart in a dark red color.
![]()
With the eraser, then remove the "staircase" effect to better define the lines of the heart.
![]()
ADDING DETAILS AND COLOR TO THE DRAWING
Fill the wings with black. Now we can disable symmetry to pick up the pencil in dark red to add a shadow on the heart, and in white to create a shiny reflection.
![]()
![]()
To make the tail, you can try to do it directly by hand to avoid the stair-step effect.
![]()
But if you can't do it, you can freehand it without paying attention...
![]()
Remove the stair-step effect after...
![]()
...And then fix any errors. We get a similar result :)
![]()
We can add a background using the paint pot and add little decorations! Our pixel art is finished!
![]()
Now we need to export the image correctly if we don't want to end up with a very small image. Click on "File" then "Export" then "Export As..."
![]()
A window opens. You can choose the size of your output image. I chose 3000 x 3000 pixels to have something large but you can choose whatever size you like. To have a sharp image, it is important to change the resampling to "Nearest Neighbor." You can export the file in the image format that suits you (png or jpg usually). Once everything is set, you need to click on "Export" and save the file wherever you want!
![]()
And there you have it! You now have some basics in pixel art on Photoshop and can try to make some yourself :)
![]()
Illustrator and writer: Natacha Peaster – "Nayala"
Discussion
Oops, I hadn't seen this comment! Thanks if you stop by 😀 Don't hesitate to post the attempts!