How to Draw a Hand
Ah, hands. For many of you, I think this has been a rather thorny subject. Personally, I've never had much trouble with them, it's rather the feet that have been a challenge for a long time ^^
Brief.
So today, I'm going to take a slightly different approach from my previous articles. My goal today is not to explain how to drawoneBut how to drawthe handsgenerally. Because well, hiding them in your back, in mittens, in pockets, works once or twice, but then it becomes noticeable. And hands are super important, and I personally find them very pretty.
So before drawing anything:
HAND OBSERVATION
Today we will spend a lot of time on this part.
Hands are not as complicated as they seem. As always, it's just a matter of breaking them down into simpler shapes to understand their arrangement.
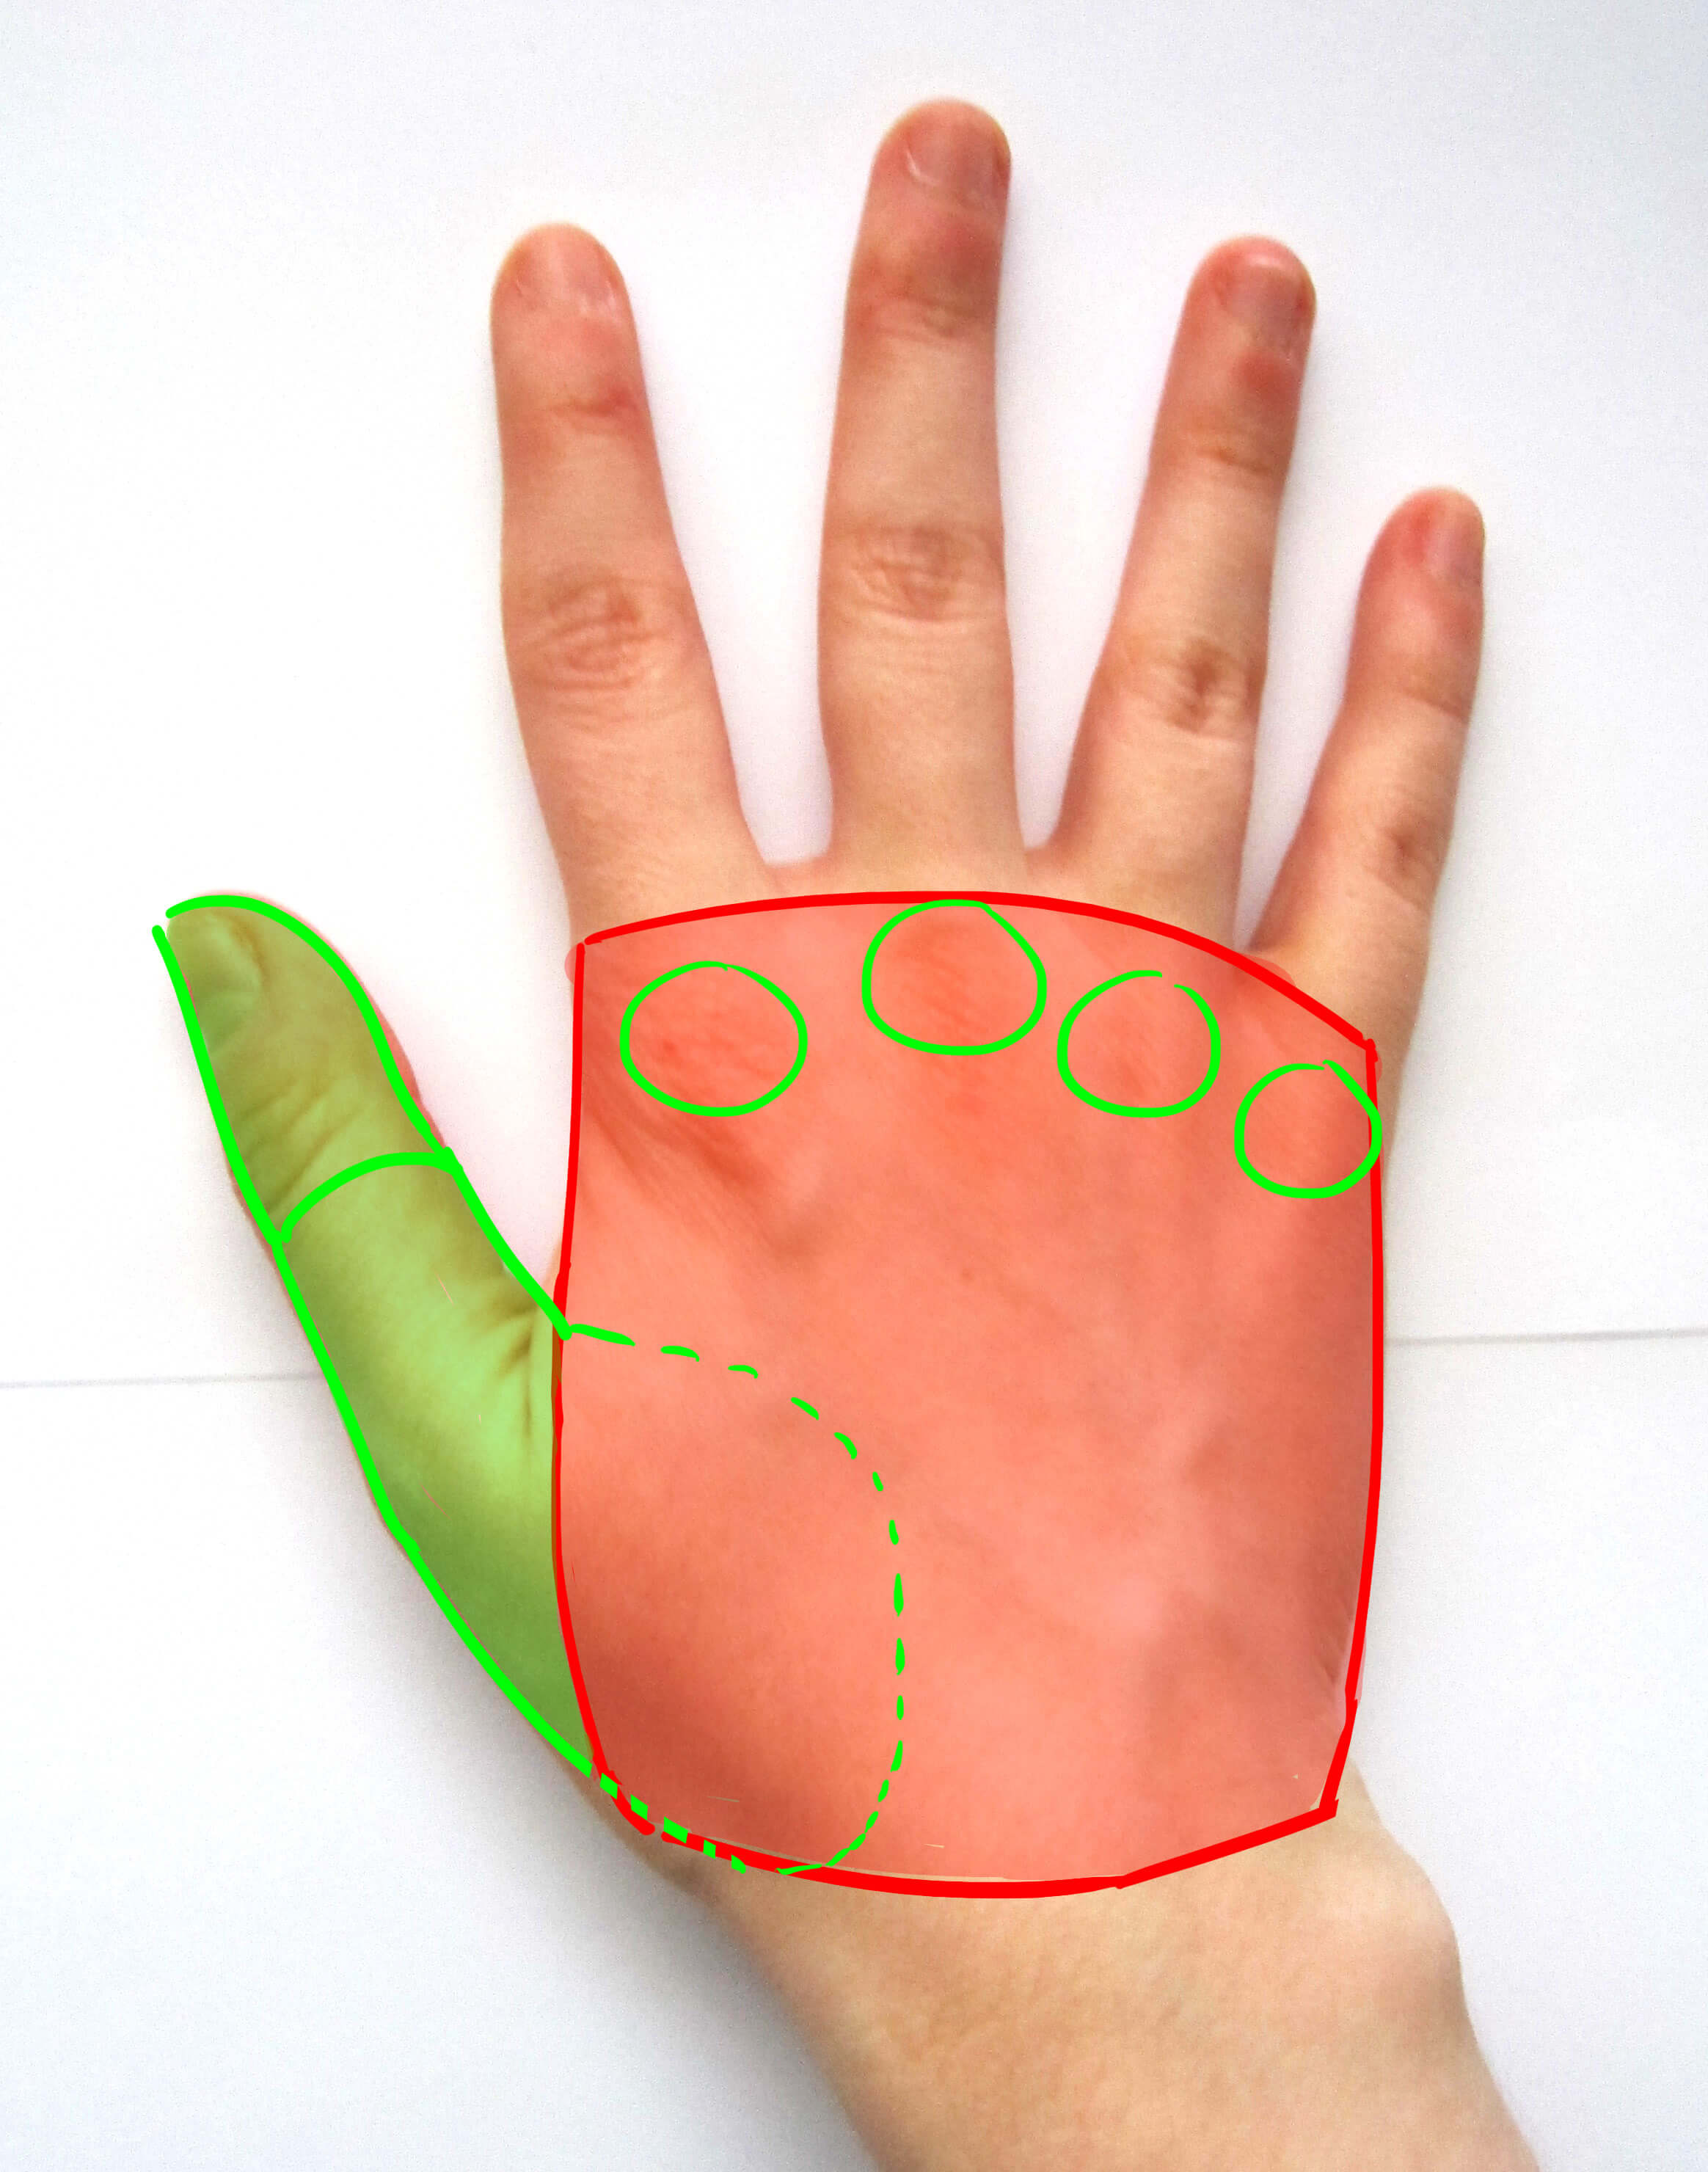
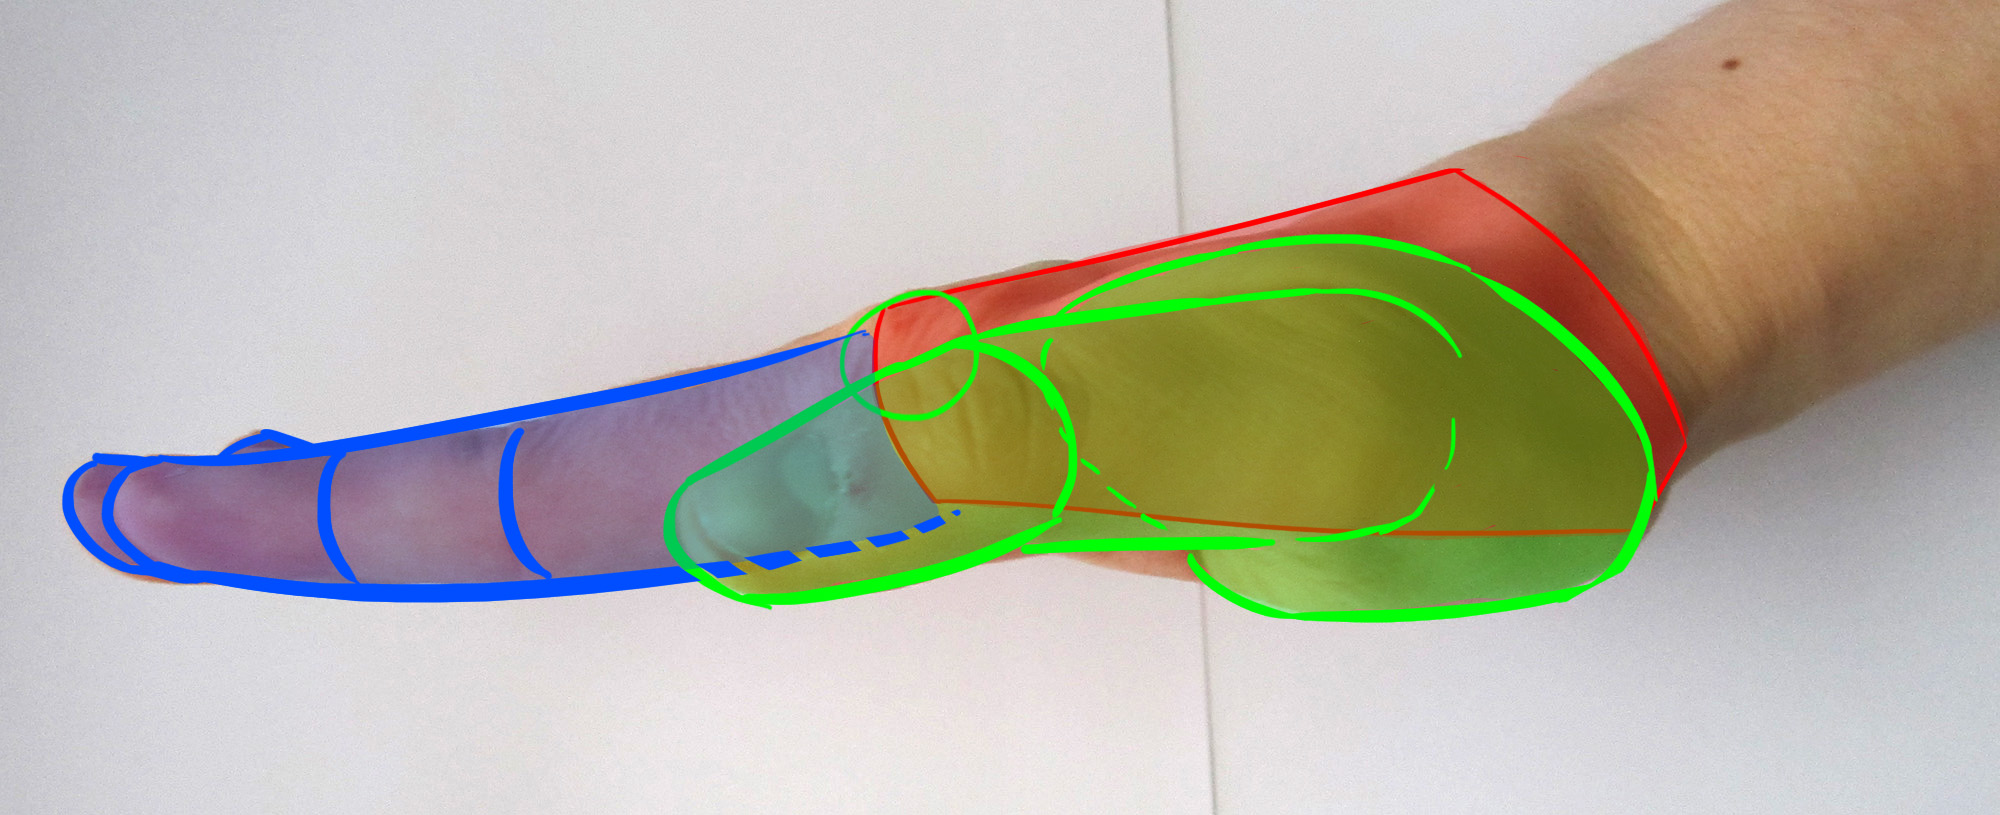
So, I will use a color code for that and segment the photos of my hands into simpler areas to understand.
The color code will always be the same:
Red for the palm
Green for the thumb
Blue for the fingers
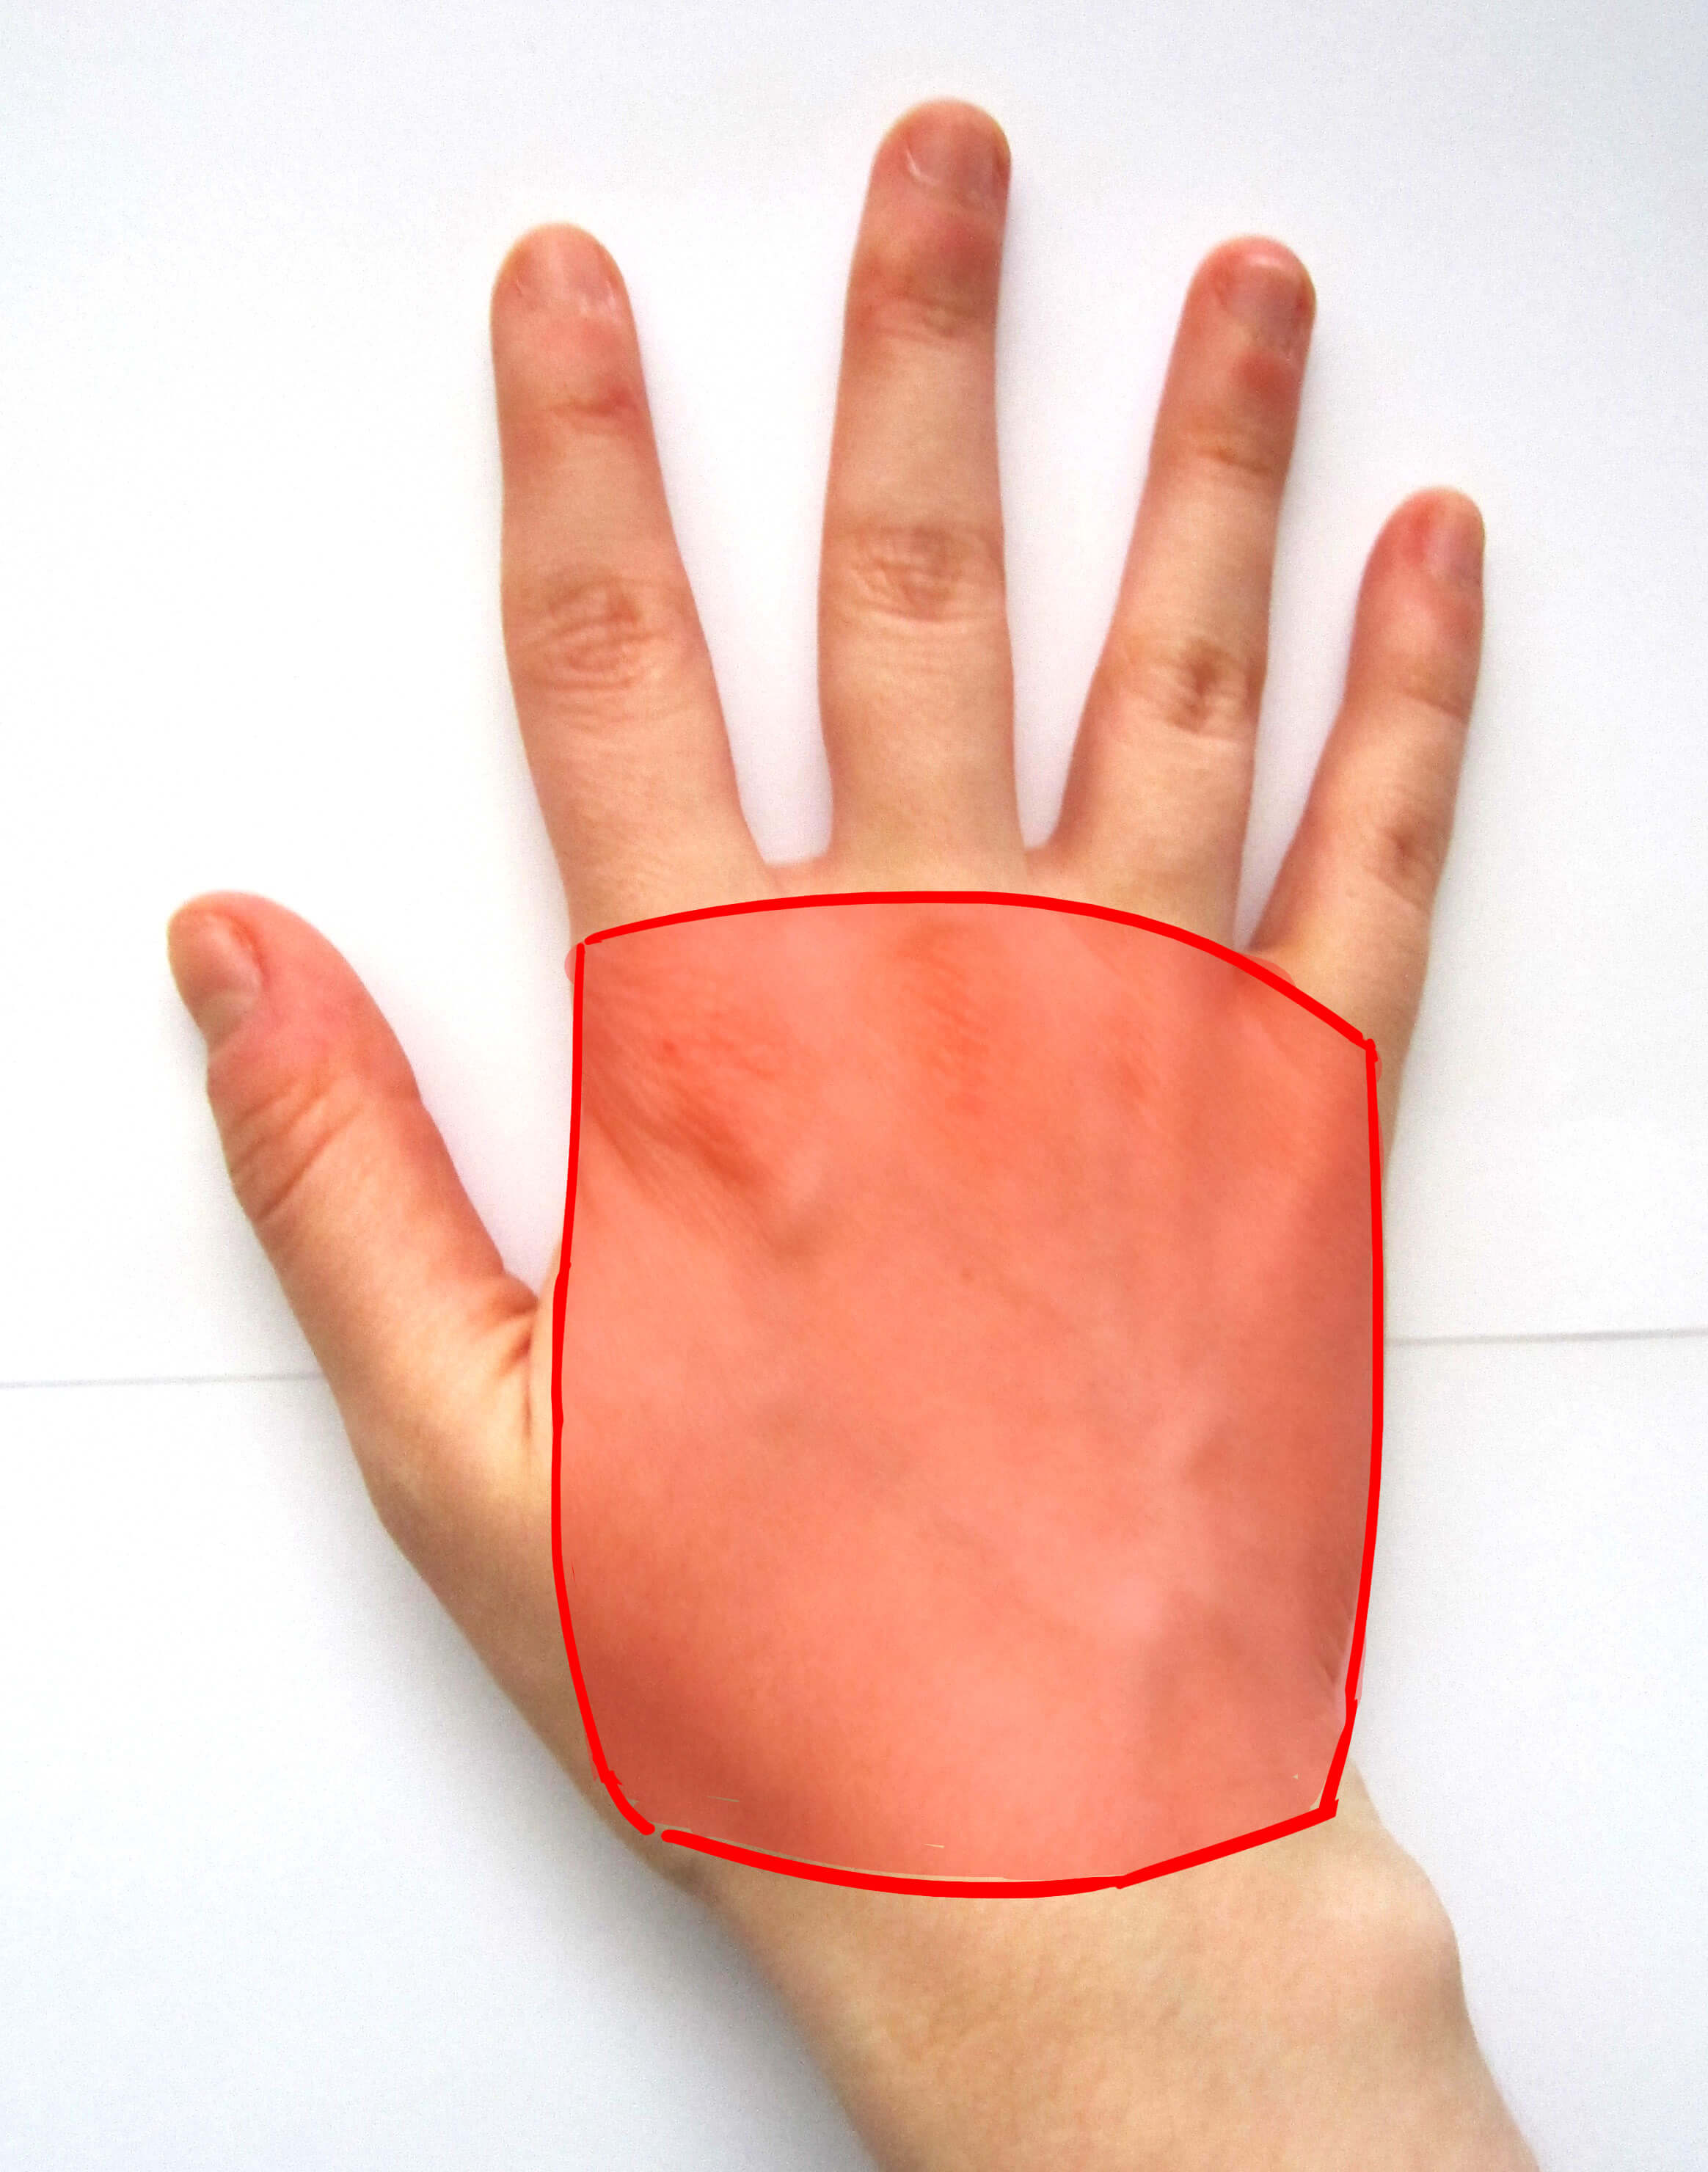
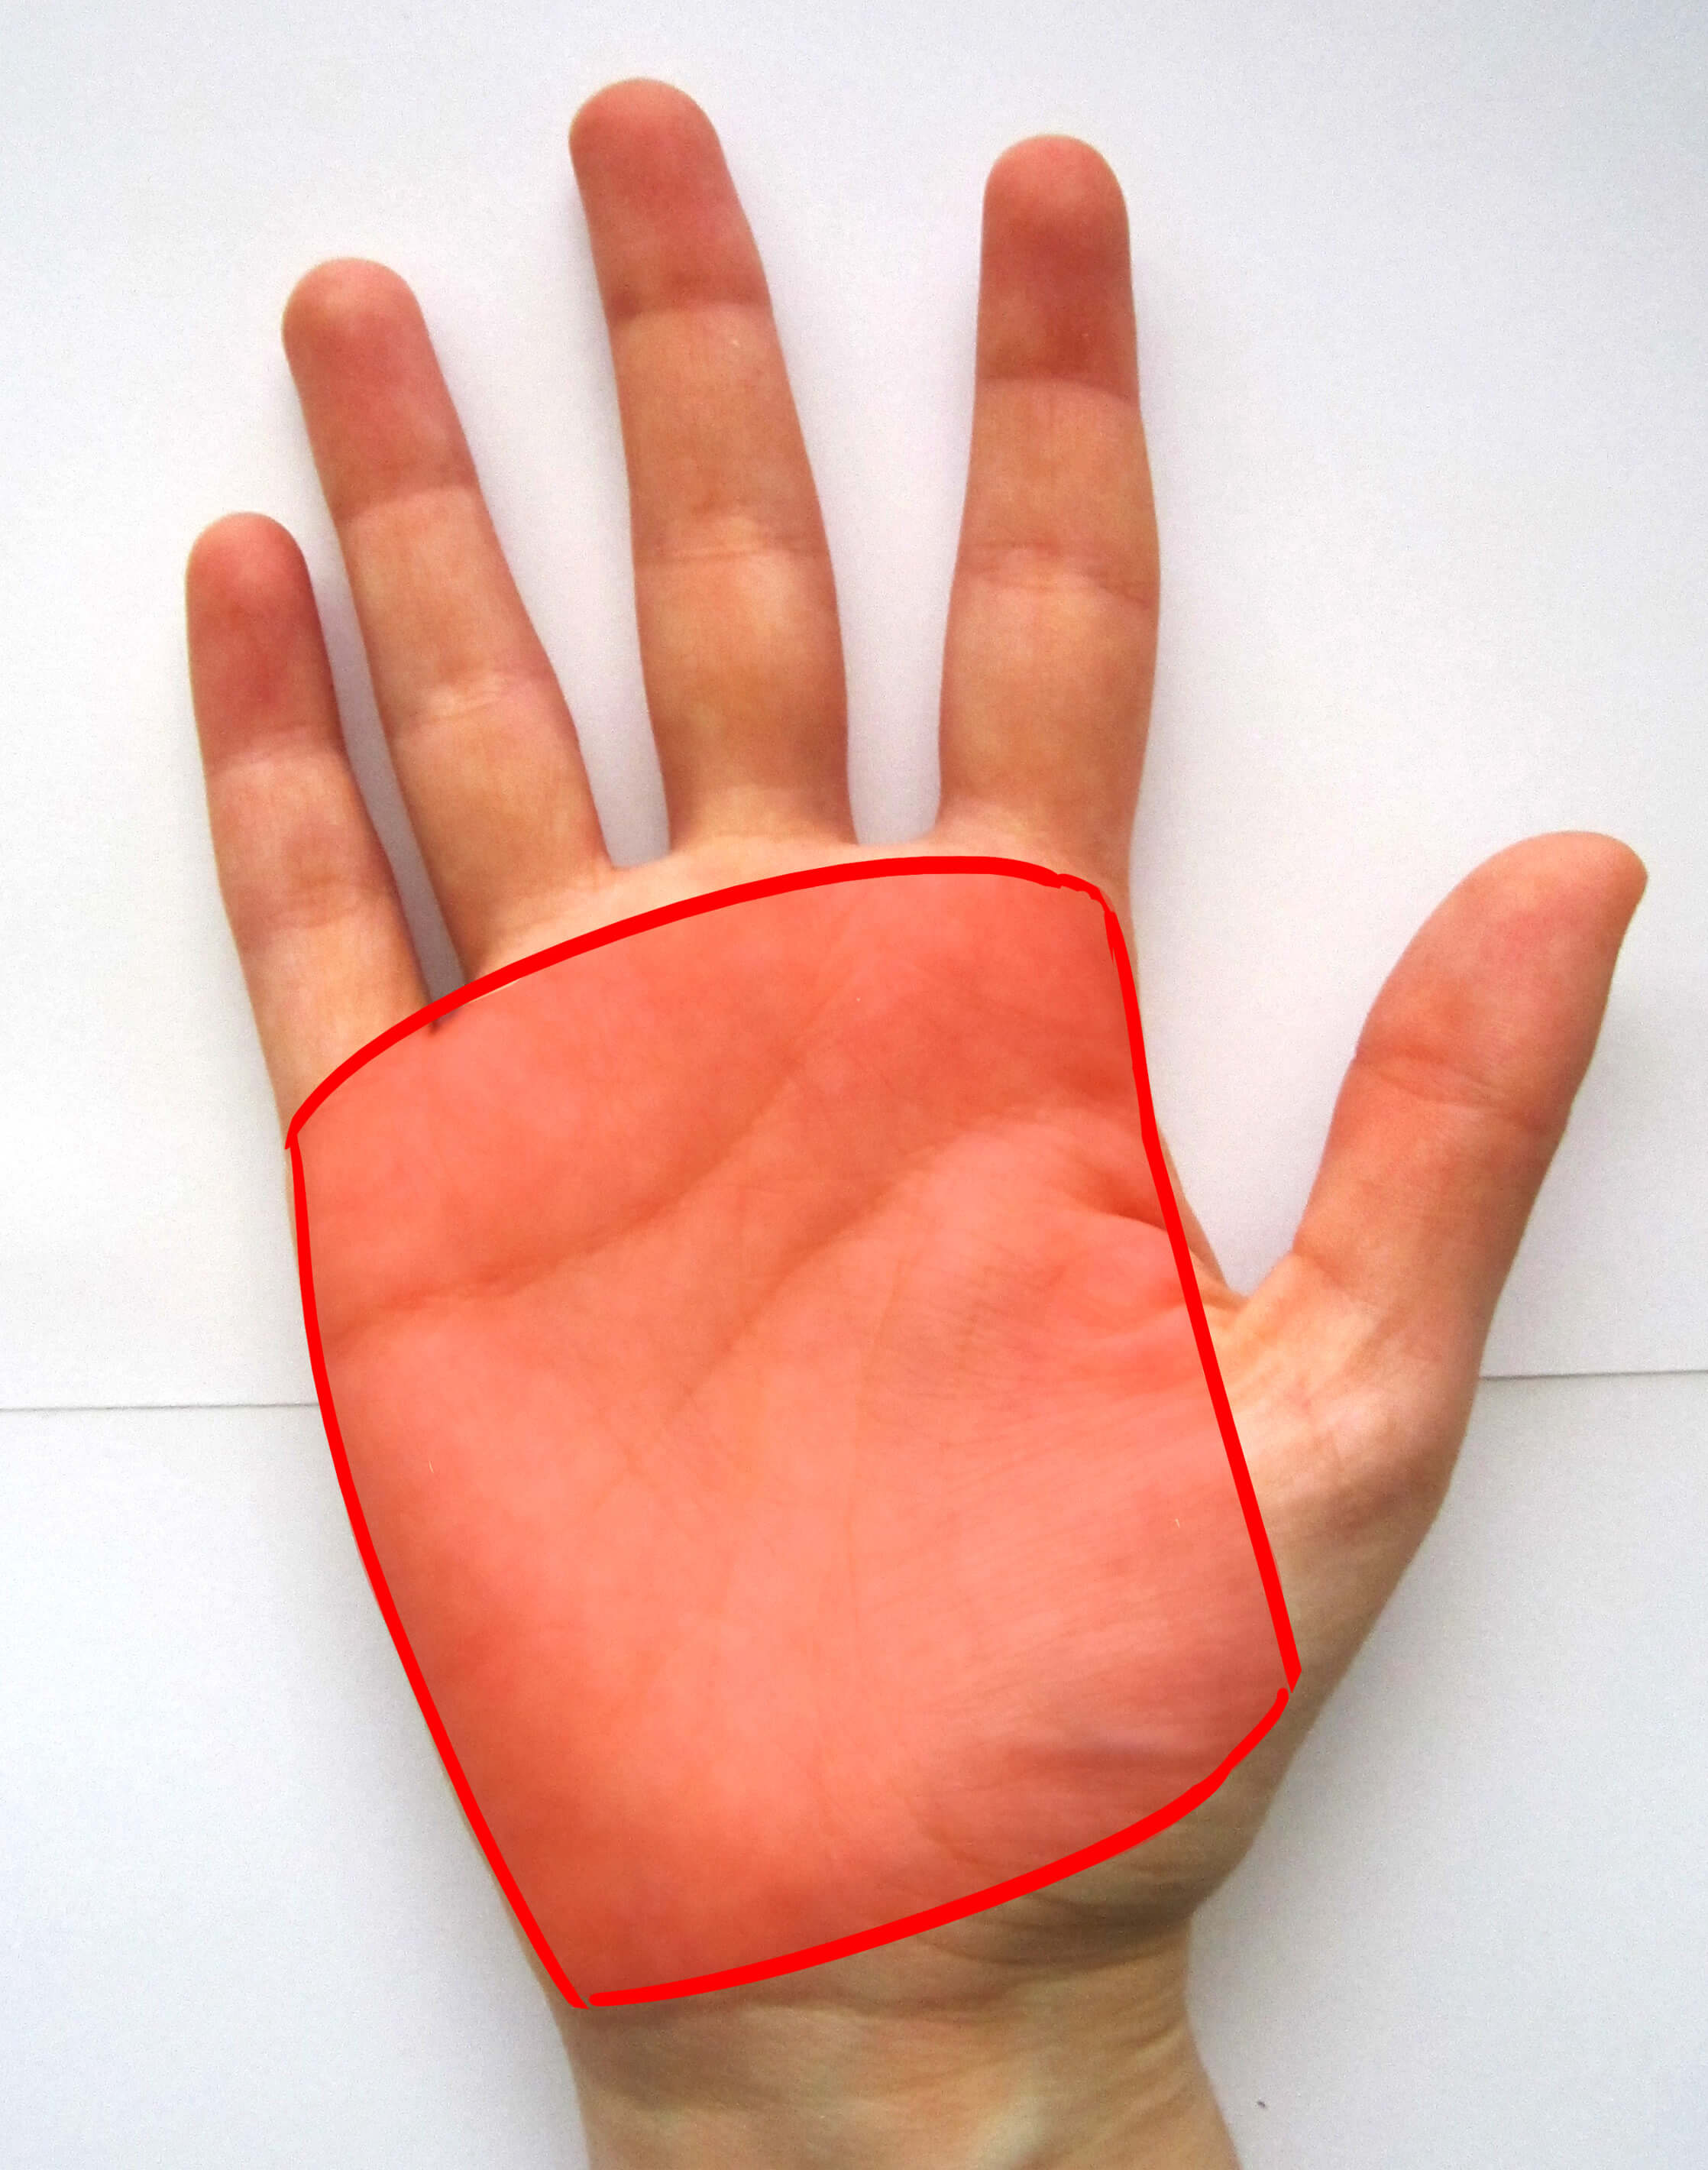
THE PALM
It's basic, you need to understand how the palm is structured. From the front and the back, it is more or less a square or a trapezoid, narrower towards the wrist, if you want to get technical.
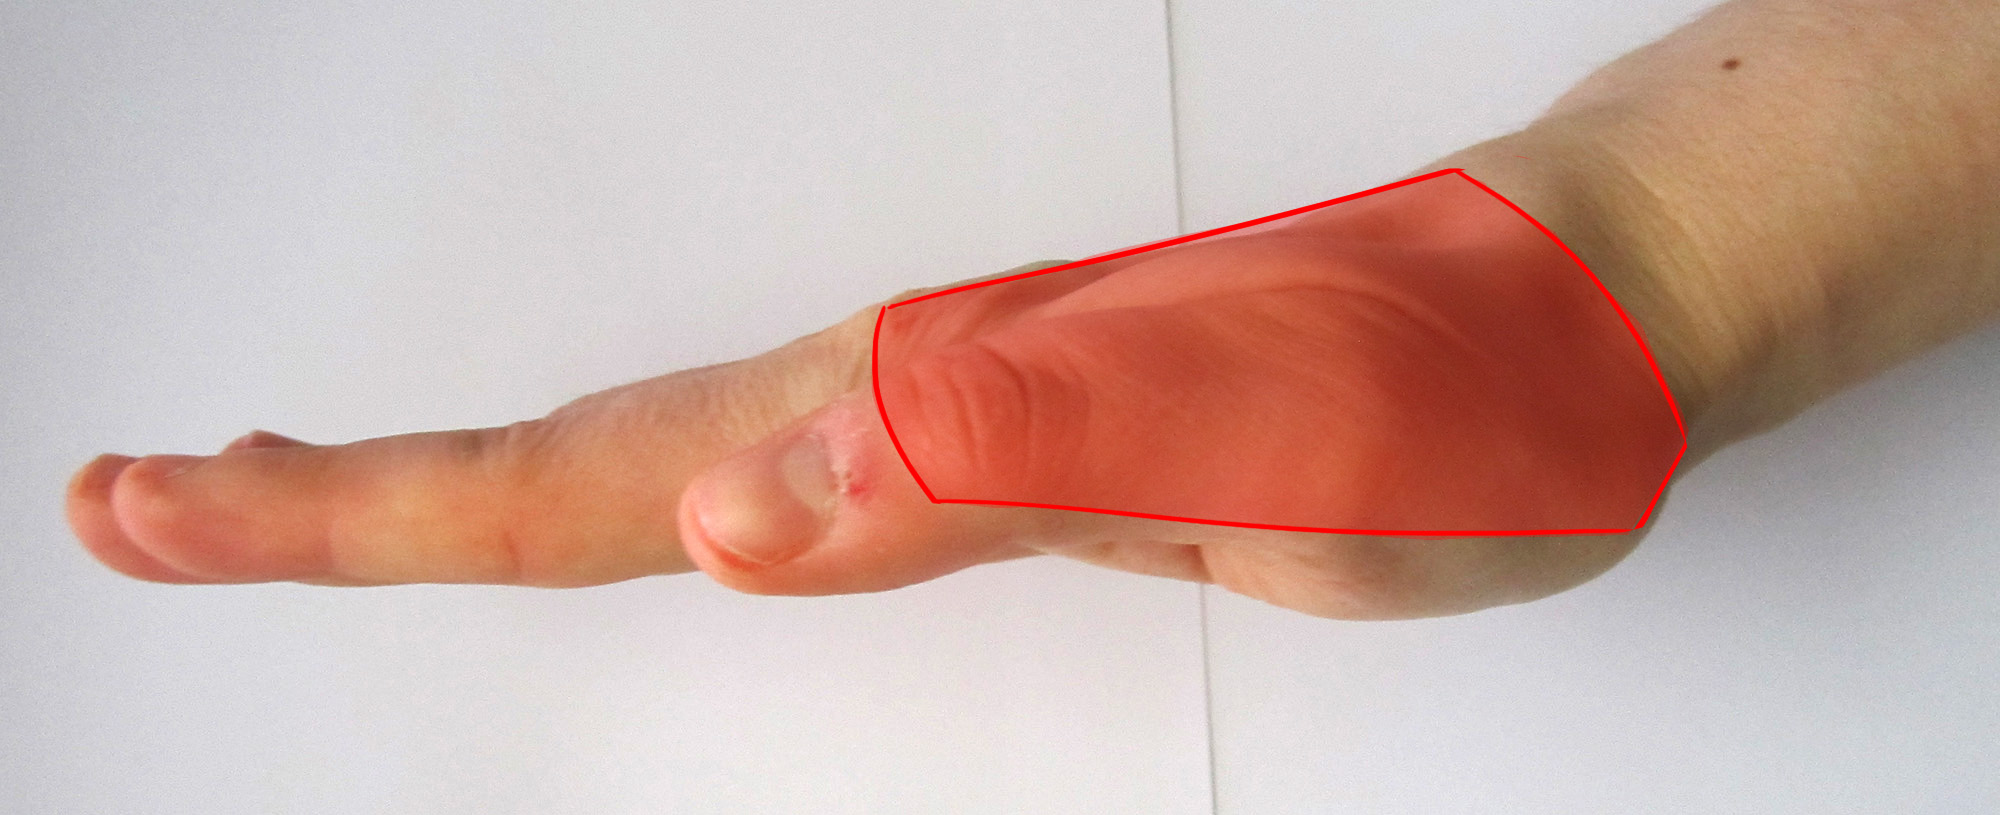
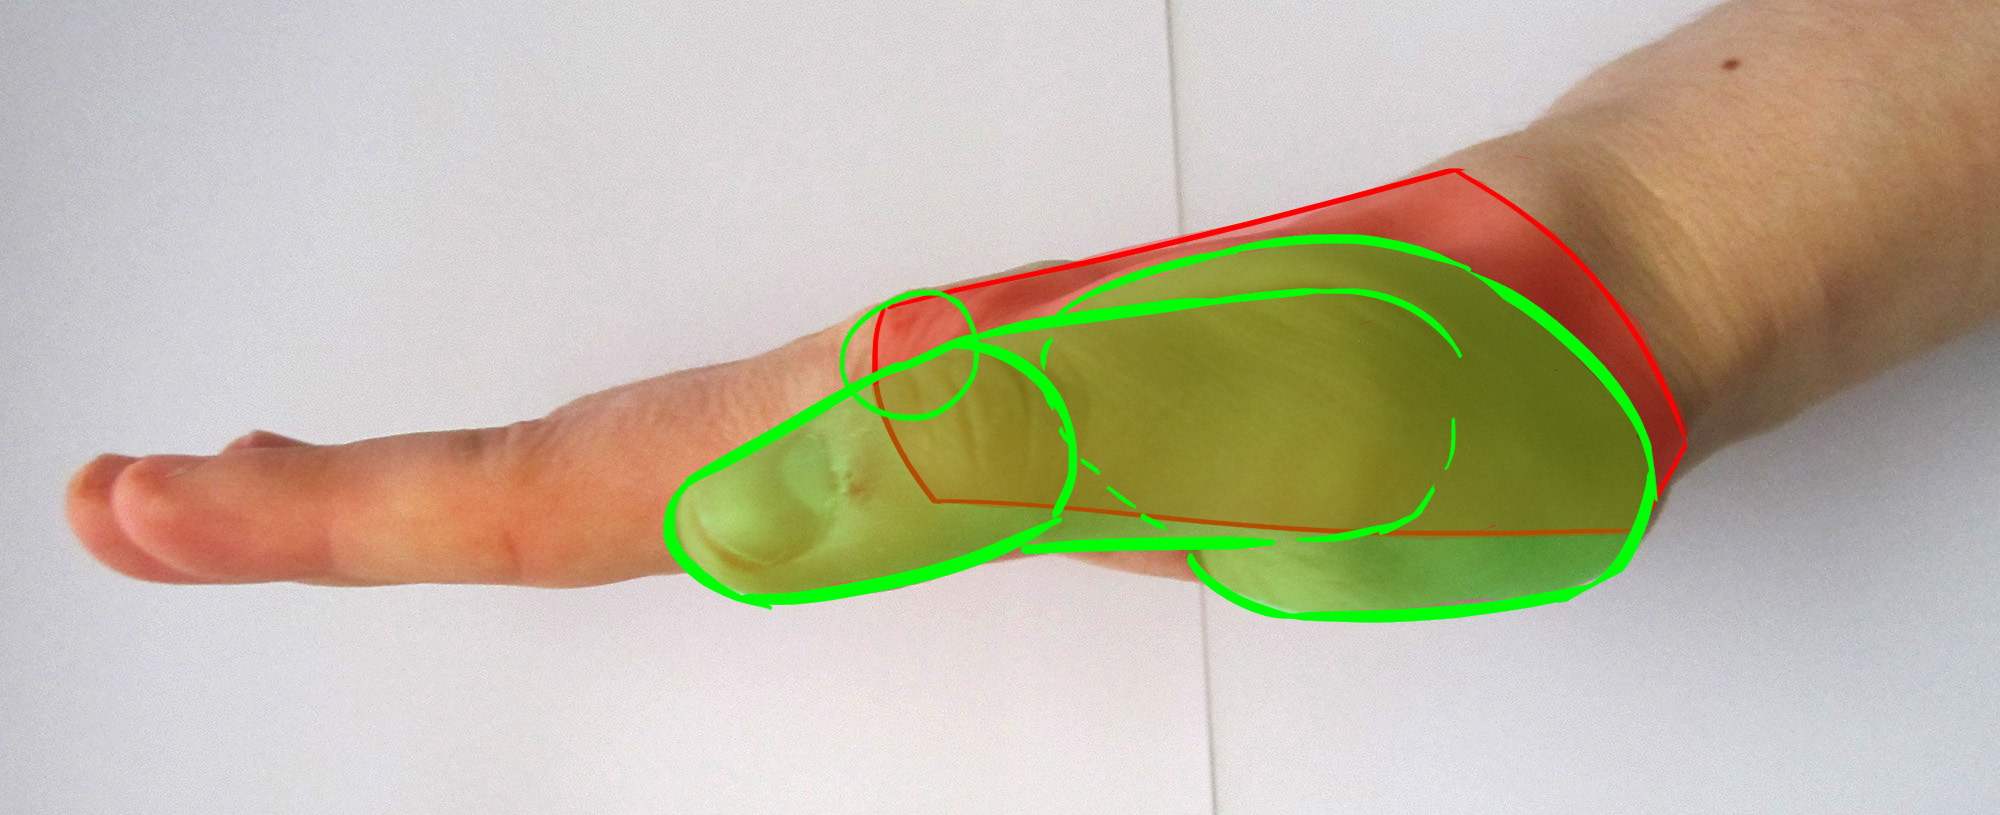
From the side, it's much more of a trapezoid or triangular shape. Opposite this time: wide towards the wrist and narrower towards the fingers.
THE JOINTS OF THE PALM
I consider that the first knuckles of the fingers, which form bumps and hollows on which most of you have learned to count the months of the year, are also part of the palm. Think about placing them when you see the back and profile of the hand.


THE THUMB
It places itself on the palm. In one of the lower quarters (either right or left depending on the chosen hand, of course).
For me, it is easier to think of the thumb as an extension of the hand, something that is attached to it and thus evolves independently from the rest. We talk about an opposable thumb, and it's not for nothing ^
I think it more or less has the shape of a chicken thigh, then again, it depends and to each their own imagination :)
Be careful, the thumb has only two joints, unlike the other fingers which have three.

THE FINGERS OF THE HAND
They are about the length of the palm, slightly shorter.
As previously mentioned, they have 3 joints, roughly equal in size. The one connected to the palm being slightly longer.
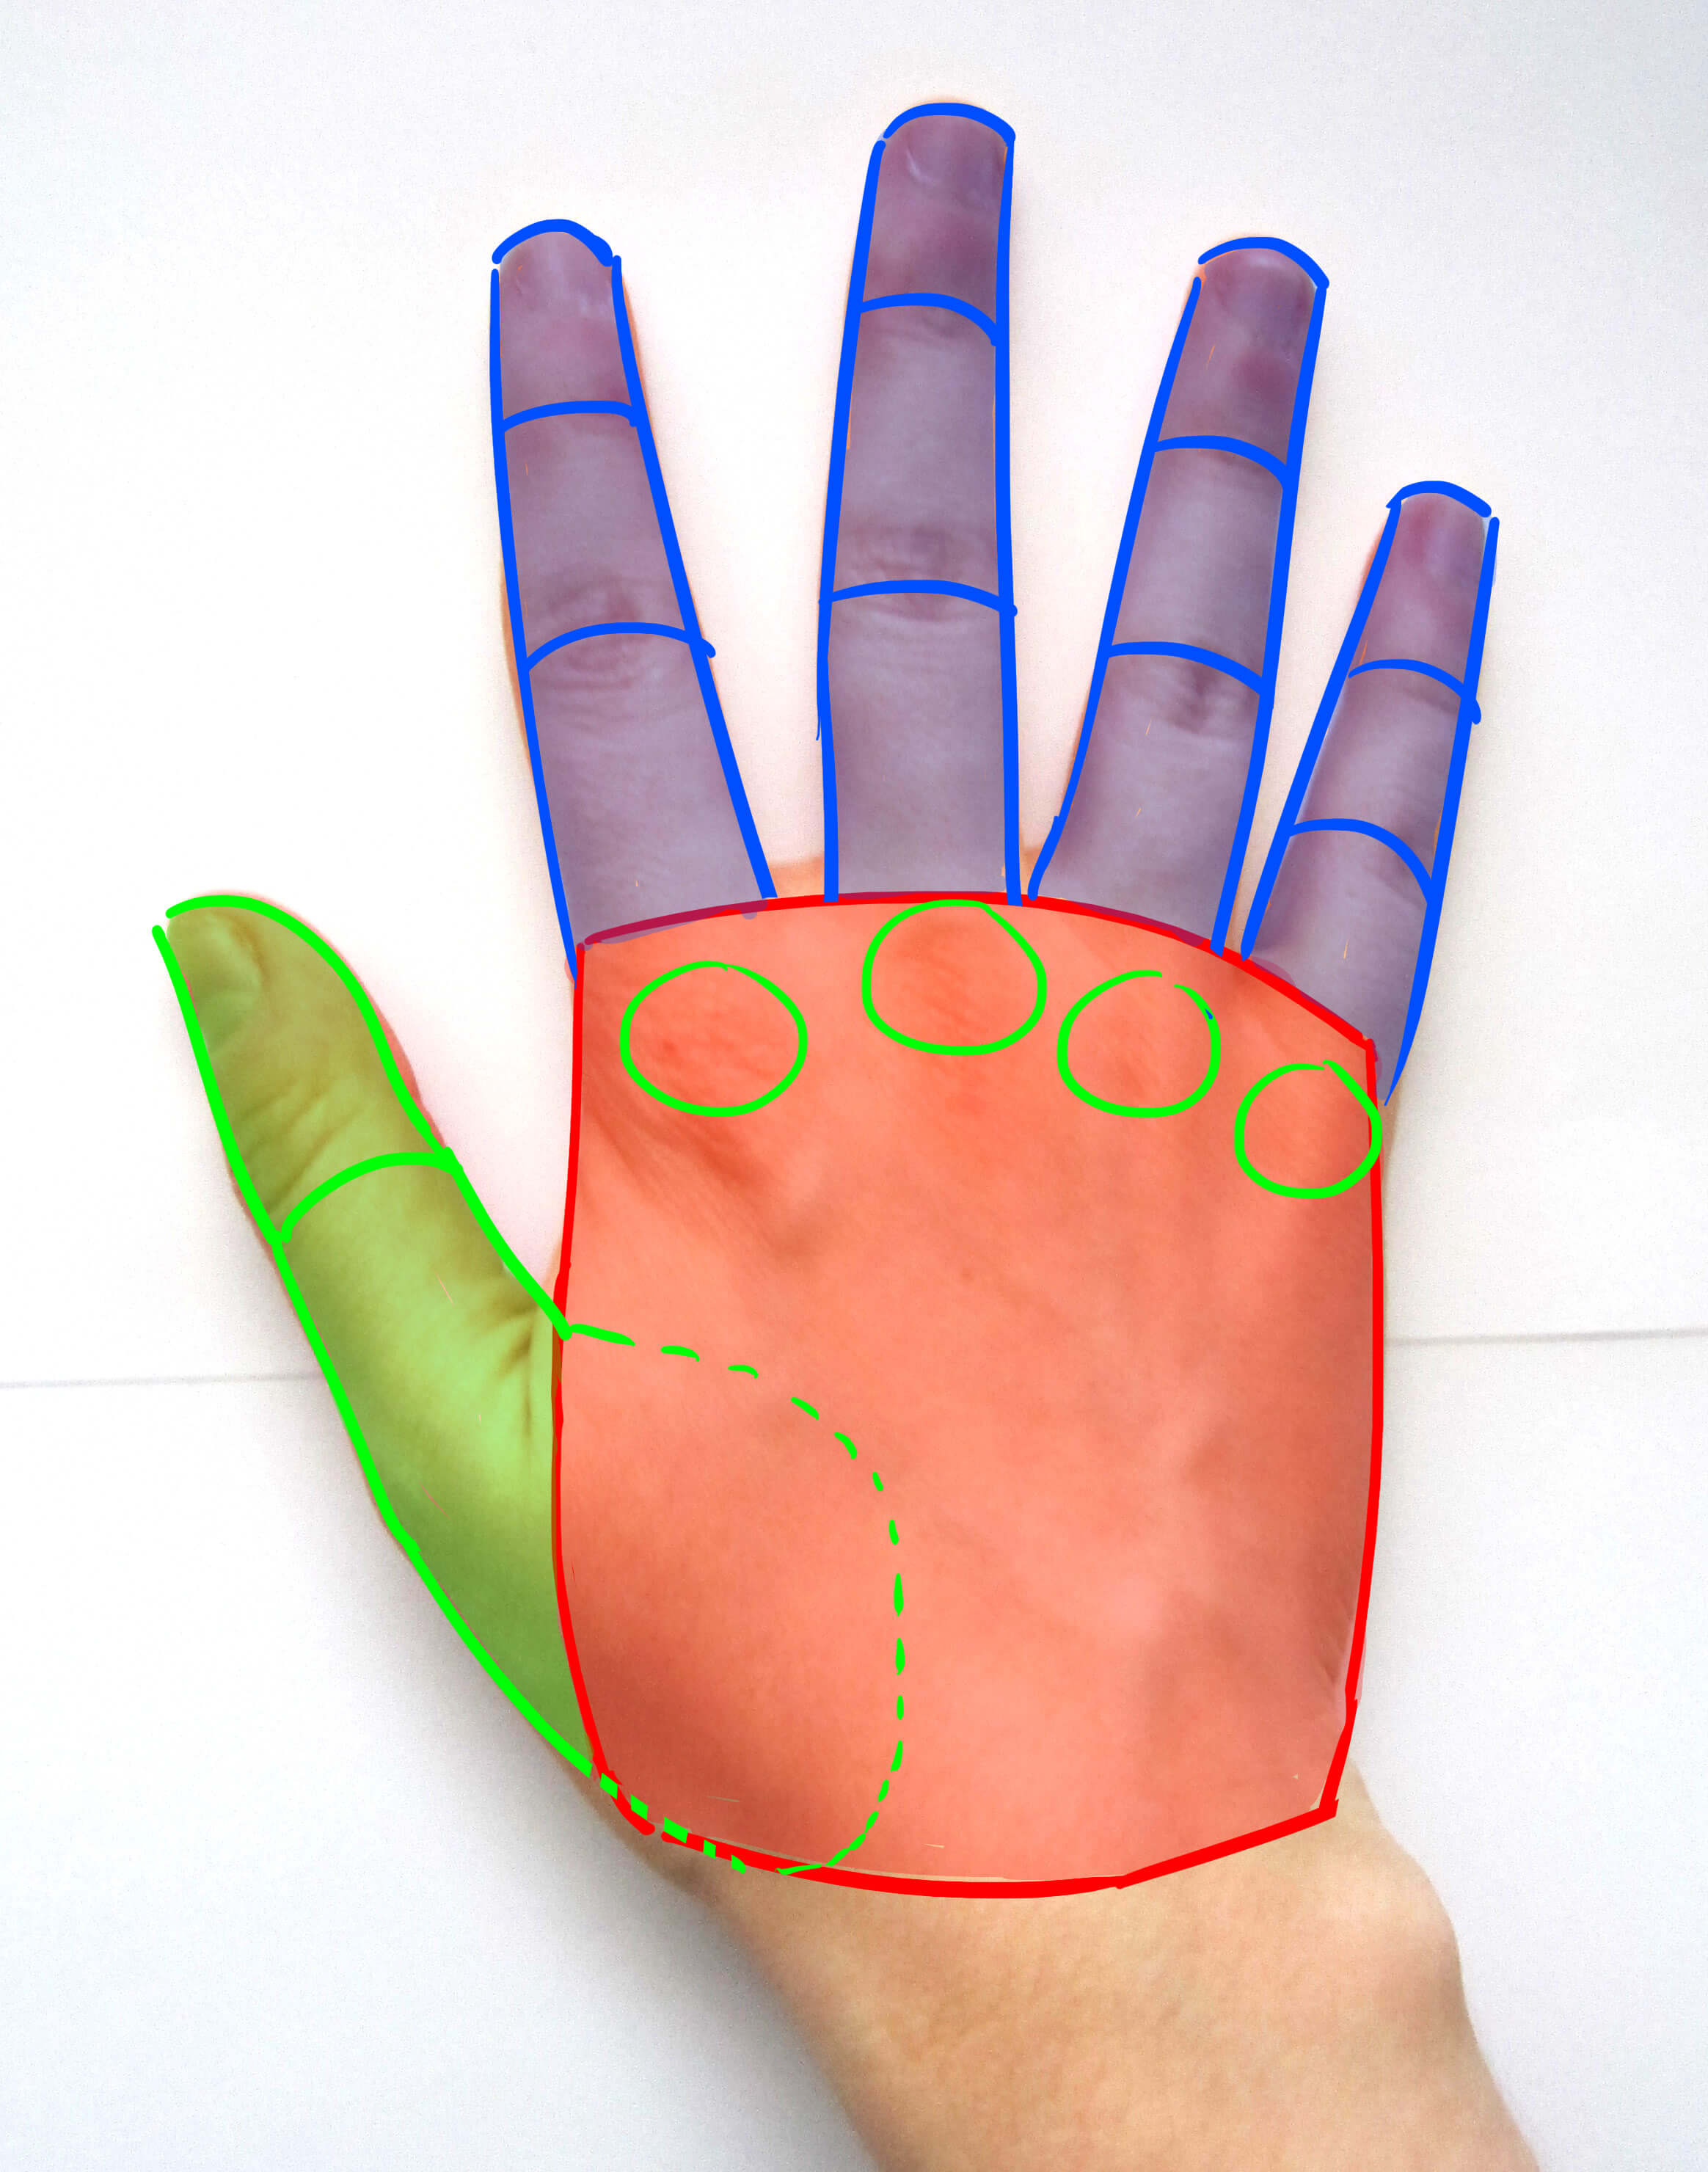
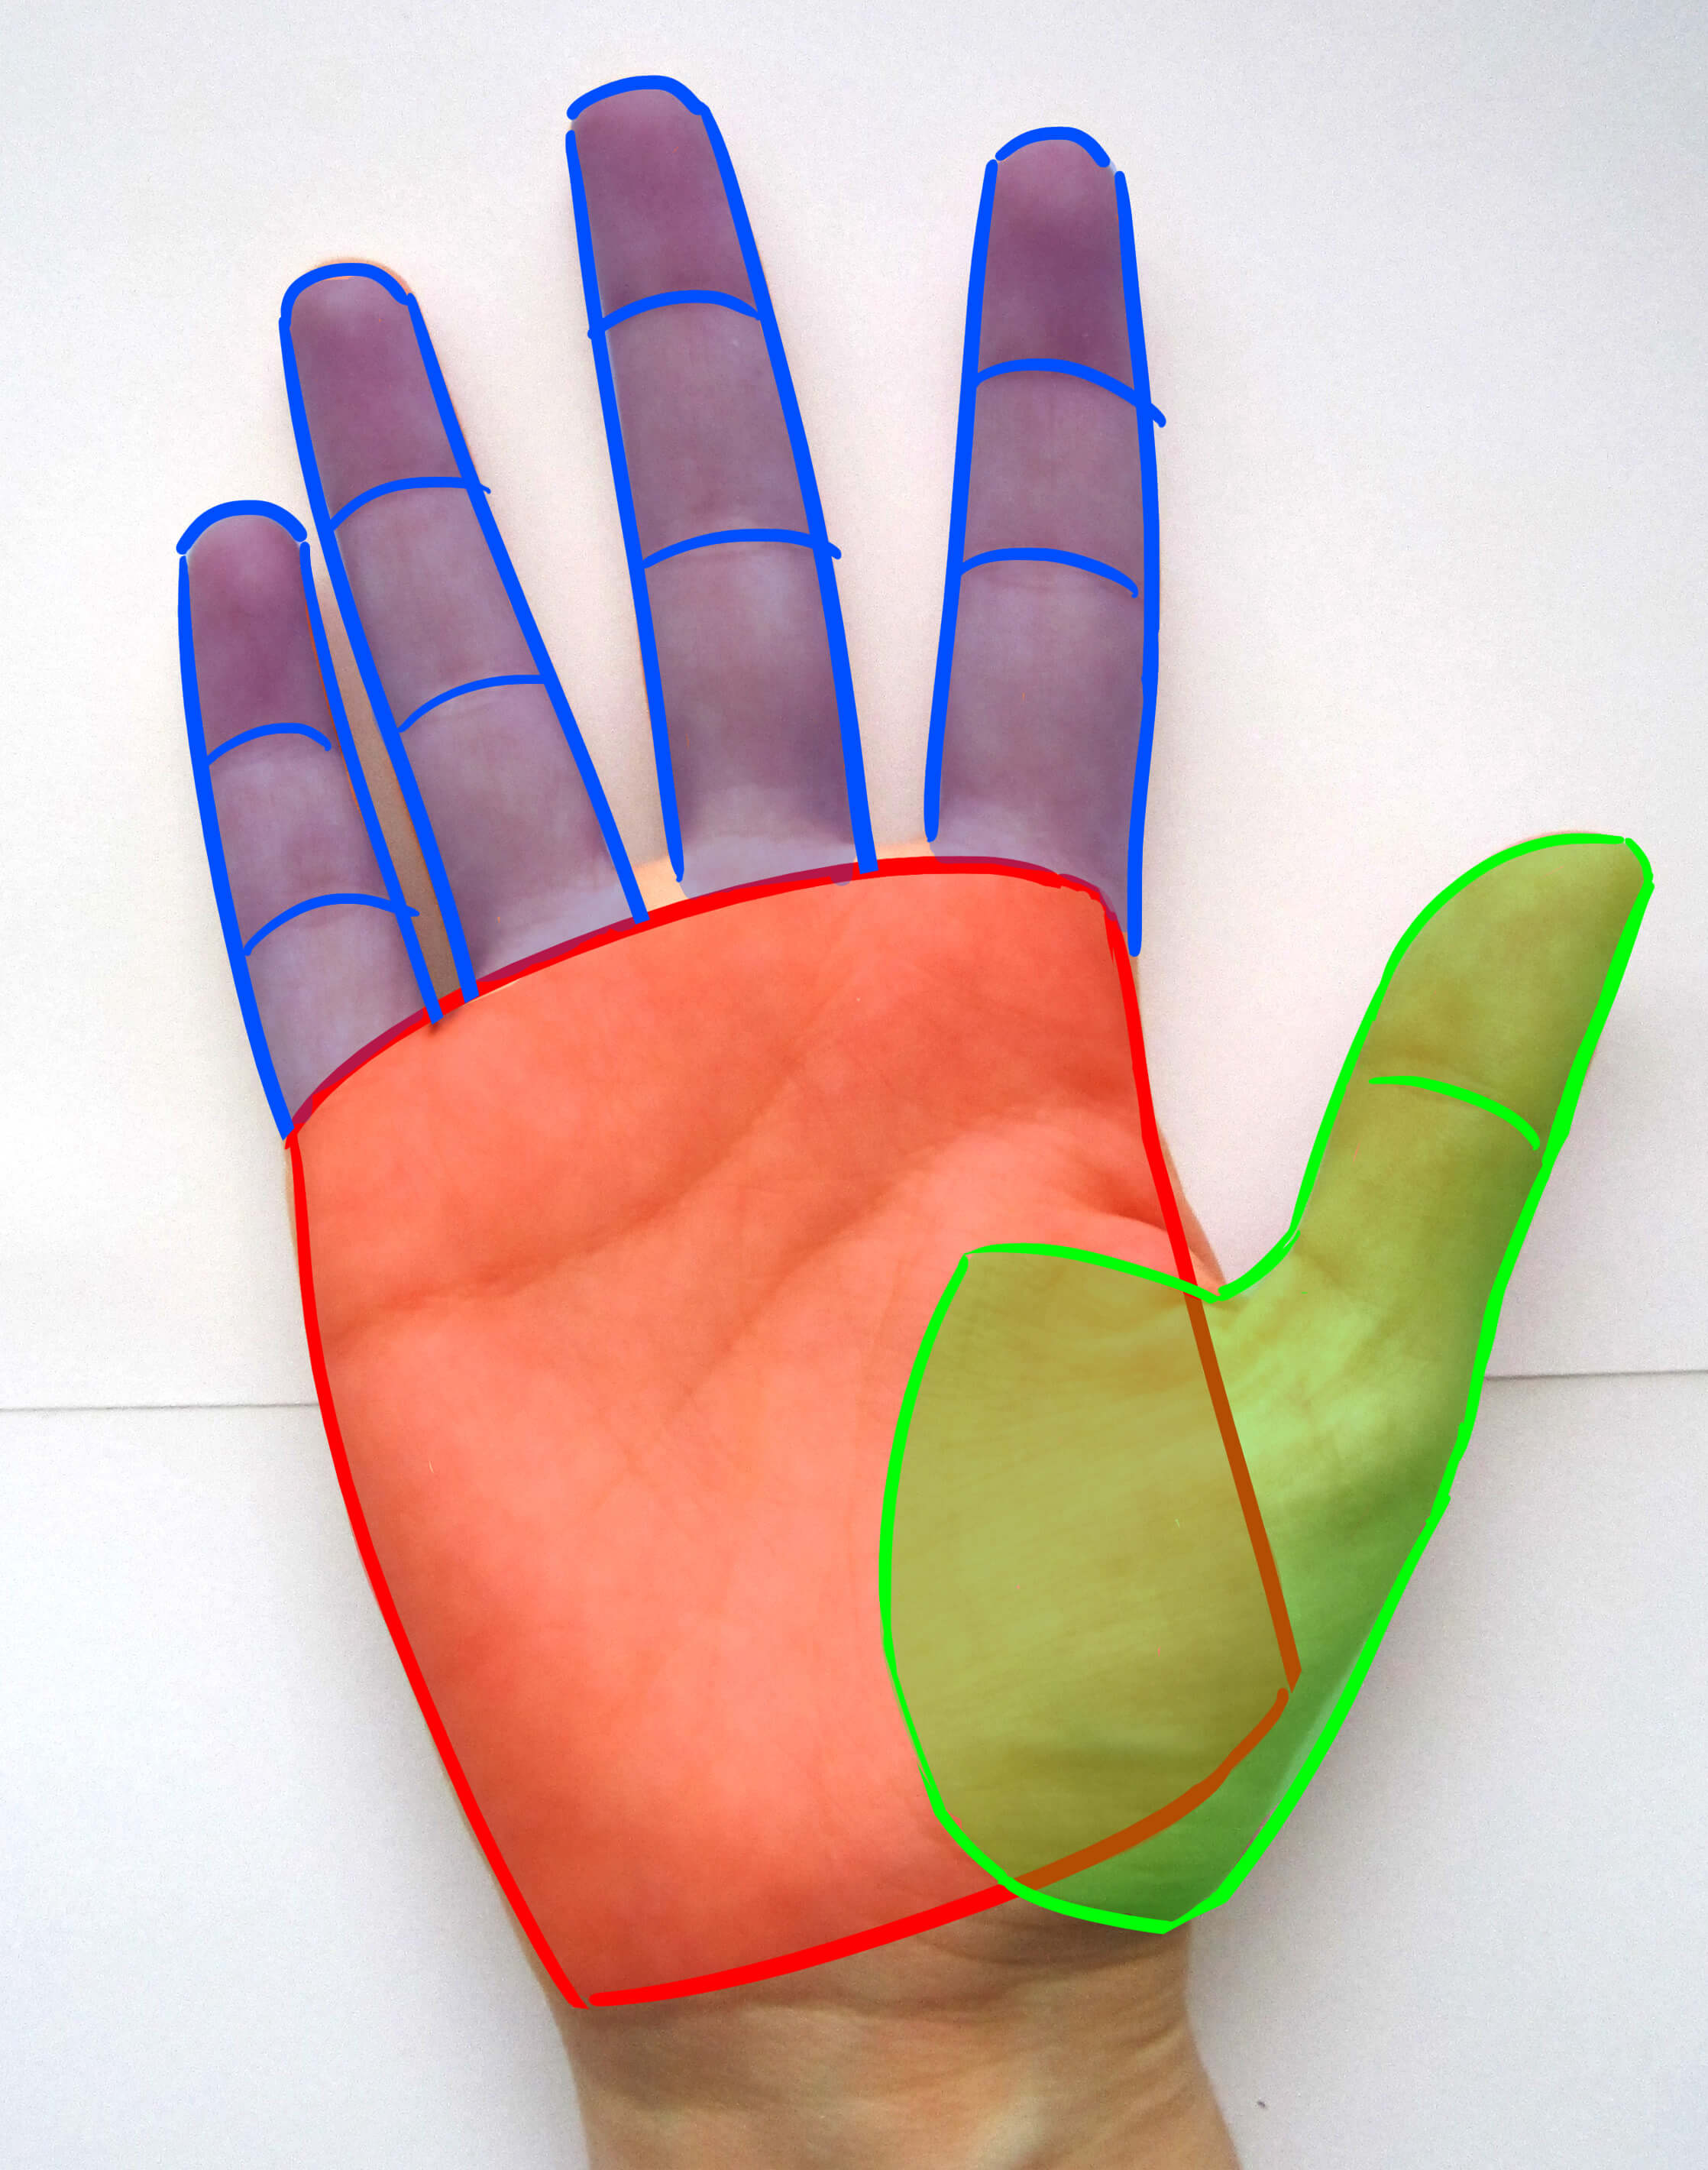
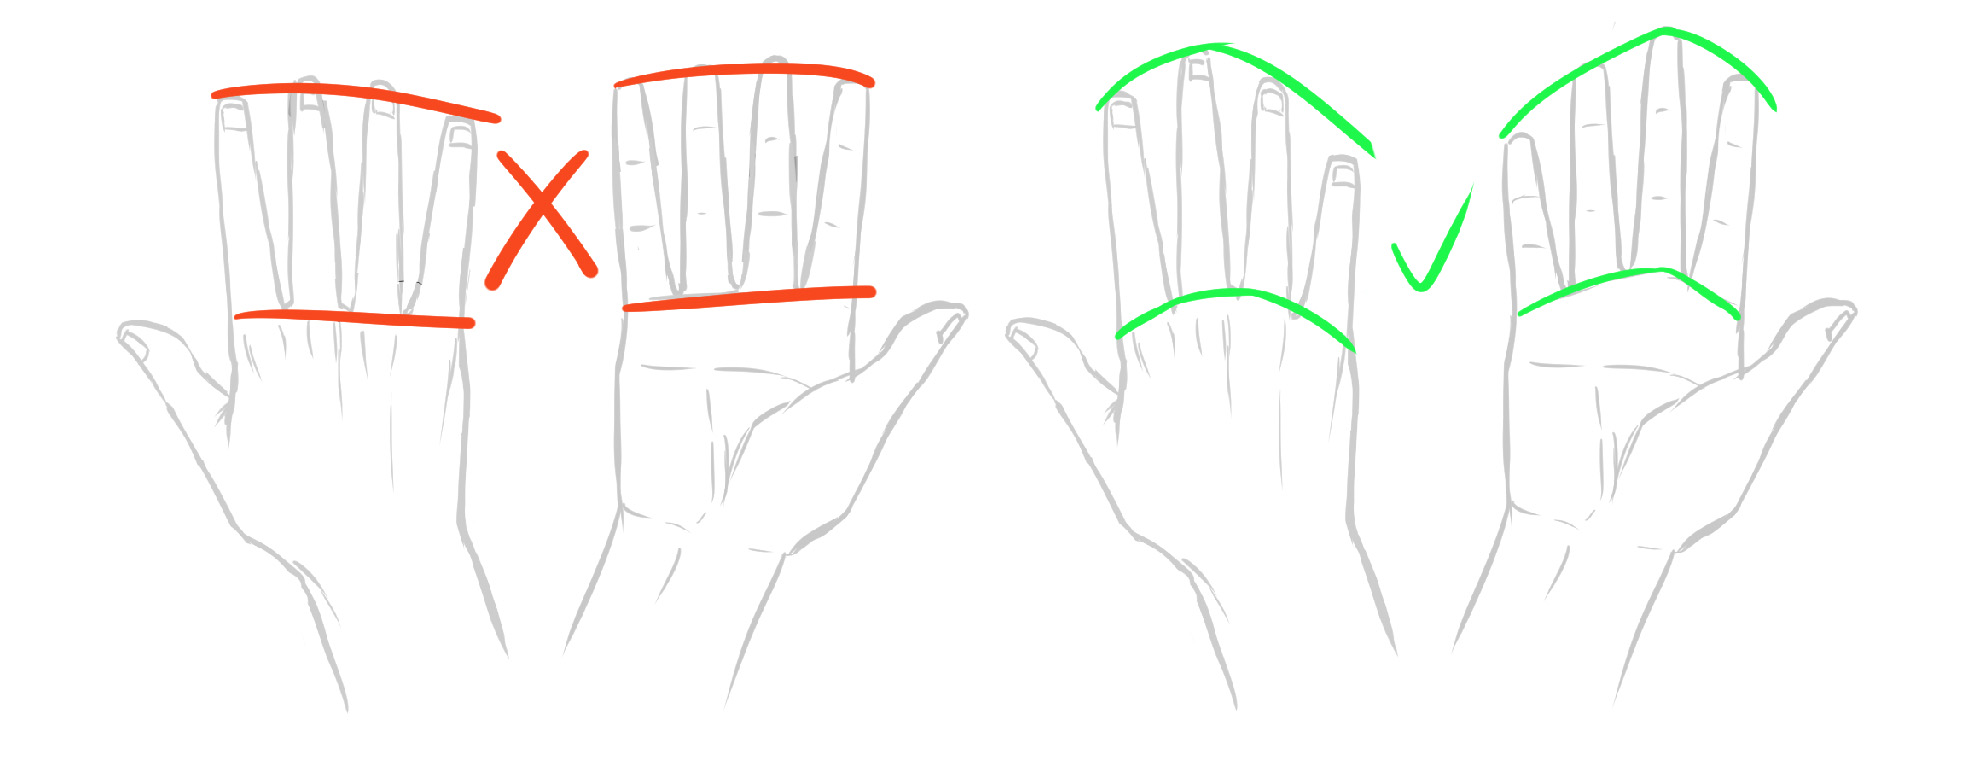
In addition to having different lengths from each other, the most important element for your hand to be successful is to understand that they are not arranged in a straight line.
Whether it be at their base or their tip. They are arranged in a curve. The middle finger, in addition to being longer, is also positioned most forward, and its joint at its base (on the palm) is the most prominent. Consequently, the same applies to the joints of the fingers that follow the same curve.
Here are the most important elements to remember.
DRAWING HAND DETAILS

Regarding the details that look good.
For the front of the hand, there is of course the demarcation area of the thumb. And the opposite part (the area just opposite and with nothing at the bottom of the palm).
There's also the crease, just above the middle of the hand. Stretch out your fingers and bend them straight, at 90°. You'll see it form ^^
From the back, there are the finger joints, of course. Those that I have already indicated on the palm and which form the small bumps. But there is also the metacarpus, especially useful in certain postures (for example, if you make a very contracted, hooked hand, they will stand out).
Not to forget the nails, of course. Some people use them, others don't. Personally, I find them very useful to indicate the orientation of the finger, especially in shorthand.
Also know that to start, you can cheat by not putting three joints in the fingers but only two. In most positions, it won’t matter ^^
Be cautious though. Depending on the type of hand you are drawing, it is not advisable to indicate all these details. For example, if your character is female, avoid emphasizing the metacarpus or the crease in the hand, especially if she is young. The same advice applies to children. Judge things well.
For more information on hands, you can find me in video on our Youtube channel, where I will give you explanations!
;DRAWINGS OF HANDS IN DIFFERENT POSITIONS
Following all this, it becomes easier to draw hands. Don't hesitate, if you have a doubt or encounter a difficulty, to look at your own hands and observe them to understand what you are struggling to grasp. You are your best model :3
Below, I have broken down four examples for you. Each time, you will have the version drawn by me, and next to it, the version divided into simpler shapes.
DRAWING A HAND HOLDING A PENCIL
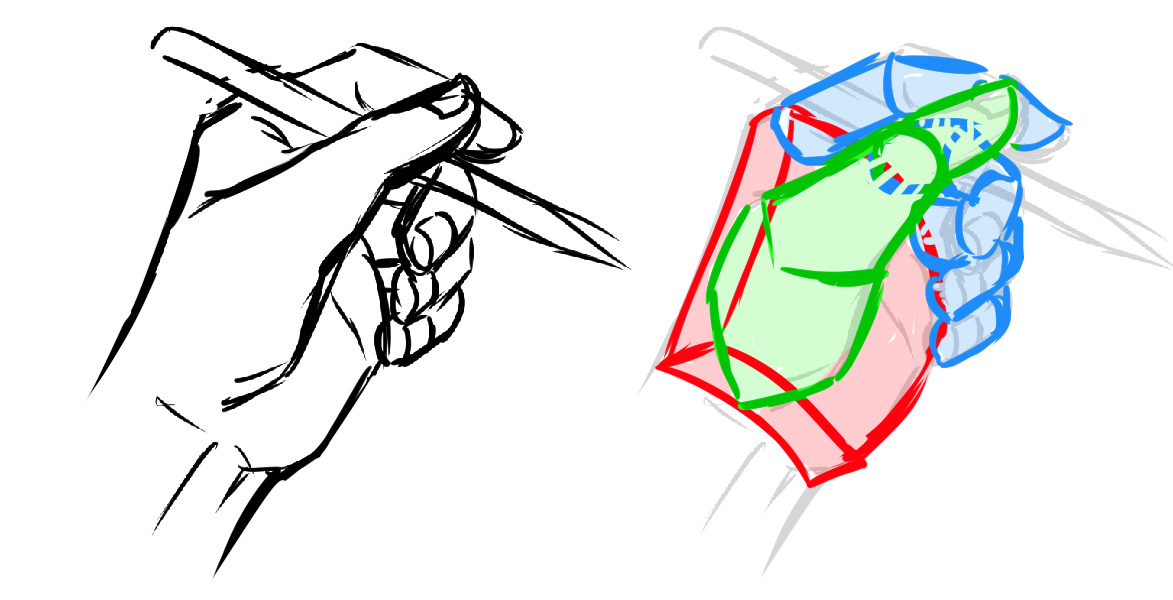
Here, a hand holding a pencil quite nonchalantly. The fingers are not on the pencil; it appears to rest on the middle finger and is simply wedged by the thumb. This is not the pose of someone who is writing, but rather of someone who has paused and released the pencil.
In breaking it down, the structure immediately becomes much more visible. The palm is seen slightly from the side, the thumb is almost extended, and the fingers are all curled up.
DRAWING CLASPED HANDS
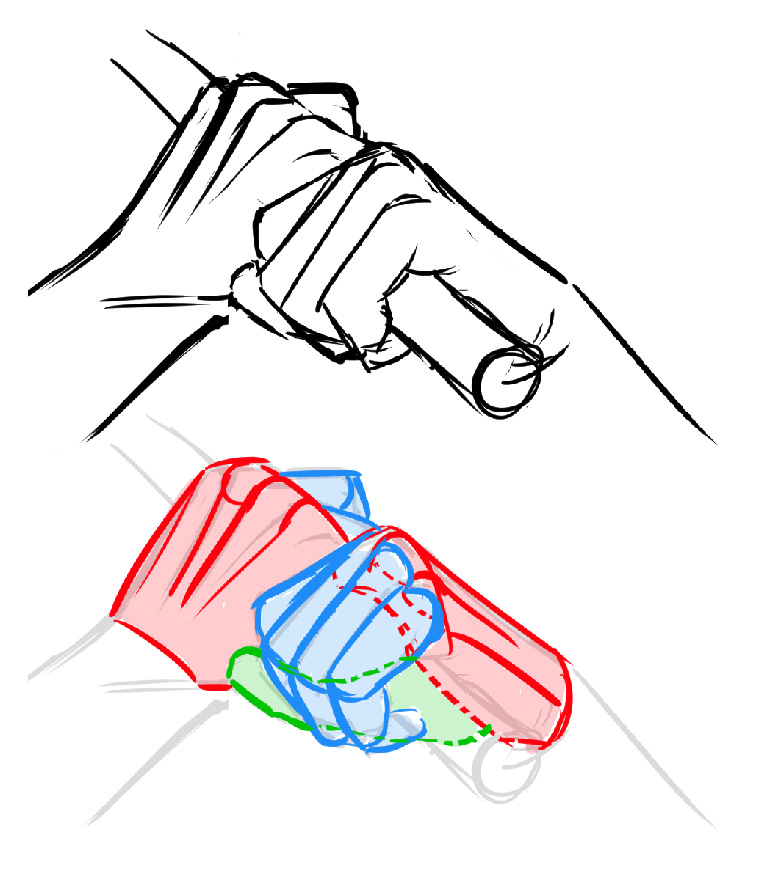
Here is a more complex view. Here you can almost see the palms in profile, holding a stick. One palm is hidden by the other. The main difficulty lies in understanding how the hand is positioned around the stick. Especially to correctly position the thumb. In this case, feel free to draw it transparently.
The second hand is easier to do, we mainly see the back and a few fingers sticking out, so no need to do everything transparently.
DRAWING OF A COMMON HAND POSE
We are in a more common pose. The hand is slightly positioned backwards (this is more evident in the sketch of the structure). The difficulty here is more on the palm. Otherwise, it’s a relatively clear position to read and replicate.
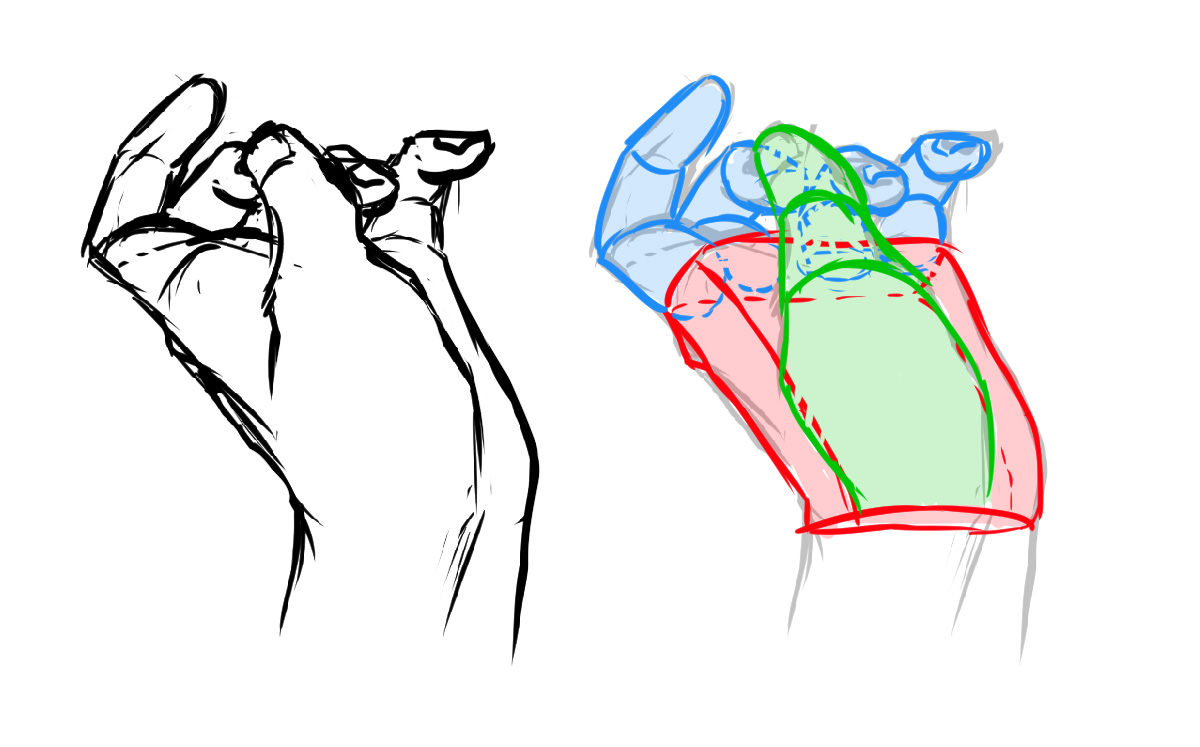
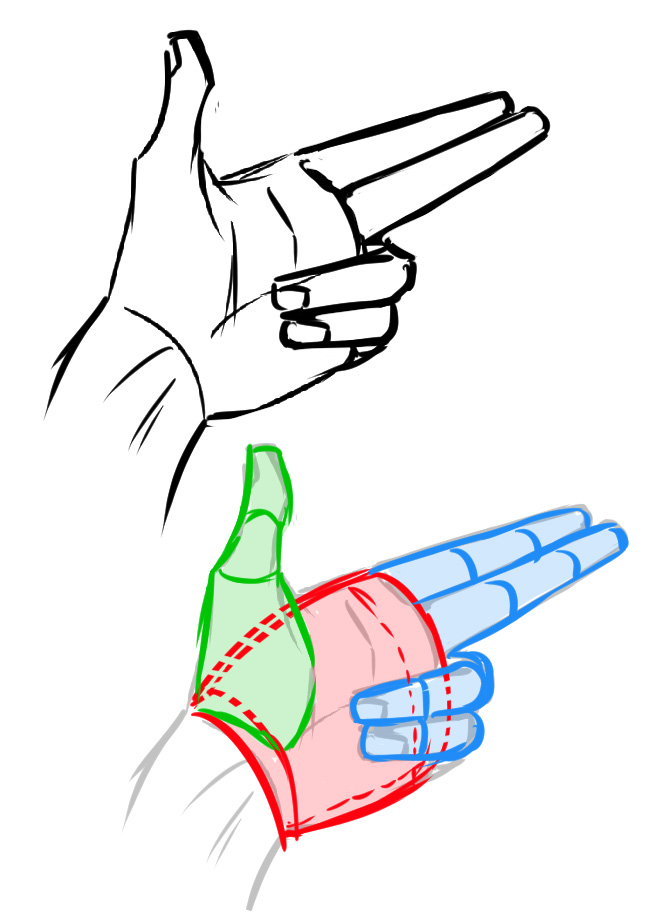
DRAW A HAND IN A COMPLEX POSITION

Here, it’s a very complex view. The kind that is difficult to achieve without reference. There is a shortcut on both the palm and the thumb. In addition to that, our palm flares towards the fingers, so we have to integrate a strange perspective effect (what is far appears smaller, but the area that narrows in perspective is wider than the base under normal circumstances).
Not to mention that this angle completely flattens the curve that we normally see at the base of the fingers, which as a result appears flat.
In addition to that, the fingers are bent backwards and thus partly hidden by the viewing angle.
Clearly, if you have to strike poses like this, take a photo or ask a friend to pose for you. It’s the kind of very complex angle to achieve without a model, if not impossible without looking weird. It was the drawing of a hand, to create the drawing of another part of the body or thedrawing of a man's bodyfor example, you can find all this on our blog ;)
TO CONCLUDE
All the examples given were made from photos or my hands. Never hesitate to use references if you feel stuck, and the advantage of drawing hands… is that we have 2: one to draw, and one as a model! Isn't life well made?!
If you ever want an article that really walks you through how to make a hand, feel free to mention it in the comments.
Editor and Illustrator: Rakjah
Popular Articles


Discussion
Very useful, thank you!