How to Draw a Lion
In general, felines have always fascinated humans. They are powerful and graceful animals, agile and mysterious. And although it is not the biggest, one of them has managed to inherit the title of King, I am obviously talking about the lion! This great predator will be the subject of our article today.
PRESENTATION AND STUDY OF THE LION
First, we will focus on the animal's skeleton, note that what it will teach us will be just as useful for drawing a lioness.
Lions have an imposing and highly developed musculature. Their body is elongated and squat on thick muscular legs (you need to be strong to take down prey that can sometimes be your size).
[Non-breaking space]
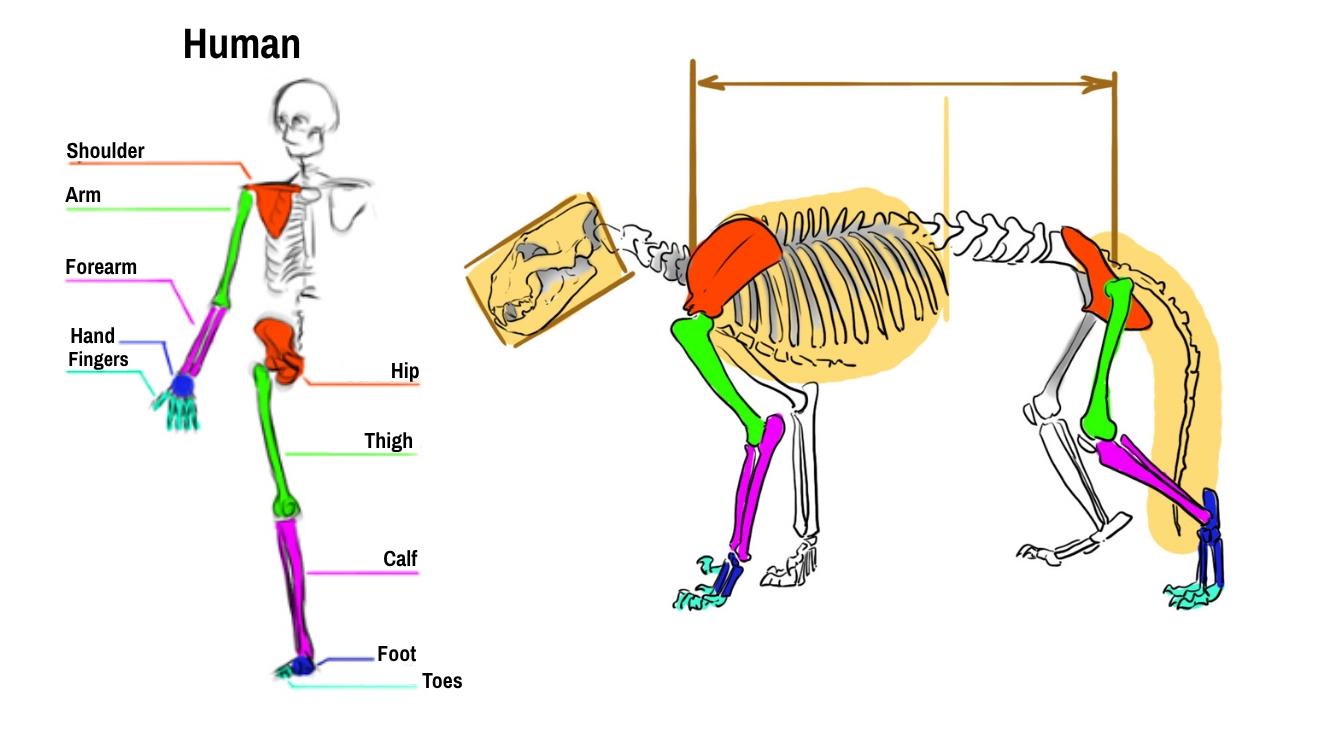
At first, let's compare the construction of the legs with human limbs. You find the same elements (as is often the case with mammals). But the lion, unlike humans, is digitigrade, meaning it walks on its "toes" (the light blue part).
The lion is the second largest feline after the tiger, yet it is generally accepted that it has the largest skull size among felines. The skull can fit within a rectangle without the jaw being too long or thin. The overall appearance is rather compact.
Also highlighted in orange, the area of the rib cage, which is very developed and occupies just over half of the torso defined by the brown lines.
Also highlighted, the tail, note which is ultimately quite long and reaches the level of the "ankle" of the hind leg.
In the following diagram, you can see the skull a bit better.
The eye, in orange, will be placed about halfway along the length of the skull, slightly towards the back. In green, the area where the muzzle will be placed. In yellow the "hearing zone" which gives us the width and the attachment points of the ear (in red). A brown line follows the upper limits of the bone, you will notice that the forehead is not marked at all.
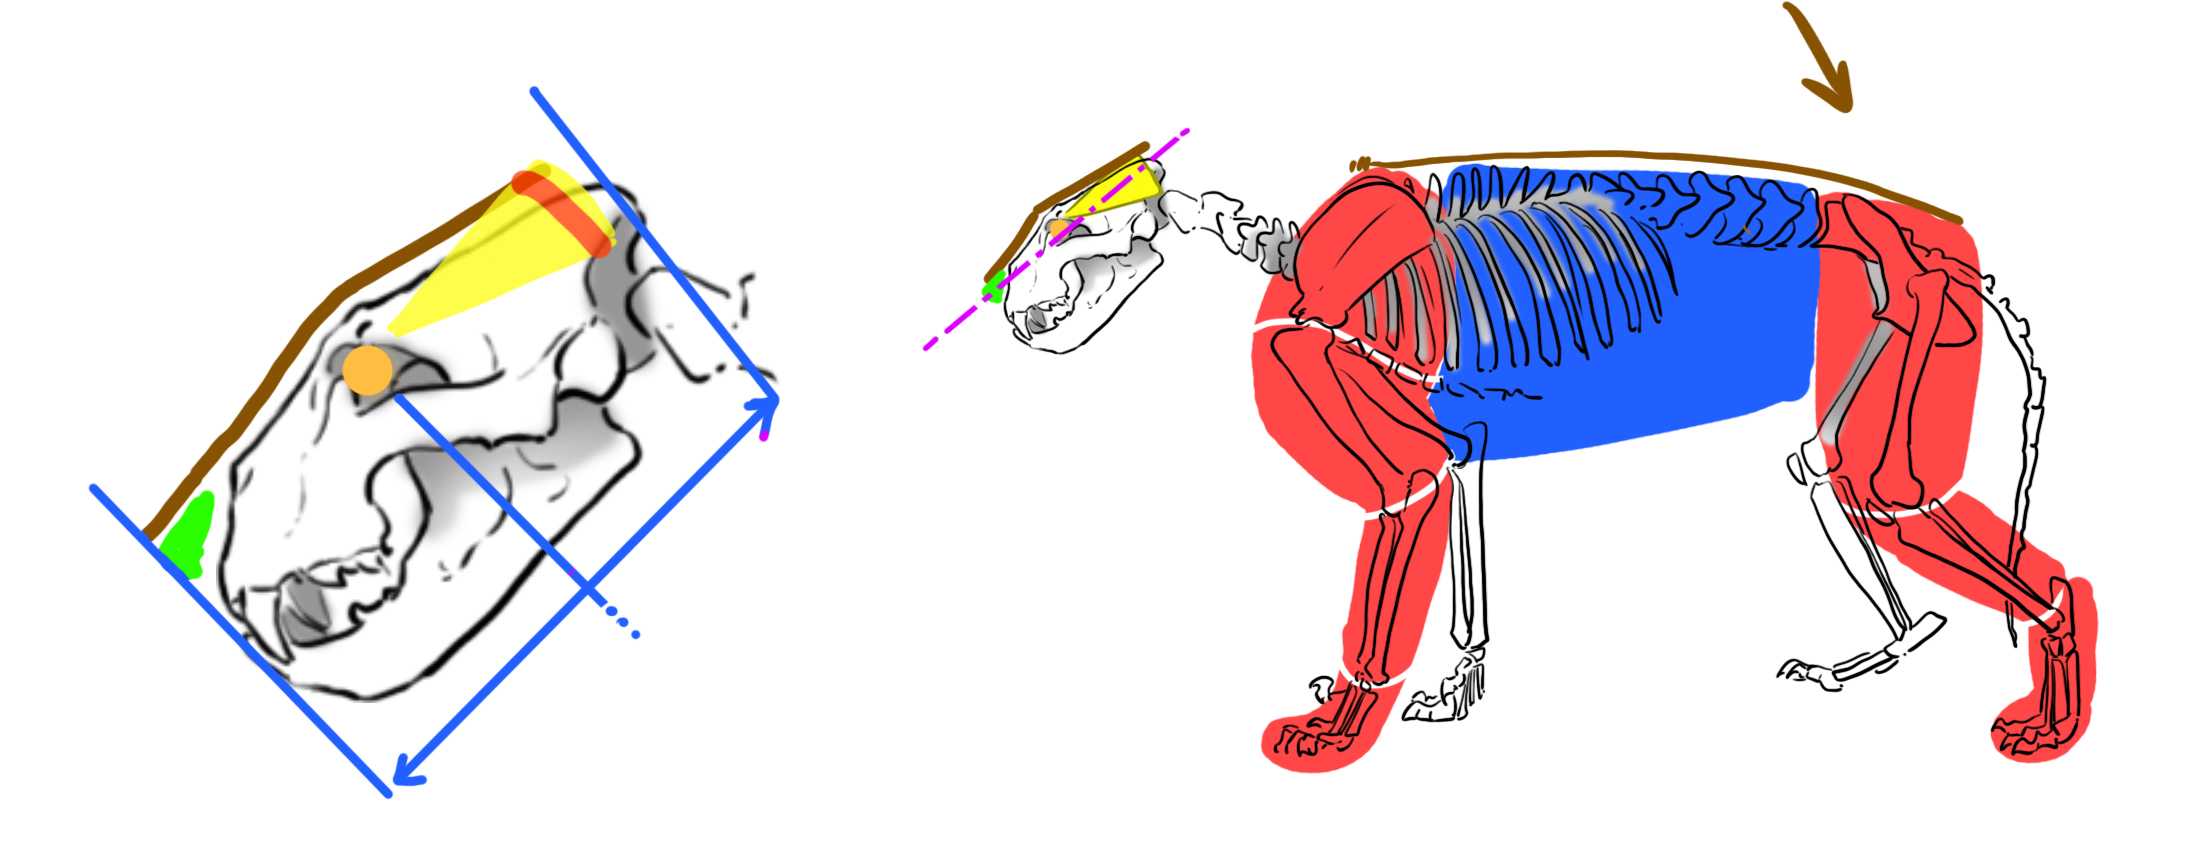
In the diagram on the right, a purple line shows that the muzzle and the eye are almost on the same line. This will result in a very wide and flat forehead.
Let's look at the red and blue areas. In red, I've roughly covered the bones with muscle mass. You can see that the upper part of the front leg and what could be called the thigh are very developed. These are volumes that structure our animal.
In blue, the chest area forms a rectangle that gently narrows towards the back of the beast.
In brown, a line follows the bones. Note from the hip, the back line gently slopes down.
If we summarize all this, we realize that our lion appears.
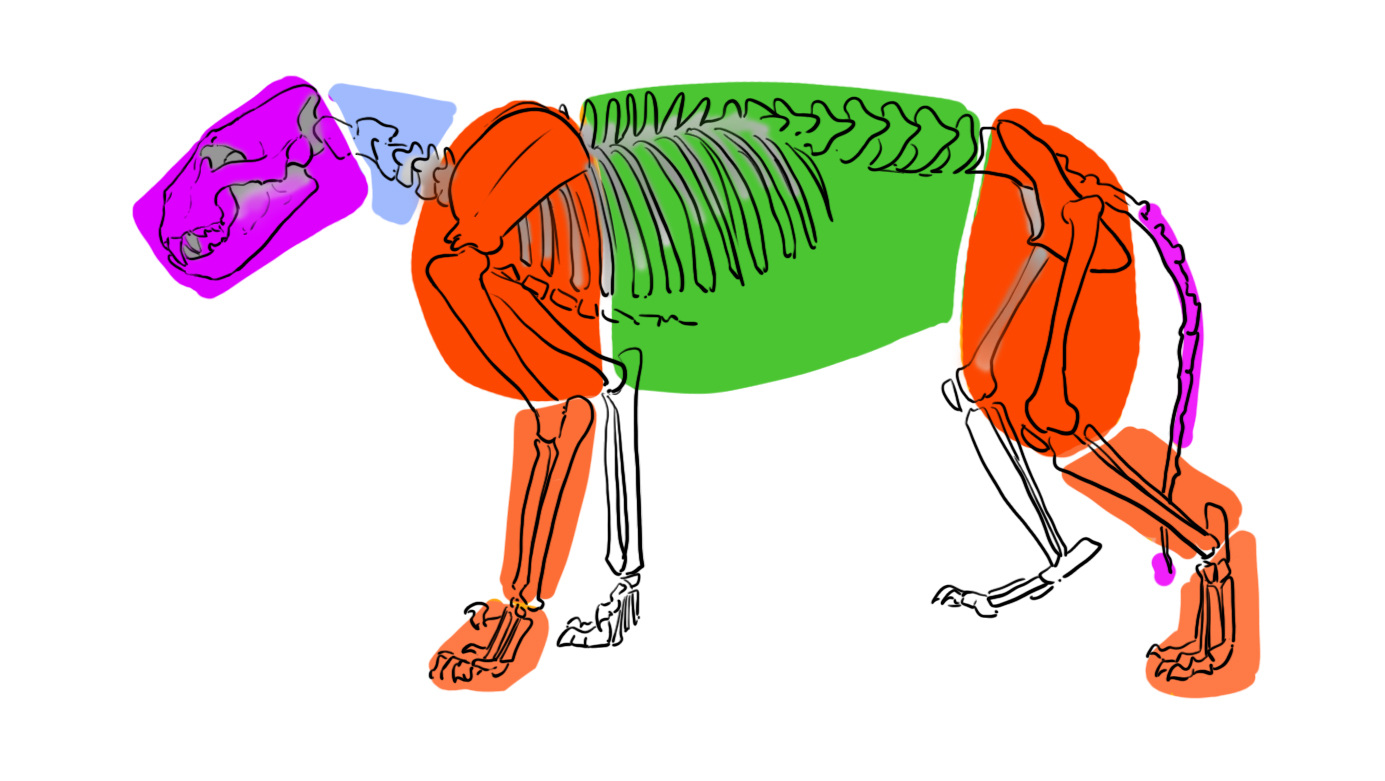
From left to right:
In purple the rectangle of the head.
In blue, the neck is short and powerful.
In red the upper muscles of the limbs, with the following limbs in orange.
In green, the bust, quite wide.
The tail is purple.
THE DRAWING
DRAW THE LION'S HEAD
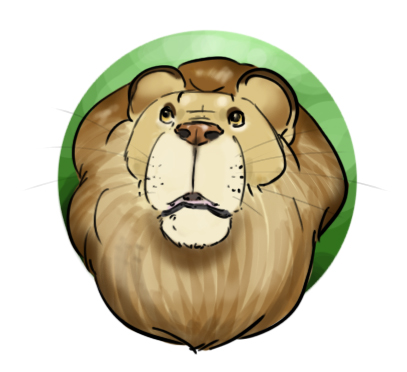
Let's resume the study of the skull but on an animal seen from the front.
You will find in yellow the hearing area which indicates where to place the ears, although they are greatly concealed by the fur.
In pink you will find the whiskers. As always, avoid making too many appear, as it may weigh down your drawing. If your drawing is not meant to be ultra-realistic, be discreet about this detail.
Please note, however, that the longest whiskers are located on the upper part of the muzzle. The lion also has some above its eyes and a few on the cheeks.
Just like the whiskers themselves, their attachment points should be handled discreetly. In the simplified version on the left, the attachment points of the whiskers are represented by 5 black lines so that you can easily locate them.
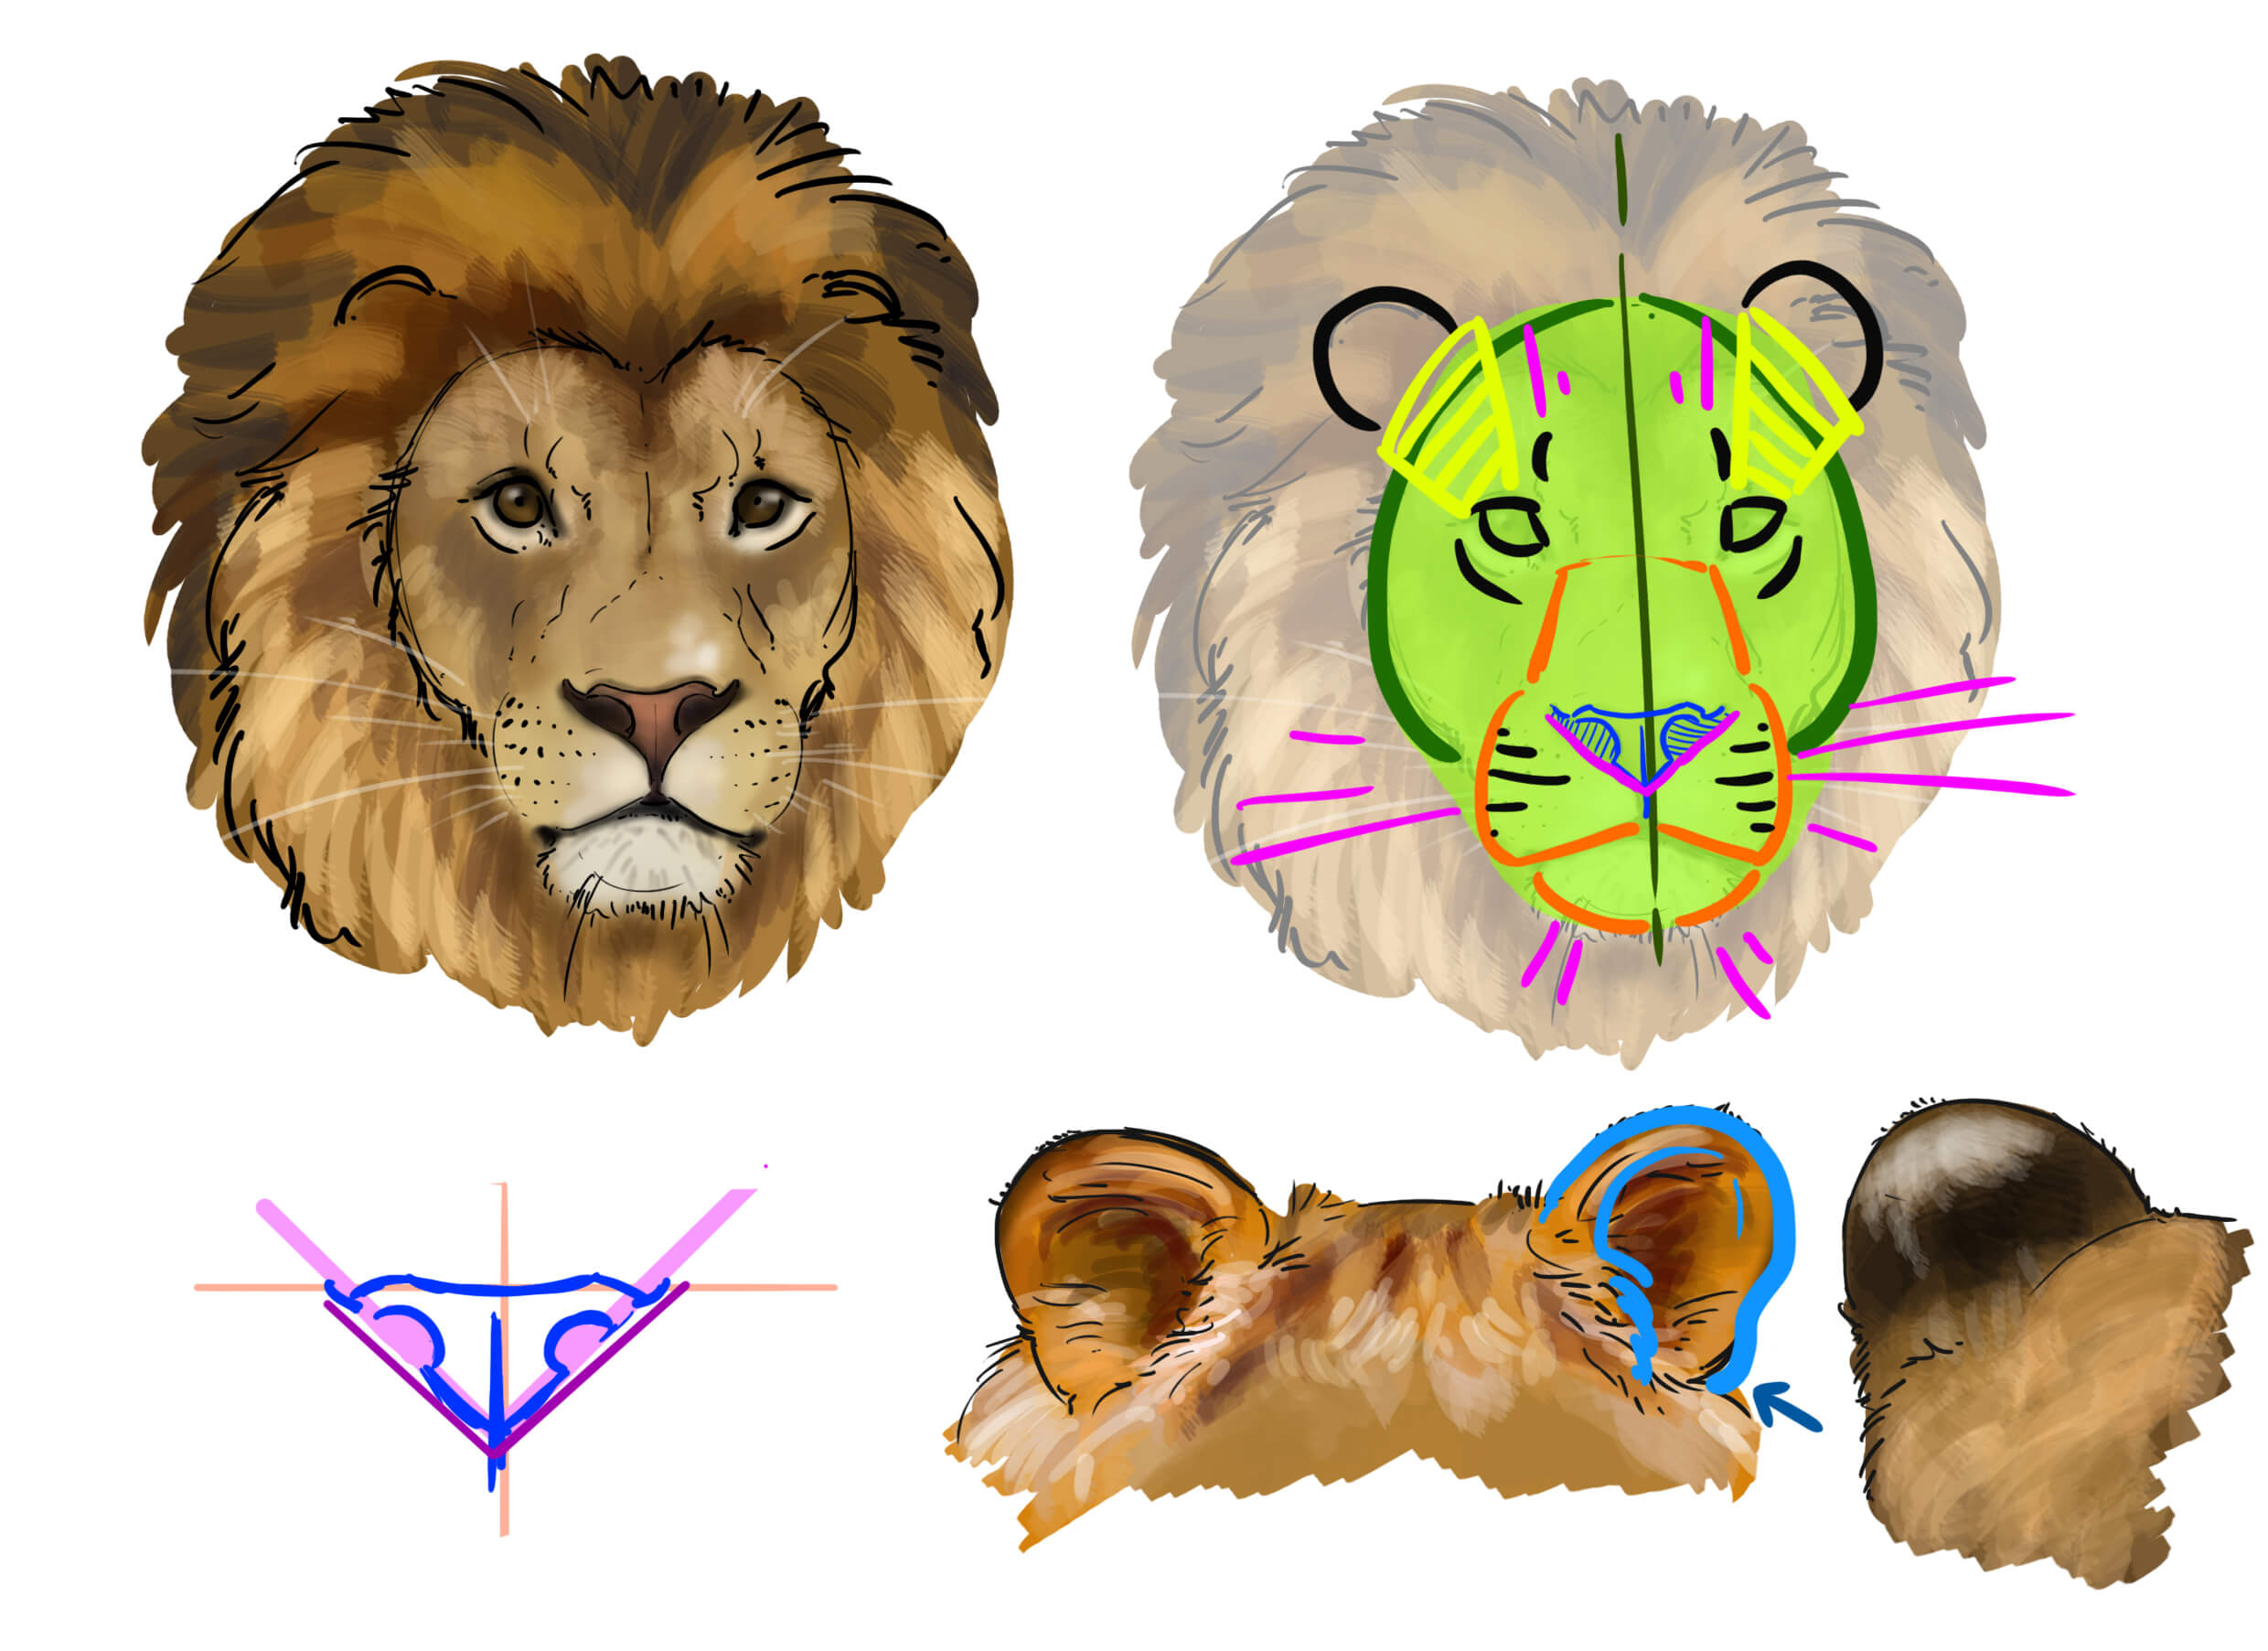
The truffle will be the same as a cat's, not quite straight on top, make a slight wave above the nostrils, with a return on the upper edges. The triangle in which you can define the truffle gives you the area of the nostrils that you will need to darken.
For the ears, they are nicely rounded, with a slight irregularity on the outer junction (indicated by the dark blue arrow). A line of fur runs in front, and the edges of the ear are also covered with fur (light blue lines). From the back, the ear is darker with a white spot on the tip.
DRAWING THE ANIMAL'S EYE
As is often the case with predators, the eyes are not located on the sides of the skull but rather at the front. This means that when you look at the animal from the front, the eyes face you, and when you look at the head from the side, the eyes are also in profile.
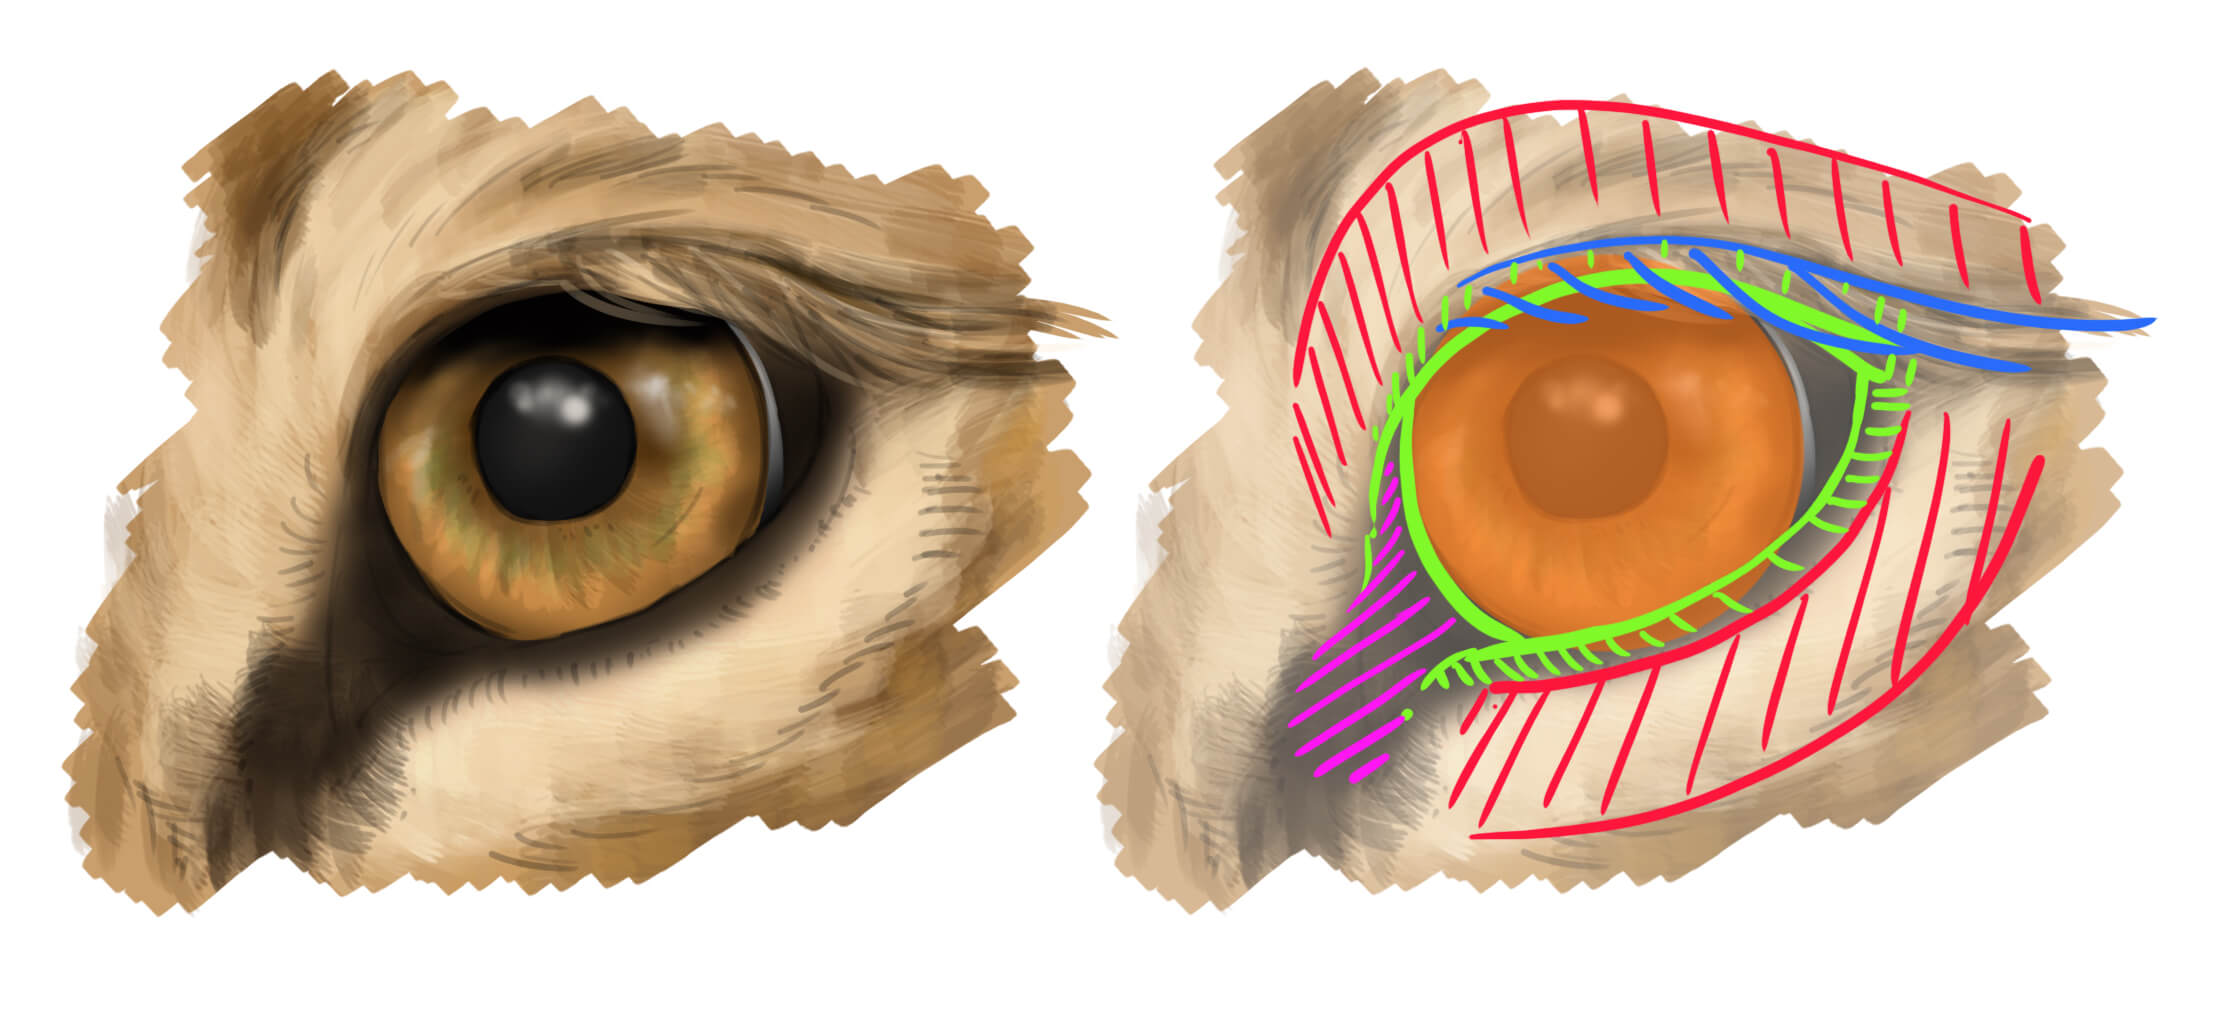
The pupil is golden to amber in color. Here I added a subtle touch of green to give density to the material. The iris is round and very black.
In the drawing on the left, you can see a subtle "white of the eye" to the right of the pupil. This "white of the eye" should remain very subtle and if you are not specifically looking for a realistic effect, you can choose not to include it.
In the diagram on the right, in green are the eyelids, black, which cover part of the eye (in orange) at the top and bottom. In blue are the quite visible eyelashes of the upper eyelid. The hatched area in pink shows you the inner corner of the eye; its junction with the pupil is wide and curved, whereas the outer edge of the eye is more pointed. This pink hatched area is hairless and quite dark. In red hatching, the eyelid muscles.
Note that the fur under the eye forms a lighter band.
THE LION'S MOUTH
Let's return to observing the skull to clearly visualize the mouth.
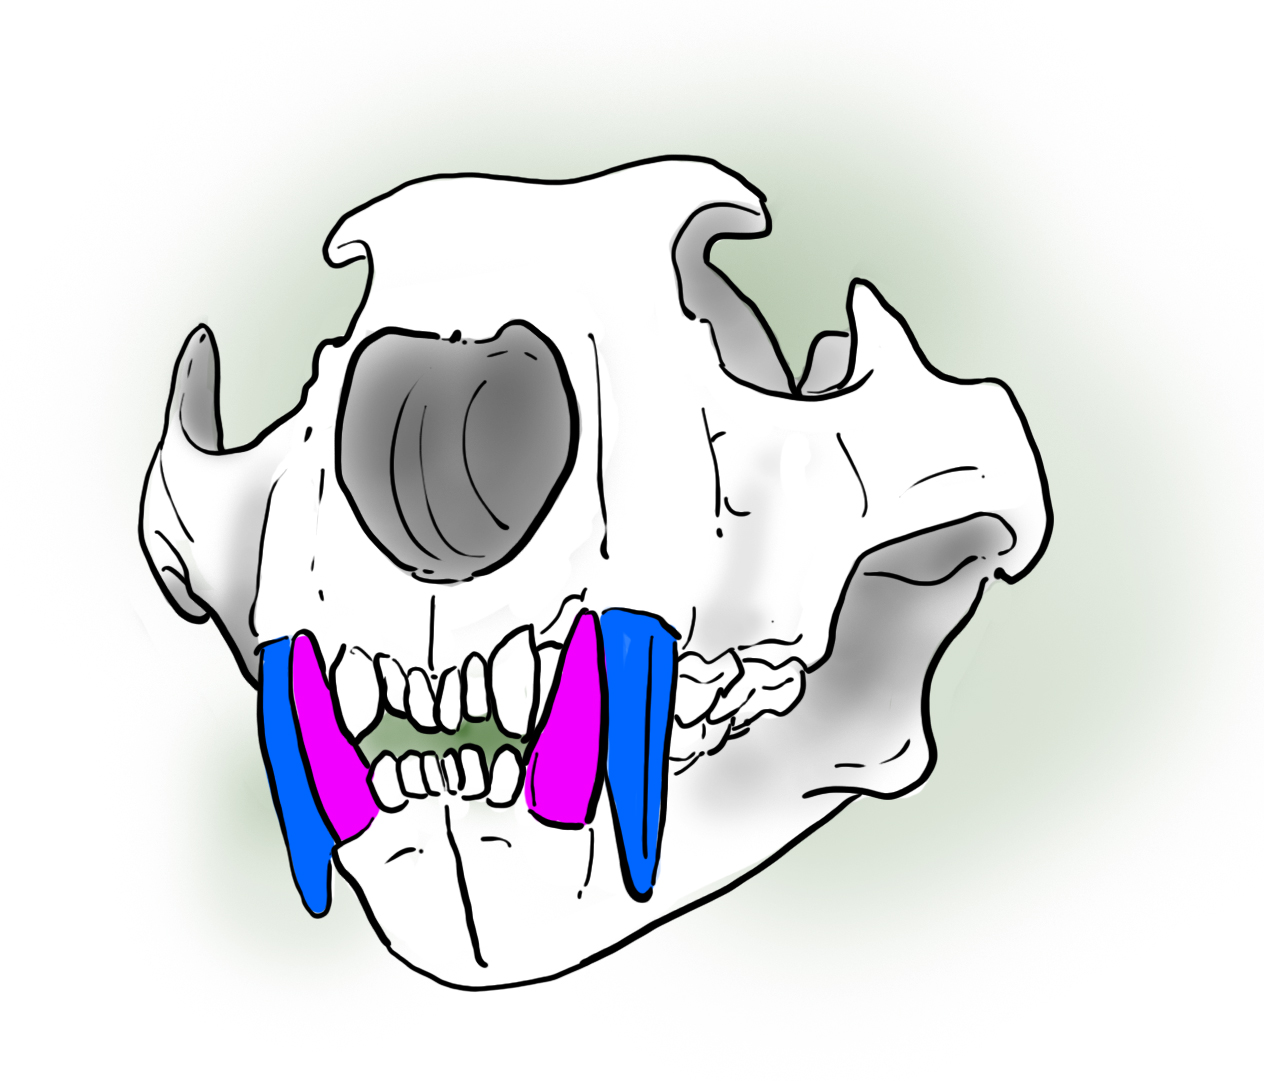
In blue are the fangs of the upper jaw. In purple are the fangs of the lower jaw. See how the upper fangs surround the lower fangs. At the front, 6 teeth on the top and bottom. Further back, the teeth have a very particular shape that we will see better in the following drawing.
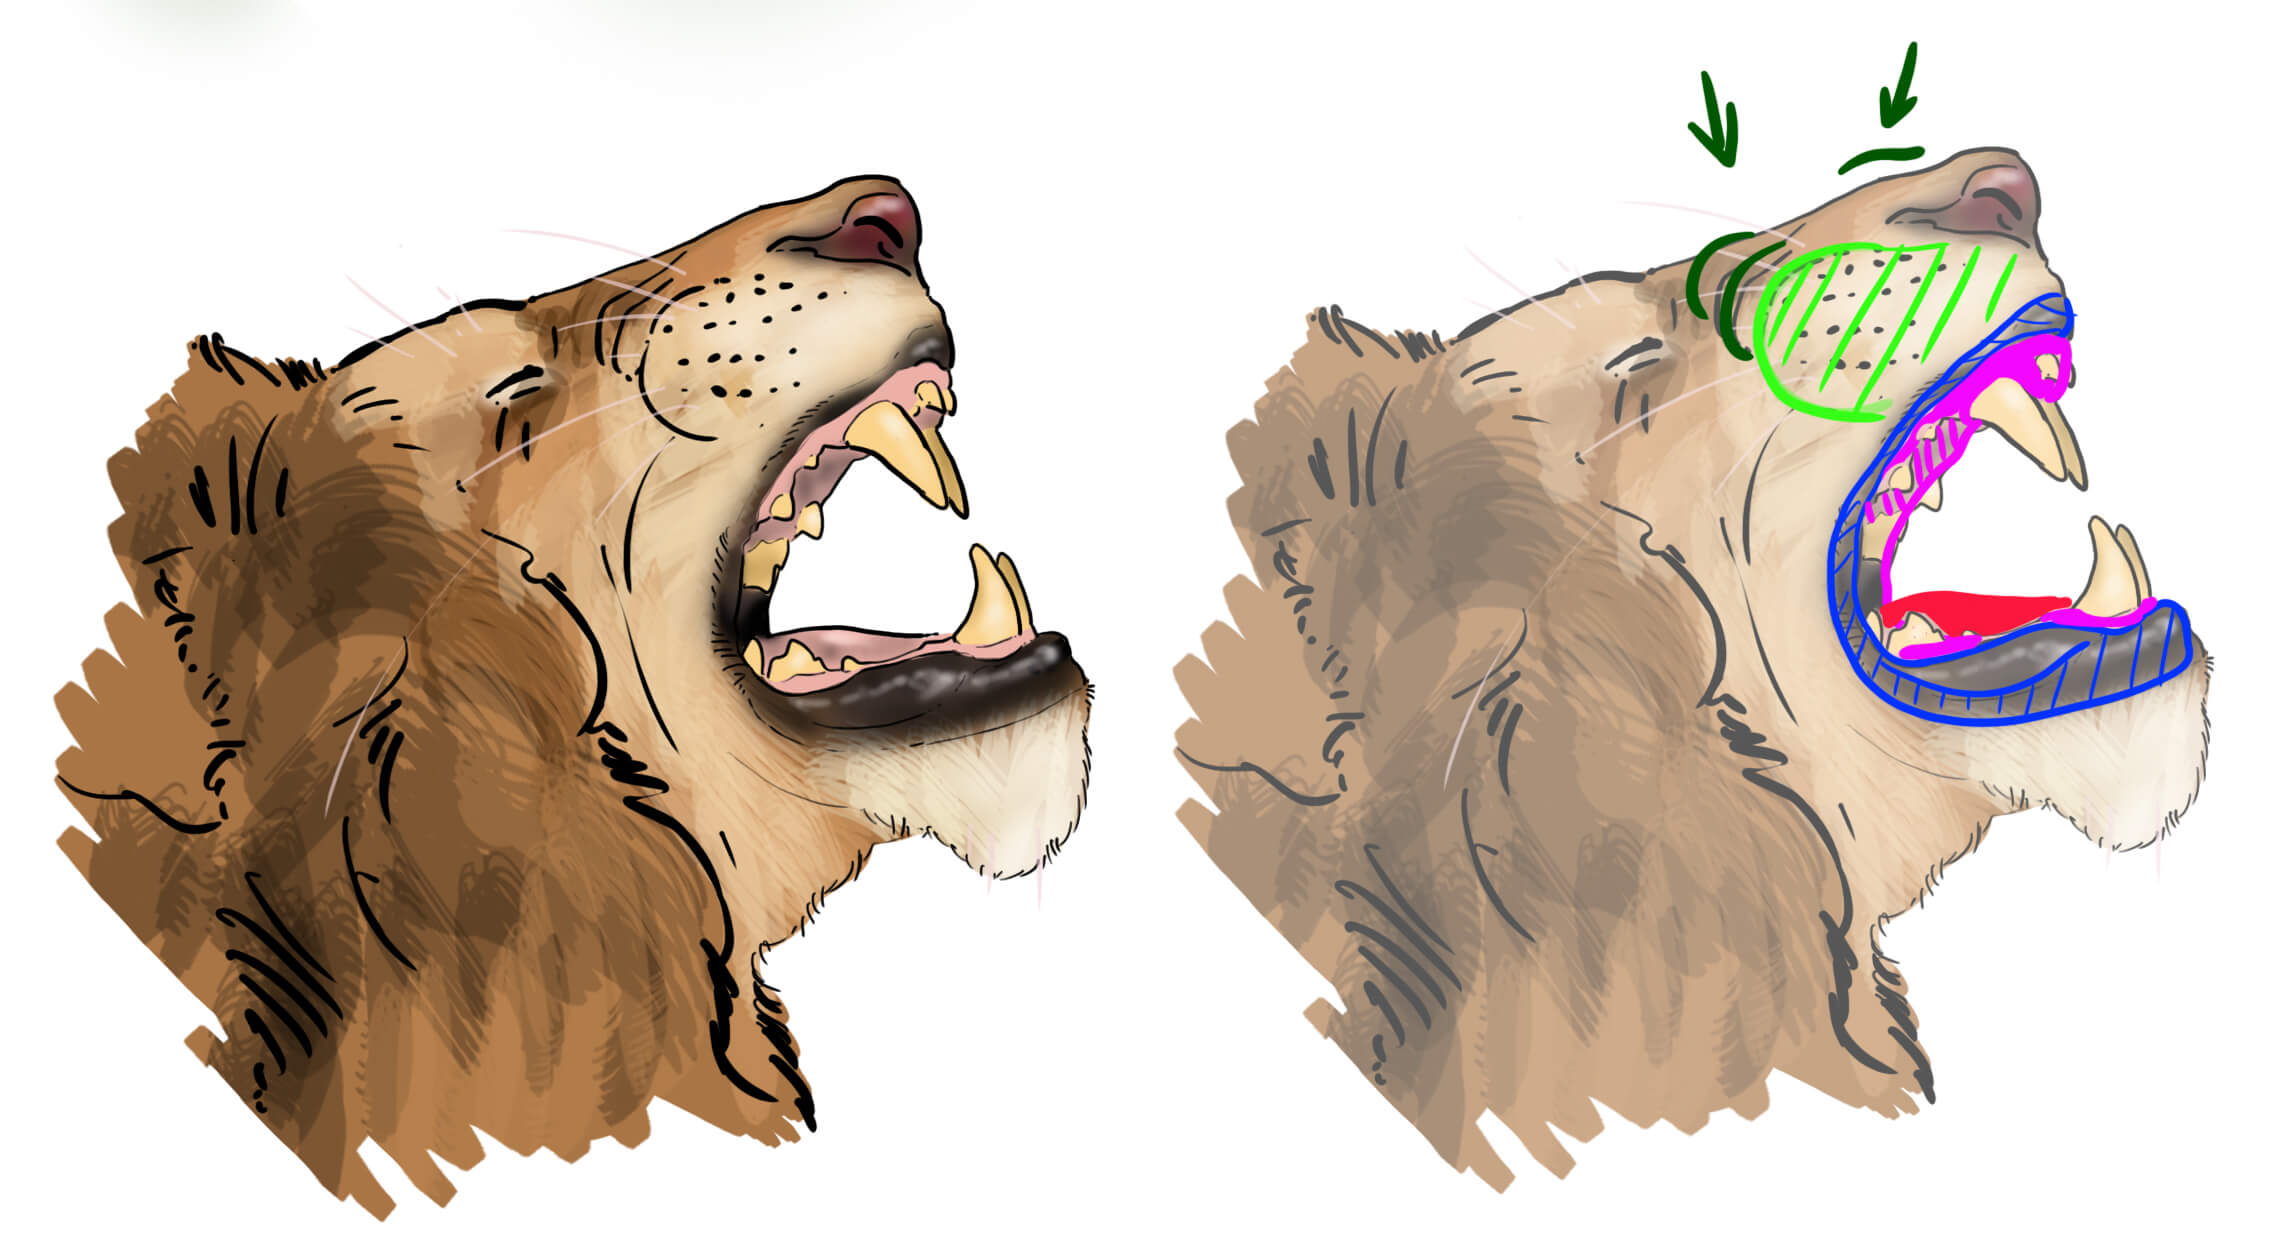
In the diagram on the right, I will highlight the important elements for you.
In blue, the "lips" or jowls, always dark and black in color. Since this area is "moist," you can enhance it with some light reflections (as in the left drawing). The lips surround the entirety of the jaws and are wider on the lower jaw. Sometimes, even when the mouth is closed, this lip area may be slightly visible.
The gums in purple, pink in color, for a realistic drawing you can add a few touches of black at the junctions with the lips.
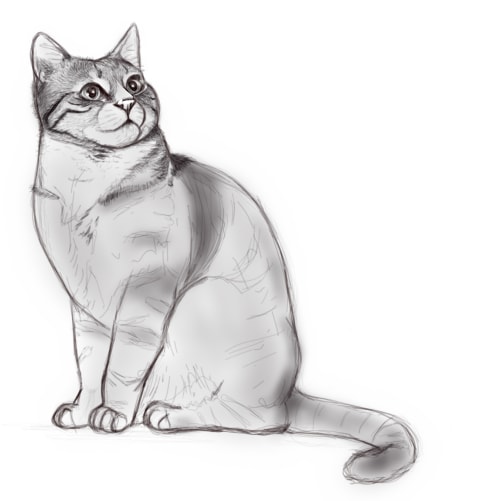
In red, the tongue. Worth knowing for a realistic drawing, like cats, lions have a rough tongue. If you want to know draw a cat, we have an article on our blog just in case that talks about it!
In green, the upper jaw muscles. In dark green, the contraction of the muscle causes folds on the top of the snout.
DRAW THE LEGS
The front legs have 5 toes and claws, and the hind legs have 4. In drawing B., I circle each "toe" in pink, blue, green, and red for the 4 that are in contact with the ground on the upper and lower limbs. In purple, the additional "toe" present only on the inside of the front legs.
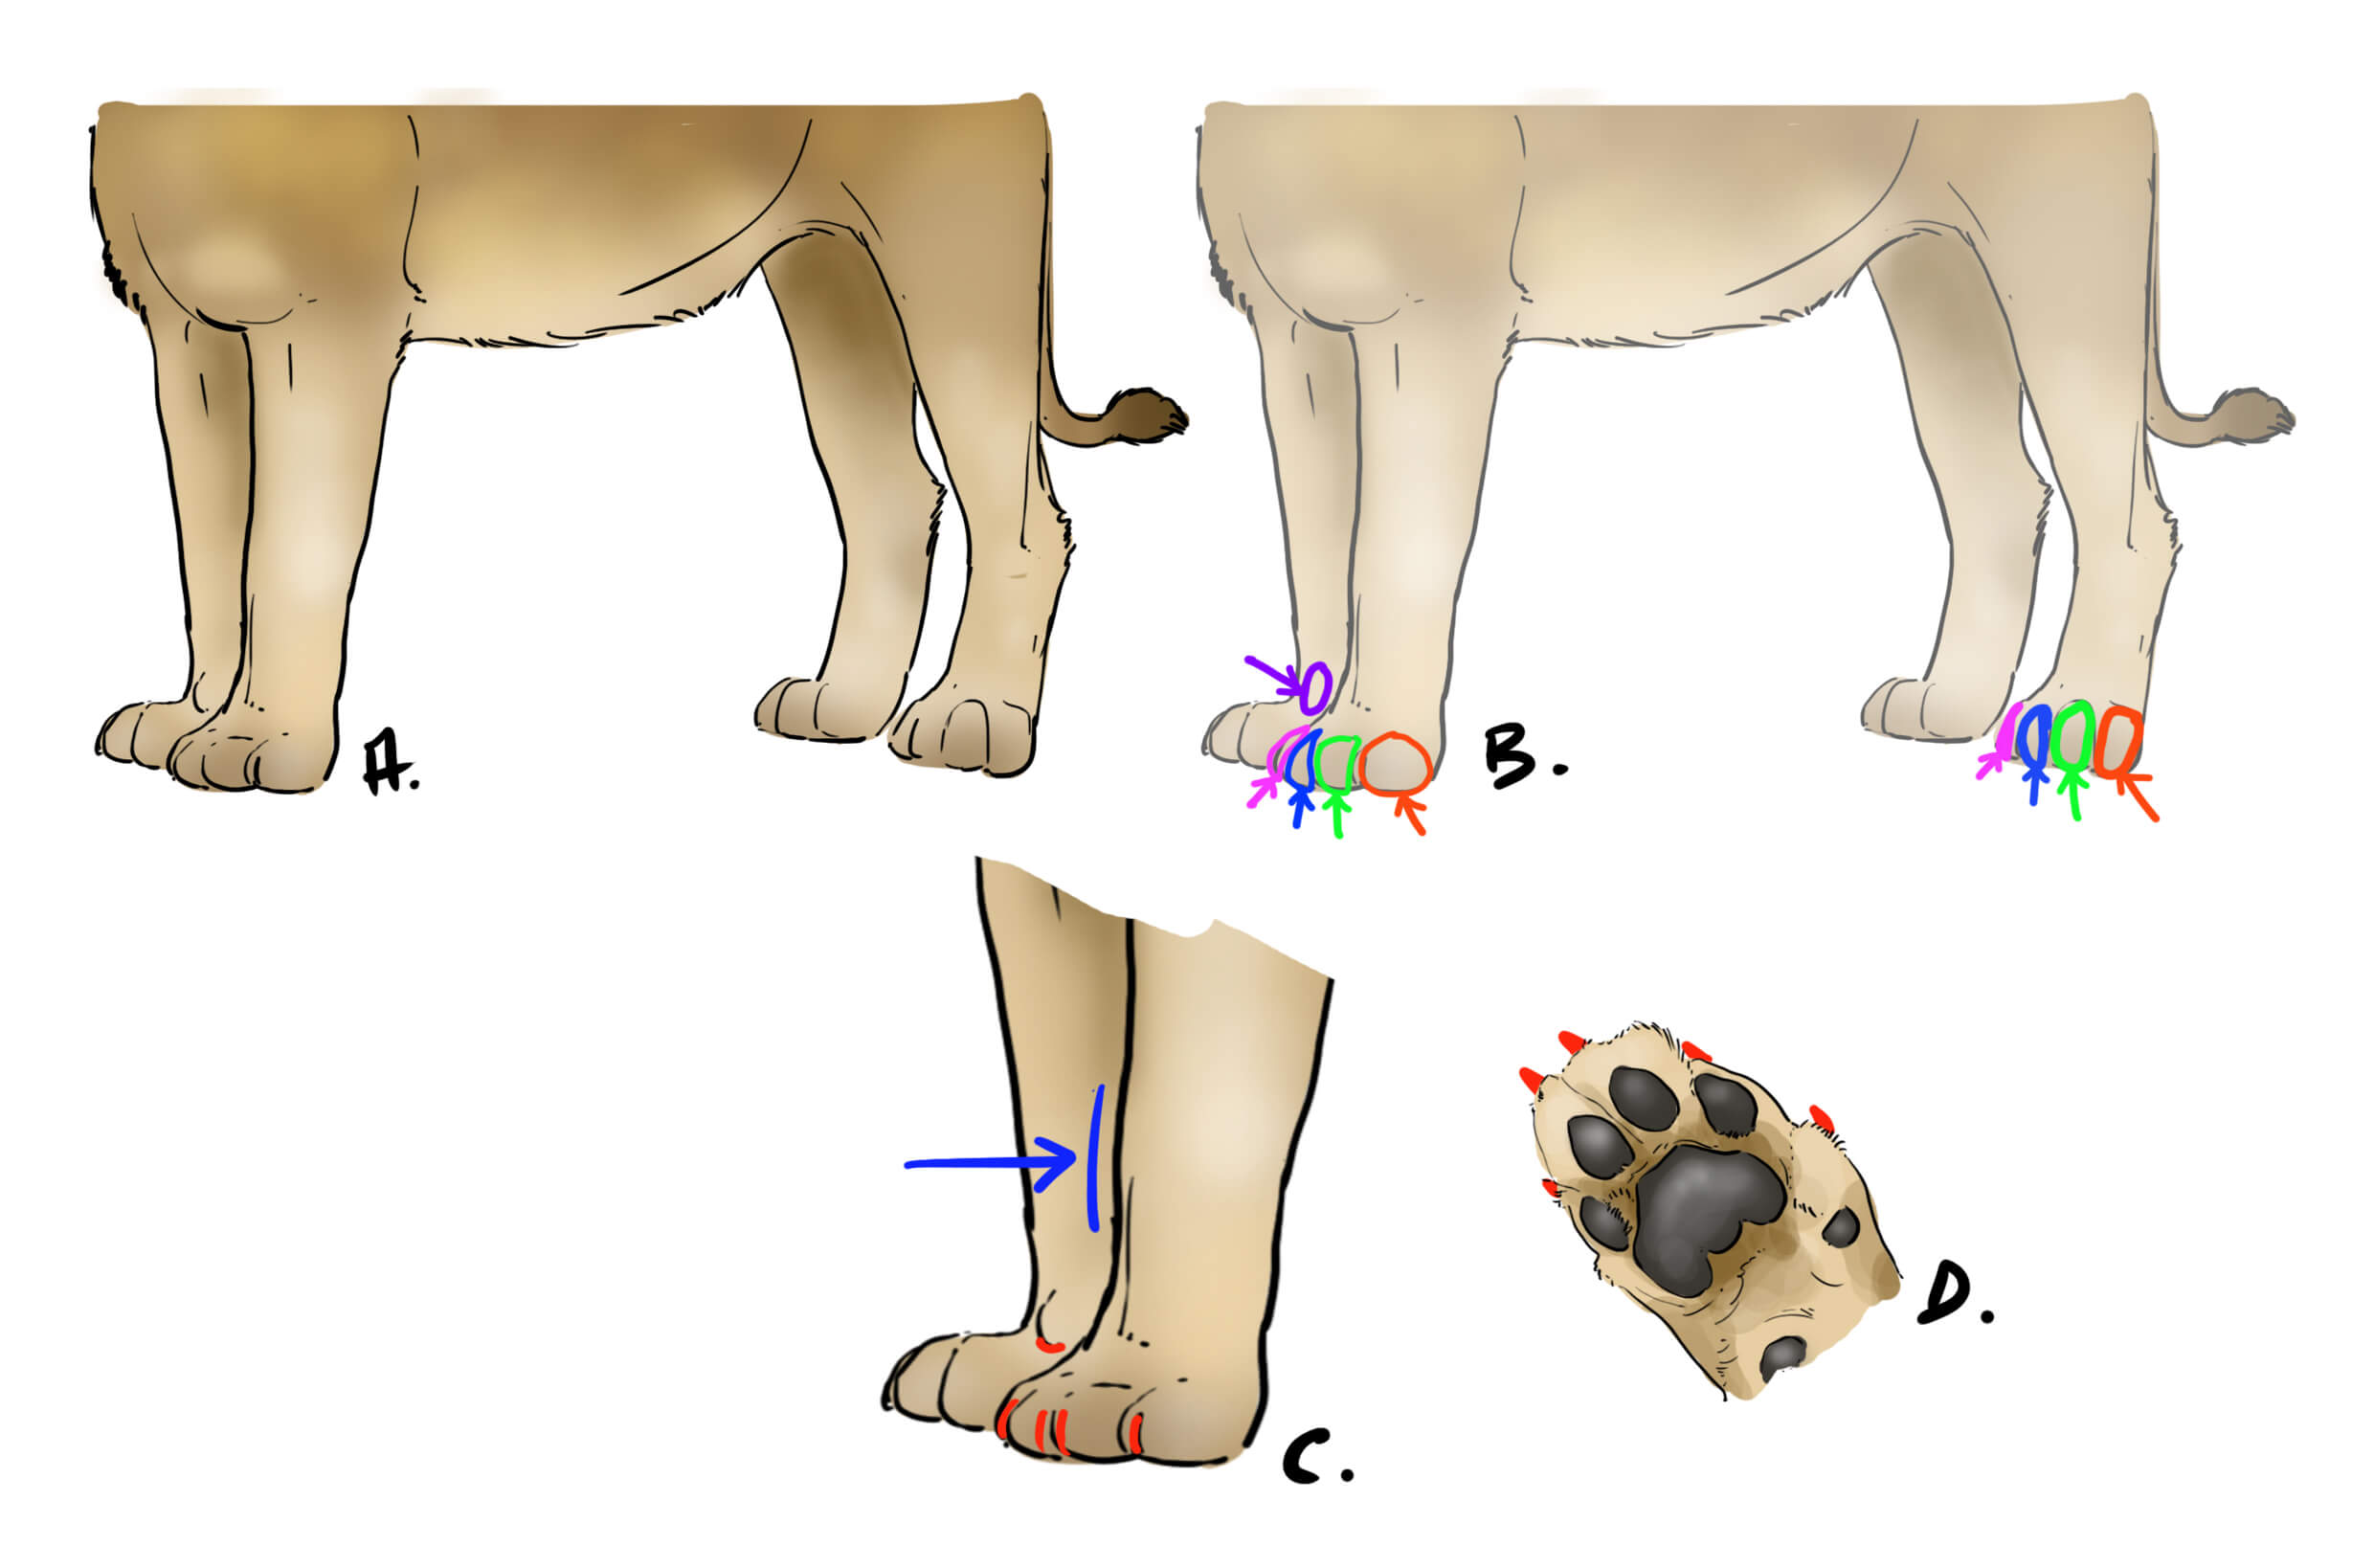
In diagram C. in blue I show you a slight irregularity in the tracing of the paw. This small bulge marks the junction of what would be our wrist. In red are the sheaths of the claws. Note that the claws are not located in the middle of the "fingers".
In diagram D, a bottom view of a front paw. You see that the claws (in red) are offset on each "finger" towards the middle of the paw.
FUR AND THE MANE OF THE LION
Finally, a determining feature, the fur in the case of the lion includes a characteristic: the mane (displayed only by males, if it were necessary to remind).
Most often, the mane ranges from tawny to black, encompassing numerous shades of darker or lighter strands. It extends from the cheeks, reaches down to the shoulders covering them to a greater or lesser extent, often descending onto the belly and covering the entire neck. The shape and color may vary, but the longer and darker it is, the more your lion will fall into the category of handsome fellows.
We are going to study the case of a lion with a thick mane:
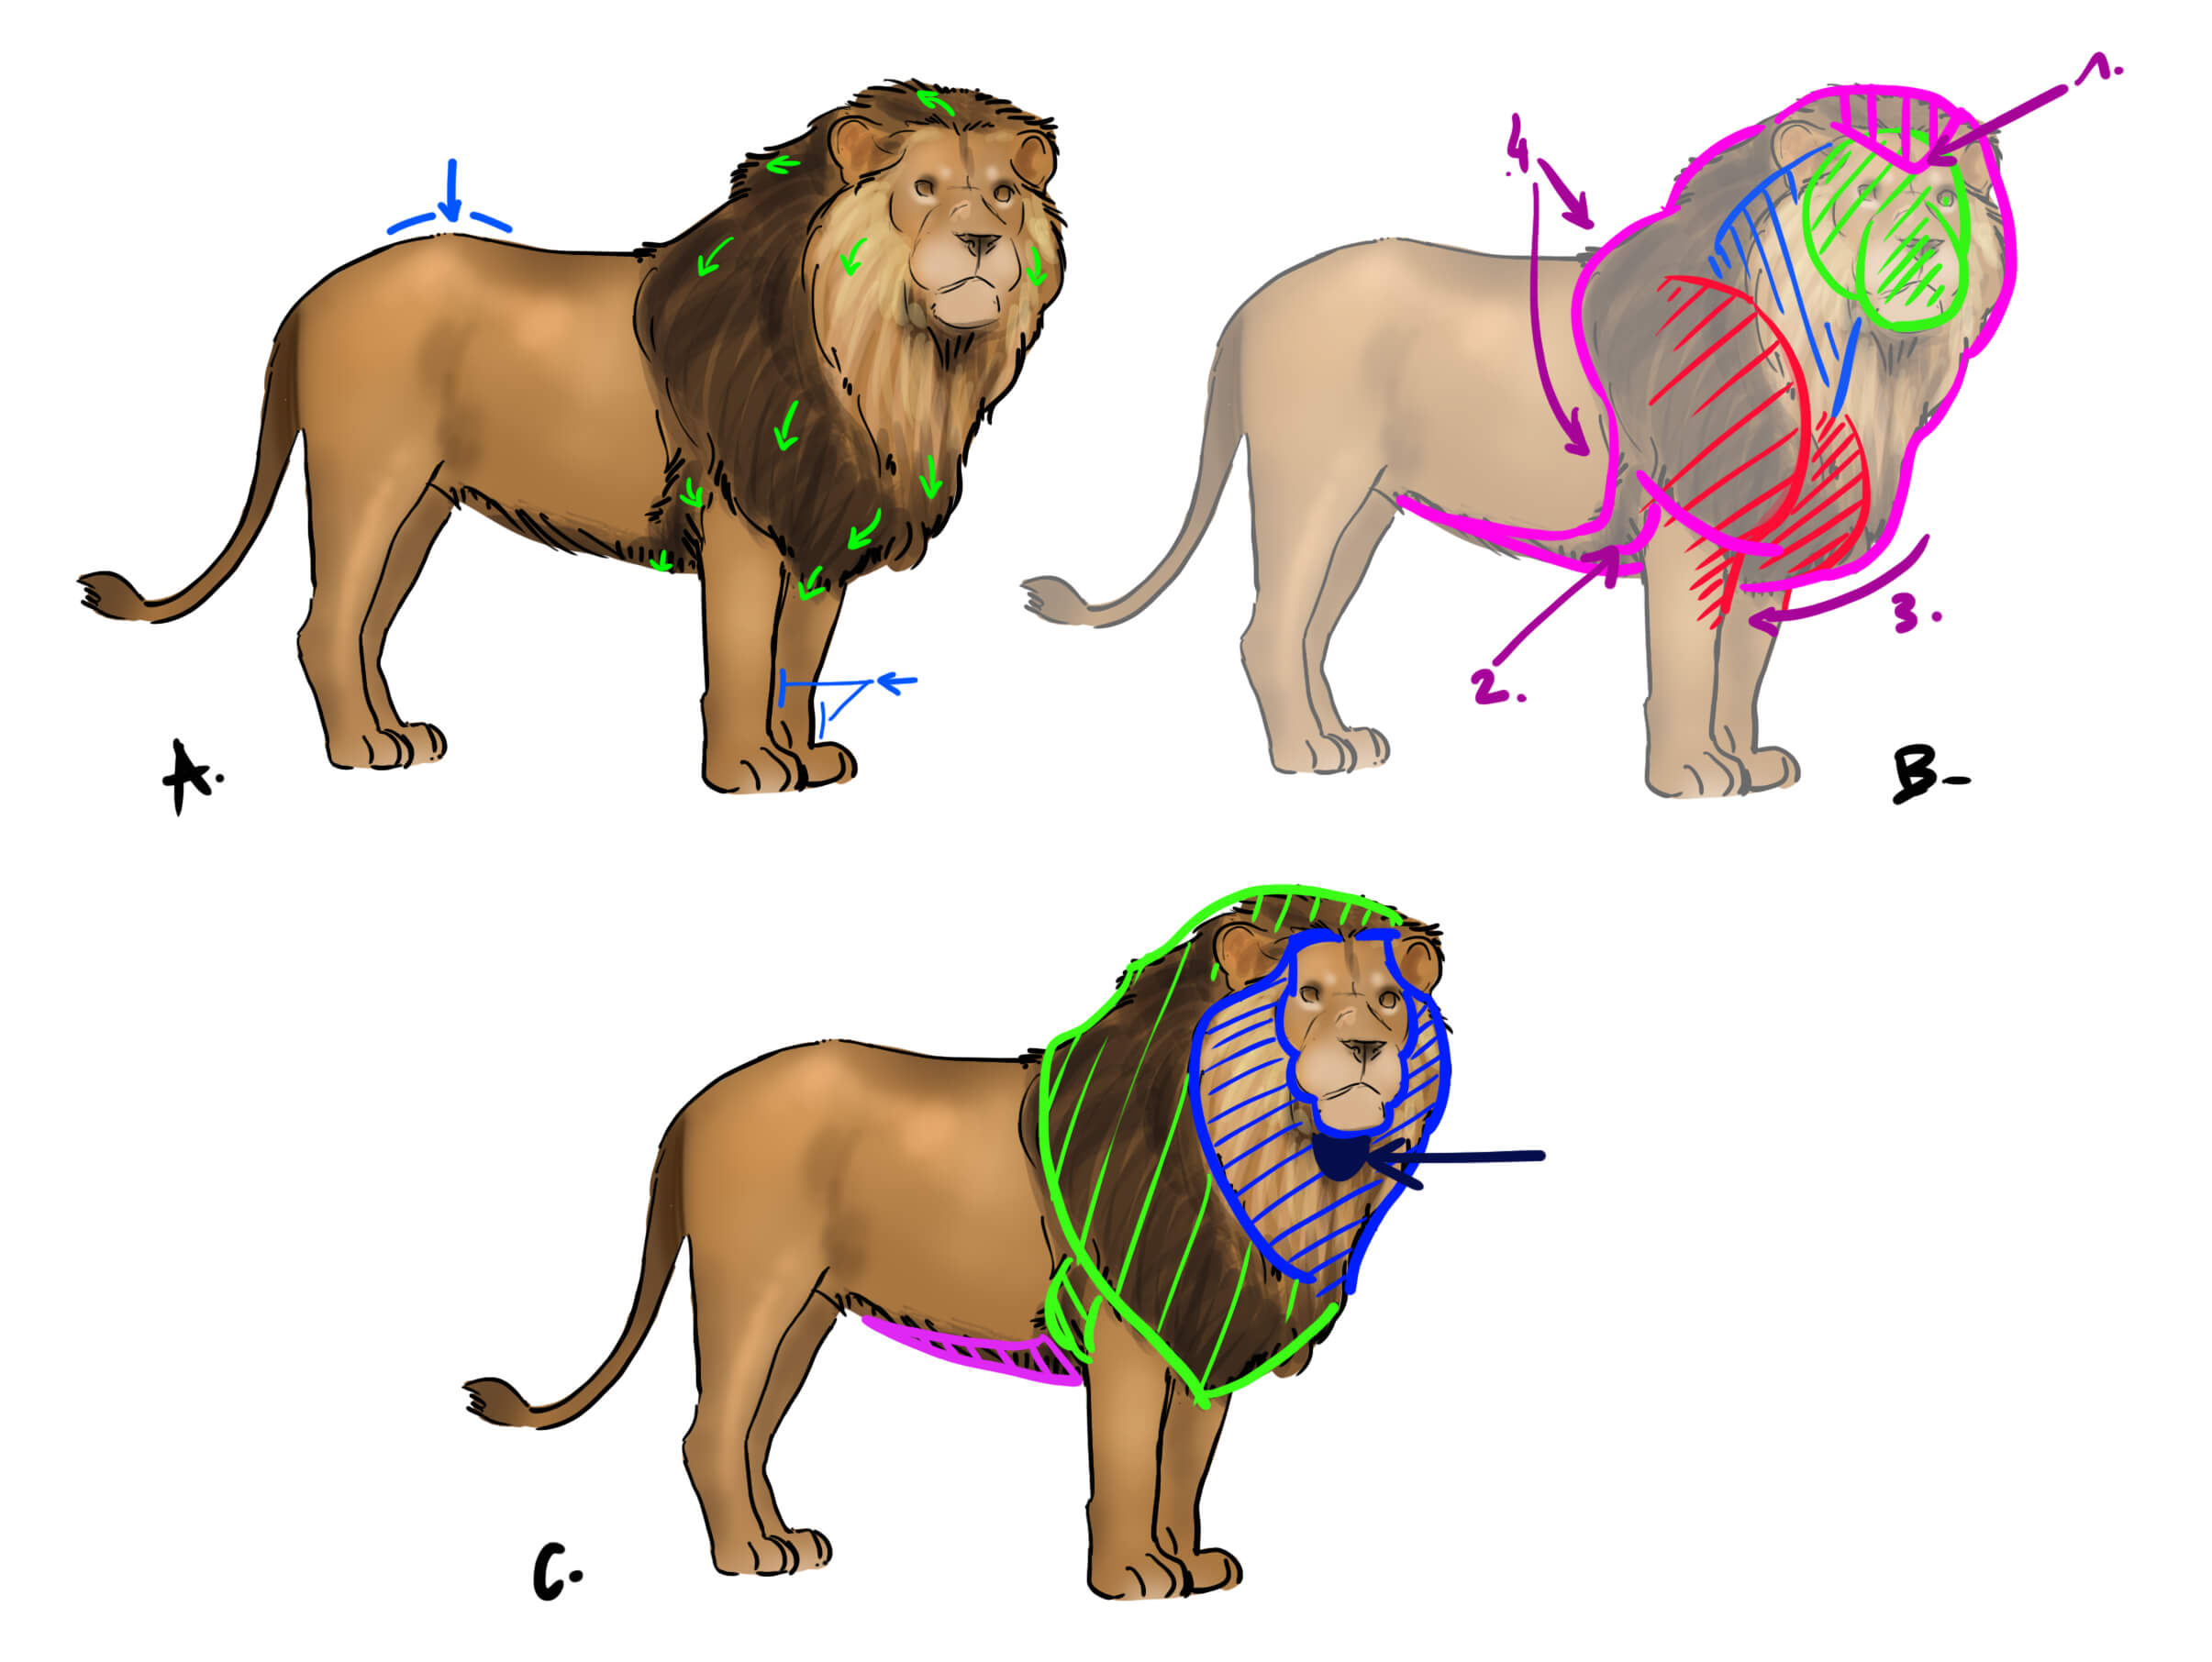
Diagram A: The green arrows indicate the direction of hair growth.
In blue, I just want to show you that during this stop, the animal's weight rests well on the hips and shoulders and this gives us a curve along the backline with a peak at the hip level. On the front legs, you see the irregularity of the "wrist" joint.
Diagram B: I mark the head in green, the neck in blue, and the shoulders in red. You can see in 1 that the fur starts at the top of the forehead. In 2, the mane also covers the joint that would correspond to our elbow. In 3, the mane covers the entire front of the animal's chest and goes under the belly. In 4, the mane extends down to encompass all of the shoulders and also covers part of the flank to reach the lower part of the animal.
Schema C: The mane can be broken down into three parts. The blue part where the hairs are attached to the head. The hairs encircle the head and descend to form a wide "collar." Generally, this part is lighter than the rest of the mane. With the arrow, I point out the area under the head, which is darkened by the shadow of the jaw.
In green the area surrounding the neck, shoulders, and chest, and which may also cover part of the front legs. The hairs are mostly linked to the neck. The further back on the animal you go, the darker the mane tends to become.
In pink, the area that runs under the animal. The fur will also be as dark or darker than the fur in the green area, and it is obviously connected to the belly.
Characteristic of the lion, the "tuft" of hair that finishes its tail. Note that the tuft of hair on the tail will be the general color of the mane.
For the coat, it is sand, golden-yellow or dark ocher in color. The inner side of the legs is always lighter, just like the belly. In very rare cases, spots on the cubs are still visible on the flanks in adulthood, but remain insignificant.
Lions called "white" can also be found, though their fur is actually more of a cream to light blond color. It is generally not albinism, as their eye color remains normal (from hazelnut to gold) but could be blue-gray or green-gray. The mane will generally be a tone lighter while still being very pale.
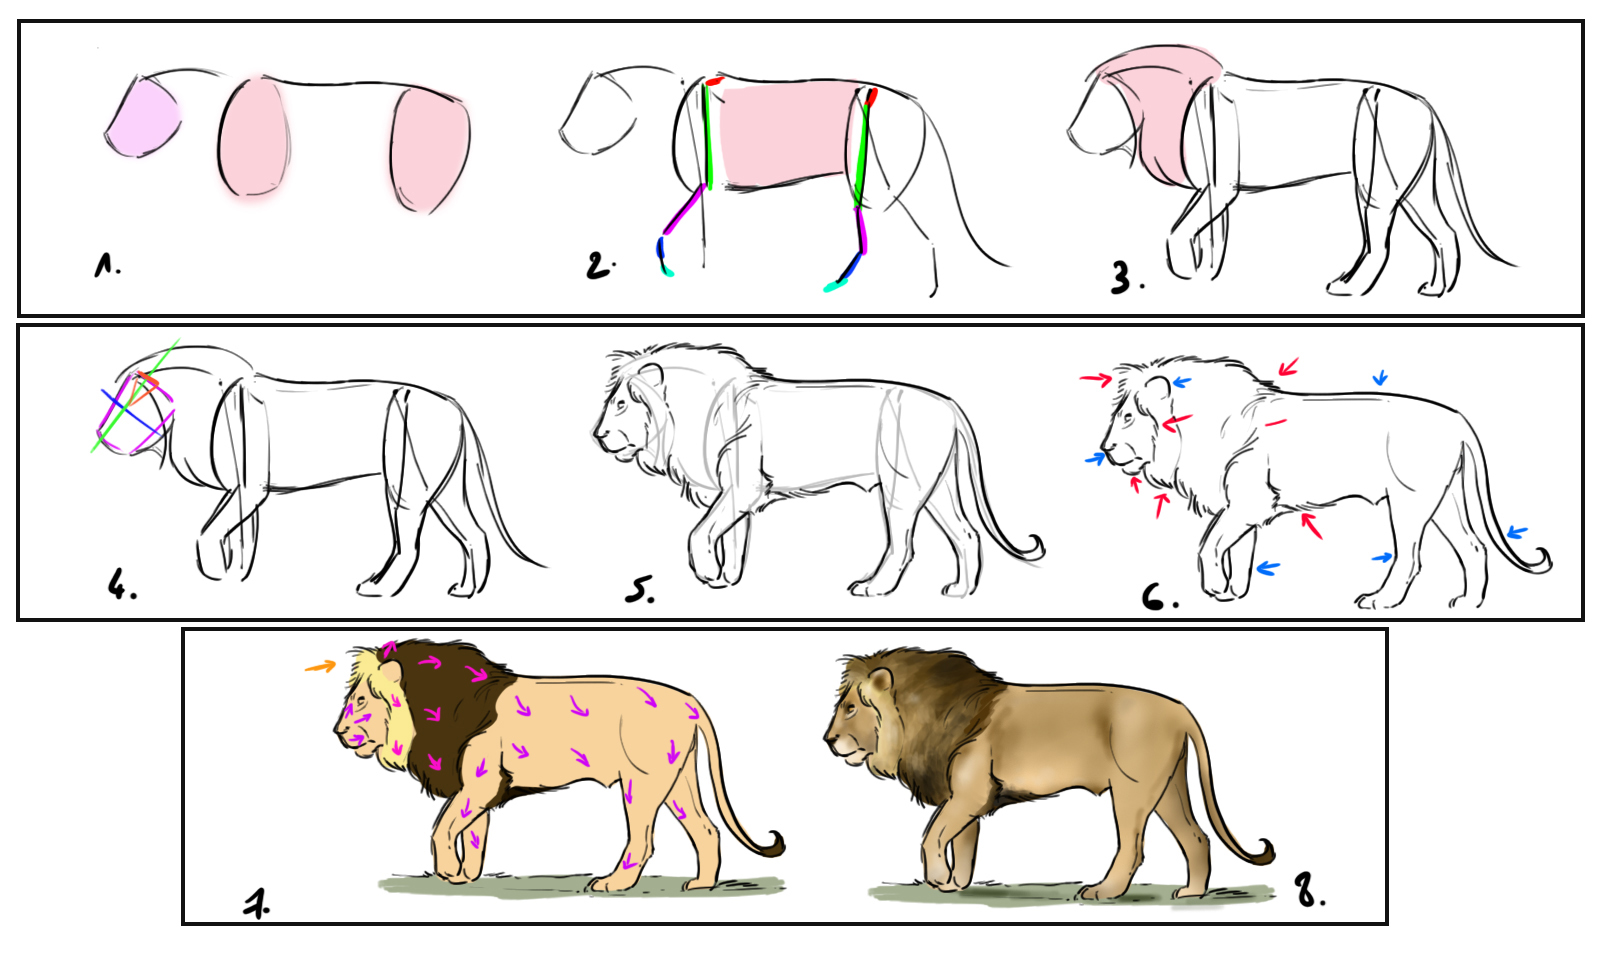
THE STEPS OF DRAWING
You're all set to draw a lion!
So I decided to focus on an individual in motion. We are going to draw a lion walking, leisurely. For a natural look, I choose to give it three supports on the ground and one paw in motion.
We are going to capture our lion at the moment its left front paw has just been "pushed" by its left hind paw.

Step 1:
I position the head, a rectangle slightly wider towards the neck. I pull the top of the neck (equivalent to the spine). From there I position the mass of the shoulder. I continue the spine with the line of the back by slightly hollowing out the back before going up to the hip tip and then gently descending.
Step 2:
I make a few construction lines to place my legs. I have highlighted the different parts with the colors used in the very first diagram. I draw the line of the tail, with the tuft that hangs a little lower than the level of the "ankles" of the back legs. I close the chest area by forming a rectangle that narrows towards the rear of the animal. For the initial width, I used the mass of the shoulders as a reference.
Step 3:
Around my construction lines I shape the legs. Above the neck line I draw the mane. At the bottom, I let it flow generously so that it joins the belly line.
Step 4:
On the head in blue, I'm looking for half of the skull, a little to the right of the line I will place the eyes. In green, the line that will help me position the height of the eyes and the muzzle. In red, the hearing area which gives me the position of the ears.
Step 5:
I erase some of the construction lines and over them, I draw my final line with some details: a line to define the upper area of the mouth, some lines on the leg joints...
Step 6:
Through the red arrows, I show you the areas represented by irregular and hatched lines. These lines correspond to areas where the hair is long and/or shaggy. In blue are the areas with short hair. You will notice that the lines are then continuous and regular.
Step 7:
I place flat colors. I used different colors for the mane to show you the structure we discussed earlier. In yellow, the "front" area of the mane, the part attached to the head. In brown, the area covering the neck and part of the shoulders and front legs. Finally, darker, the fur under the belly.
The pink arrows show you the direction of the fur, which is always good to know but especially that it will be necessary for you to take into account when it comes to a realistic drawing. Marked in orange, to give a bit of movement to this lion which is in motion, I made a break with a small tuft of fur going forward.
Step 8:
I apply a very light cream color on the muzzle and under the eye. I add texture to the mane with several layers of different strands. I quickly shade and highlight the contours.
[No content to translate]
CONCLUSION
Well, we are coming to the end of this article... Always keep in mind that the lion has a quite long body. Initially, do not skip the step of placing the neck/spine line.
Place the mane afterward, this will prevent you from mispositioning the shoulders and will allow you to maintain the proportions and overall line of the animal.
Discussion
15 comments