
How to Draw Geometric Shapes
Hello everyone, today I suggest we focus on drawing geometric shapes. In general, geometric shapes are known for their use in mathematics, but they are also ubiquitous in drawing and even very useful. Through this article, I propose that we look at how to draw the most well-known ones and some ideas on how to use them in drawing.
Geometric shapes are ubiquitous in drawing.
By definition, a geometric shape is a figure or object that can be described in terms of geometric properties, such as size, shape, angle, relative position of points, etc. Geometric shapes are fundamental in geometry, a branch of mathematics that studies the properties of spatial objects and their mutual relationships.
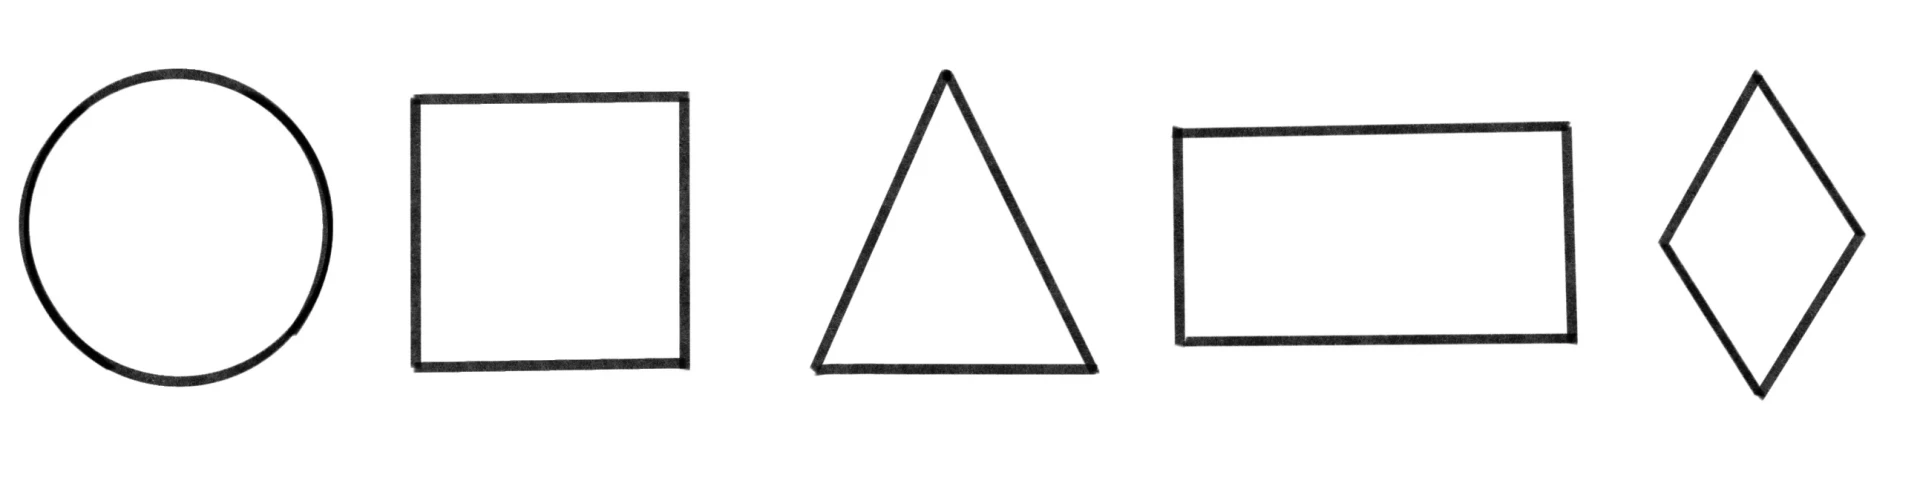
Geometric shapes can be 2D, as in the following examples: the circle, the square, the triangle, the rectangle, and the rhombus.
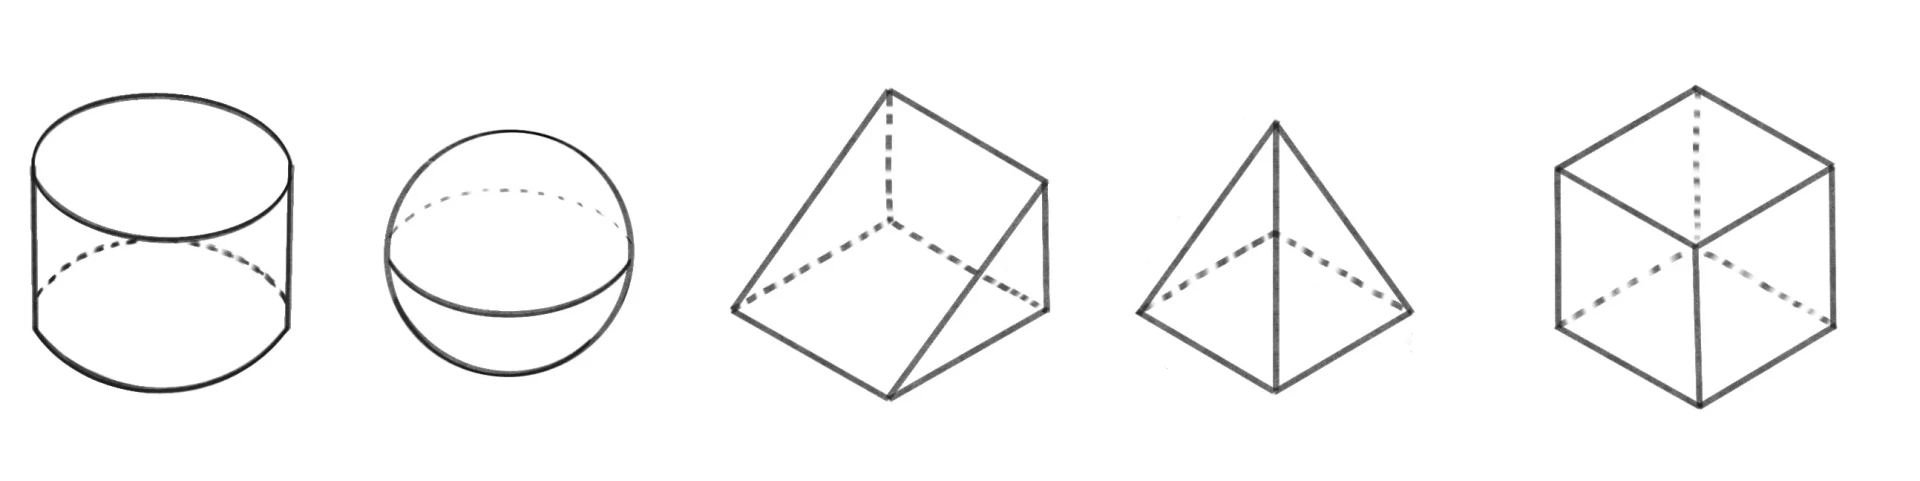
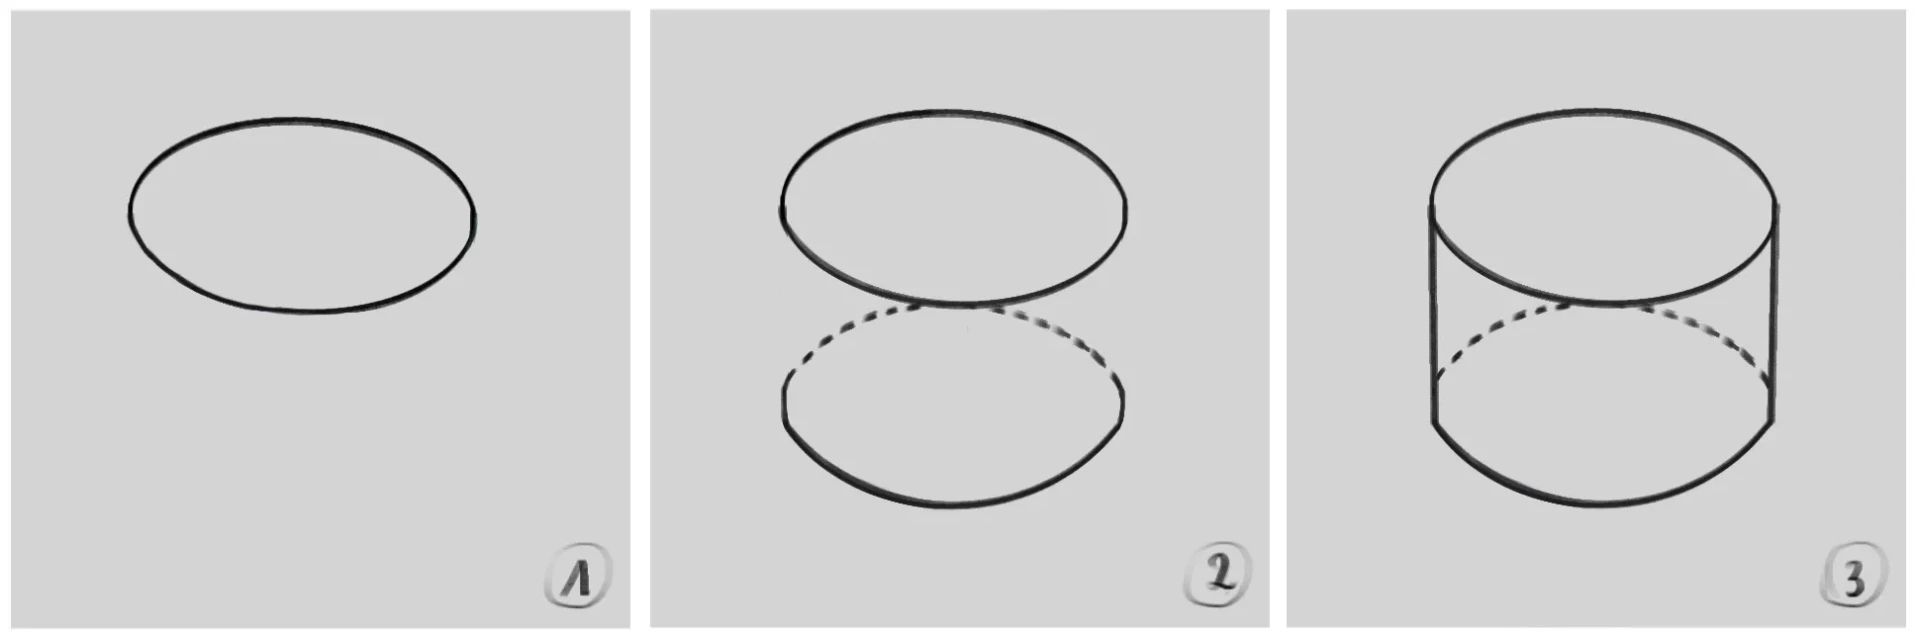
Geometric shapes can also be in 3D; to clearly highlight the volume, the invisible areas are drawn in dotted lines (for a solid volume in a material such as opaque plastic).
Geometric shapes are used to model and describe objects in space in many fields, including mathematics, physics, architecture, and drawing. They serve as an absolute basis for all complex volumes and allow for the rapid simplification of elements in order to make them more understandable.
As you can see, geometric shapes are ubiquitous and very important.
The 4 geometric shapes to draw in 2D.
Usually, geometric shapes are drawn using geometry tools: ruler, set square, compass, etc. However, to improve your drawing skills, I strongly encourage you to draw them freehand; this will improve your accuracy and visualization.
Note: The steps for the various geometric shapes below are very detailed, but you can simplify them if you feel more comfortable doing so.
The circle
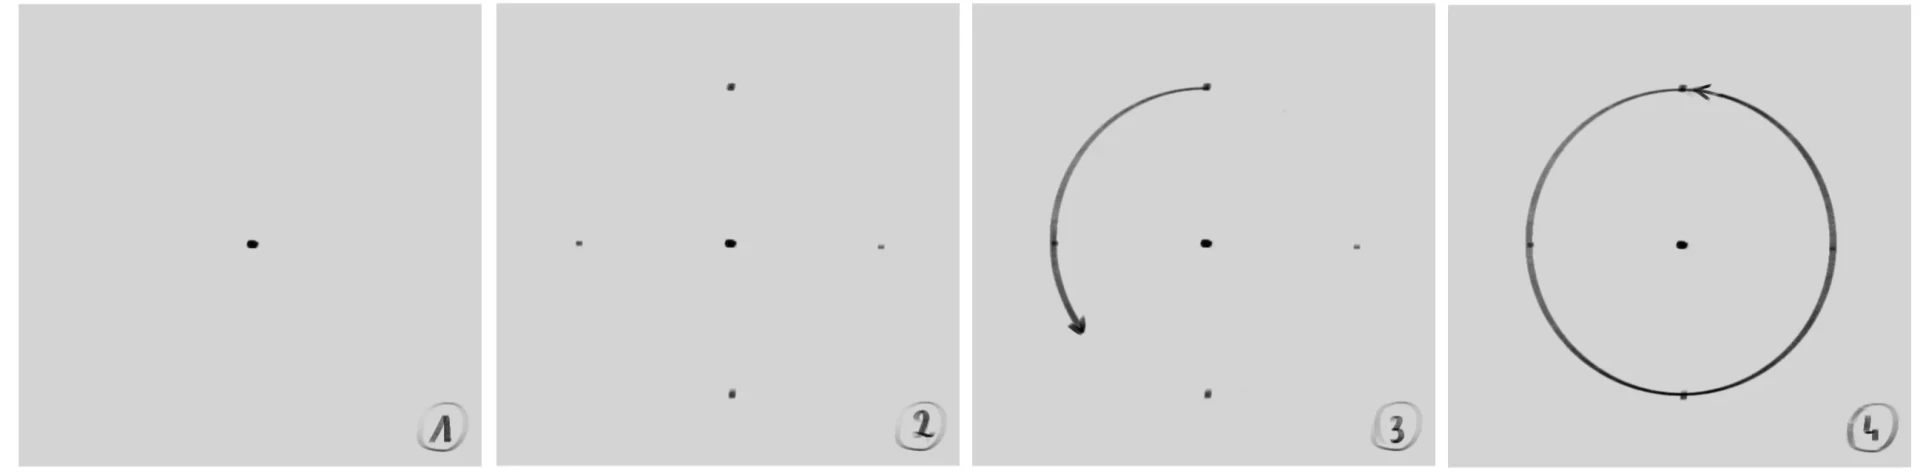
1 - I start by choosing the center of the circle.
2 - With the naked eye, I try to place four points forming a cross at equal distances from the center of the circle.
3 - I choose to draw in a counterclockwise direction (but you can choose the opposite direction) to connect the points to each other. I try to visualize the next point before I reach it so that my line is as stable as possible.
4 - I finish going around my circle.
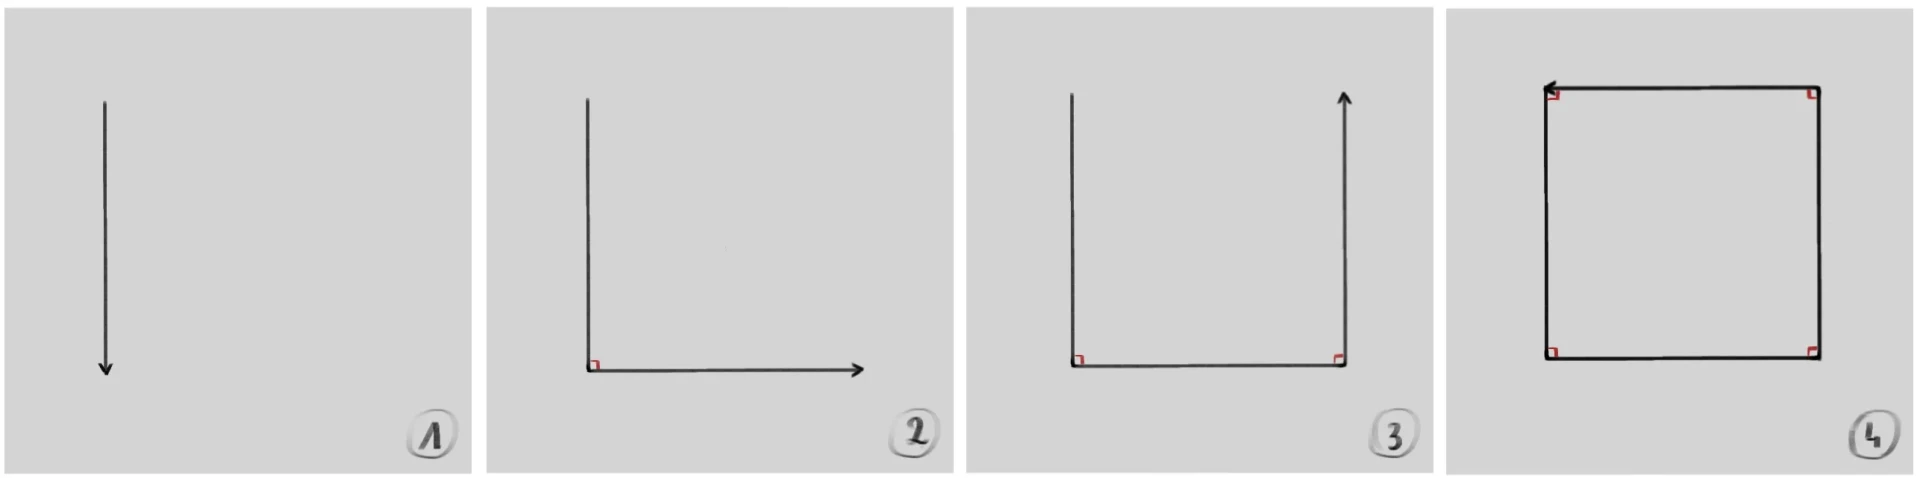
The square.
1 - I draw the first side of the square as straight as possible.
2 - Making sure it is as perpendicular as possible, I draw the second side. I make sure that it is the same length as the first.
3 - I draw a new line that is perpendicular and of the same length.
4 - I finish my square by repeating the operation one last time.
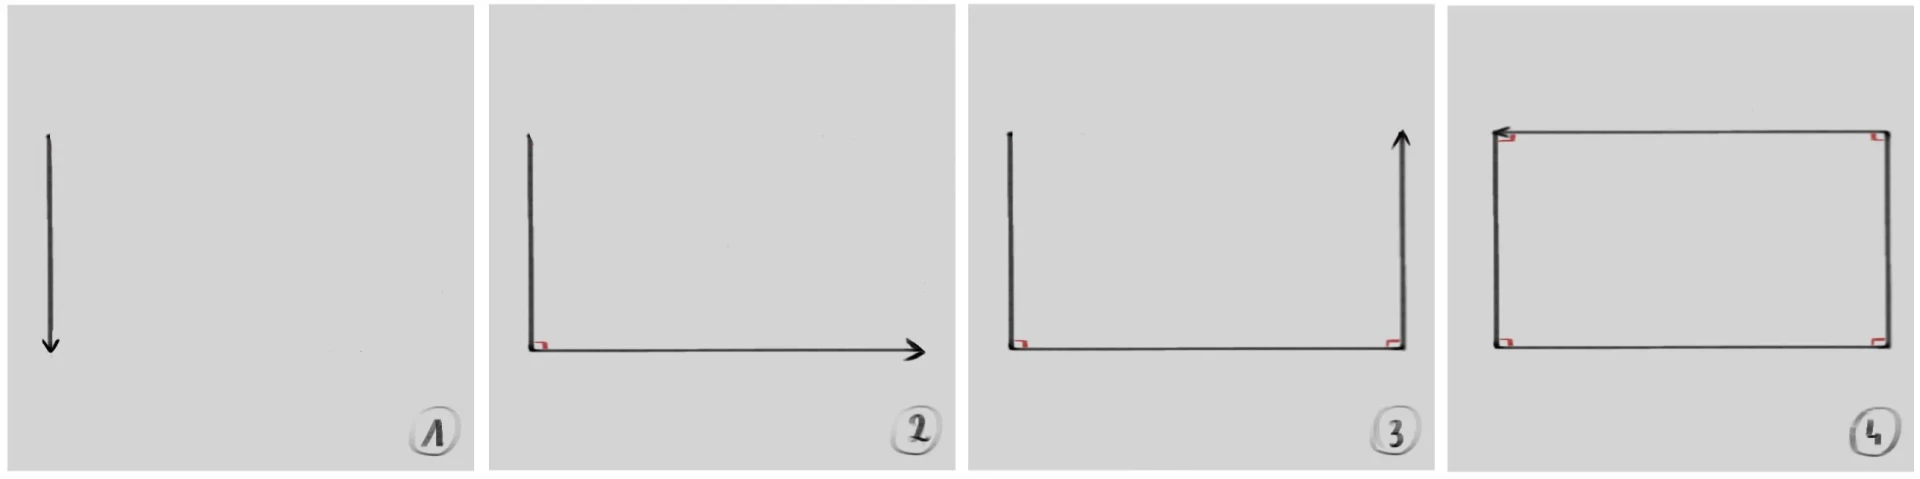
The rectangle
The steps are exactly the same as for the square, but I make sure that the opposite side has a different length.
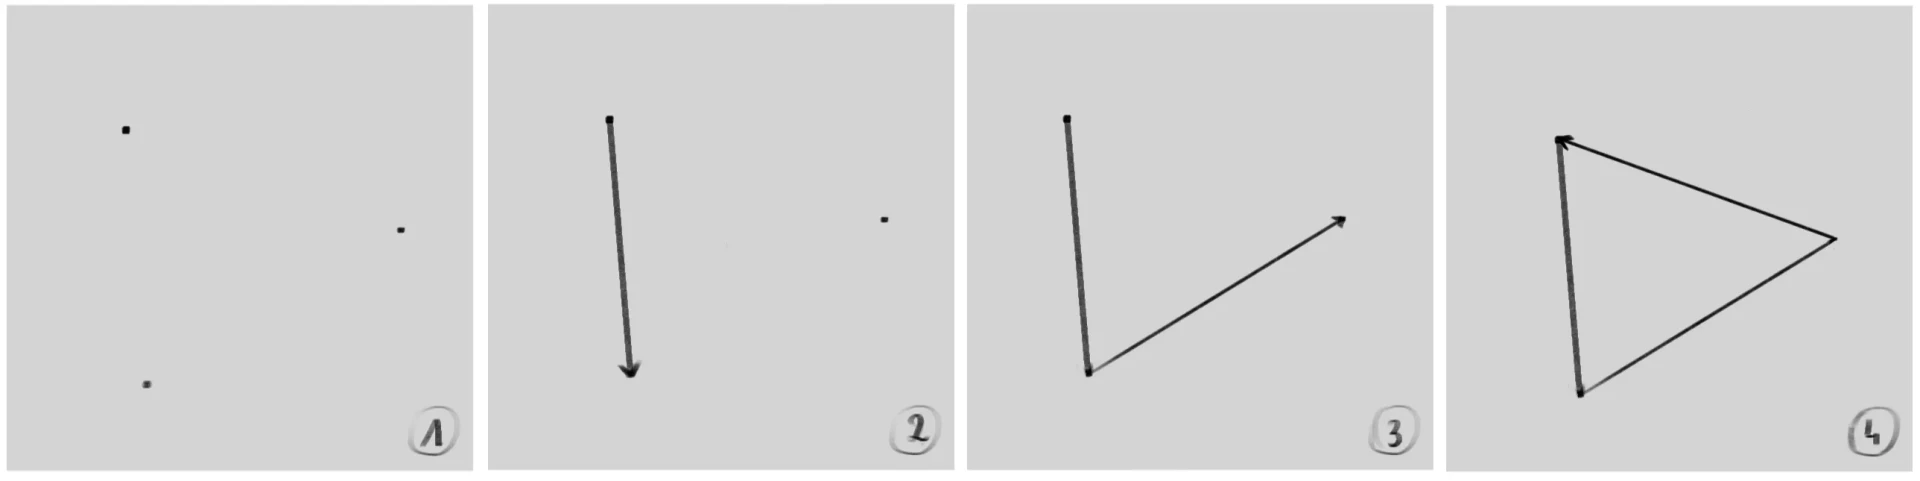
The triangle
For this example, I chose an arbitrary triangle, but it should be known that there are several other types of triangles with specific properties:
- The right triangle: two of the sides are perpendicular.
- The equilateral triangle: all sides have the same length.
- The isosceles triangle: two of its sides have the same length.
1 - For any triangle, I place three points on the sheet.
2 - I connect the first point to the second, always visualizing where I want my pencil to go.
3 - I connect the second point to the third.
4 - I reconnect the third point to the first.
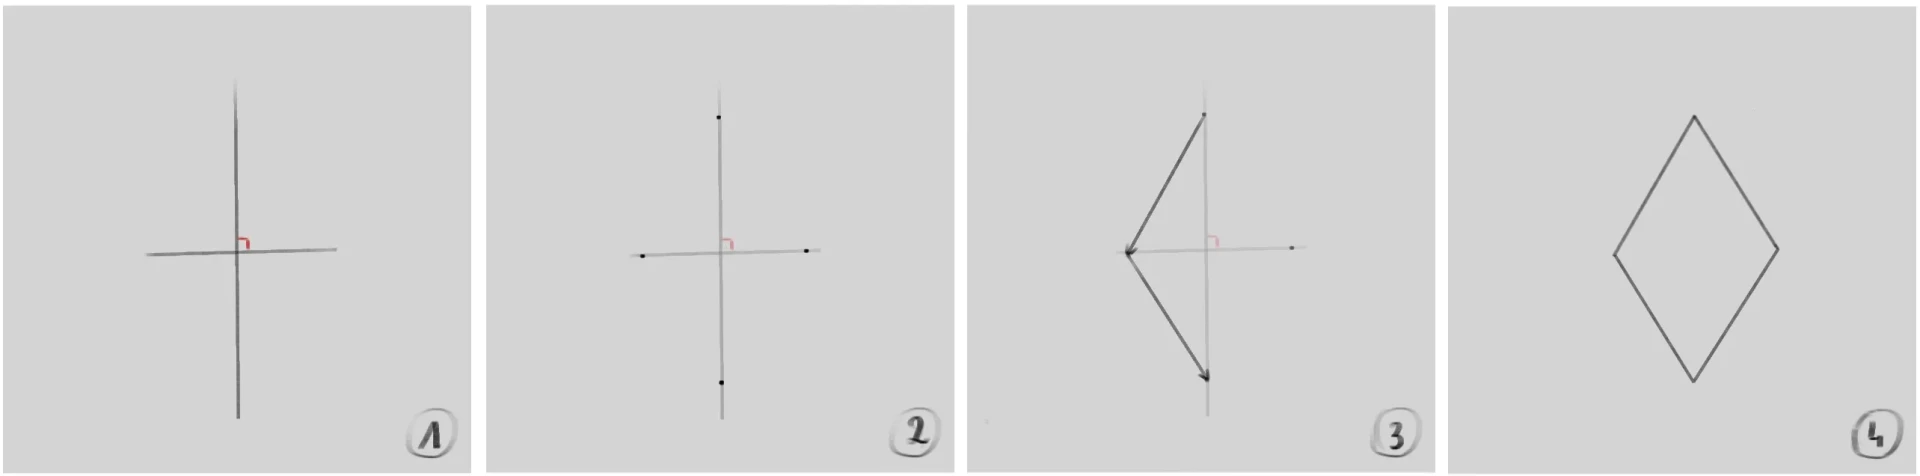
The rhombus
1 - I start by drawing a cross with lines as perpendicular as possible.
2 - I choose equidistant points from the center on each of the lines.
3 - I connect the points to each other.
4 - I erase the construction cross.
The 5 geometric shapes to draw in 3D.
Just like with 2D geometric shapes, I advise you not to use any construction tools to draw them. I also advise you to master 2D shapes before moving on to the 3D shapes stage, which requires more visualization and technique.
The cube
1 - I start by drawing a construction cross.
2 - I draw a rhombus that serves as the base for the cube.
3 - I draw lines from each of the rhombus’s vertices, trying to make them as perpendicular and straight as possible.
Note: with perspective, the lines must have the same length and will therefore not stop at the same points.
I connect the ends of each of the lines to form a second rhombus, which is used to complete the cube.
file name: cube-drawing-geometric-shape
alt image: draw a geometric shape with a cube
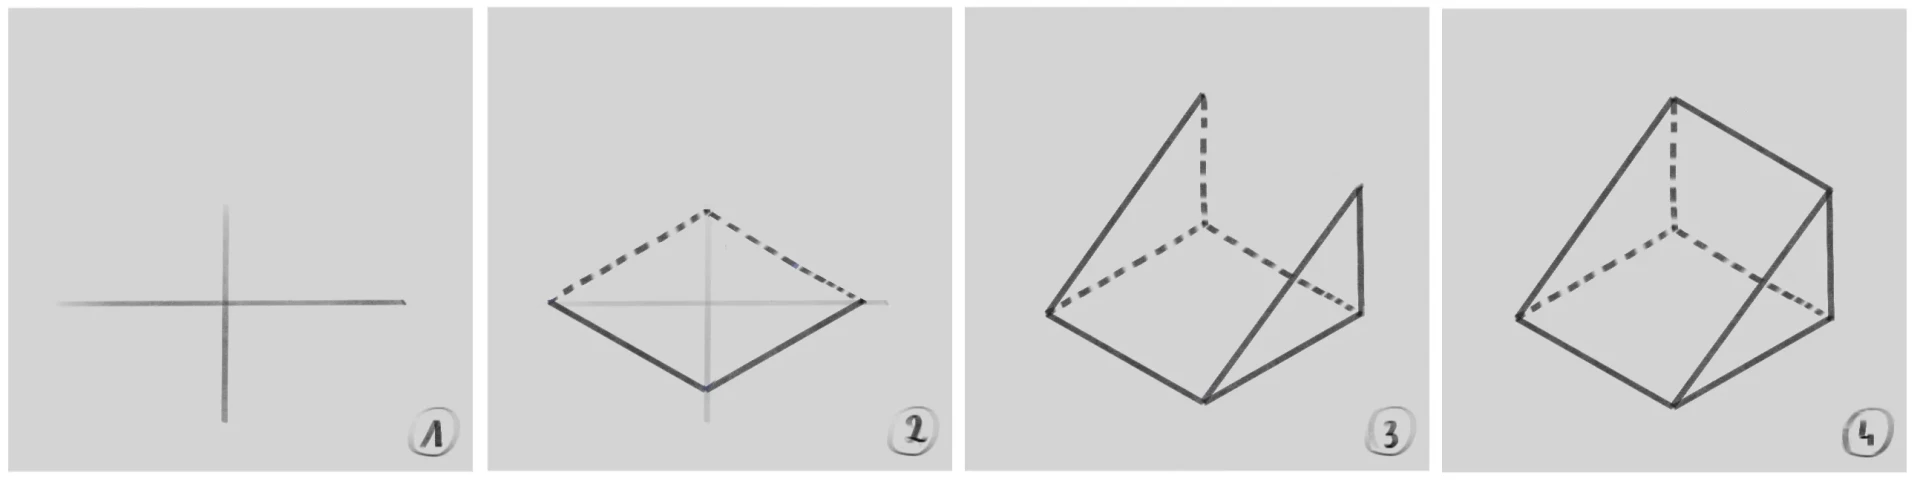
The triangular prism.
1 - I am drawing a construction cross.
2 - I draw a rhombus that serves as the base of the prism.
3 - I will build two triangles at each end of the prism, making sure they look like right triangles.
4 - I connect the ends of the two triangles.
The sphere
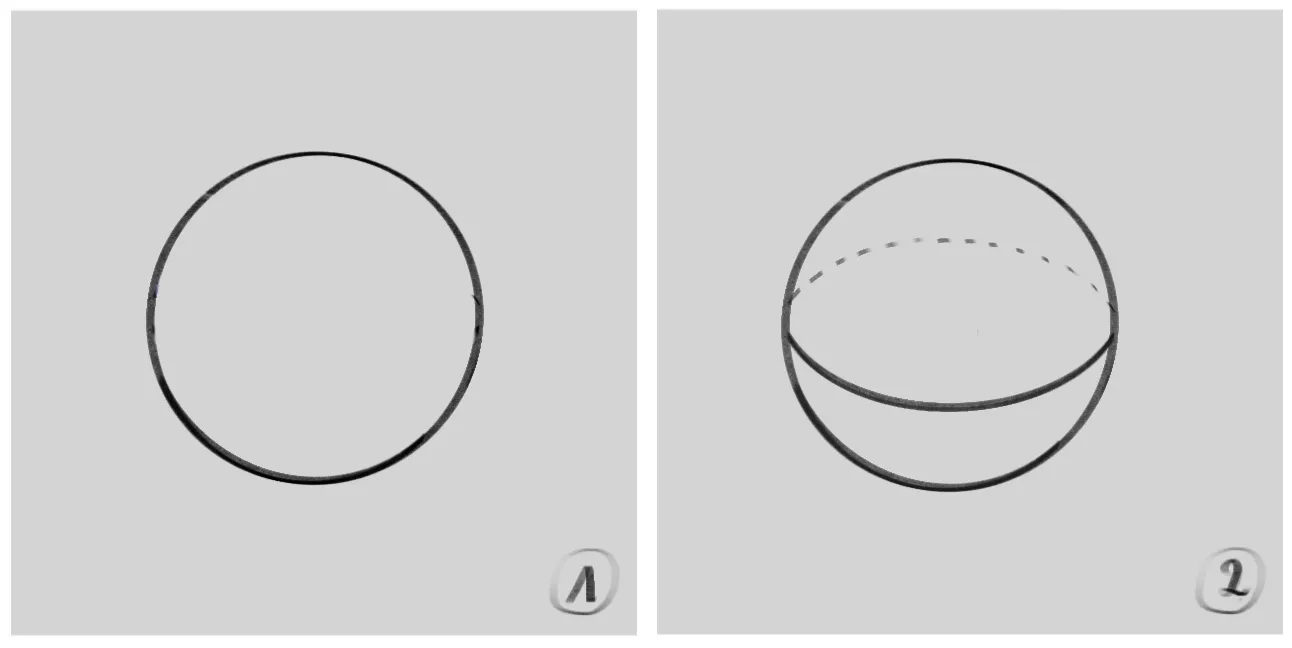
Note: the sphere is one of the simplest shapes to draw using lines, and one of the most complex to color while maintaining that impression of volume.
I am drawing a circle.
I draw an ellipse in the center of the circle, making sure to have a symmetrical curve between the left and right sides of the circle.
The pyramid
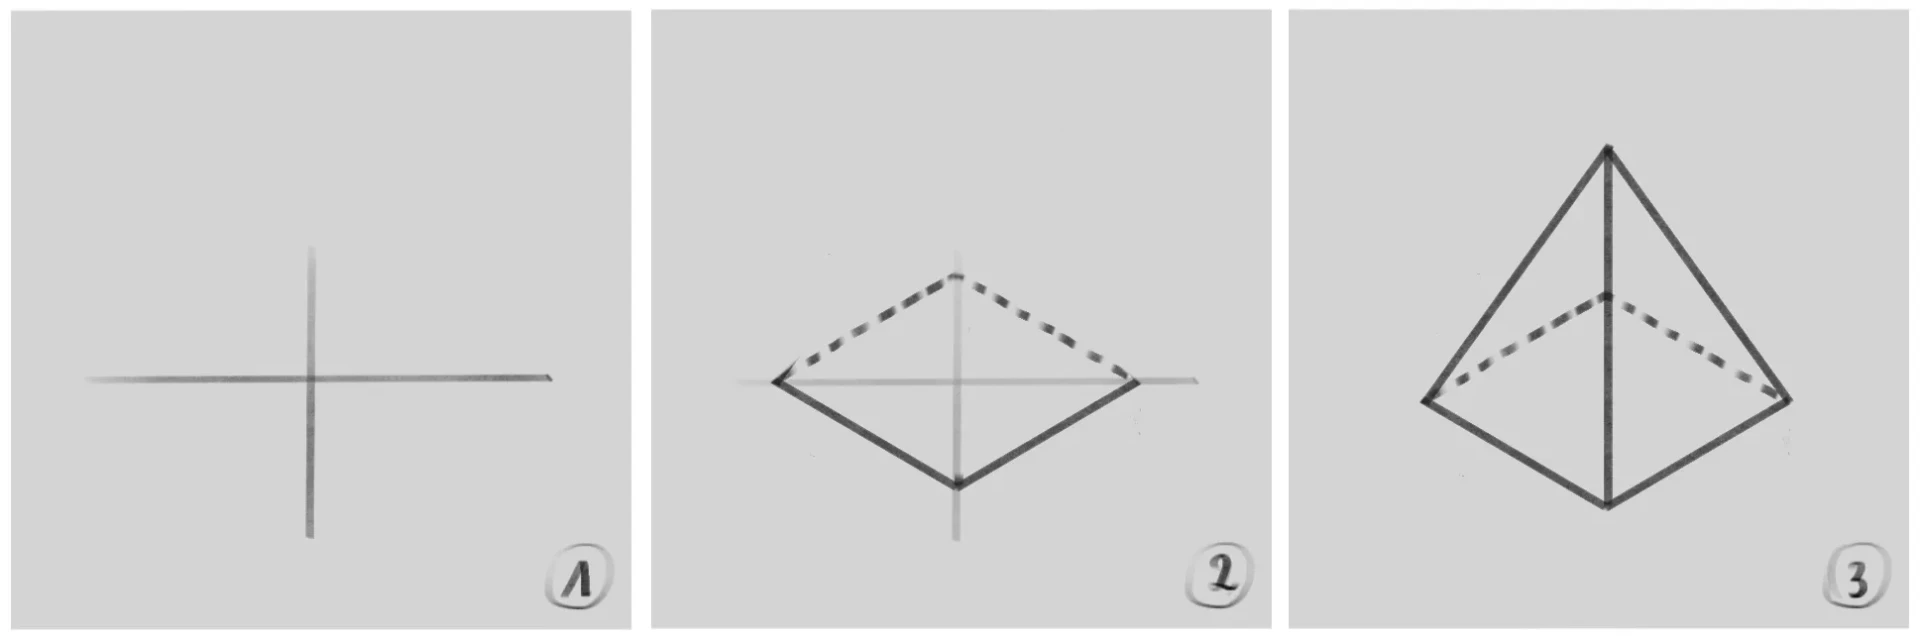
1 - I draw a construction cross.
2 - I draw a rhombus.
3 - I draw the central edge first, making sure it follows the axis of the construction cross, and then I connect the other two angles of the rhombus to this edge to form the pyramid.
The cone
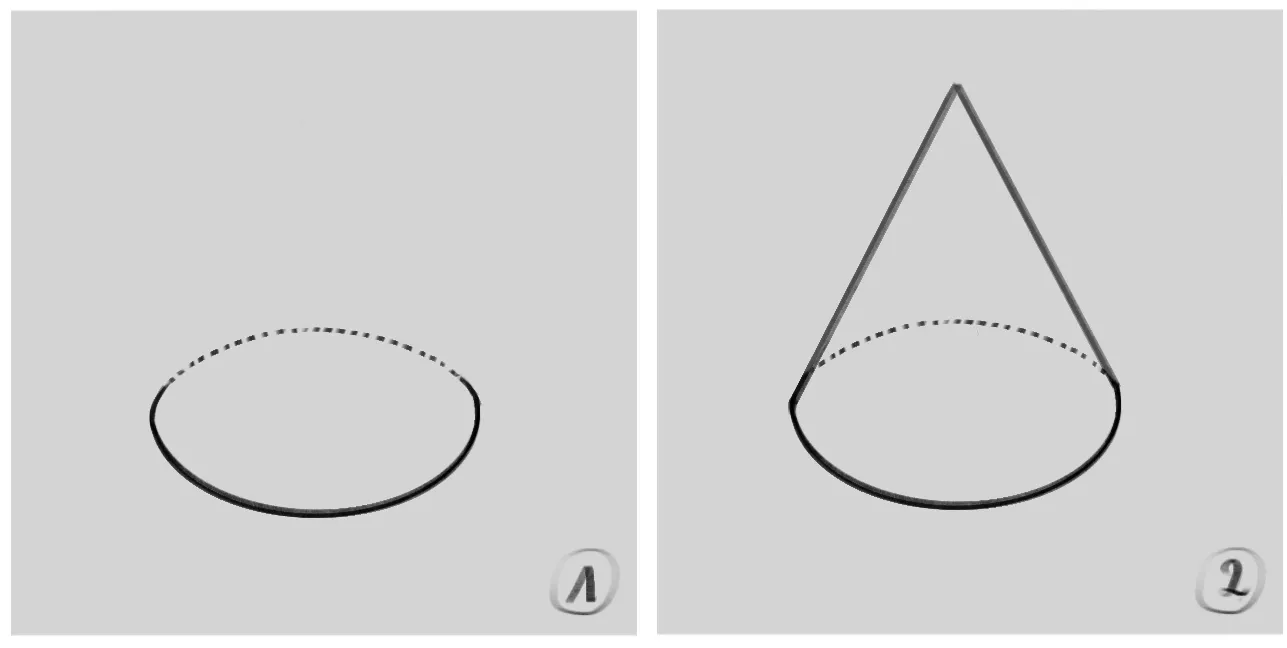
1 - First, I draw an ellipse (a slightly flattened circle).
2 - I connect the ends of the ellipse at a single point perpendicular to the ground.
The cylinder.
1- I draw an ellipse.
2 - I draw a second ellipse, making sure that it is as aligned as possible with the first.
3 - I connect the two ellipses with lines.
Some exercises for drawing geometric shapes.
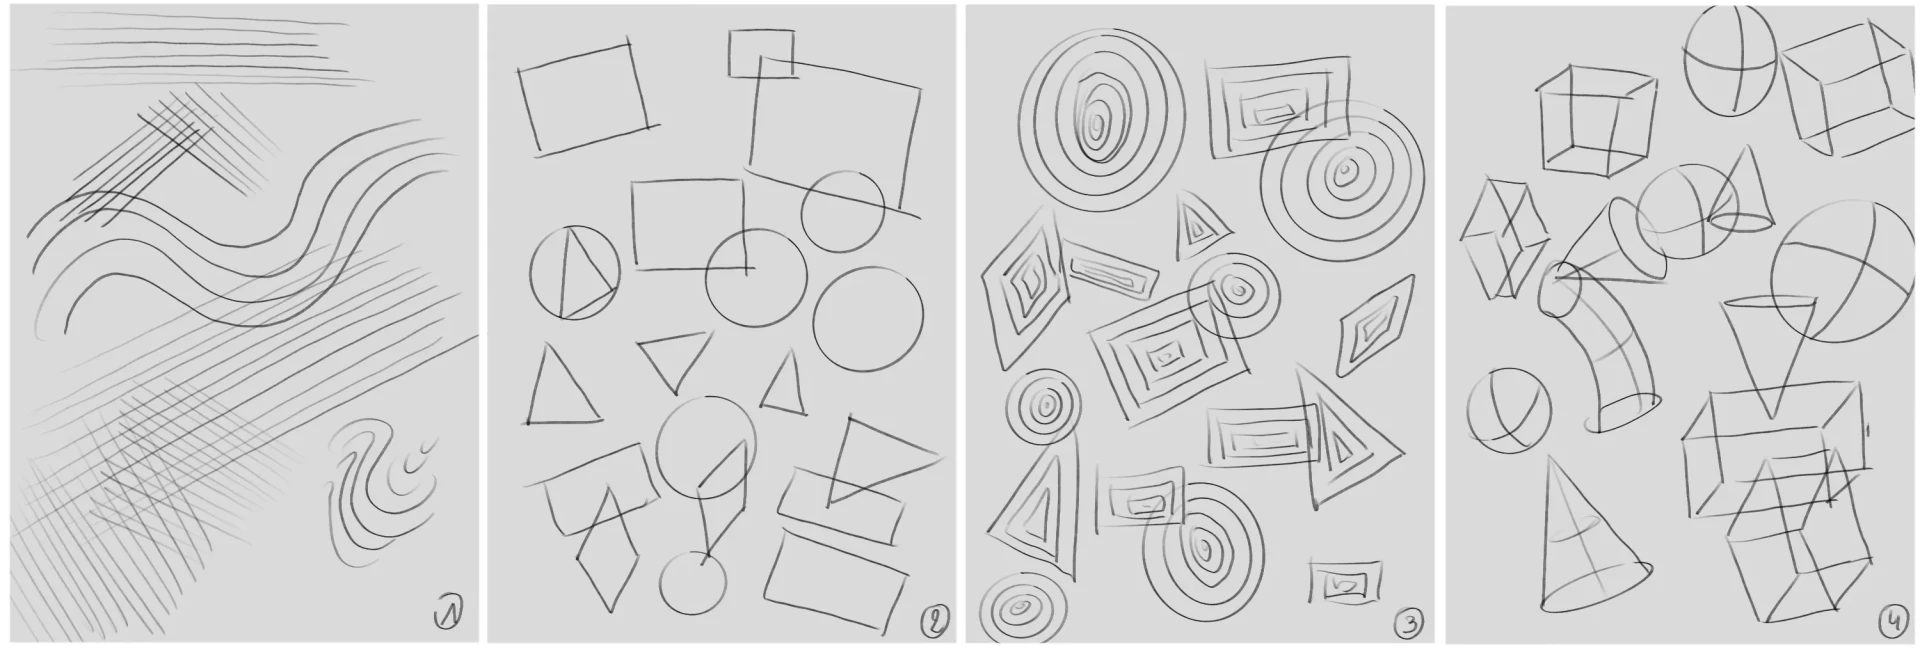
As we saw in the introduction, geometric shapes are present everywhere; in drawing, they will also be a great help to us. Here are a few small examples of exercises where they can be useful.
Warm up your hand to draw.
Just like athletes warm up their muscles before exercising, it is important to warm up your hand before drawing, as this helps to avoid injury and, above all, allows you to be much more precise when drawing.
The traditional (and very good) exercise is to draw lines (or curves) while trying to make them straight and parallel or perpendicular; this can be a very good starting point.
An interesting alternative to line exercises is to draw 2D geometric shapes very quickly; the goal is not for them to be perfectly accurate, but rather to get used to visualizing the shape without any construction aids. This will allow you to work on the connection between your brain and your hand and greatly improve your dexterity and precision.
Along the same lines, you can quickly draw 2D geometric shapes, then draw smaller versions of them, trying to be as consistent as possible so that it gives the impression that it is exactly the same shape with the same deviations and irregularities. Once again, this exercise helps to develop precision and trains your eye.
This fourth exercise is similar to the second one; it involves quickly drawing 3D geometric shapes, while trying to accurately represent the volume of each one.
I advise you to do these exercises whenever you want to do some drawing; you don't need much time, 1 to 2 minutes per exercise is more than enough, and it will allow you to work on many skills and improve more quickly.
Once you are very comfortable with these exercises, you can consider making them more complex by drawing complex geometric shapes (2D and 3D).
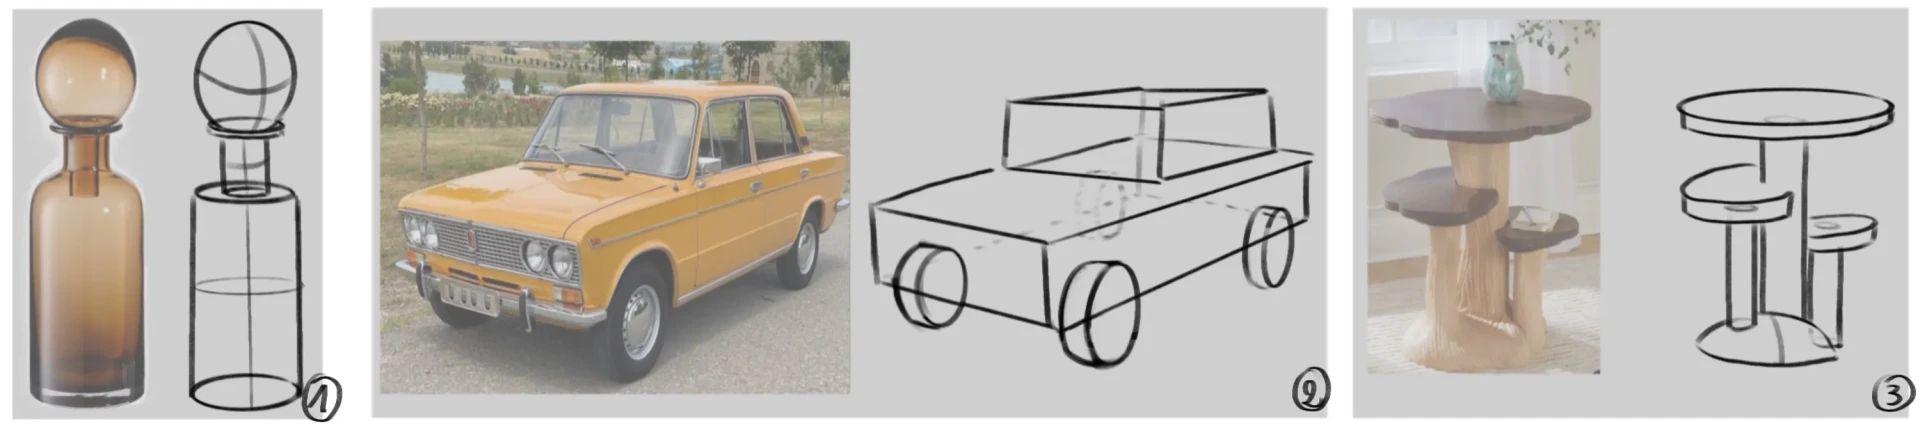
The decomposition of its design.
This exercise is slightly more difficult than the ones we just saw, but it is one of the best exercises available for making progress: decomposition.
This exercise involves choosing objects (it’s best to start with simple ones) of your choice and analyzing them in order to identify the simplest geometric shapes you can see. The idea is not to go into detail, but rather to observe the most obvious shapes and be able to reproduce them as accurately as possible.
This will allow you to work on your analysis, your understanding of volumes and perspectives, but above all, it will serve as a foundation as soon as you want to draw more complex things; you will be able to analyze and reproduce them, adding more and more details as you progress.
This concludes this article on geometric shapes; I strongly encourage you to regularly take the time to draw these shapes, as they will help you improve your dexterity, precision, analysis, and, above all, the connection between your brain and your eye.
I hope you enjoyed this article 😊
Popular Articles

Discussion
No comments yet.