How to Draw a Mouse
Today we're going to discover a very likeable small rodent, the mouse! We already know it from a young age when we lose our baby teeth because the tooth fairy never fails to collect them! Obviously, there are the stars, Mickey and Jerry, and then there are all those tiny ones that scurry around in attics...
Let's start with the basics, and well no, the word "mouse" does not correspond to any scientific classification of species. This term generally designates (and somewhat vaguely from a biological standpoint) small rodents sharing a rather pointed snout, rounded ears, and a long tail. From there, we will primarily base our study on the house mouse, a species very common in houses.
ANATOMY AND SKELETON OF THE MOUSE
As is customary among mammals, we can observe that the limbs of a mouse are built on the same basis as our own limbs. Like us, mice are plantigrade, meaning they walk by pressing the "sole" of their feet (and the palm of their hands) against the ground. In practice, this results in the two blue areas being in contact with the ground.
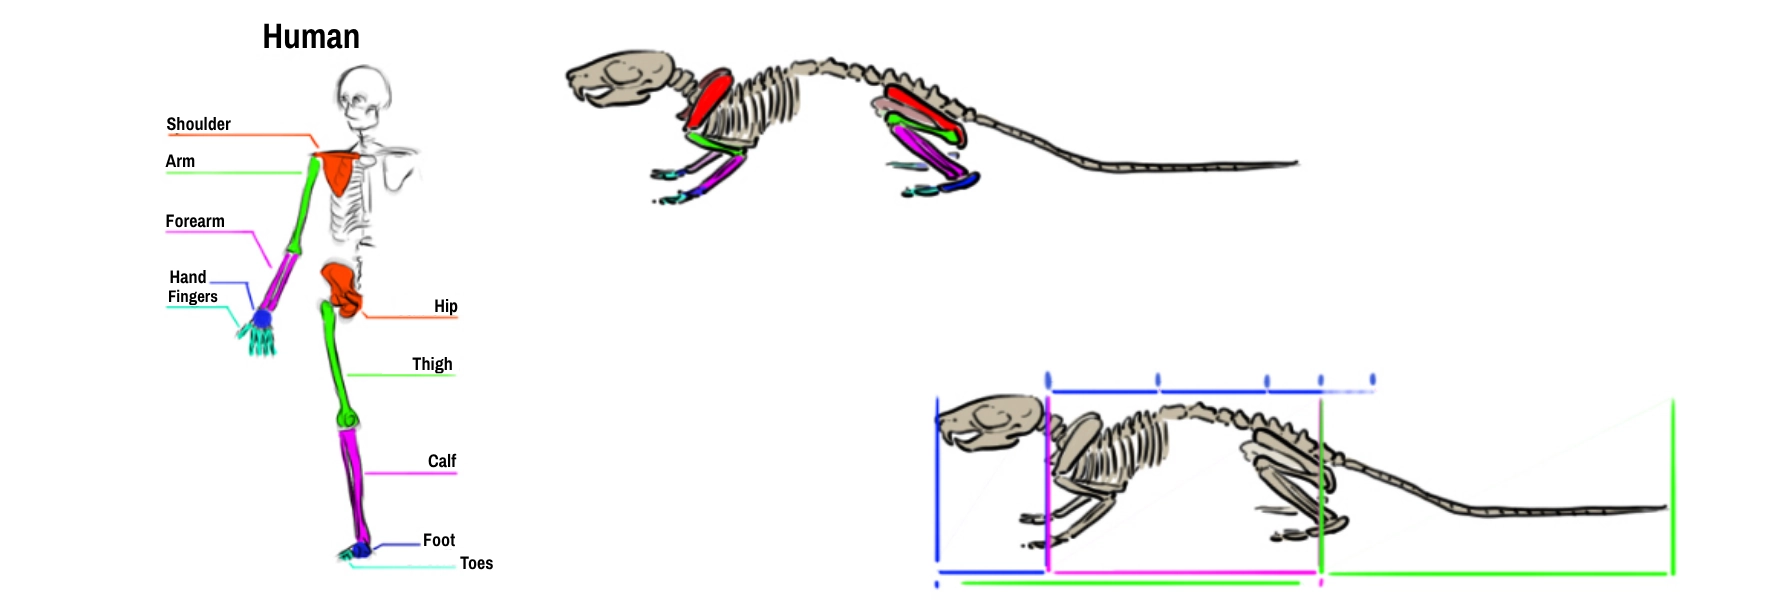
In the drawing at the bottom right, we can define the proportions of the animal.
The tail (in green) is almost as long as the head (blue) and the trunk (purple) combined.
The trunk itself is about 2.5 head lengths, however, this will not always be evident to transcribe, as the mouse tends to have its spine curved in its resting positions or when it is eating (in other words, it often arches its back).
While, like the word "mouse," the term "rat" does not specifically refer to one or more species, we would not want our mouse to be mistaken for a rat, knowing that overall the skeletons of the two groups are very similar.
But if we compare the skull of a common rat to that of a house mouse, we can still notice a difference in the general appearance. The rat's skull is more elongated.
By roughly outlining the mouse's skull, in A., we notice that it can be inscribed in an oblong shape that can further be reduced to a triangle with very soft corners, where the longest side would be the forehead line.
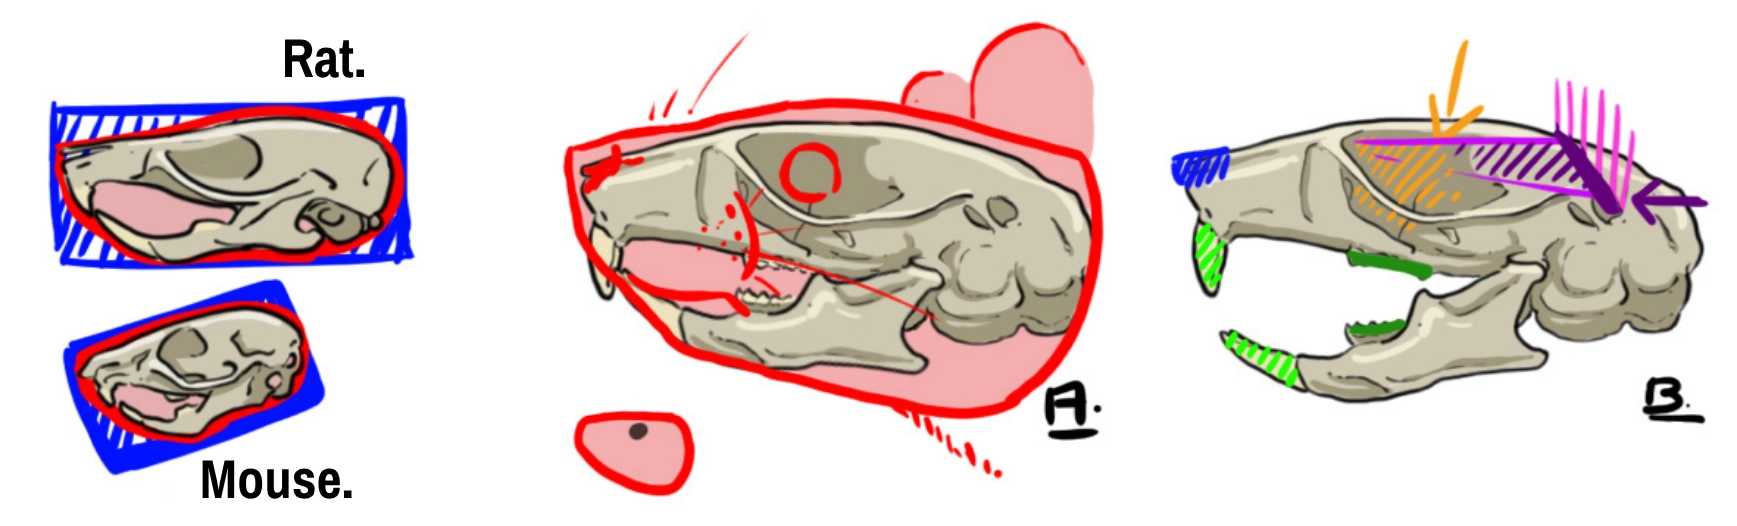
In diagram B, we position various elements.
In blue, the nose finishes off the tip of the snout. In light green, the two pairs of incisors are quite long. Further back on the jaws is the rest of the teeth, which will ultimately never be visible.
The area shaded in orange corresponds to the eye socket, which will accommodate the eye (orange arrow). From there, as with many mammals, we can define the hearing area (shaded in purple) which will enable us to place the ear (purple line and pink shading).
Let's now observe the animal in flesh and fur!
On zoom A, we continue the study of the head. The eye (in red) is placed roughly at the halfway point of the head's length (orange line), actually a bit offset towards the snout. It should be noted that the lower fold of the nostril aligns with the position of the eye (green line). The general shape of the skull is shown (blue hatched).
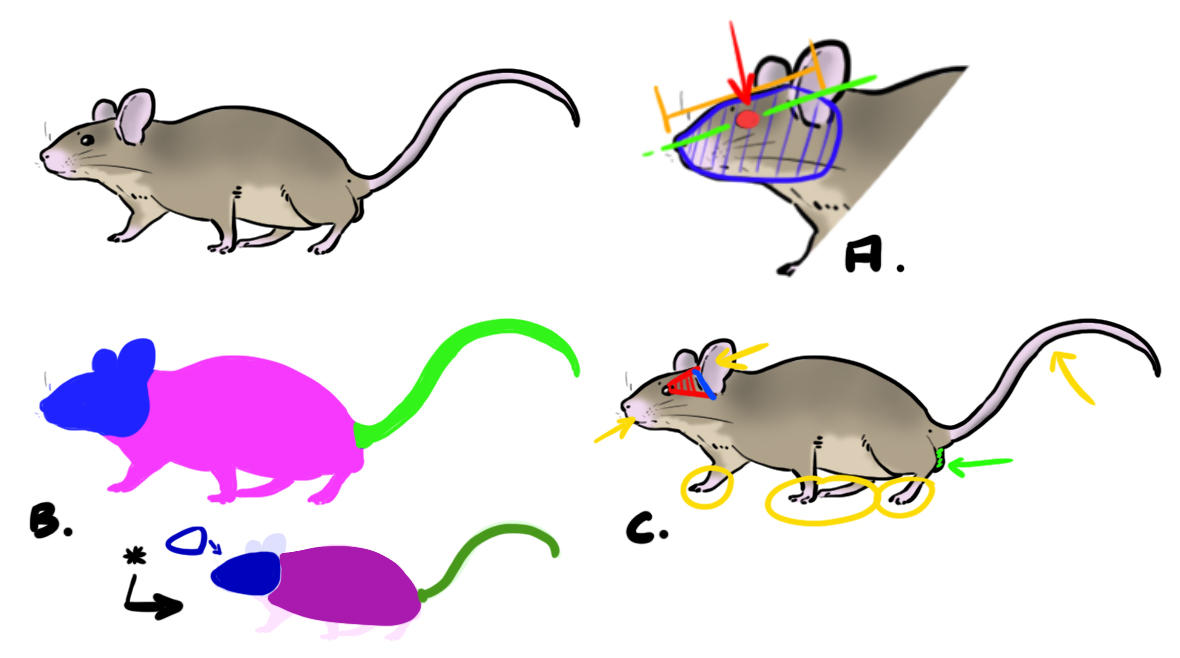
In diagram B, we simplify the silhouette by erasing the ears and the legs. We are left with a very soft triangle and an oblong body.
Finally in diagram C, we examine the fur pattern. The body of the house mouse is covered with hair, gray to brown, which is lighter on the belly, under the neck, the chin, and the cheeks.
The fur will be very sparse and thin on the legs, nose, ears, and tail (yellow arrows and areas). If you're not producing a hyper-realistic drawing, you can choose to show none in these areas.
In red hatching, we see the hearing area starting from the eye, forming a triangle, which by reaching the end of the head enables us to place the ear (attachment represented by the blue line). Indicated in green is the small characteristic "bulge" just before the tail under the belly.
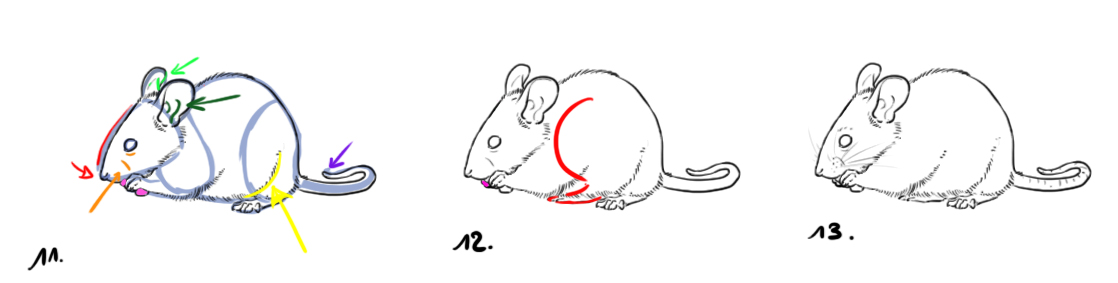
However, even though it looks all cute, we must not forget that the mouse is actually quite muscular (see diagram D.). The muscles of the front and hind legs (in green) are well-developed. While the contours of these muscles disappear under the fur, they will be useful when positioning them. The shoulder muscles attach to the spine after the neck and those of the thighs at the lower part of the spine.
Note that on the hind leg, we tend to discern only the "foot and toes" part (in light blue and dark blue).
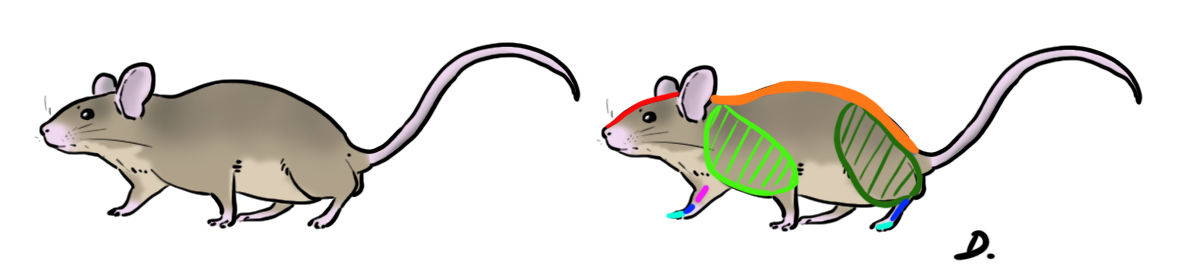
I'm highlighting for you the profile, in red, very soft, and the line of the column, in orange, with a small curve in the middle of the back.
THE MOUSE'S PAWS
The front paws have 4 well-developed fingers and an atrophied thumb (blue arrow in drawing B.) which will at best be represented by a small irregularity (blue arrow in drawing C.). The hind paws have five toes. All the toes (except for the thumb substitute) end with a small claw. The claws should be treated more like very long nails than cat claws that protrude at the fingertips.
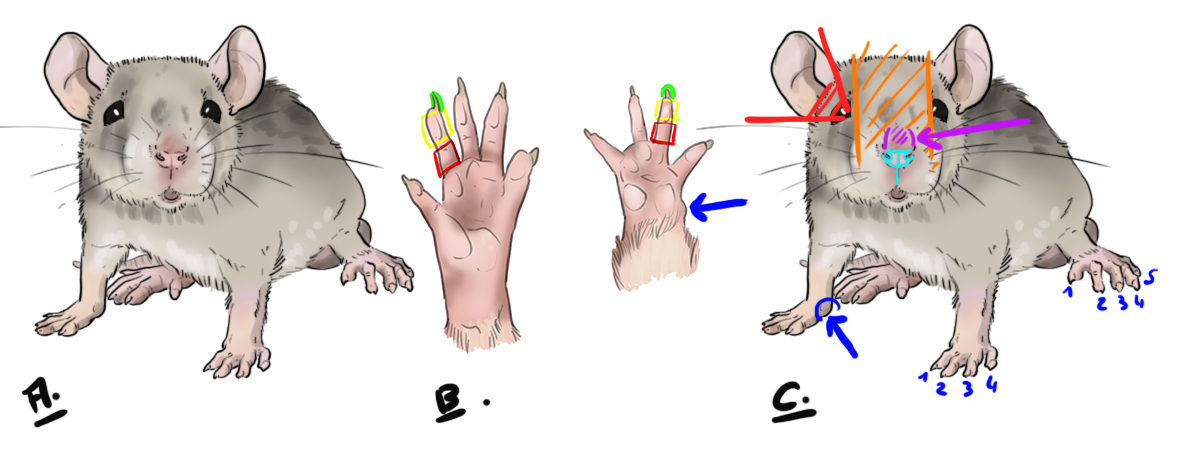
The observation of drawing A reminds us that the legs are rather short.
In diagram C, in addition to the blue count of the fingers, I'm taking the opportunity to complete our study of the head.
In light blue, the nose, and just above in hashed purple is a small relief created by the muscles of the snout. In orange, we have the "forehead" area, quite wide, which includes the nose and the snout. The eyes are positioned on either side of this area. In red, the triangular area that starts from the eye and enables us to position the ear.
ANATOMY OF THE HEAD FOR DRAWING
Indeed, let's study the construction of the head. Here we observe a mouse of the "field mouse" type.
Diagram A:
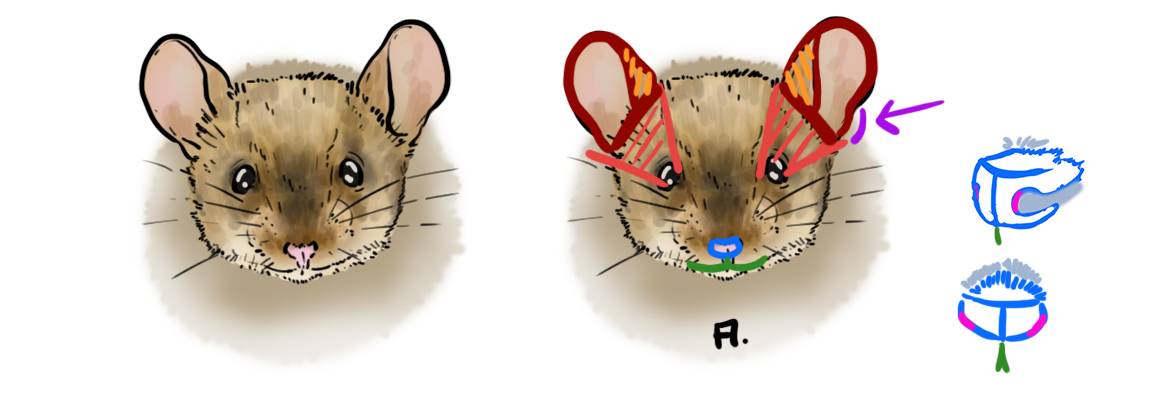
The snout is symmetrical in composition. The nostrils open along the length after a slight curved depression (in pink). You can lightly draw a line in the middle that you can continue (green line) to define the upper lip.
The mouse has lips on the top and bottom, slightly pinkish and very thin. They will be almost invisible and if you want to make them appear, prefer a light pink line just under the lower incisors.
Hatched in red, the hearing area that starts from the eyes.
The ear is quite round with a very slight irregularity on the outer edges (purple arrow) which you can completely avoid marking. Note that on the inside, the rim of the ear is quite visible (orange area).
Diagram B:
Although the head seen from the front seems to be round, the lower jaw slightly gives it structure. I am very roughly outlining the angles created by green lines.
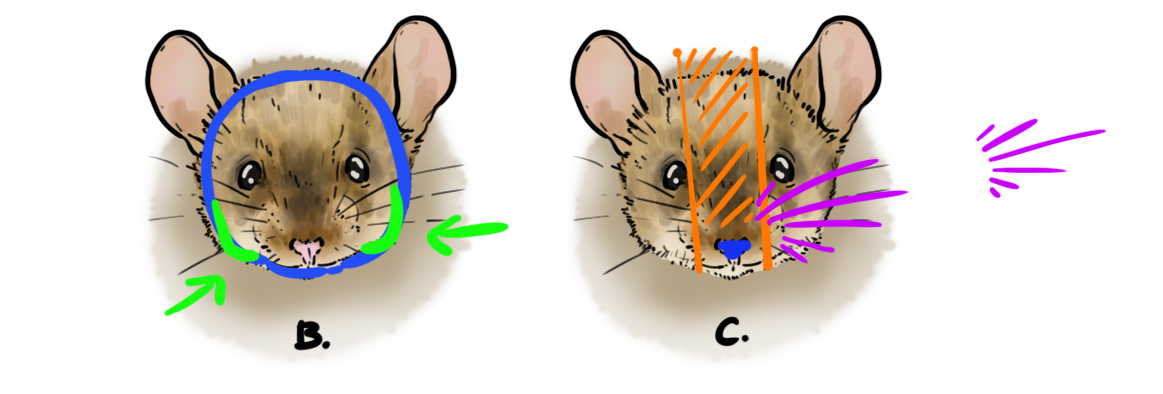
Diagram C :
We find the little snout in blue. In orange, the forehead area that encompasses the muzzle and helps us define the spacing of the eyes.
In purple, the whiskers. Mice have beautiful and long, thick whiskers. As always, unless you're doing a hyper-realistic drawing, don't overdo the number of whiskers as it may make your drawing too heavy.
Note that the whiskers are getting longer before shortening again. There are obviously many attachment points of the whiskers but they are moderately marked. As with the lines of the whiskers, avoid marking them too much.
The eyes are very rounded in shape and can range from the deepest black to a slightly dark red. They have both upper and lower eyelids, which are very discreet. There will be no visible demarcations of iris or pupil. The eyes are positioned on the sides and are slightly protruding.
THE MOUSE'S TAIL
Like the tails of "rats," the tails of "mice" are ringed and covered with small scales. Between these small scales, you can see the discreet presence of fine, short hairs; they are a detail that will only be visible in a magnified drawing,
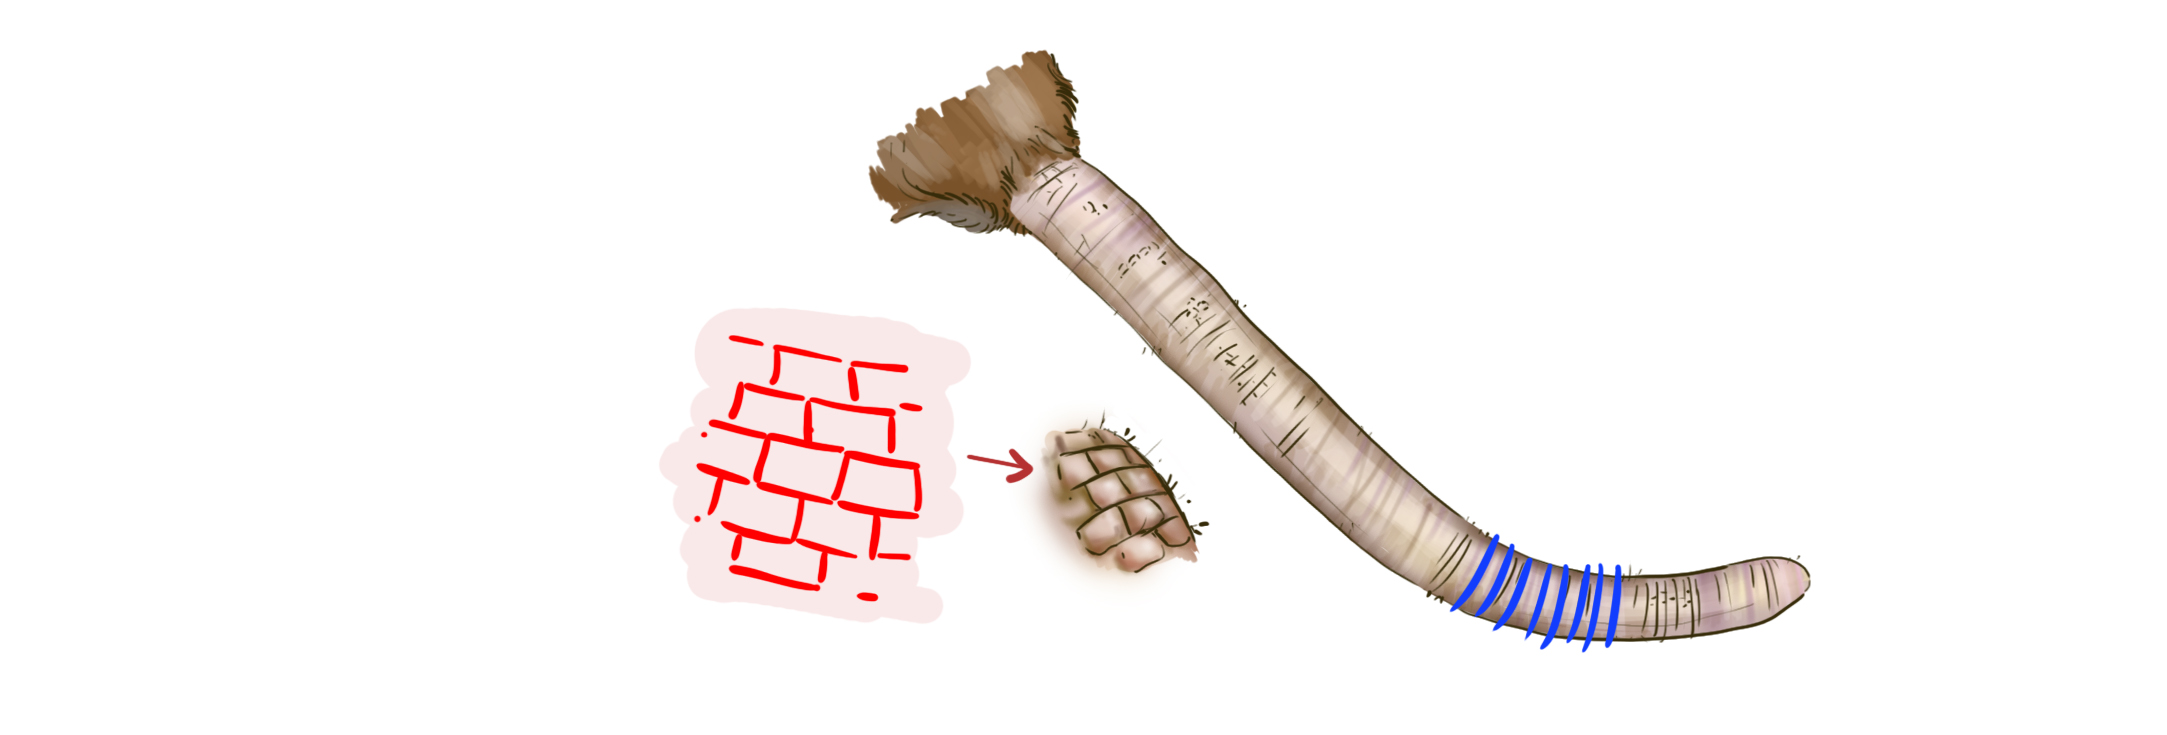
In blue I underline the ring structure and in red I zoom in on the scales that make up the rings. Note the staggered formation of the scales.
DRAWING THE MOUSE
I believe you are now quite familiar with the mouse, it's time to move on to drawing! We are going to draw a little mouse nibbling away. To work on the shape of the mouse, we will choose to draw it in profile, but because an exact side view would be a bit too static, we will slightly turn (blue arrow) our axis (purple and pink lines) forward.

Let's start...
OUTLINING THE MAIN SHAPES
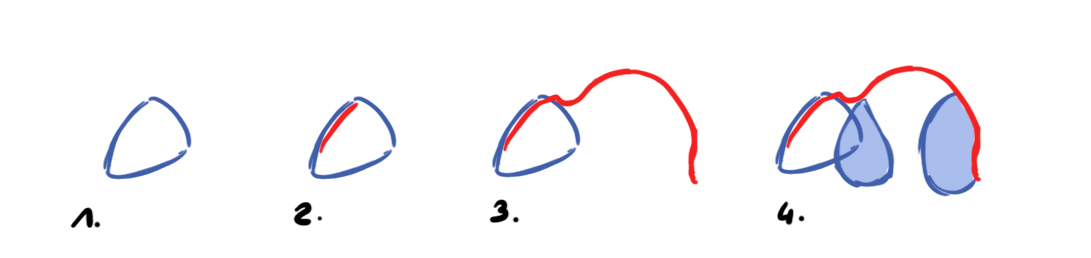
Step 1: The head triangle.
Step 2: I draw a line across the top of the forehead, in the middle of the head, knowing that since we are not perfectly in profile, the middle is slightly offset to the side.
Step 3: From this middle line I draw the back line. Our mouse is well hunched over itself.
Step 4: I place the front and rear limbs, respectively after the neck and at the bottom of the topline.
Step 5: I place the bone structures of the legs using the color code used at the beginning of the article.
Step 6: Based on my "muscle mass" foundation and relying on the bones, I quickly shape the front and rear legs.
Step 7: In a dashed line I place the spine in order to draw the tail line. I do not forget that it should be quite long but I take into account the fact that it coils and that the viewing angle will flatten the perspective a bit.
I close the belly starting from the junction of the head and the front of the shoulder down to the lower back.
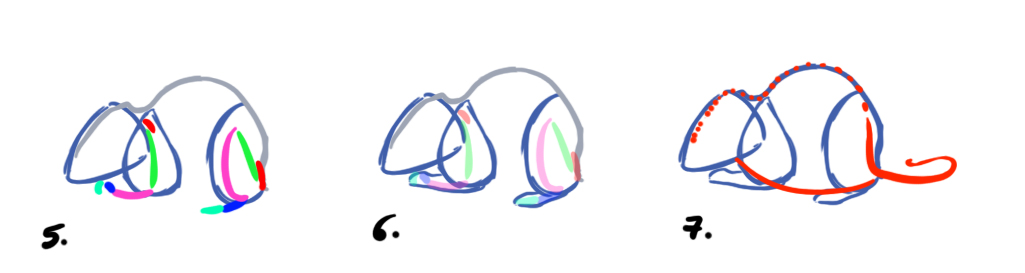
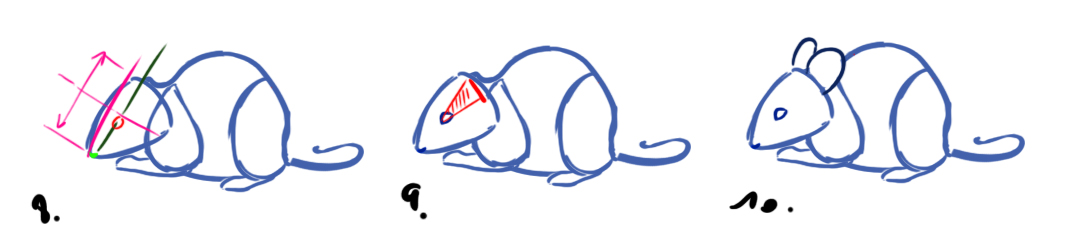
Step 8: I am looking for the length of the head (pink line), I find the middle and place the eye against the middle of the pink length but on the "snout" side of the head. The nose is in green and from its fold I draw a line (dark green) parallel to the upper line of the skull. This line helps me place the eye on the width.
Step 9: Now that the eye is in place, it enables me to define the attachment area of the ear.
Step 10: I draw the ear placed thanks to the previous step and also offset the ear on the other side.
ADDING DETAILS TO THE DRAWING
Step 11: I trace the outlines more neatly over our construction line. I slightly correct the tilt of the head (arrow and red line) by lowering it a bit.
In orange, I draw a small line at the level of the snout (which corresponds to the relief of the upper jaw muscle) and under the eye (which corresponds to the relief created by the lower eyelid).
In light green, I underline the ear attachment on the right side, and in dark green, I quickly sketch the internal folds of the ear.
In yellow, I pass the fur from the belly over the line of the thigh.
In purple, I adjust the end of the tail slightly so it tapers off gently without ending in too sharp a point.
In pink I add a little something to snack on in the front paw.
Step 12: In red, I quickly position the right thigh to place the back leg that partly appears. In pink, I add the right front paw that holds the meal with the other paw.
Step 13: I add the whiskers and create some whisker attachment points on the muzzle. I gently suggest the tail rings. I draw a few lines above the eye to make it stand out a little bit.
Now let's move on to coloring.
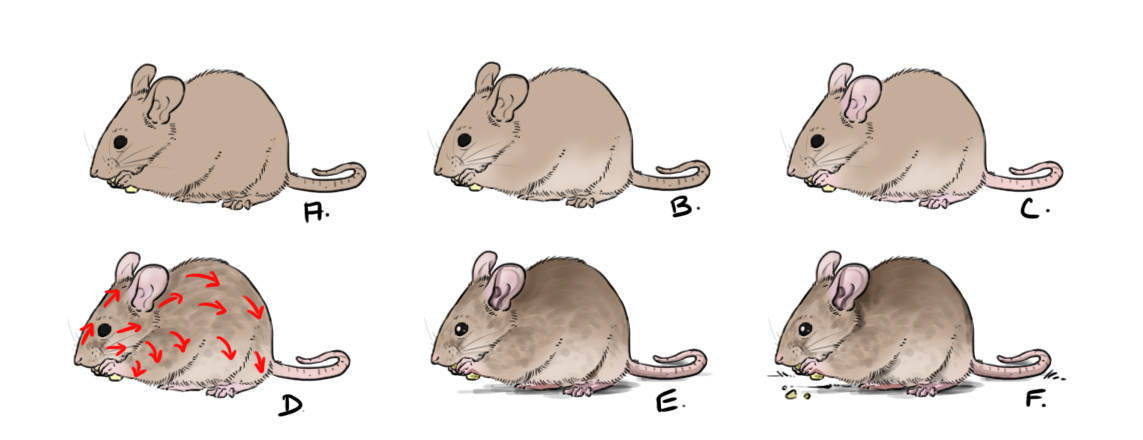
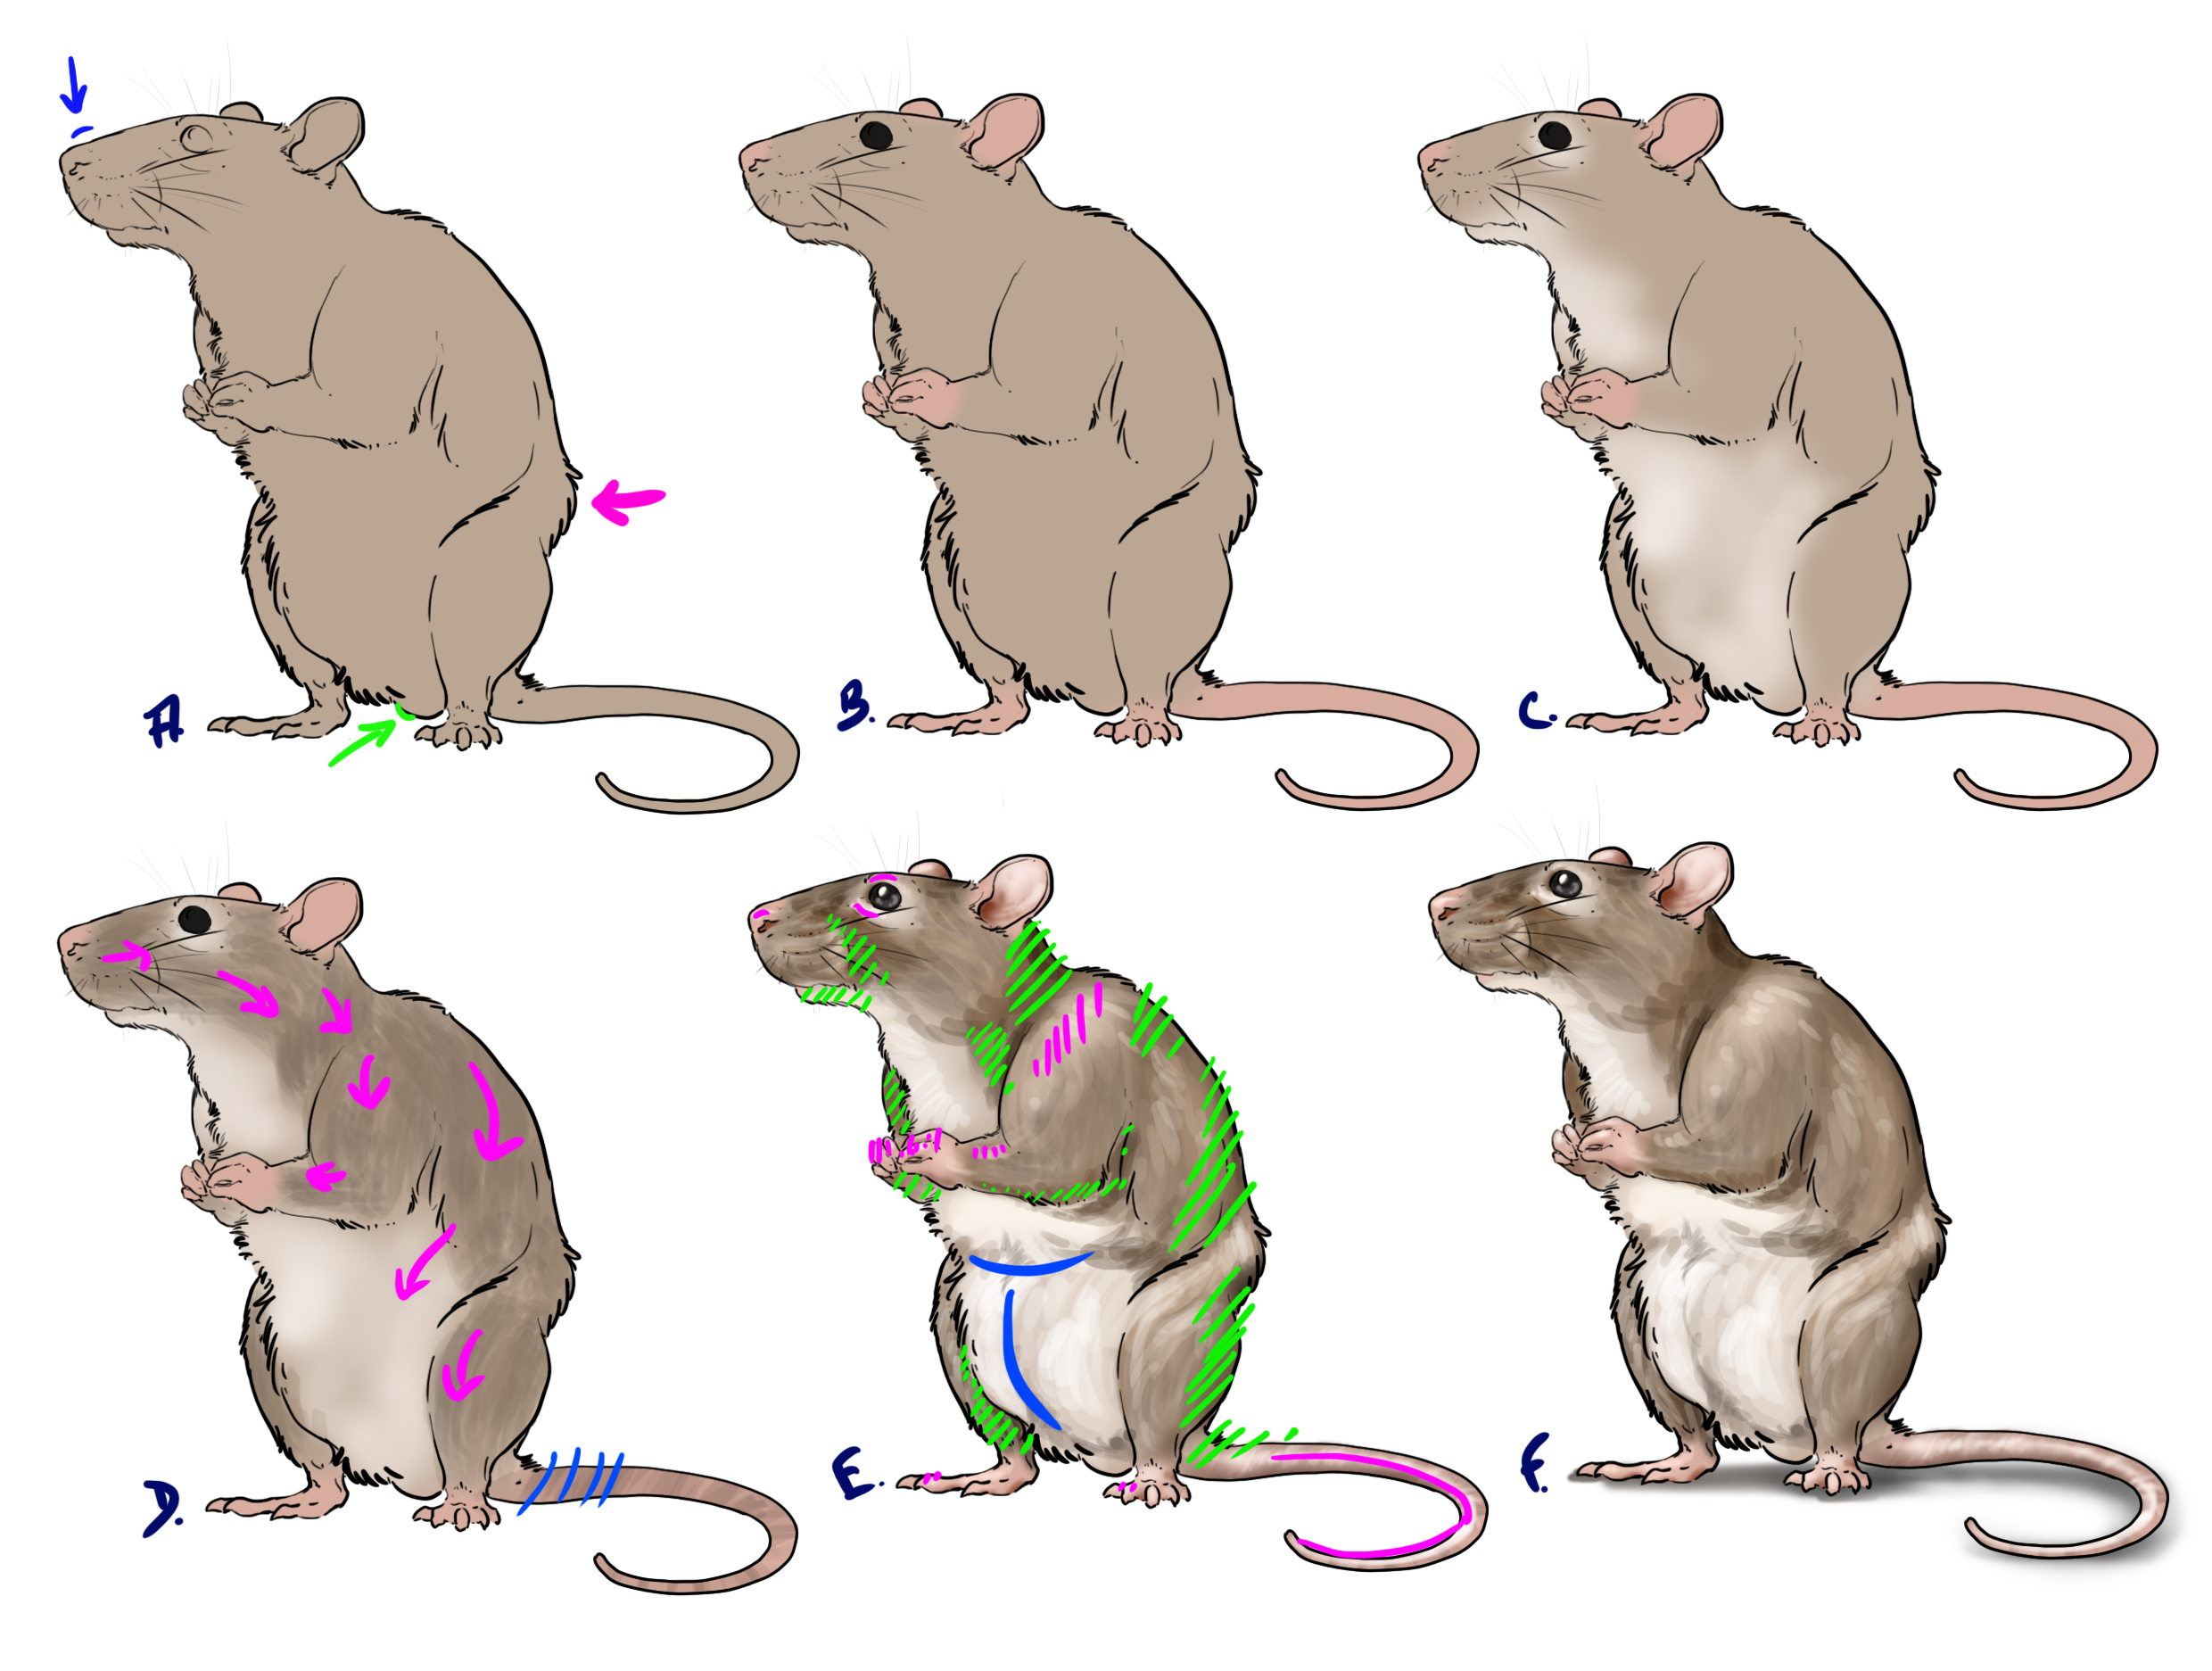
ADDING COLOR TO THE DRAWING
Step A: I choose a light strand for the fur. I choose a black that is not entirely pure for the eye and I color the meal with a slightly unsaturated yellow.
Step B: I lighten the belly, the hairs on the "tail" side of the limbs, the muzzle and the cheeks.
Step C: I color the ears, the snout, the paws, and the tail with a light pink and a hint of orange-red.

Step D: I take a slightly darker shade than the brown of the fur to speckle it. I apply my small touches following the direction of the hair (red arrows).
Step E: I add a sparkle of light on the eye. I darken the back of the animal and shade the "underneath" elements and the folds.
Step F: I finish adding the shadows and add a few crumbs.
And that's it!
The "risk" is ending up with a mouse that looks a bit like a rat. If you really want to ensure that your mouse is not mistaken for a rat, there are a few tricks you should know:
- emphasize the size of the eyes and ears,
- enlarge the head a bit and round the body,
- lengthen whiskers.
If you want to know how to draw a rat, there's an article that discusses this, I encourage you to check it out! ;)
Get your pencils ready, and have fun :)
Editor and Illustrator: Elo Illus
Discussion
7 comments