How to Draw a Reindeer
Deer are very popular animals and today we are going to study one of them, the reindeer. Although it is not an animal found in our immediate environment nowadays, everyone knows it. It is a symbol of winter, cold, closely linked to the figure of Father Christmas or Santa Claus (well, you know who we're talking about!). You will find an article on our blog to create a drawing of Santa Claus, it's worth checking out if you haven't already! :D
Let's get to know this magnificent animal.
So first of all, reindeer or caribou? Well, these two names actually refer to the same animal. It will be called caribou in Canada and reindeer in Europe and Asia.
Second point: both males and females can sport antlers, and this is an exception among cervids. Ah, so yes, the reindeer is a cervid, it's a cousin of deer.
STUDY OF THE REINDEER SKELETON FOR DRAWING
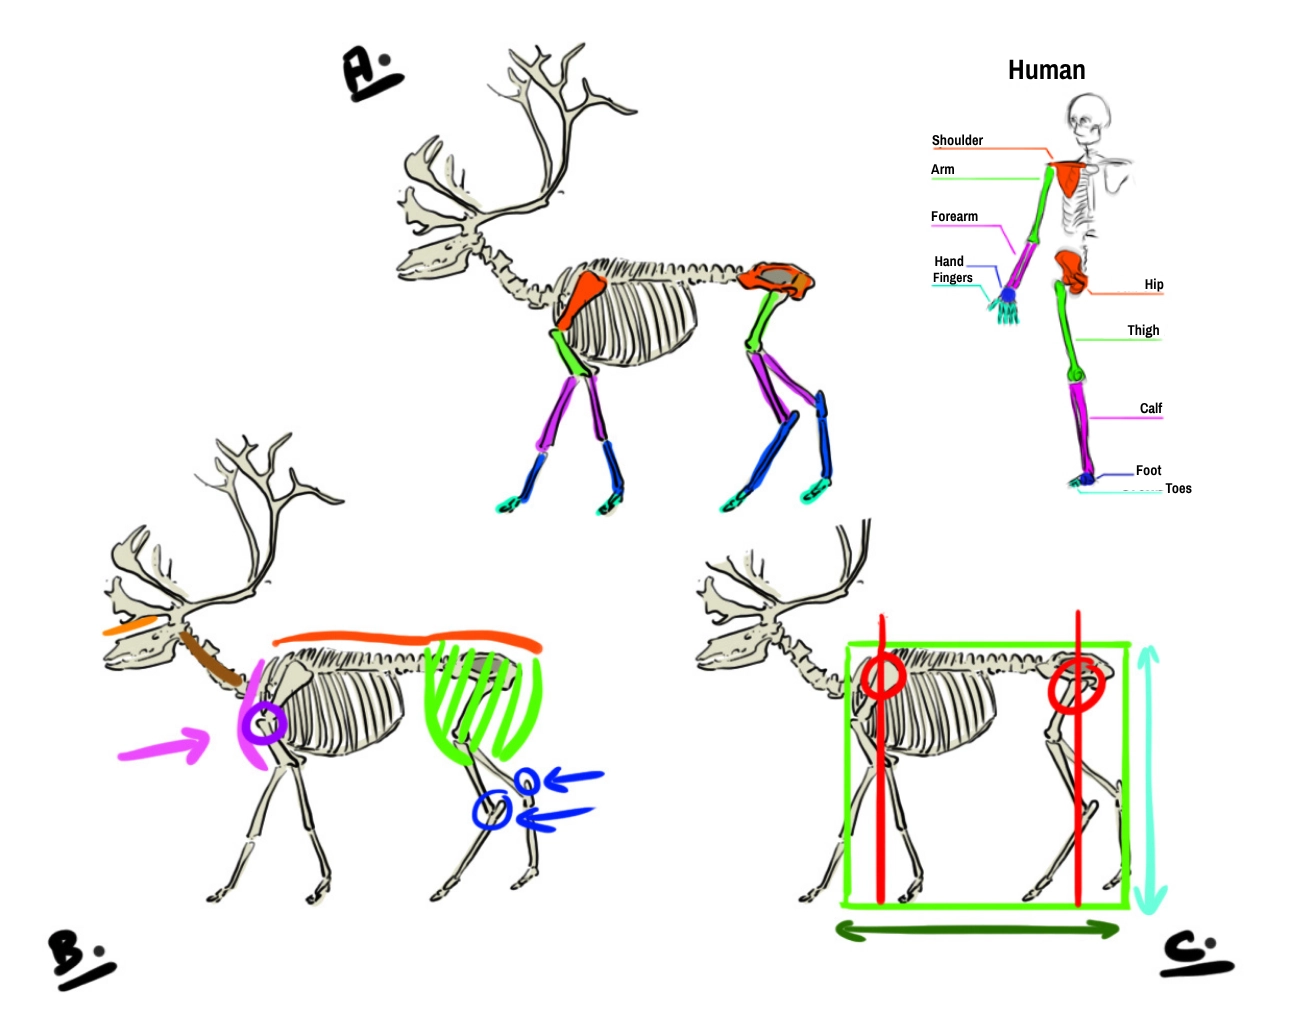
Diagram A:
You can see that the limbs of the reindeer are built on the same pattern as our limbs. Note that the reindeer is an ungulate; that means it walks on hooves (in this case 2) located at the ends of the limbs.
Diagram B:
The skull has a flat profile (orange line) which can be seen in the animal's silhouette.
The neck (brown feature) "fits" into the body of the animal below the spine line (in red). The back is rather straight until the end, except for small "bumps" created by the leg attachments.
The line and the pink arrow are there to show you that the joint of the 2 bones (purple circle) will be found in the construction of the animal.
In shaded green, the rear thigh muscle will cover the back part of the animal.
In blue, the ankle bone will shape this joint.
Diagram C:
If we disregard the head/neck block, the body fits into a rectangle where the horizontal side (in dark green) constitutes the length. But note that this rectangle could quickly be mistaken for a square.
THE GENERAL APPEARANCE AND FUR OF THE REINDEER
In general, the reindeer is a robust animal, although the females are a bit slighter. In adults, we can see that the neck hairs are quite long. The tail is short and is positioned high at the end of the back.
The coat may be brown or gray. Often the muzzle will be a bit darker and the eye will be rimmed with lighter hairs. The tail and belly are often covered with cream-colored hairs. Sometimes a band of darker hairs can be observed at the bottom of the belly.
The color of the antlers may vary according to the season. In summer they will be covered in velvet and tend towards a light shade. In autumn and winter, they can display a brown/red and then a dark brown.
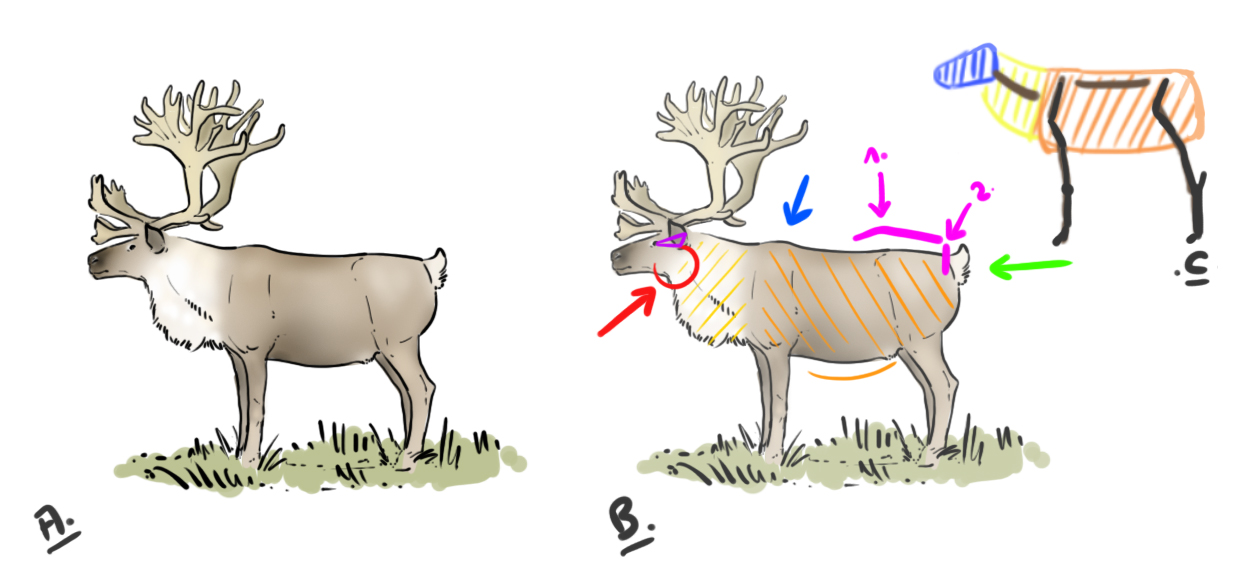
Note the following elements on diagram B:
Through the red arrow, note that we cannot really distinguish the delineation of the lower jaw, as might be the case, for example, with a horse. The back of the jaw is lost in the neck fur. Highlighted in yellow, the neck is quite wide. The long neck fur shortens at the junction with the front legs.
In shaded orange, the animal's body forms a fairly elongated rectangle with a slightly bulging belly.
In the picture, there are few curves. In blue, the small "bump" of the shoulder. Further along the column, the hip will create a small unevenness (in pink point 1) but the back will end quite straight (in pink point 2), do not curve it much. It will be the tail (green arrow) that will make the connection with the top of the rounder thigh.
Diagram C simplifies the form. The head, a "rectangle" wider towards the ears, rounded at the muzzle. There is no head/neck demarcation. The neck widens significantly to the shoulders. The body is a rectangle and there is a small black outline of the main bones.
DRAWING THE REINDEER'S HEAD
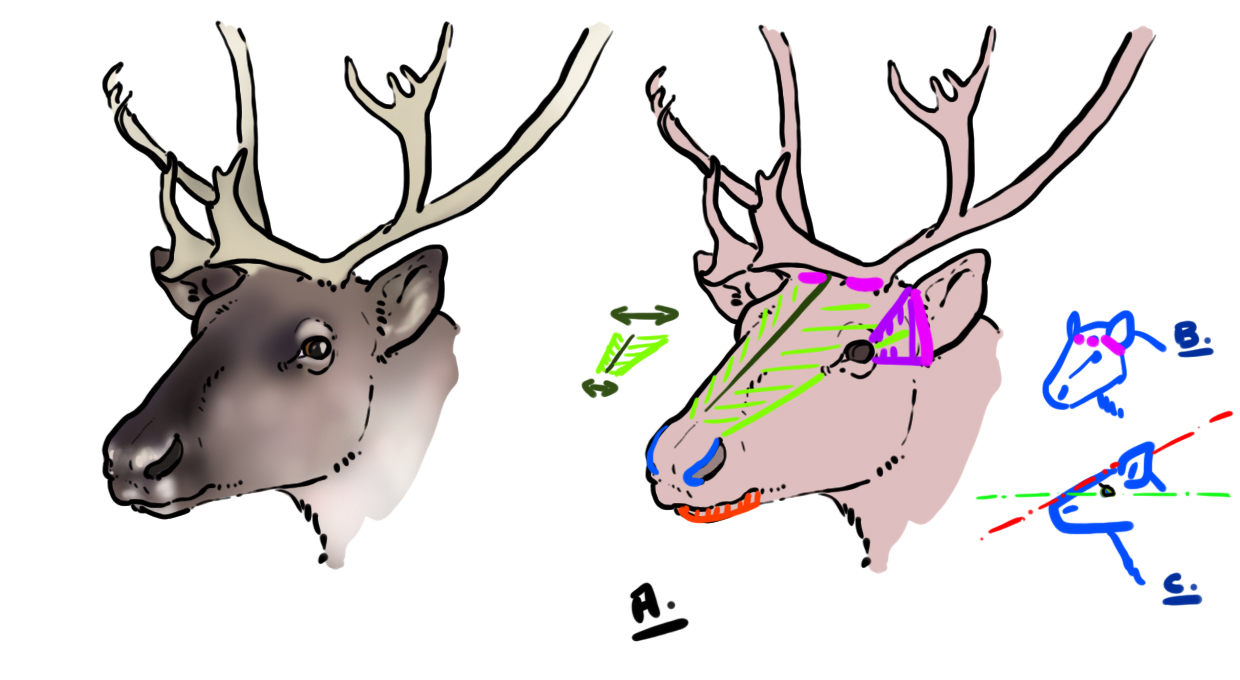
I didn't create a drawing exclusively for the eye. You can see in the drawing on the left that it is quite similar to ours. You can notice the white of the eye, especially towards the inner part of the eye. The iris will often be brown, less frequently gray or blue.
The pupil is very black, round and large. Eyelashes can be seen on the upper eyelid in the context of a quite zoomed-in and realistic drawing.
Be careful to place the eyes high up on the head.
On diagram A there are some key points to remember:
The nostrils (blue line) are open along the length of the head. The lower jaw is quite thin (red hatched area).
The forehead is very flat and widens towards the top of the skull. Indeed, the distance between the nostrils is smaller than the distance between the eyes (green lines).
The antlers are attached high on the skull, like the ears. The ears, as is often the case, are positioned in a triangle (shaded purple) behind the eye.
On simplification B:
The pink attachments of the ears and antlers, high on the skull.
On simplification C:
The reindeer's eyes are positioned on the sides of the animal (as is often the case with prey). When the animal is in profile, you will be able to observe the eyes almost from the front. However, note that their orientation is on an axis (in green) different from the forehead line (in red).
From the front view:
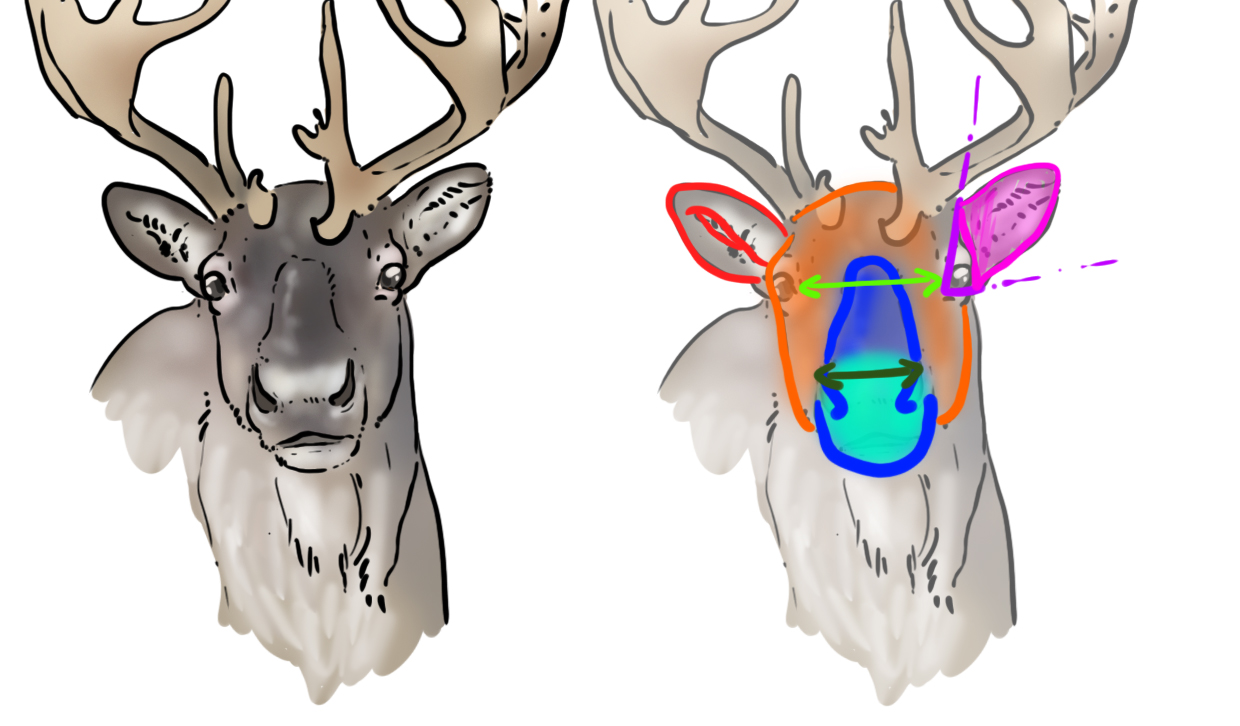
In blue we have the "block" muzzle. Notice how the shape of the muzzle rises high between the eyes. There is no curvature or break, we find the animal's profile is very flat.
We find the distance between the nostrils (dark green line) is shorter than the distance between the eyes (light green line). The eyes are high up on the head. The ears can be placed in a triangle (purple lines) just behind. The ear (in red) ends in a rounded tip. Although the edges can be distinguished, they are thickly covered with inner hair (often light).
On the bottom of the shape (orange area) we will find soft angles created by the bones of the lower jaws.
THE REINDEER'S HOOVES
Whether it's the front or hind legs, the configuration will be the same.
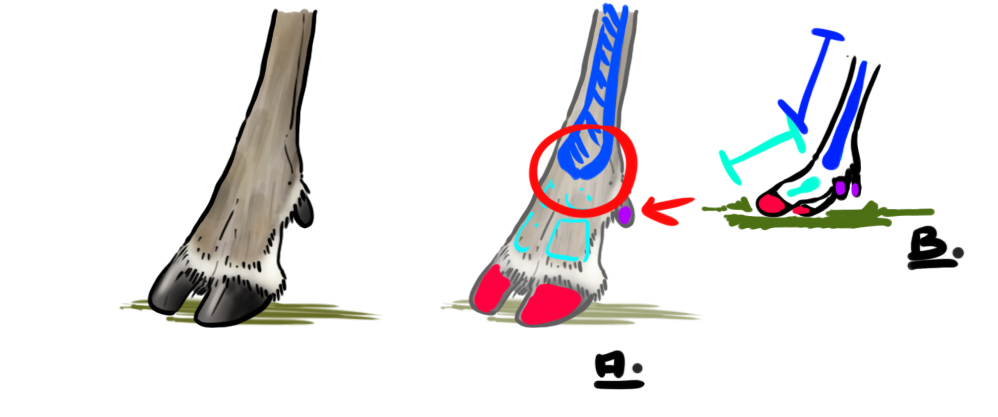
Diagram A:
The animal has two large main hooves. On soft ground surfaces, such as snow, the two hooves can spread apart to optimize ground grip. A little higher, at the joint (between the dark blue bone and the light blue "finger" bones), are two "mini" hooves (in purple/red arrow).
In B:
A simplification of the rear view of the hoof.
DRAWING THE ANTLERS
We come to a characteristic and more complex element, the antlers... Honestly, your best allies will be observation and practice to fully grasp the shape. However, we can still outline a "simplified method" which can serve as a basis.
Based on 4 different animals, we will attempt to schematize the structure of antlers. Although females have antlers, the largest ones are found in males. Sometimes a difference in thickness can be observed between individuals. Here, for example, the animal in B has thicker antlers than the animal in C.
The basic shape, which makes up the framework of the antler, is shown in red. In reindeer, the antler starts in a circular arc. As it grows, the antler will curve forward. The shape should not display too harsh curves (refer to the following diagrams).
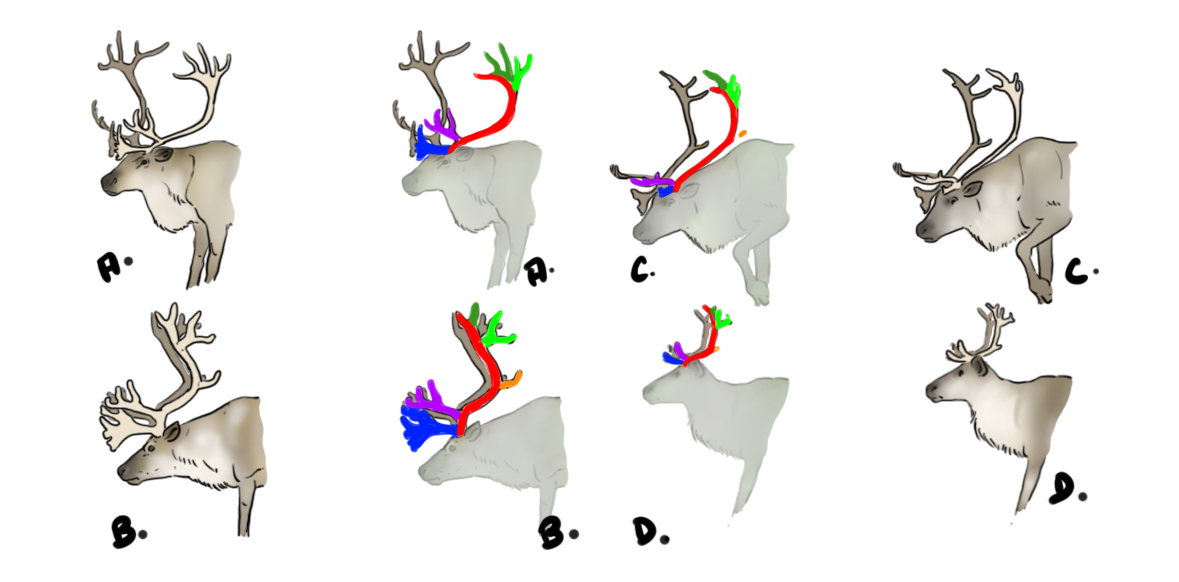
So, we have our red line that curves back. At the front, there are two "sections". In blue, the first part tends to curve inward, especially when it is well developed. On animal B, you can see that this part is offset inward compared to the segment above. On animal C, note that this part is broken. In purple, we see the second front segment. You can see its shape evolve on the different animals.
Regarding the curvature, a spike is often observed (in orange), but sometimes it may have been broken (animals A and C).
At the top of the wood, the branches can be divided into two sections. In light green, the first section composed of at most two tips, then after the tips the rest are in dark green which spread along the length of the antlers.
In any case, avoid finishing shapes with overly sharp points.
So we can simplify all that:
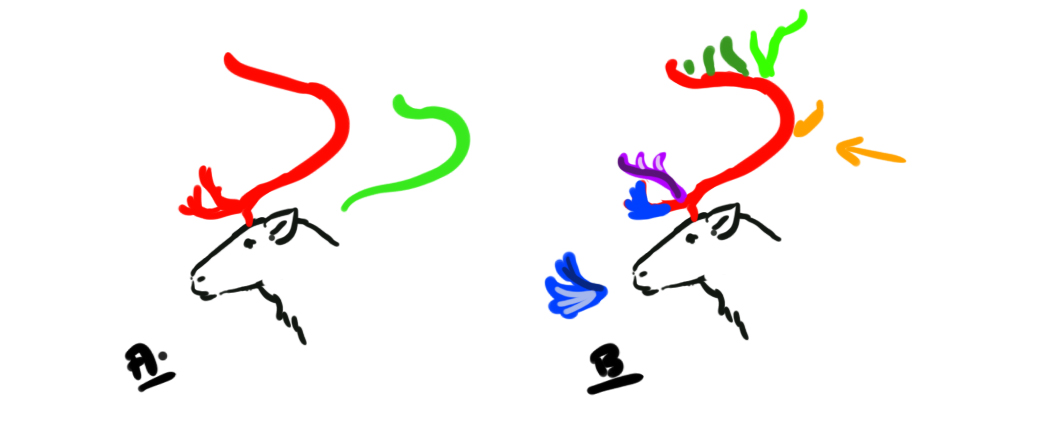
The basic shape (in red) is curved and rounded (green line in A).
In B, we see the sections: at the front in blue and violet. Whether it is for the blue or violet sections, the main "peaks" are represented by the dark color and the secondary branches by the same color in light.
There is a tip at the bend (in orange).
On the upper part: a pair of peaks (in light green) followed by segments (in dark green) that are distributed along the length.
DRAWING THE CHRISTMAS REINDEER
Before moving on to the step-by-step drawing, we will just look at the reindeer's harness. Traditionally, common sleds are pulled by a single animal. Obviously, you can adjust this according to your needs.
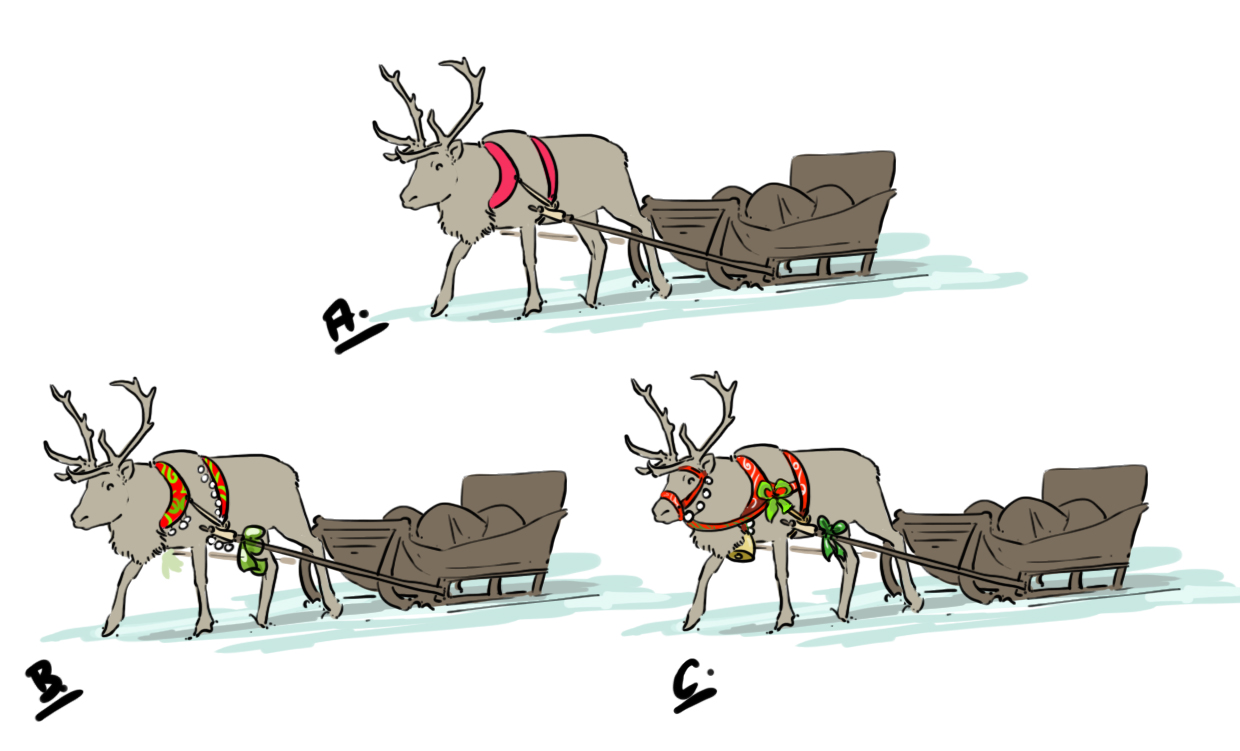
Drawing A shows you a simple, very classic harness. We will see two possible variations for a more festive harness, noting that I will not deal with the sled but only with the elements present on the animal.
On drawing B I brighten up the existing harnesses with Christmas-themed decorations, white pompoms and a ribbon on the sleigh bar.
Over drawing C I add a halter to the head that I connect to the breastplate harness. I add a bell and another ribbon.
And just like that, very easily, we're in the mood!
DRAWING A REINDEER STEP BY STEP
So obviously, the profile option remains the most relevant in order to see the most of the animal, but that would be a bit easy so we are going to slightly turn our viewpoint. We will look at the animal a bit from the front, with it coming towards us.
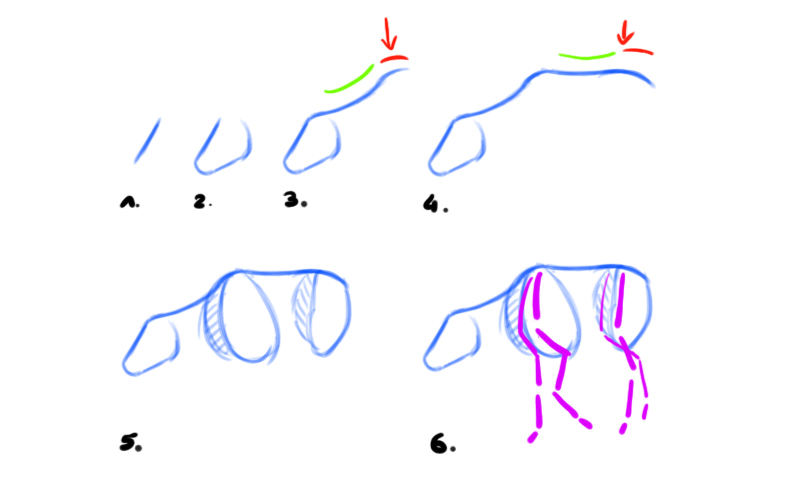
Step 1:
The front line, very straight.
Step 2:
I'm drawing the rest of the head, keep in mind that the animal will not be entirely in profile.
Step 3:
The animal moves at a walking pace, its head slightly lowered. I draw the line of the neck (green line) to the shoulders (small bump in red).
Step 4:
In continuation, I trace the rest of the back with a slight curve (the red arrow marks the hip).
Step 5:
I place the masses of the leg muscles (hatched areas for the sides that are not visible).
Step 6:
I quickly position the limb bones. The hind limb on our side has just been set down, prior to the front limb on the same side.
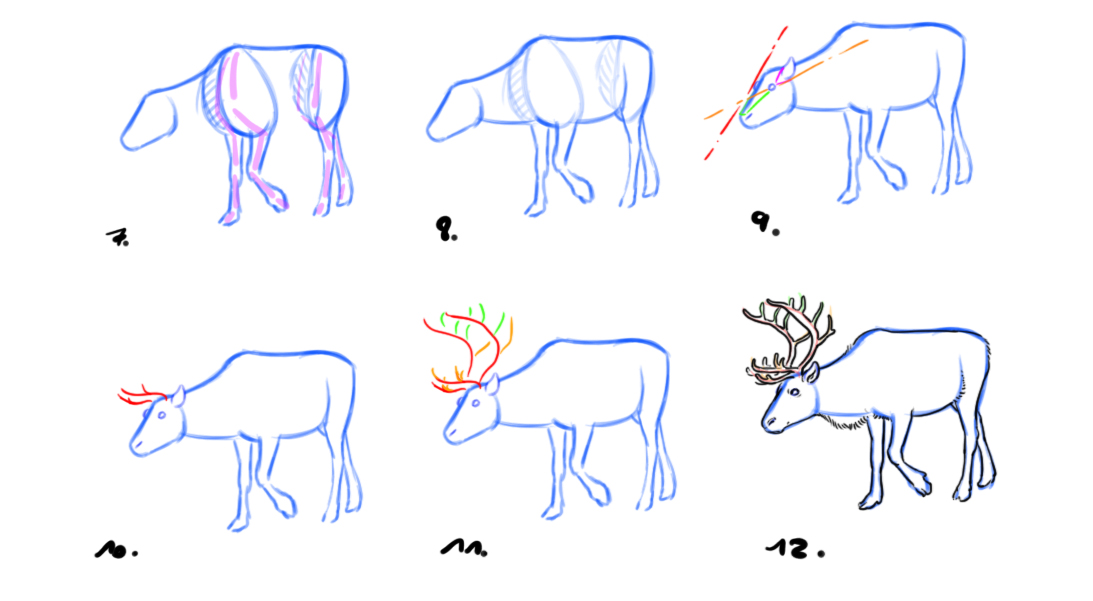
Step 7/8:
I draw the legs and clean up the sketch.
Step 9:
I draw the nostrils, along the length of the head, I place the eyes and ears. I draw a tiny bump for the eyebrow arch that we do not see.
Step 10:
I place the frame of the sections in front of the antlers.
Step 11:
I am tracing the rest of the antlers according to the color code chosen for the study.
Step 12:
I am reworking the basic lines. For the front segments of the antlers on the side that is not visible, I partially draw them. For the neck, I add a few small lines for the long hairs. I add two small lines around the eye to give it some volume.
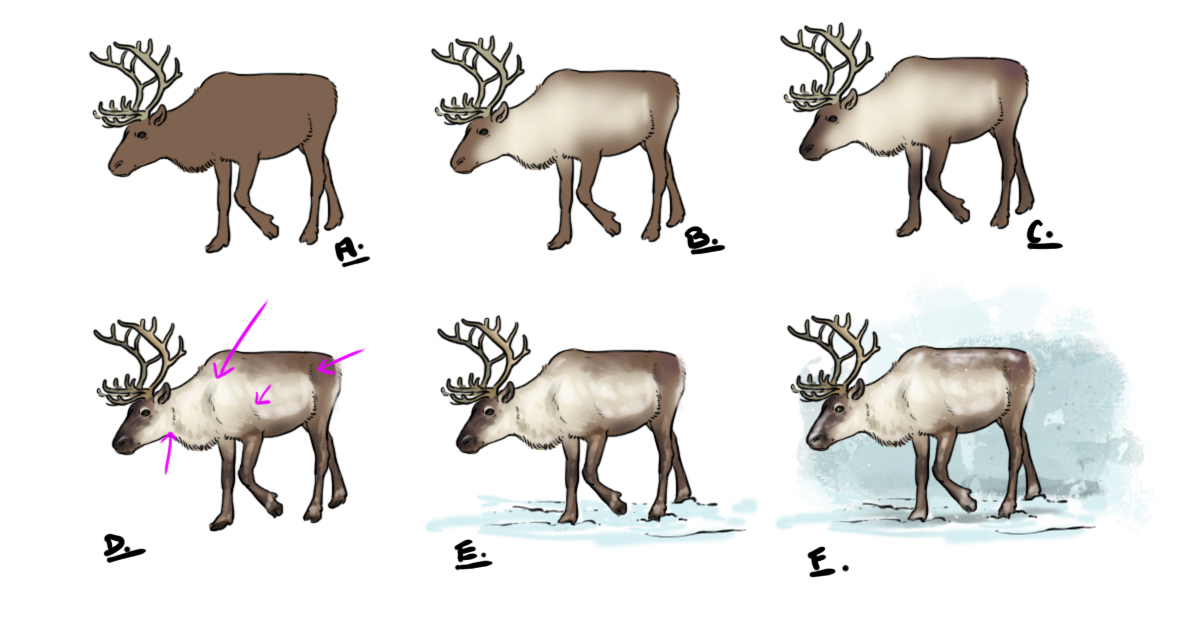
COLORING THE DRAWING

Step A:
I'm laying down my flat colors.
Step B:
I'm lightening the neck and sides.
Step C:
I choose a darker brown than my base to darken the legs, back, muzzle, and forehead.
Step D:
I add a few strokes to suggest the muscles (pink arrows) and detail the fur a bit more. I apply a light beige above the eye. I slightly lighten the line of the nostril and the hair above the hooves.
I use a slightly darker shade on the cream base to "dirty" the neck and flanks while respecting the shadow areas created by the volumes. I darken the hooves and the tips of the ears. For the antlers, I lighten the high tips and darken the elements on the side that are not visible.
Step E:
I place a bit of snow at the animal's feet and thus cover the hooves a bit.
Step F:
I place a background of low sky, a few snowflakes, some snow on the animal (on the forehead and the back), the shadow on the ground, and a gleam of light on the eye. It's done!
As you will have understood, the main difficulty remains the antlers. You will need a lot of practice to permanently understand and master their appearance. I recommend you keep looking back to observe the animal. This remains the best way to stay as close as possible to reality.

Discussion
4 comments