How to Draw a Bear
The bear is an impressive animal due to its stature and strength, but it is also very friendly. Millions and millions of children hug a small teddy bear every day. Today we are going to study this superb animal.
First, a quick overview of the animal. The bear is a mammal (like you and me) from the Ursidae family. It is plantigrade, walking on the palms of the hands and the soles of the feet (like you and me). Most bears are omnivorous. They are divided among eight species present in various habitats from Europe to Asia, through North and South America.
We will base our study primarily on the observation of brown bears. It should be noted, for example, that the grizzly (North America), the Kodiak bear (very large, living in Alaska) and the European brown bear are all brown bears.
ANATOMY OF THE BEAR FOR DRAWING
As I want you to understand how an animal is structured, stands, and can move from a strictly mechanical standpoint, we are going to start with our usual study of the skeleton.
As often noted, the paws have the same structure as our limbs. Do not forget, especially for drawings of the animal at rest, that it is plantigrade, meaning that both blue areas (dark blue and light blue) are in contact with the ground [D].
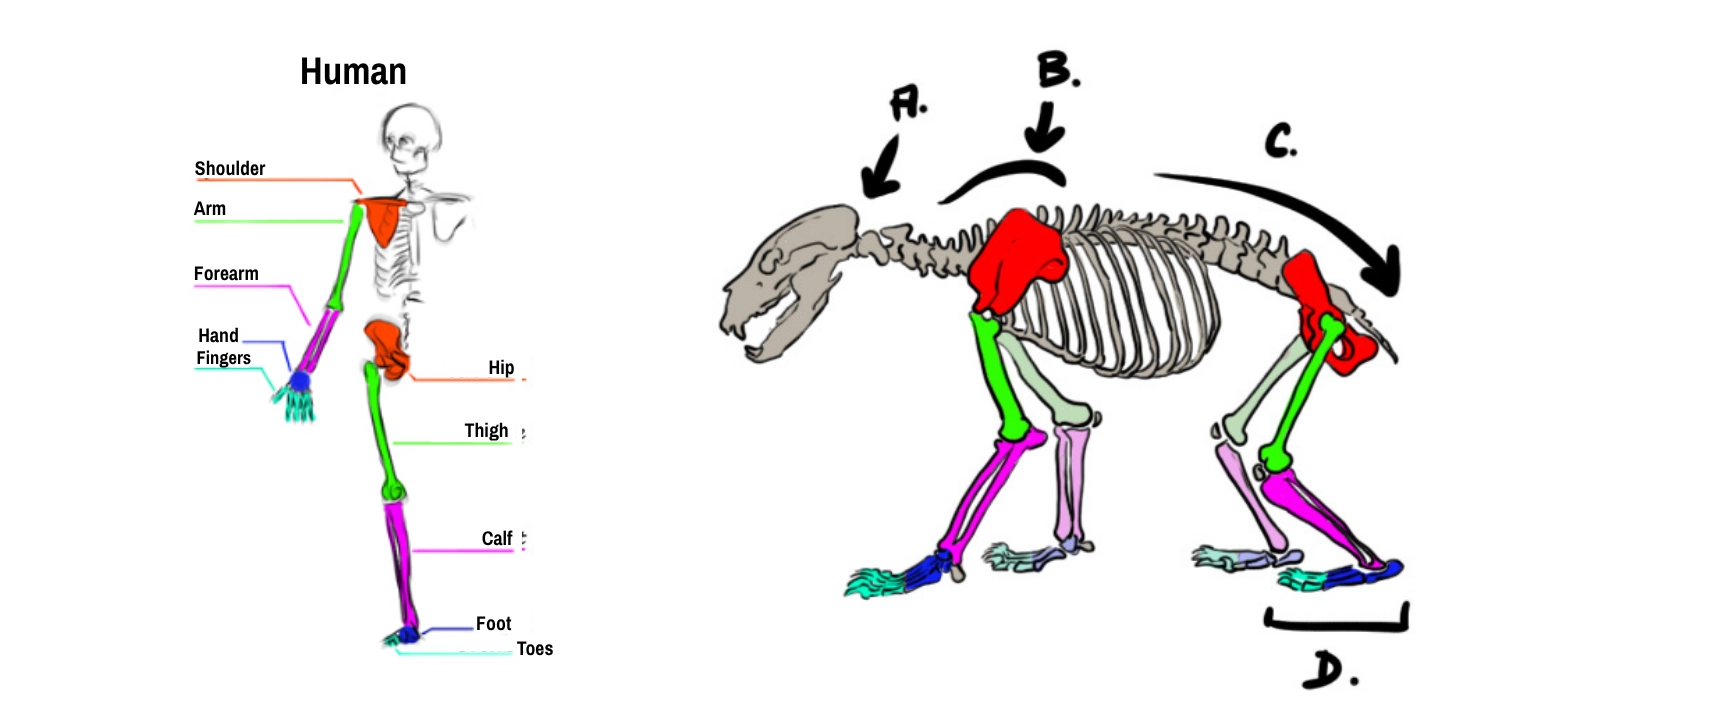
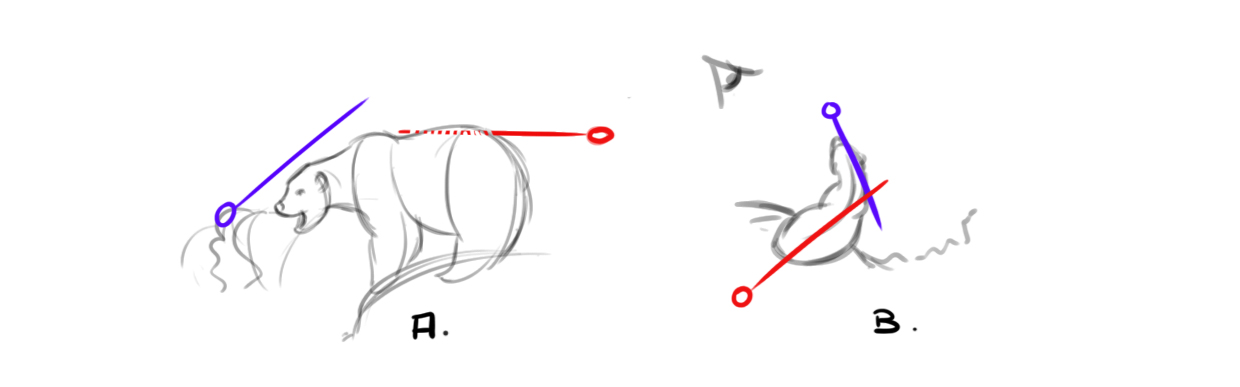
It is noted in [A] that the column attaches to the back of the skull quite high up. Care must be taken not to bend the animal's neck too much upwards as it may break its vertebrae.
In brown bears, the area above the shoulder [B] will show a swelling of skin (and fat) that is quite significant and characteristic of the species.
In [C] I highlight the shape of the column that goes down from the back of the shoulders.
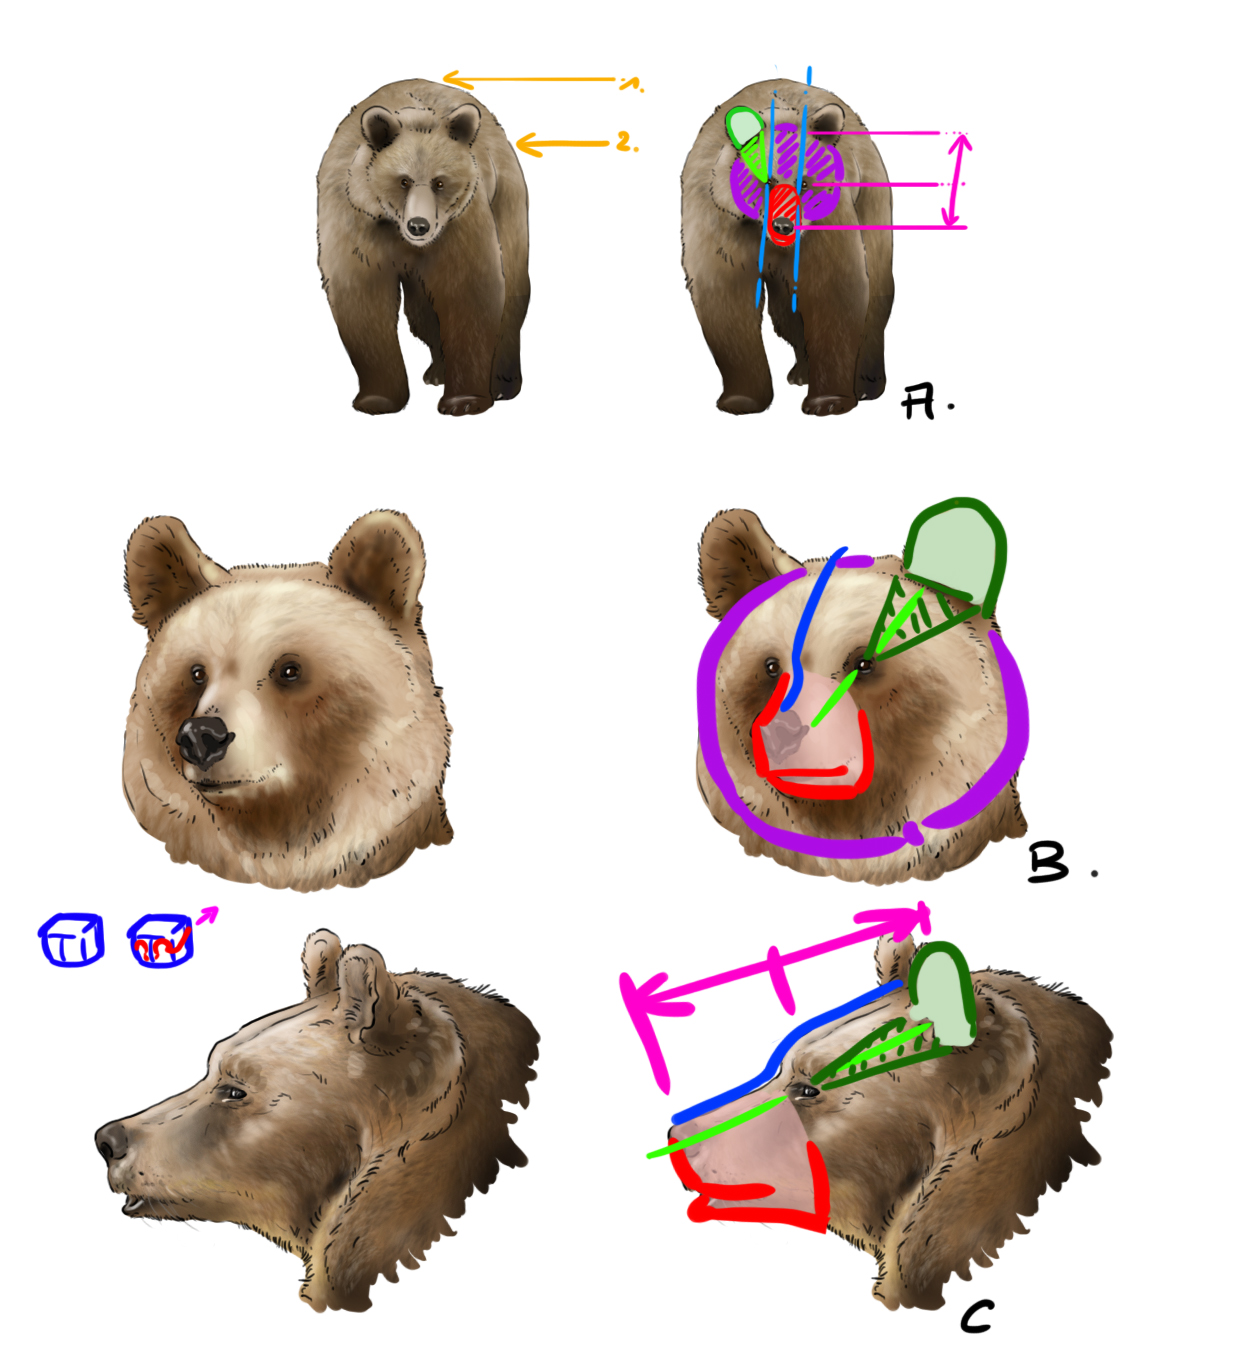
Now, in the following drawings let's study the animal in a bit more detail.
First, diagram A:
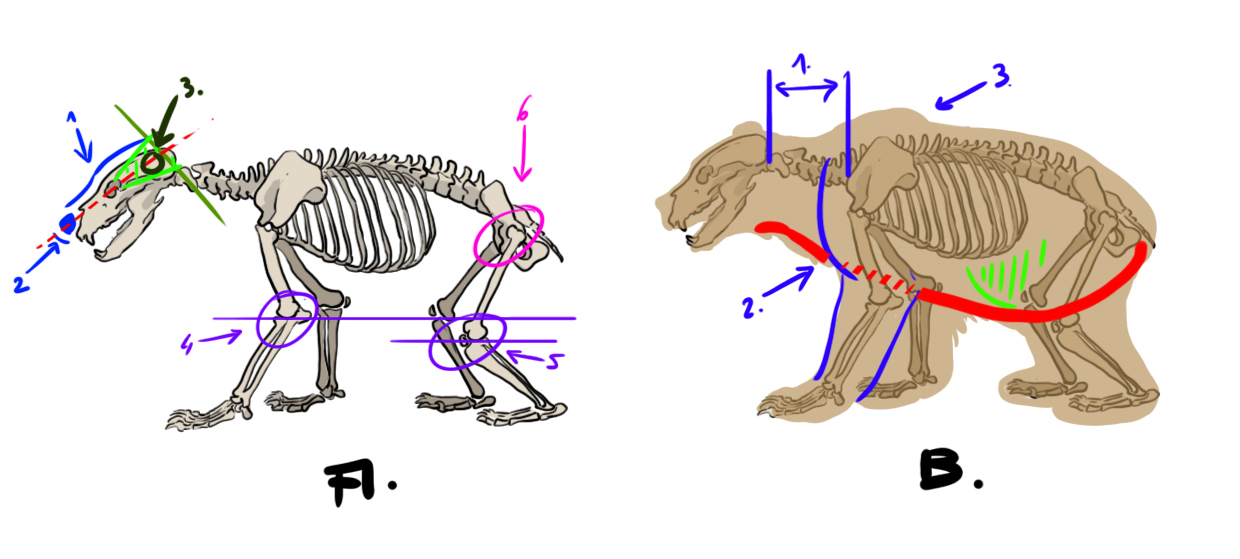
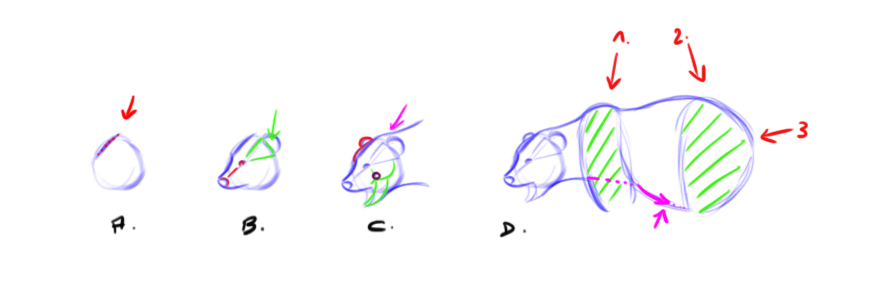
In step 1, you note the tilt of the skull which will give the bear its profile, the forehead will be slightly marked. You also note that the eye socket is positioned right under the forehead's slope.
At the tip of the snout, the nose takes up a significant place. We can observe that the eye will be aligned with the nose (red line) and already, we can determine the placement of the ears by drawing a triangle from the eye (green lines/green arrow 3) towards the rear limit of the skull.
Then we observe that the elbow joint (4) is located slightly higher than the knee joint (5).
Finally, in (6) I would like to point out the connection of the hind leg to the hip. Note that the joint is quite high and towards the back end of the spine. This can be useful if you want to draw your bear standing on its two hind legs (a threatening stance or to reach for some fruit up high).
The tail will be very short.
Diagram B:
I used red to highlight the boundary of the animal's belly. Note that it is an extension of the throat and under the hind leg the belly connects to the tail. This should never be forgotten, for example by starting the belly too low behind the front legs. The viscera (hatched in green) and some of the animal's fat are located in the lower belly. You can see how the red line drops down to the hind legs.
In (1) I emphasize the length of the neck. The bear has a wide and powerful neck that is not too short. Therefore, be careful not to make its head sink into its shoulders as you might be tempted to do on the pretext that the animal is bulky.
In (2) I highlight the high mass of the front paw, it forms the silhouette of the animal and will help you in constructing your drawing.
In (3) I revisit the swelling present above the shoulder in certain species.
THE BEAR'S SKULL
Before observing the animal in flesh and fur, a quick note on the skull with a side and front view observation.
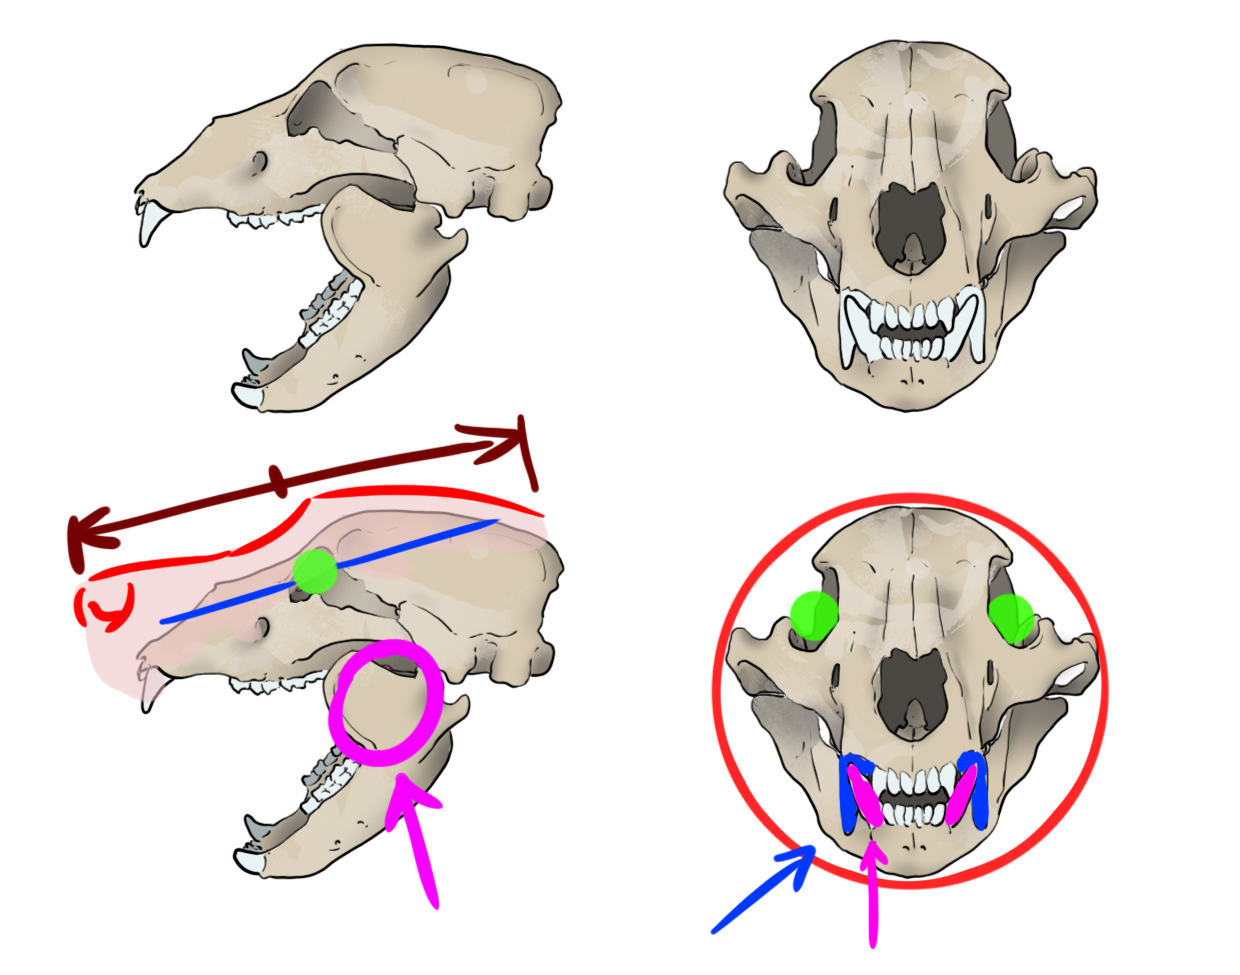
In the profile drawing, the front's shape is marked in red. The eye, in green, aligns with the extension of the nasal cavity. In pink, note that the axis of the lower jaw joint is positioned below the eye. The eye itself is approximately in the middle of the skull's length.
In the front view drawing, note that the skull can fit within a circle and, even once the muscles are added and covered with fur, this general shape will still be apparent on the head. In green, the eyes are directly facing you. Like us, the bear has eyes on the front of the skull, not on the sides like a horse, for example.
Finally, the fangs, which are moderately developed. In blue, the upper fangs overlap on the outer sides of the jaw. The fangs of the lower jaw (in pink) are slightly inclined forward. Most often, due to the fact that the fangs are not very long and the lower lips are drooping, only the lower fangs will be visible when the animal opens its mouth.
THE BEAR DRAWING FROM SEVERAL ANGLES
First, the animal seen from the side.

In (A) the head: we see the profile with the marked forehead (orange arrow) and the eyes placed under where the forehead drops more sharply. In blue, the muzzle is ultimately rather long and rectangular in this species.
But the skin of the lower jaw and neck tends to "pull" the line downward and in the end, we are left with a generally triangular shape with a point at the top of the skull (at the ears), a point at the level of the nose, and a point at the back of the lower jaw.
In (B) I quickly realign the leg bones. Let's not forget that the end of the paw is made up of two areas (dark blue and light blue). This gives its characteristic appearance to the front paw which is raised, for example.
In terms of posture, it is noted that the shoulders (1) are higher than the hips (2).
And finally, we find the structure of the head with the alignment of the nostrils/eye; the eye at the halfway point of the head's length and the ears placed on the back of the skull in a triangle that starts after the eye.
Now, a brief overview of a frontal view [A] and two close-up views of the head, ¾ [B] and profile [C].
Drawing [A]:
In purple, you see the general shape of the fairly round head; in red, the long, rectangular muzzle. Note that the eyes are placed on the outer edges of the muzzle. The ears are quite round. The shoulders (1) are also higher than the hips (2).
Drawings [B] and [C]:
In purple the round head, in blue the profile with the forehead slope and the eye placed in the curve of the profile. In red the snout with its rectangular shape that widens at the junction with the throat. In green the round ears that are positioned following the eyes. In pink the eye is found halfway along the length of the head.
I've added a quick sketch of the snout for you. You can start with a square shape. The nostrils (in red) are quite round at the front and extend along a horizontal line (pink arrow).
The eyes are round and very similar to ours. The pupil is black, round, and quite large. The white of the eye is barely discernible. The iris is usually brown to tawny. The eyelids are dark and have fine and very discreet eyelashes.
Let's just take a moment to quickly look at a more complex position, the stance on both hind legs.
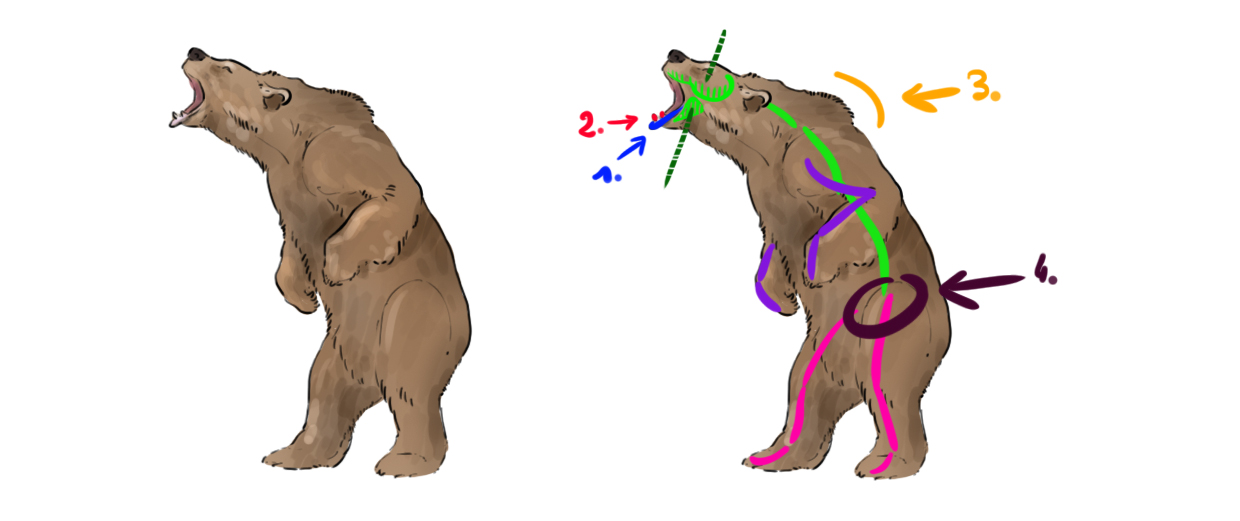
Here the bear is in a threatening position. You can note that the head does not bend the neck too much (remember where the spine attaches to the skull). In green, I have roughly replaced the bones of the jaws and the spine. Remember that the rotation axis of the lower jaw is located below the eye (dark green line).
In this position, the lower lip (1/in blue) reveals the lower fangs (2/in red).
In 3, you find the hump of brown bears. In 4, the attachment of the hind legs is found well down on the spine.
THE LEGS
We finish with the paws. The bear has five toes on each paw, each with a claw, which is somewhat curved. The claws are non-retractable.
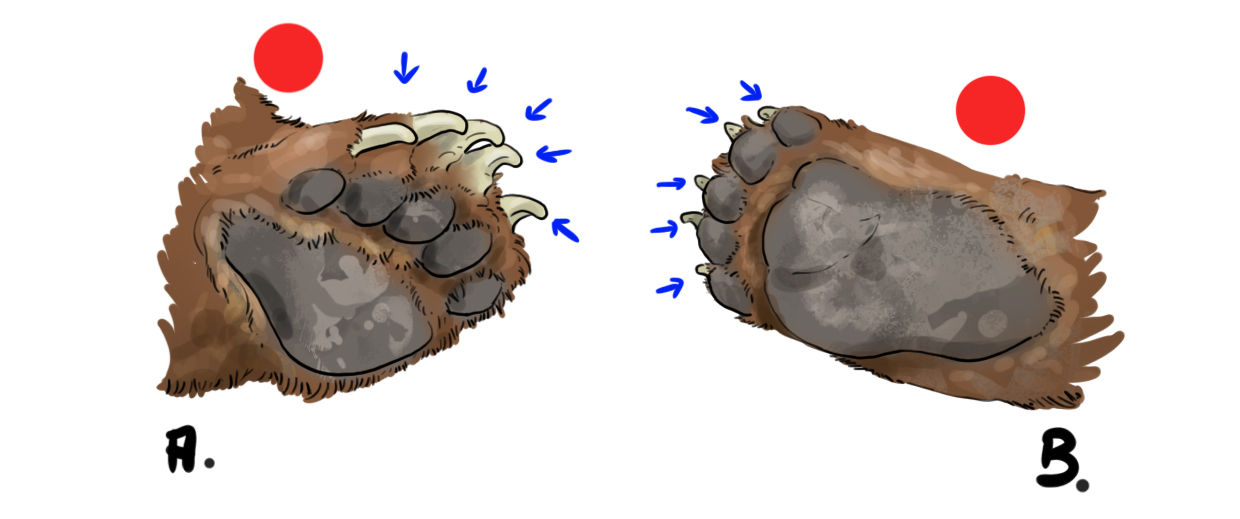
Diagram [A] shows a front paw and diagram [B] shows a hind paw. The red dots indicate the inside side.
On the front paw, it can be observed that the claws are slightly offset towards the inside. On the hind paw, the plantar arch is longer than at the front.
POLAR BEAR, GIANT PANDA, GRIZZLY AND BROWN BEAR
Before we dive into the step-by-step drawing, let's take a look at some other species of bears.
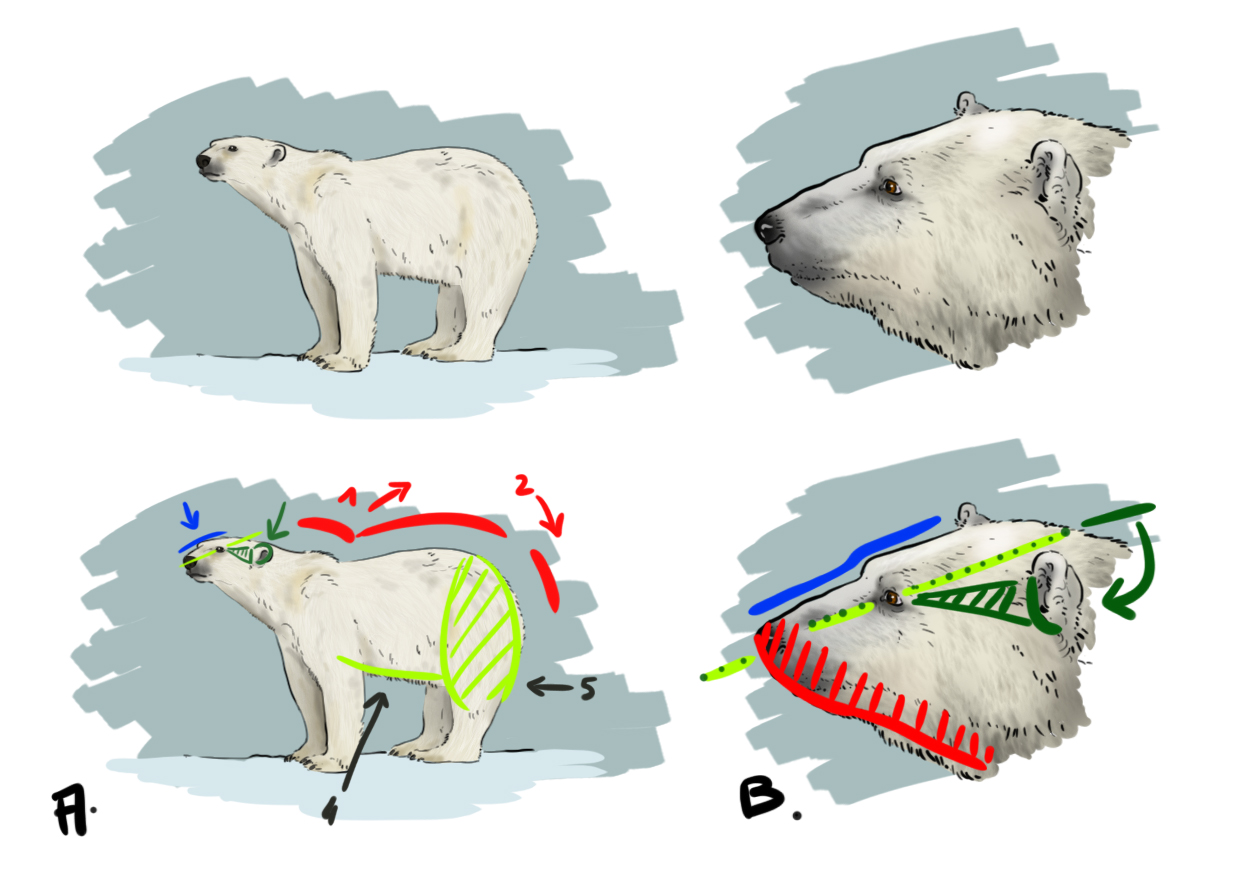
Firstly, the polar bear.
You will find the polar bear has the basic morphological characteristics of a bear, the fairly long and square muzzle, the round and sloping rump (2), and the descending belly line (points 4 &5).
On the other hand, the polar bear has a much flatter and more elongated forehead (blue line). The ears tend to be attached a bit lower on the skull (green lines).
In some individuals, depending on the state of the animal's fat reserves, the snout may appear more pointed, but this is solely because the throat is very full and drooping (diagram [B] in red).
Also note that the polar bear does not have a hump (1) above the shoulders and that its rear end is as high as its shoulders (diagram [A] red lines 1 & 2) which alters its back line.
The overall appearance of the head is more elongated and less round.
Finally, it would be better to study the characteristics of other species a little more specifically.
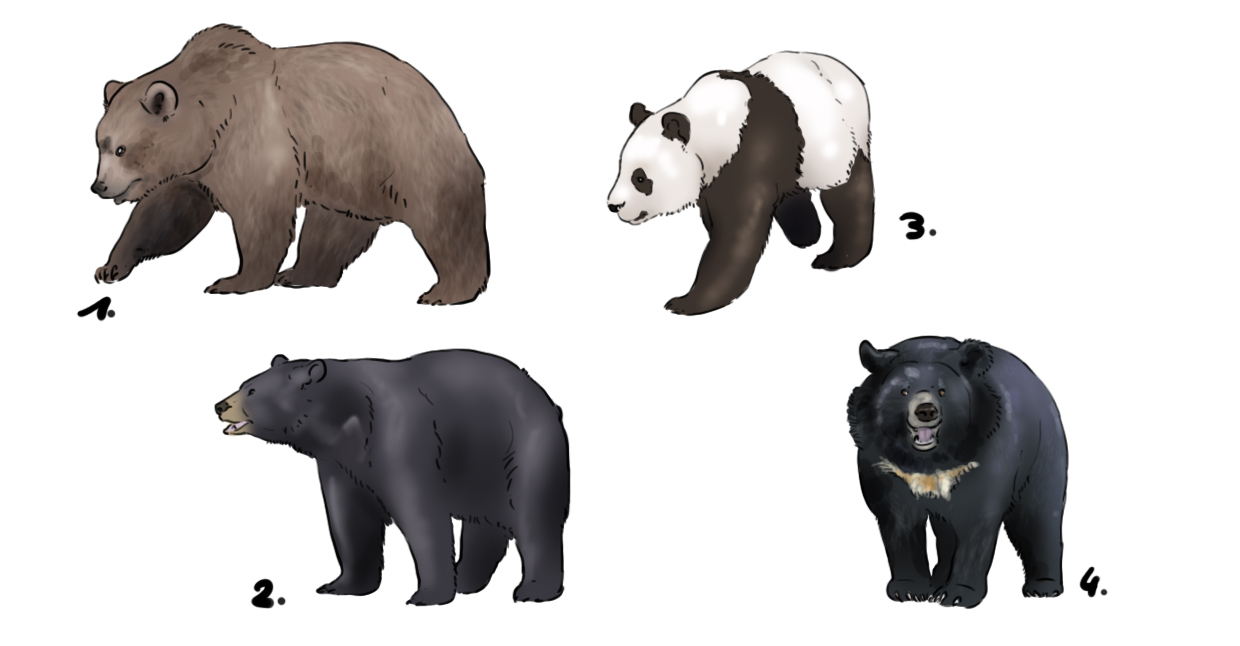
Here in 1 you have a grizzly bear, a brown bear, alongside other species. In 2 a black bear (or American black bear), in 3 a giant panda drawing (which is the subject of an article by Rakjah), in 4 an Asian black bear (or Tibetan bear or moon bear).
For example, in the black bear you find the hips as high as the shoulders, just like in the polar bear. The head of the Asian black bear, on the other hand, shows quite characteristic variations of the species.
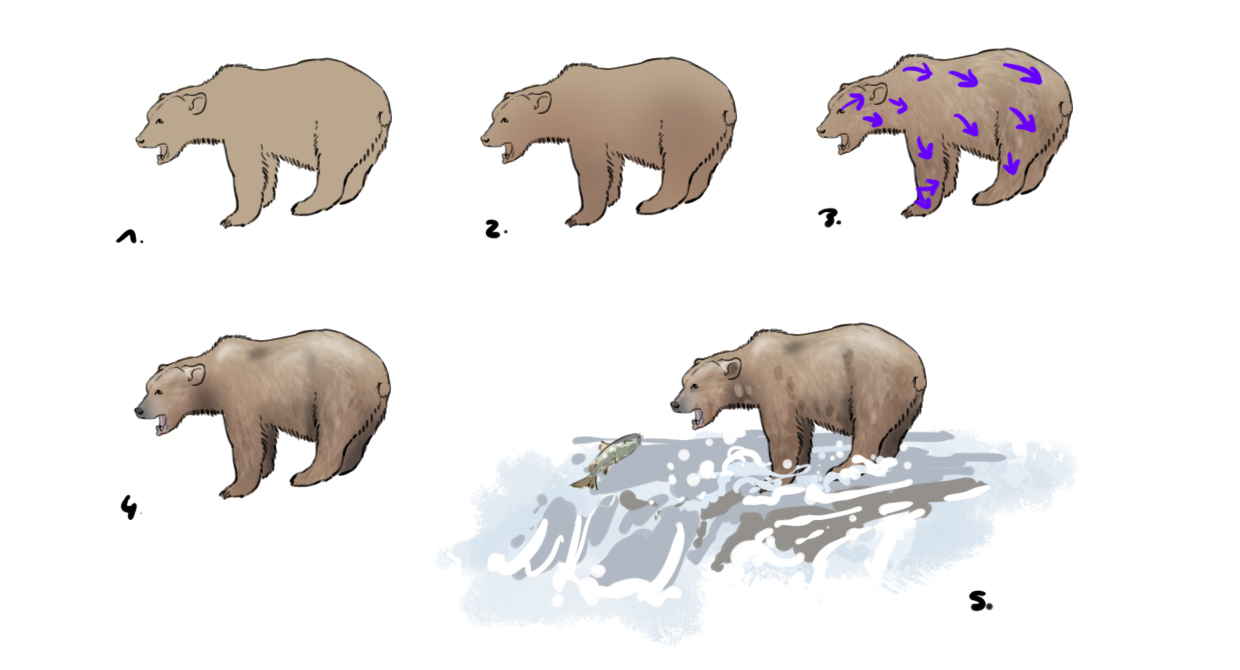
DRAWING A BEAR STEP BY STEP
Now, if you have paid close attention to everything we've discussed, you should be fully capable of correctly sketching a bear.
We will draw the animal in a scene commonly seen in wildlife documentaries, where it is fishing for salmon. Our animal will be a brown bear. We're going to make it a bit more challenging by opting for a pose that is not entirely in profile. The head will be turned slightly towards us while the body will be angled differently.
Purple shows the axis of the head with a ball for what is towards us. Red shows the axis of the body with a ball for what is towards us.
In [A] we see the sketch of what we are going to do and in [B] the scene viewed from above with the eye placed for the point of view so that you have a good idea of the whole thing.
Step A: I place the central axis of the head (in red dotted lines) and slightly form the back of the jaw.
Step B: Starting from the central axis drawn just before, I draw the frontline, place the nose at the end, and form the upper jaw by slightly widening my rectangle. From the nose, I draw a line to place the eye and from there I draw the triangle that allows me to place the ear (in green).
Step C: I place the ear (in red) that can be guessed on the other side. I remember that the axis of the lower jaw is located below the eye. From there I can open the mouth and trace the lower jaw (jawbones in green). I extend the neck in line with the skull (pink arrow).
Step D: I draw the back of the animal. In 1, in addition to the hump characteristic of this species, the supporting position clearly delineates the curve of the shoulder (1). Here the animal is not on flat ground, its hind legs are elevated compared to the front legs. As a result, the hindquarters are not lower than the front but at the same level (in 2). I finish the rear of the animal with a very round rump (in 3).
I remember that the belly sags but continues from the throat (pink line/arrows).
In shaded green, I place the mass of the legs.
Step E: I quickly place the limb bones and form the legs wide around them.
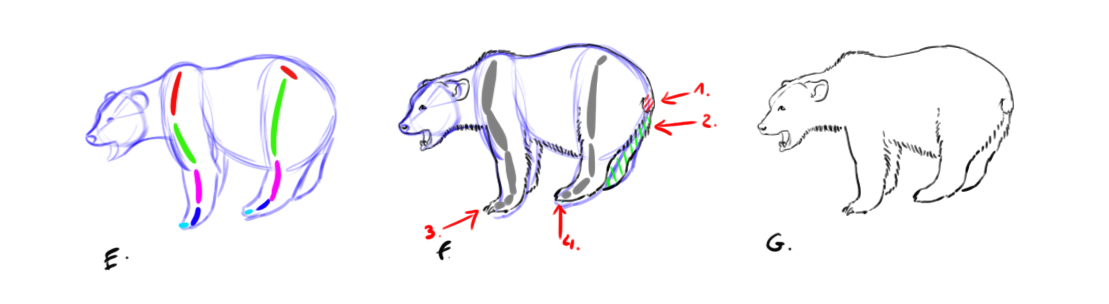
Step F: I draw over my construction lines with a bit more precision and make some adjustments. In (1), I shape the small round tail. In (2), I lightly refine the back of the second hind leg which is slightly discernible.
In (3) and (4) I curve the ends of the legs a bit more and place them a bit more horizontally, so that our bear does not slip. In gray I quickly add the bones. I place the two fangs on the lower jaw.
Step G: The clean outline. The hairs on the throat, belly, and behind the legs are a bit longer, I render this by a succession of hatched lines.
Colorization:
Step 1: I choose a fairly soft brown as the base.
Step 2: I deepen the lower part of the animal with a darker and slightly more reddish shade.
Step 3: I apply shading following the direction of hair growth (purple arrows).
Step 4: I add shadows and a bit of light on top. I darken the muzzle and color the eyes.
Step 5: I add extra details and reinforce the bulk a bit.

SUMMARY
For a brown bear, we will remember:
- the hump on the shoulders.
- the rear is lower than the front.
For all bears, we will note:
- the structure of the legs with elbows slightly higher than the knees.
- the fact that the animal is plantigrade with non-retractable claws.
- the long and rectangular muzzle.
Discussion
11 comments