How to Draw a Wolf
In this article, we will study a predator that has fascinated humans for millennia. Whether from Roman antiquity with the Capitoline Wolf (associated with the legend of Remus and Romulus), in Norse mythology with Fenrir, or later with the Brothers Grimm and Perrault in Little Red Riding Hood, the wolf has never left anyone indifferent.
The aim is not to give you a biology lesson on the wolf, so I will be brief. Although the term "wolf" is not precisely associated with a specific species, it is often understood that this term refers to the gray wolf (Canis lupus), the most widespread canid species across continents.
Be aware that this species includes several subspecies, but we will mainly focus our study on the observation of the common European gray wolf.
THE MORPHOLOGY OF THE WOLF
Although a wolf always looks like a wolf, it is important to keep in mind that the species is known for exhibiting notable variations depending on the regions and subspecies, whether it be in terms of size, weight, fur, or even in appearance with varying size and shape of muzzles and silhouettes.
Nevertheless, traditionally it can be established that the wolf is an imposing canine, with a broad muzzle, rather short triangular ears, and a deep chest. The back is slightly sloped, the neck is very muscular, and the legs are long enough to ensure optimal mobility.
In females, it is sometimes noted that the shoulders and neck are less developed and that the muzzle is slightly narrower.
DRAWING THE SKELETON

Diagram A:
As is often the case among mammals, we find a similar limb structure in both wolves and humans. This can help you when you want to draw the animal in motion. Note, however, that the wolf, unlike us, is digitigrade, meaning it walks on its "toes".
Diagram B:
In red we see the top line of the skull. The forehead will be quite wide and shows a small step at the level of the orbital hole. This little "slope" can be seen on the animal's profile.
The green line represents the back line, where a small irregularity can be found in 1. due to the shoulder joint and in 2. because of the hip. The back will curve towards the end to continue along the tail, shown in blue. Once covered with fur, the tip of the tail will reach the "ankle", which is the junction of the pink bone and the dark blue bone in diagram A.
Diagram C:
In green hatching, the muscles of the front legs are very developed, as much as or more than the muscles of the hind legs. The torso, in red, can be summarized as a rectangle that narrows very slightly towards the rear of the animal. Do not raise the belly line too much, which connects the hind legs, lest you give your wolf a lean and famished look.
In blue, note that the "elbow" and "knee" joints are located just below the belly line.
THE WOLF'S SKULL
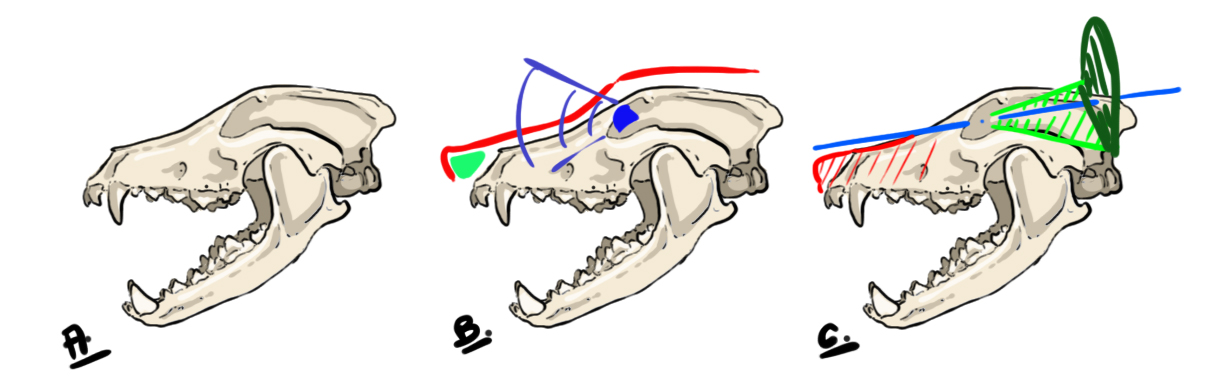
Diagram A:
The wolf's head is broad and more compact than that of other canids. The fangs are well developed but will be shorter and less thin than those of a feline. At the front, there are 4 incisors and 2 canines, and a bit further back are the premolars and molars.
Diagram B:
In red, we see the frontline with a slight elevation at the level of the eye (in blue). The wolf, like many predatory mammals, has forward-facing eyes (to gauge distances well...). This means that when you draw a wolf in profile, the eyes are also in profile, and from the front, the eyes are clearly facing forward. In green, the nose that will be placed at the end of the muzzle will be wide and slightly rounded.
Diagram C:
In blue, the axis of the eye is slightly above the top line of the muzzle. In light green we have the "hearing area" which allows us to position the ear (in dark green). Starting from the inside of the eye, draw an extended triangle to the back limits of the skull and you will know where to place the ear.
DRAWING THE WOLF'S HEAD
I wanted this article to be a small summary of useful references for you. The idea is that you find referential elements if you have any doubts about one thing or another. For observing the head, I suggest a wolf in ¾ view, profile view, and front view.
THE WOLF'S HEAD IN 3/4 VIEW
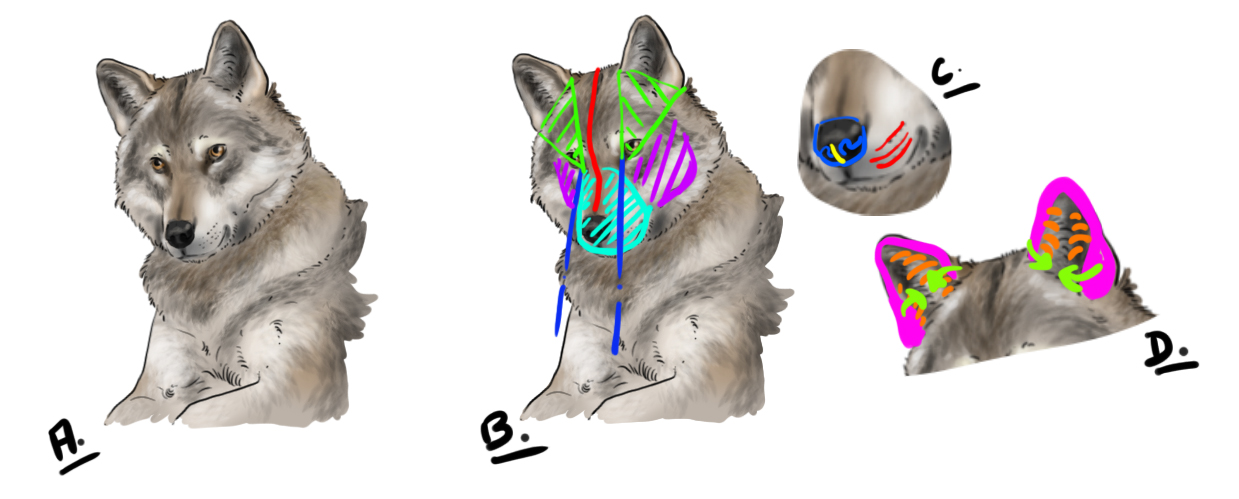
Diagram B:
In light blue, the muzzle, a rectangle that widens to meet the lower jaw. The lower jaw (in purple), even though it blends into the fur, affects the structure of the head.
In red, I remind you of the shape of the front that we have already seen.
In green, we find the triangle that starts from the eyes which helps us to place the ears.
In dark blue, the eyes are positioned above the muzzle and just on the edges of the light blue area. The field of vision is thus not too obstructed by the muzzle.
Diagram C:
The nose has two rounded nostrils and a symmetrical structure. You can guess the "middle" of the nose, yellow line, but avoid over-emphasizing this detail. The nose can fit within a rectangle/square with rounded corners.
Red lines are the attachment points of the whiskers. Also keep this element discreet. The whiskers themselves are rather discreet and short.
Diagram D:
The ears can be simplified into an isosceles triangle, the two equal sides forming the ear. In pink, the edges are distinguished, but the interior of the ear will be completely "covered" by hairs (in orange/direction of the hairs in green). Although the wolf's ears are pointed, avoid drawing a very sharp and clear point, it's preferable to round it slightly.
DRAWING THE HEAD IN PROFILE VIEW

Diagram 2:
In red, it's the same shape as always.
The mouth is blue, and we can clearly make out the rectangular shape that widens slightly towards the lower jaw.
The purple line shows you how the skeleton can be guessed within the structure beneath the fur.
In dark blue, the bottom of the eye is at the level of the top of the mouth. The field of vision is placed above. You notice that the eye is well situated at the level of the profile's slope, as observed in the studies of the skeleton.
In green the area that allows us to place the ear. We can see here that the ear should not be placed too low on the skull.
In pink, we can roughly define that the mouth, before the contour of the profile, makes up a large third of the length of the head.
Diagram 3:
The rounded nostrils are shown (in blue). The axis around which the nose is symmetrically built is not visible (in yellow).
In red you will find the attachment lines of the whiskers. As previously and as you can observe in drawing 1, I advise you to represent only a few sparse points. Likewise, be quick on the whiskers.
THE WOLF'S HEAD FROM THE FRONT
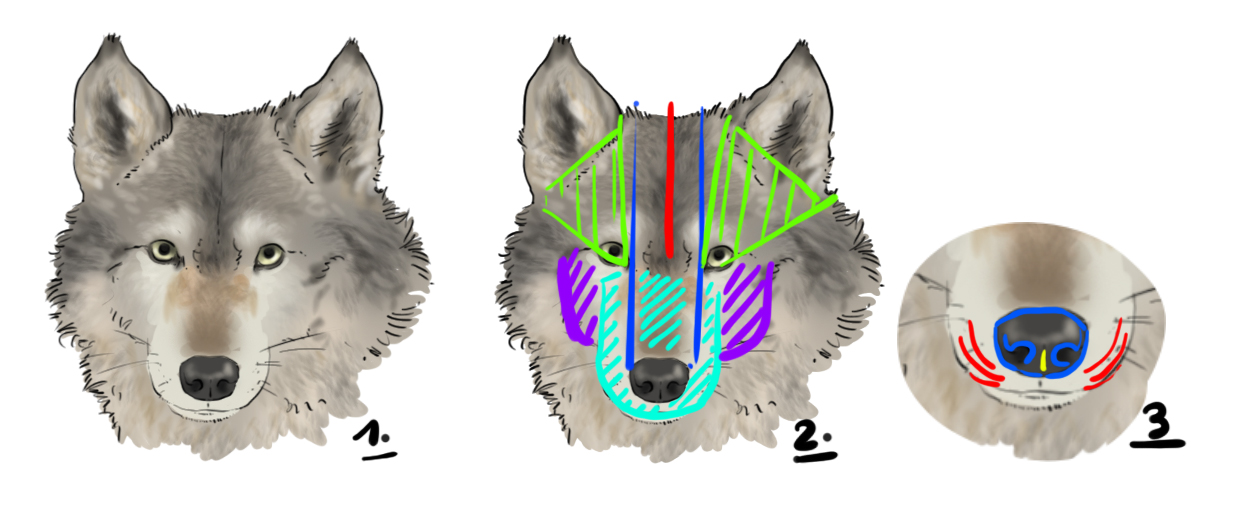
Diagram 2:
With this viewing angle, the snout (in light blue) becomes a rounded rectangle at the nose.
In purple, the lower jaws define the structure of the mouth beneath the mass of fur.
In green, the triangle allows us to position the ears. Note that from this angle we can clearly see that the ears are on the top of the skull.
In dark blue, there are two lines that start from the sides of the nose. See, this gives us the spacing between the two eyes.
Finally, in red we have the length of the forehead, from the top of the skull to the eyes. From this angle, which somewhat flattens the depth, you can observe that the muzzle is also as long as the red line.
Diagram 3:
We find the structure of the nose with its rounded nostrils and the lines of the whisker attachments (in red).
In all these drawings, you may have noticed that the lips are not visible when the animal's mouth is tightly closed. We will quickly observe two postures where the mouth is open: when the animal is howling and when it is threatening.
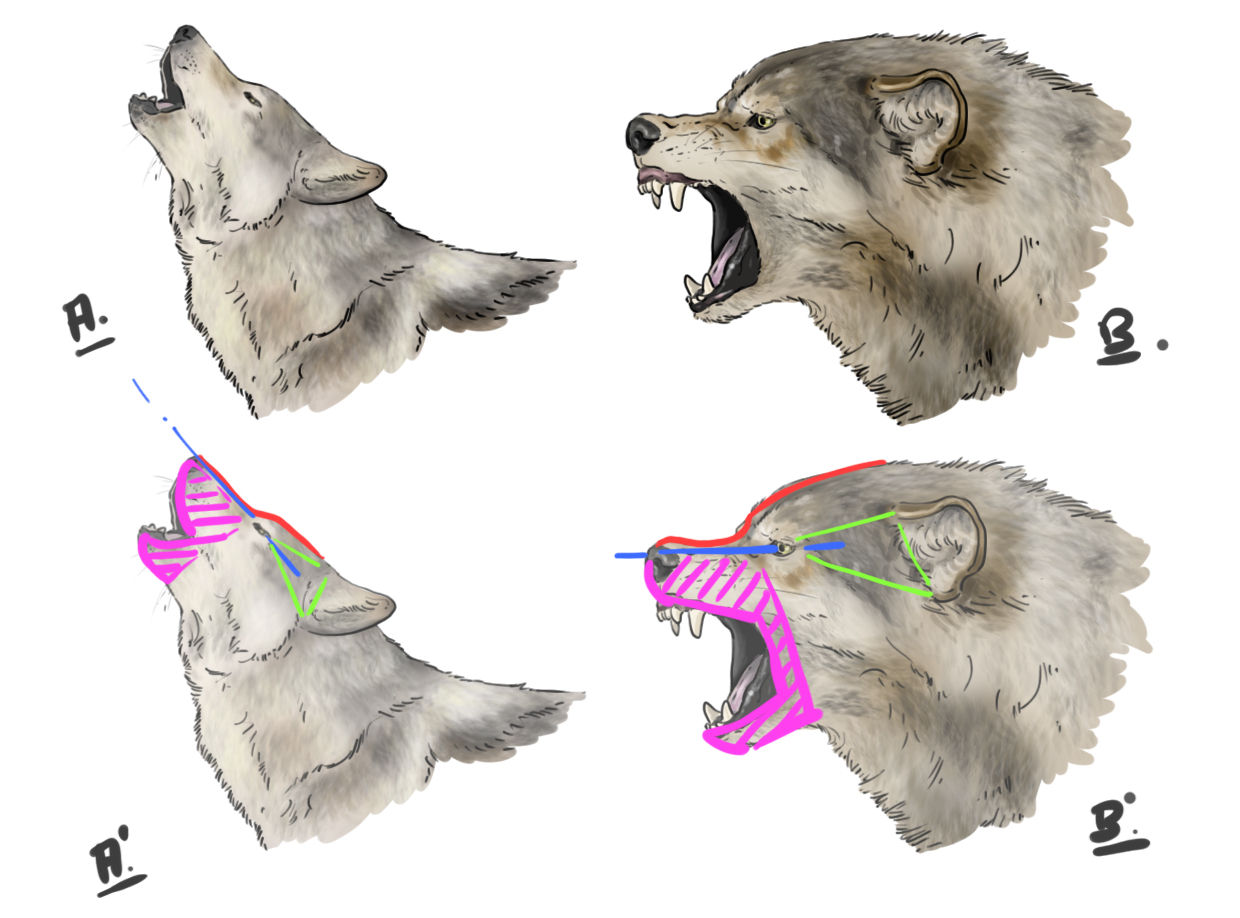
Posture A:
Only the lips of the lower jaw can be guessed, mainly around the lower fang. The lips are generally black and the gums are pinkish.
Posture B:
The animal curls its upper lips, and we can observe the folds on the top of the snout. Then, the upper gums can be seen.
Postures A' and B':
I will highlight the edges of the muzzle in pink for you.
In red is the profile line, in blue the positioning of the eye, and in green the construction lines of the ears. It is noteworthy that in position B' the ears are very low, this is due to and emphasized by the fact that the animal lowers its ears in this posture.
DRAWING THE WOLF'S EYES
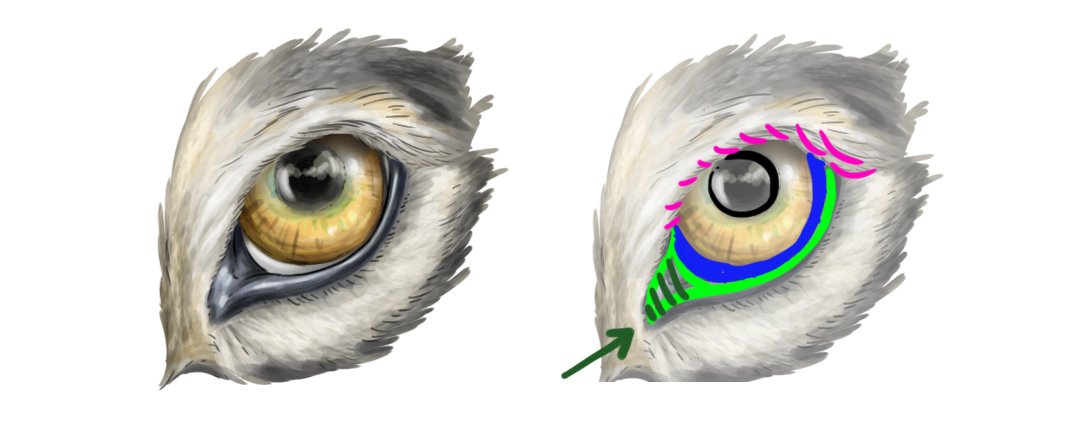
I would like to make a brief digression about the eye. As in humans, there is a round, black pupil and a colored iris. Generally, the iris will have shades ranging from golden yellow to slightly brownish orange. The "white of the eye" can be distinguished (in blue on the right diagram).
The upper edge of the eyelids will not actually be visible and will get lost under the hairs. The eyelashes (in pink) are discreet. The lower edge of the eyelids is clearly visible and black (light green stroke). Note that the inner area of the eye is well distinguished (dark green hatch).
In a less "zoomed" drawing, the eye will appear rimmed with kohl.
DRAWING THE BODY OF THE WOLF
Now let's observe the wolf as a whole.
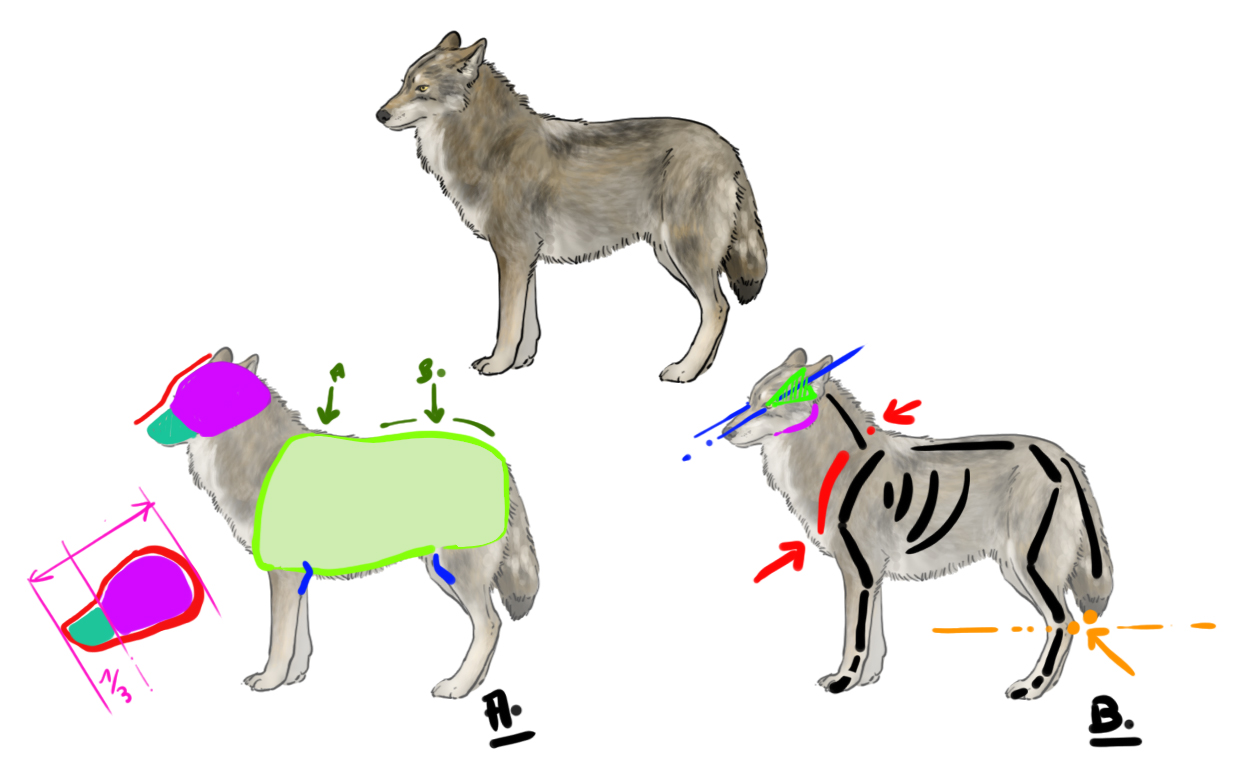
Diagram A:
In red, we have the profile line. In turquoise, the muzzle (the jaws before the profile's slope) and in pink, the rest of the head. The small zoom on the side shows us that the muzzle covers 1/3 of the length of the head.
In blue, the "elbow" and "knee" joints are located right under the belly.
The green area shows the body with the irregularities A and B corresponding to the attachments of the limbs. The body can be summarized as a rectangle that tapers very slightly towards the rear of the animal.
Diagram B:
In red, see how the neck widens nicely and completely covers the junction with the shoulders.
In orange, the tip of the tail reaches the level of the "ankles".
The blue lines define the eye axes. It is clear that they are on the outer sides of the muzzle and just above.
In green we have the hearing area for ear attachment and in purple the lower jaw that structures the head.
In black, I've quickly added the bones of the limbs for you.
DRAWING THE LEGS
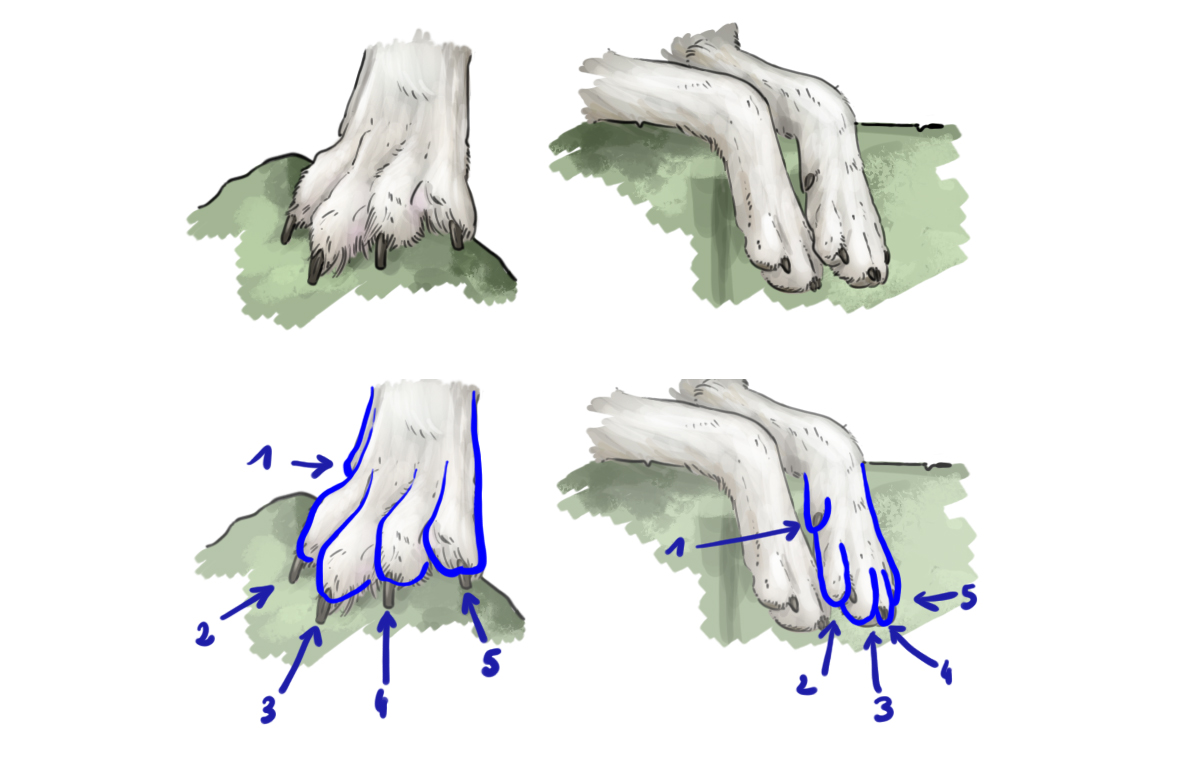
As we said at the beginning, the wolf is digitigrade, it walks on its toes. Like dogs, the front paws have 5 toes and the rear paws 4. If you want to learn how to draw a dog, you can find this article on our blog.
The claws are not retractable and will be slightly visible at the tips of the paws. Avoid making them too sharp, as they are rather blunt.
Here I'm showing you only the front paws. The hind legs will not have the "first" toe. Note that this toe "1" is positioned higher on the paw than the other toes.
DRAWING THE WOLF STEP BY STEP
Today we are going to take a fairly simple point of view and draw the animal from the side. However, we are going to draw it as it moves forward.

In the drawing we're going to make the hind leg B2 land on the ground, "chasing" the front paw B2, and paw B1 will be about to leave the ground.
Let's begin...
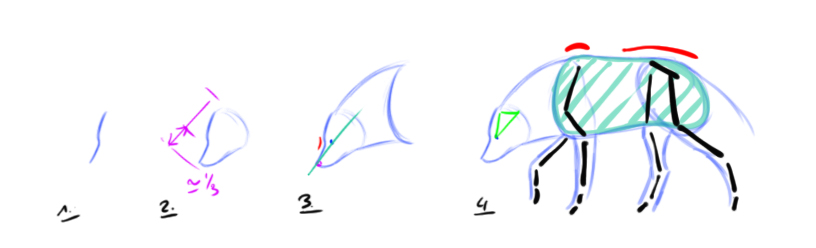
Step 1: The front line.
Step 2: The muzzle, about 1/3 of the length of the head, is a rectangle that widens.
Step 3: I place the nose and eye (at the curve of the profile/in red and at the top of the muzzle/blue line). The neck is quite wide and I mark the front mass of the shoulders with a line.
Step 4: In black I quickly place the limbs. In red the "irregularities" of the back (shoulders and hips). You can see the general shape of the body. The legs naturally form around the bones.
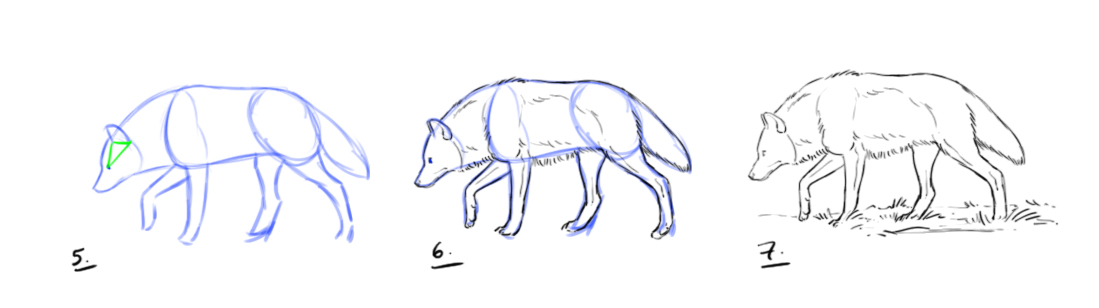
Step 5: I draw the tail, neither too long nor too short (about ankle height). I position the ears.
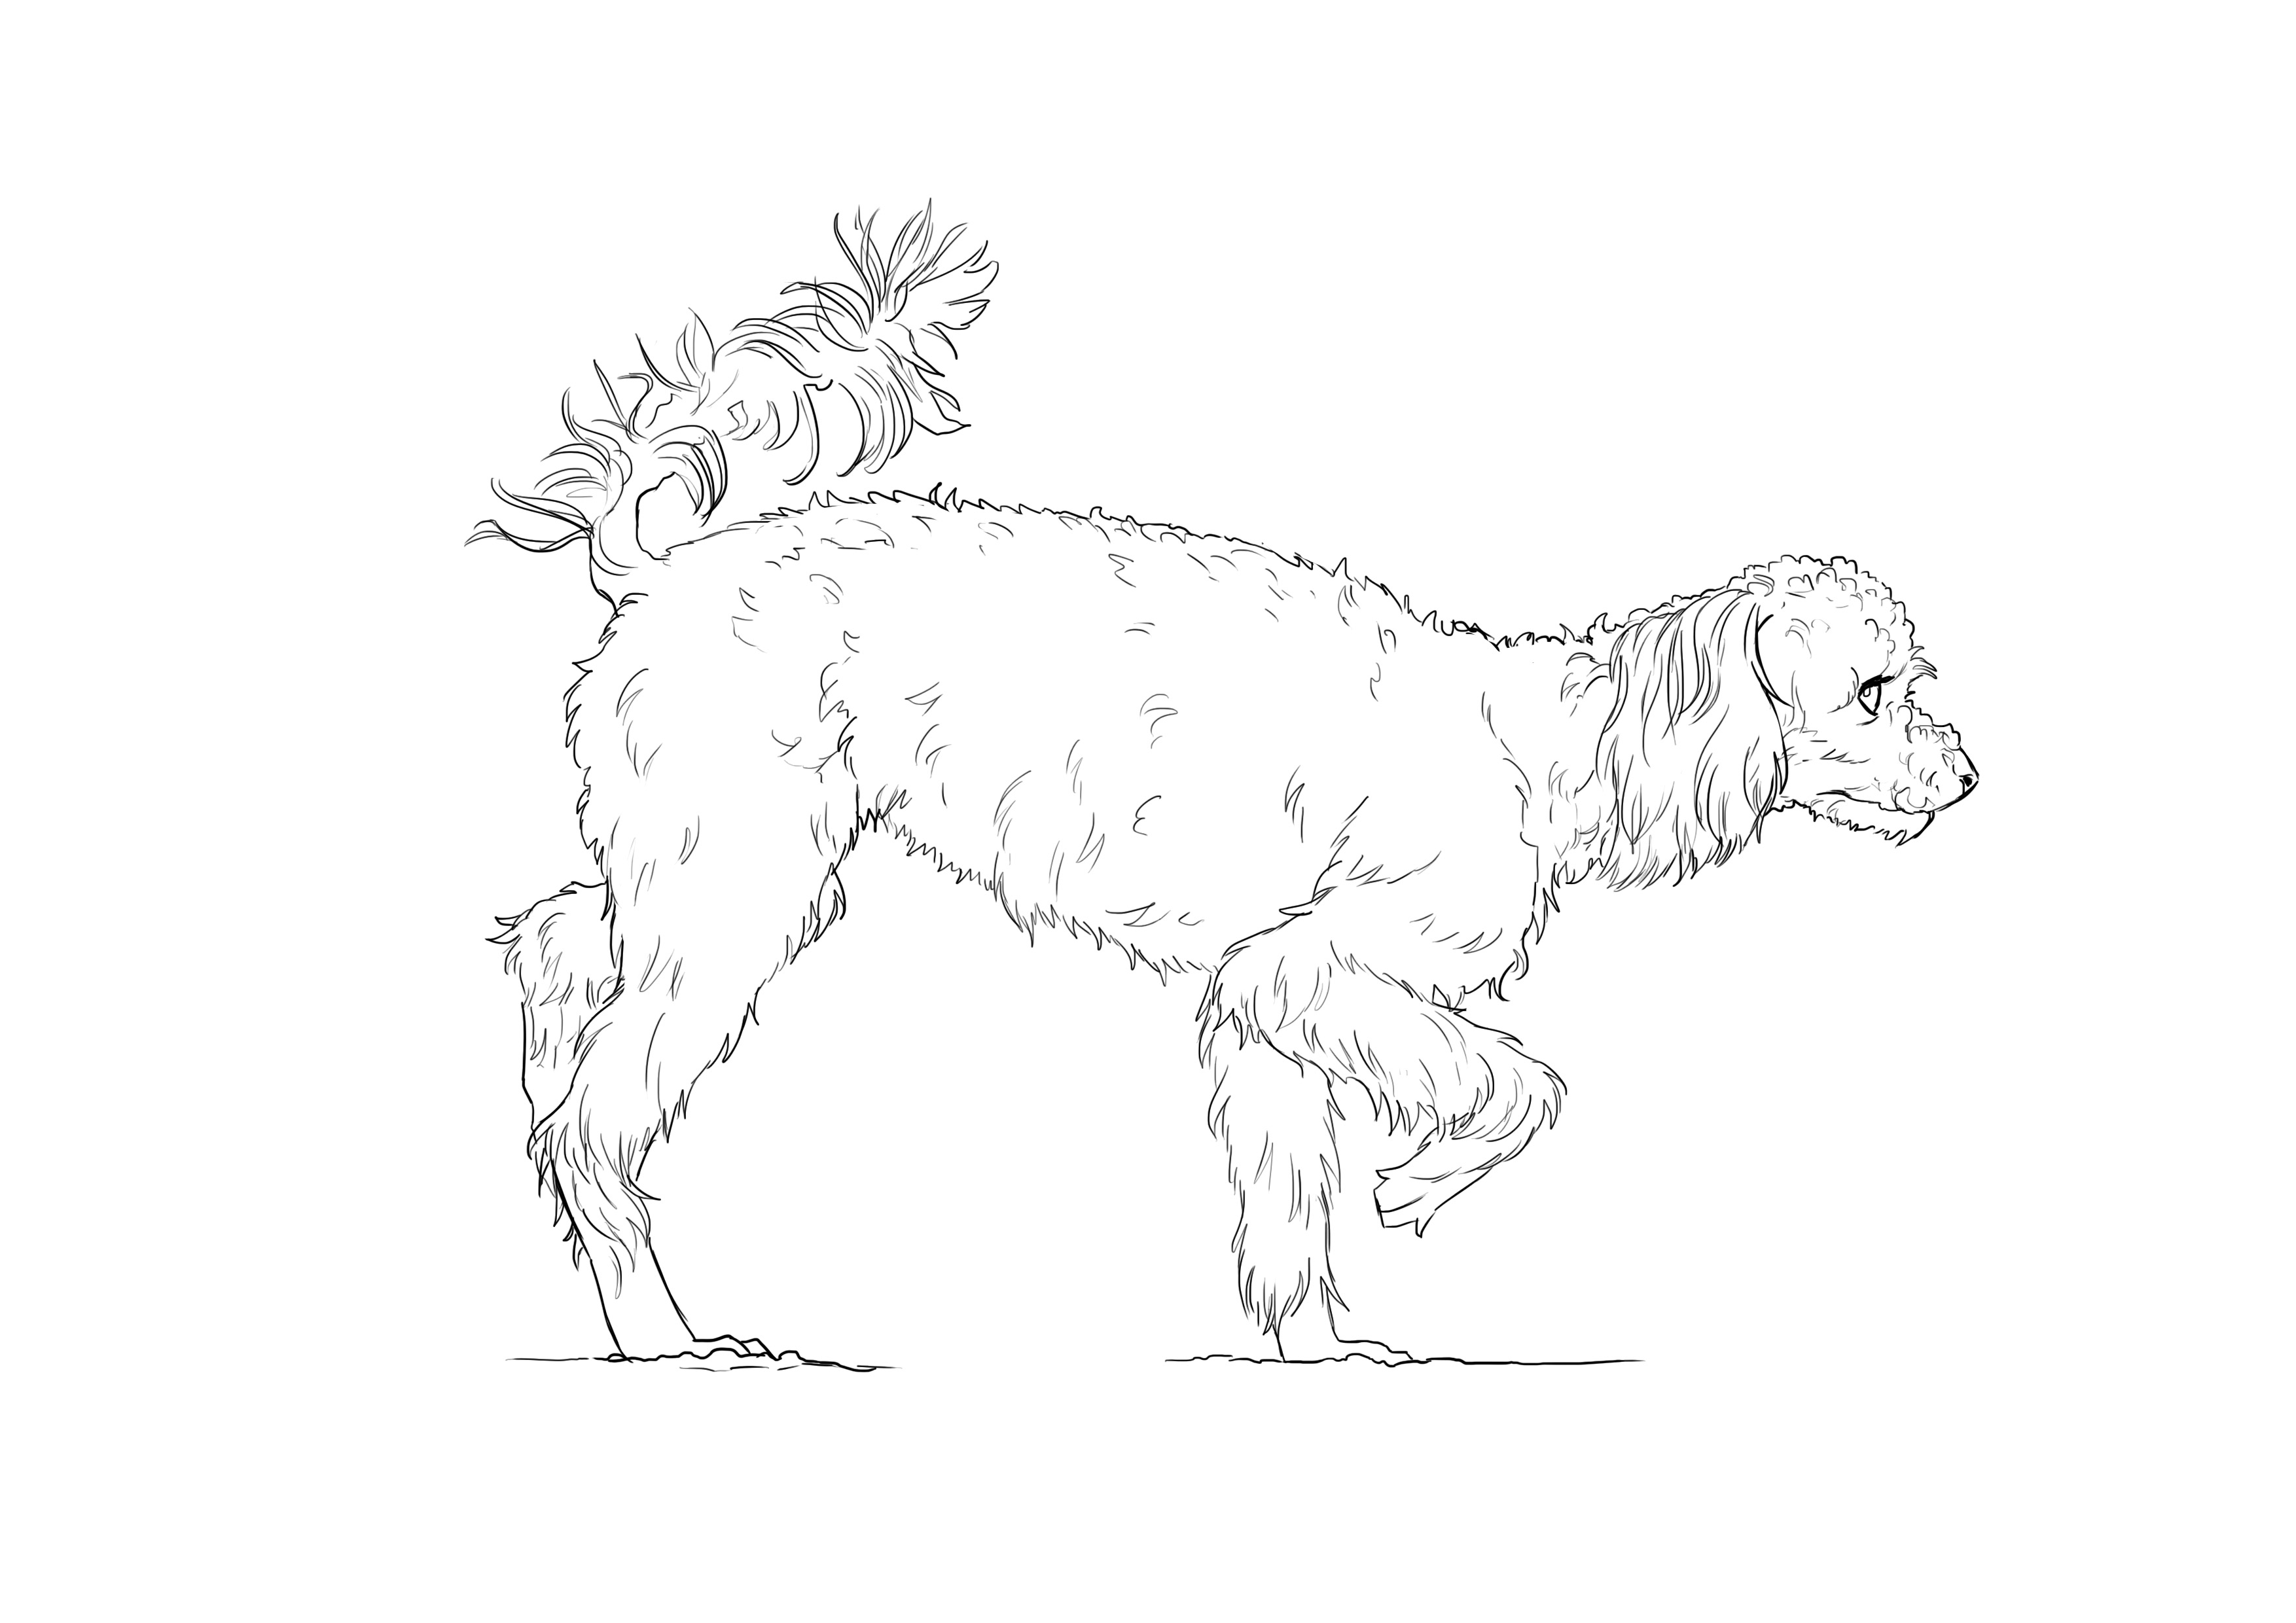
Step 6: I redraw the outlines over the construction lines. For the longer and shaggier fur, I create the outline with small strokes (under the belly, for example).
Step 7: I clean up the drawing and place some grass on the ground. Note that I've added some structure to the legs with one or two strokes inside. On the flank and the neck, I also placed a few short strokes to suggest fur.
COLORING THE WOLF DRAWING
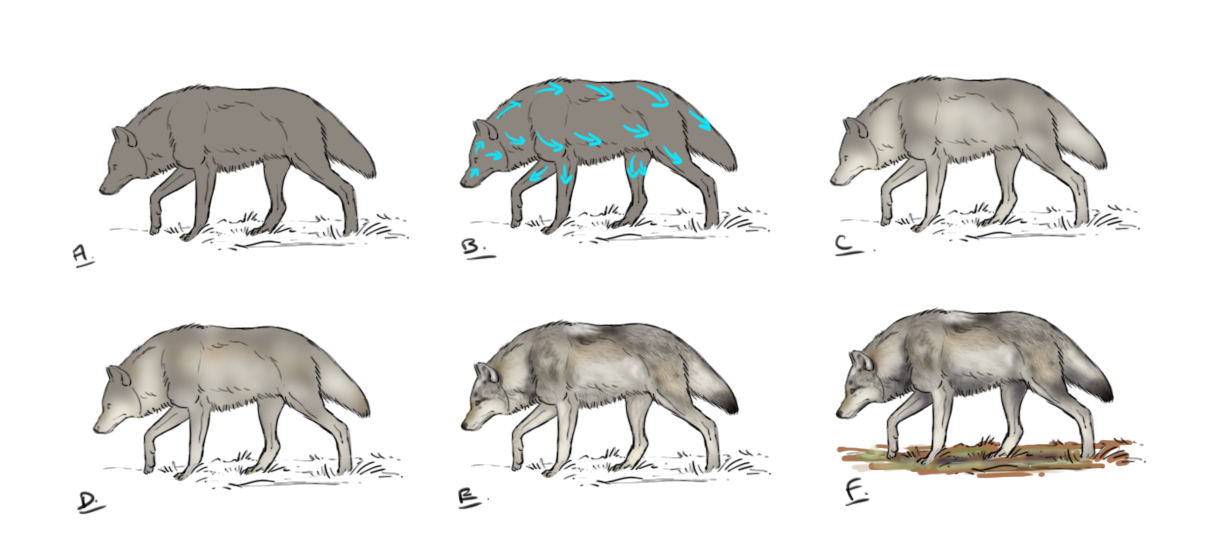
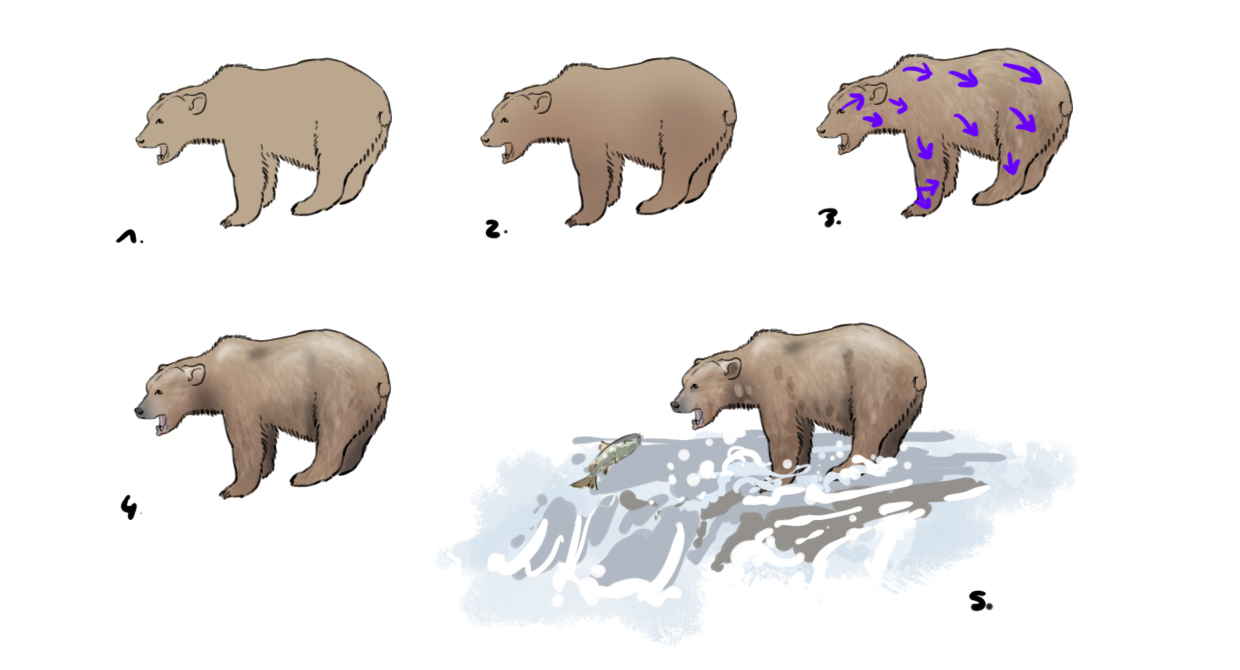
Step A:
I'm going with a flat gray. Be aware that I make this choice knowing that I am working on a graphics tablet. Obviously, if I were to make this drawing with watercolor, for example, I would not make the same choice.
Step B:
As is often the case, it's better to have a little idea of the direction of the fur of the animal you are drawing. Here, in blue, I quickly place the orientation of the fur.
Step C:
I lighten the belly, legs, tail, neck and muzzle.
Step D:
I break up the gray with a few touches of tawny brown on the forehead, flanks, tail, and legs.
Step E:
I detail the fur a bit more and highlight the darker areas of hair a bit more.
Step F:
I color the ground and place the shadows, mainly underneath the animal assuming natural light is above the animal.
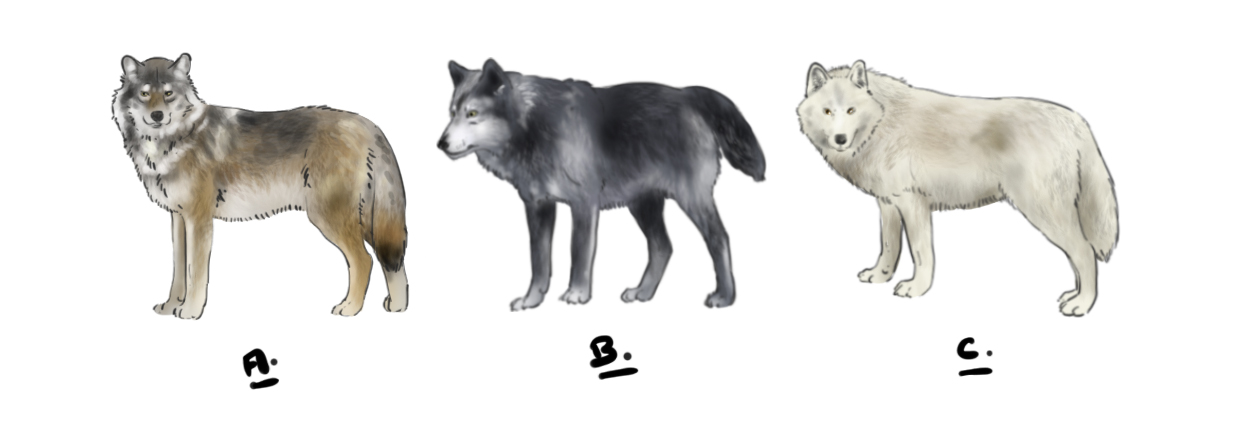
I've followed the color scheme of a common gray wolf (A) but I am proposing two other options here. In B a black wolf scheme, like a timber wolf, and in C an arctic wolf coat. The arctic wolf may seem more bulky but this is mainly due to its particularly dense fur.

As always, observation and practice will be essential in order to familiarize yourself well with the animal. I hope, however, that this article has helped you! Get your pencils ready!
Discussion
4 comments