Draw a Pig
In this article, we will study an animal that has long been, wrongly, underestimated, the pig. Today its intelligence and sensitivity are recognized (as well as its great cleanliness!), and sometimes it is even found as a pet.
STUDYING THE ANIMAL FOR DRAWING
First, let's briefly discuss the animal.

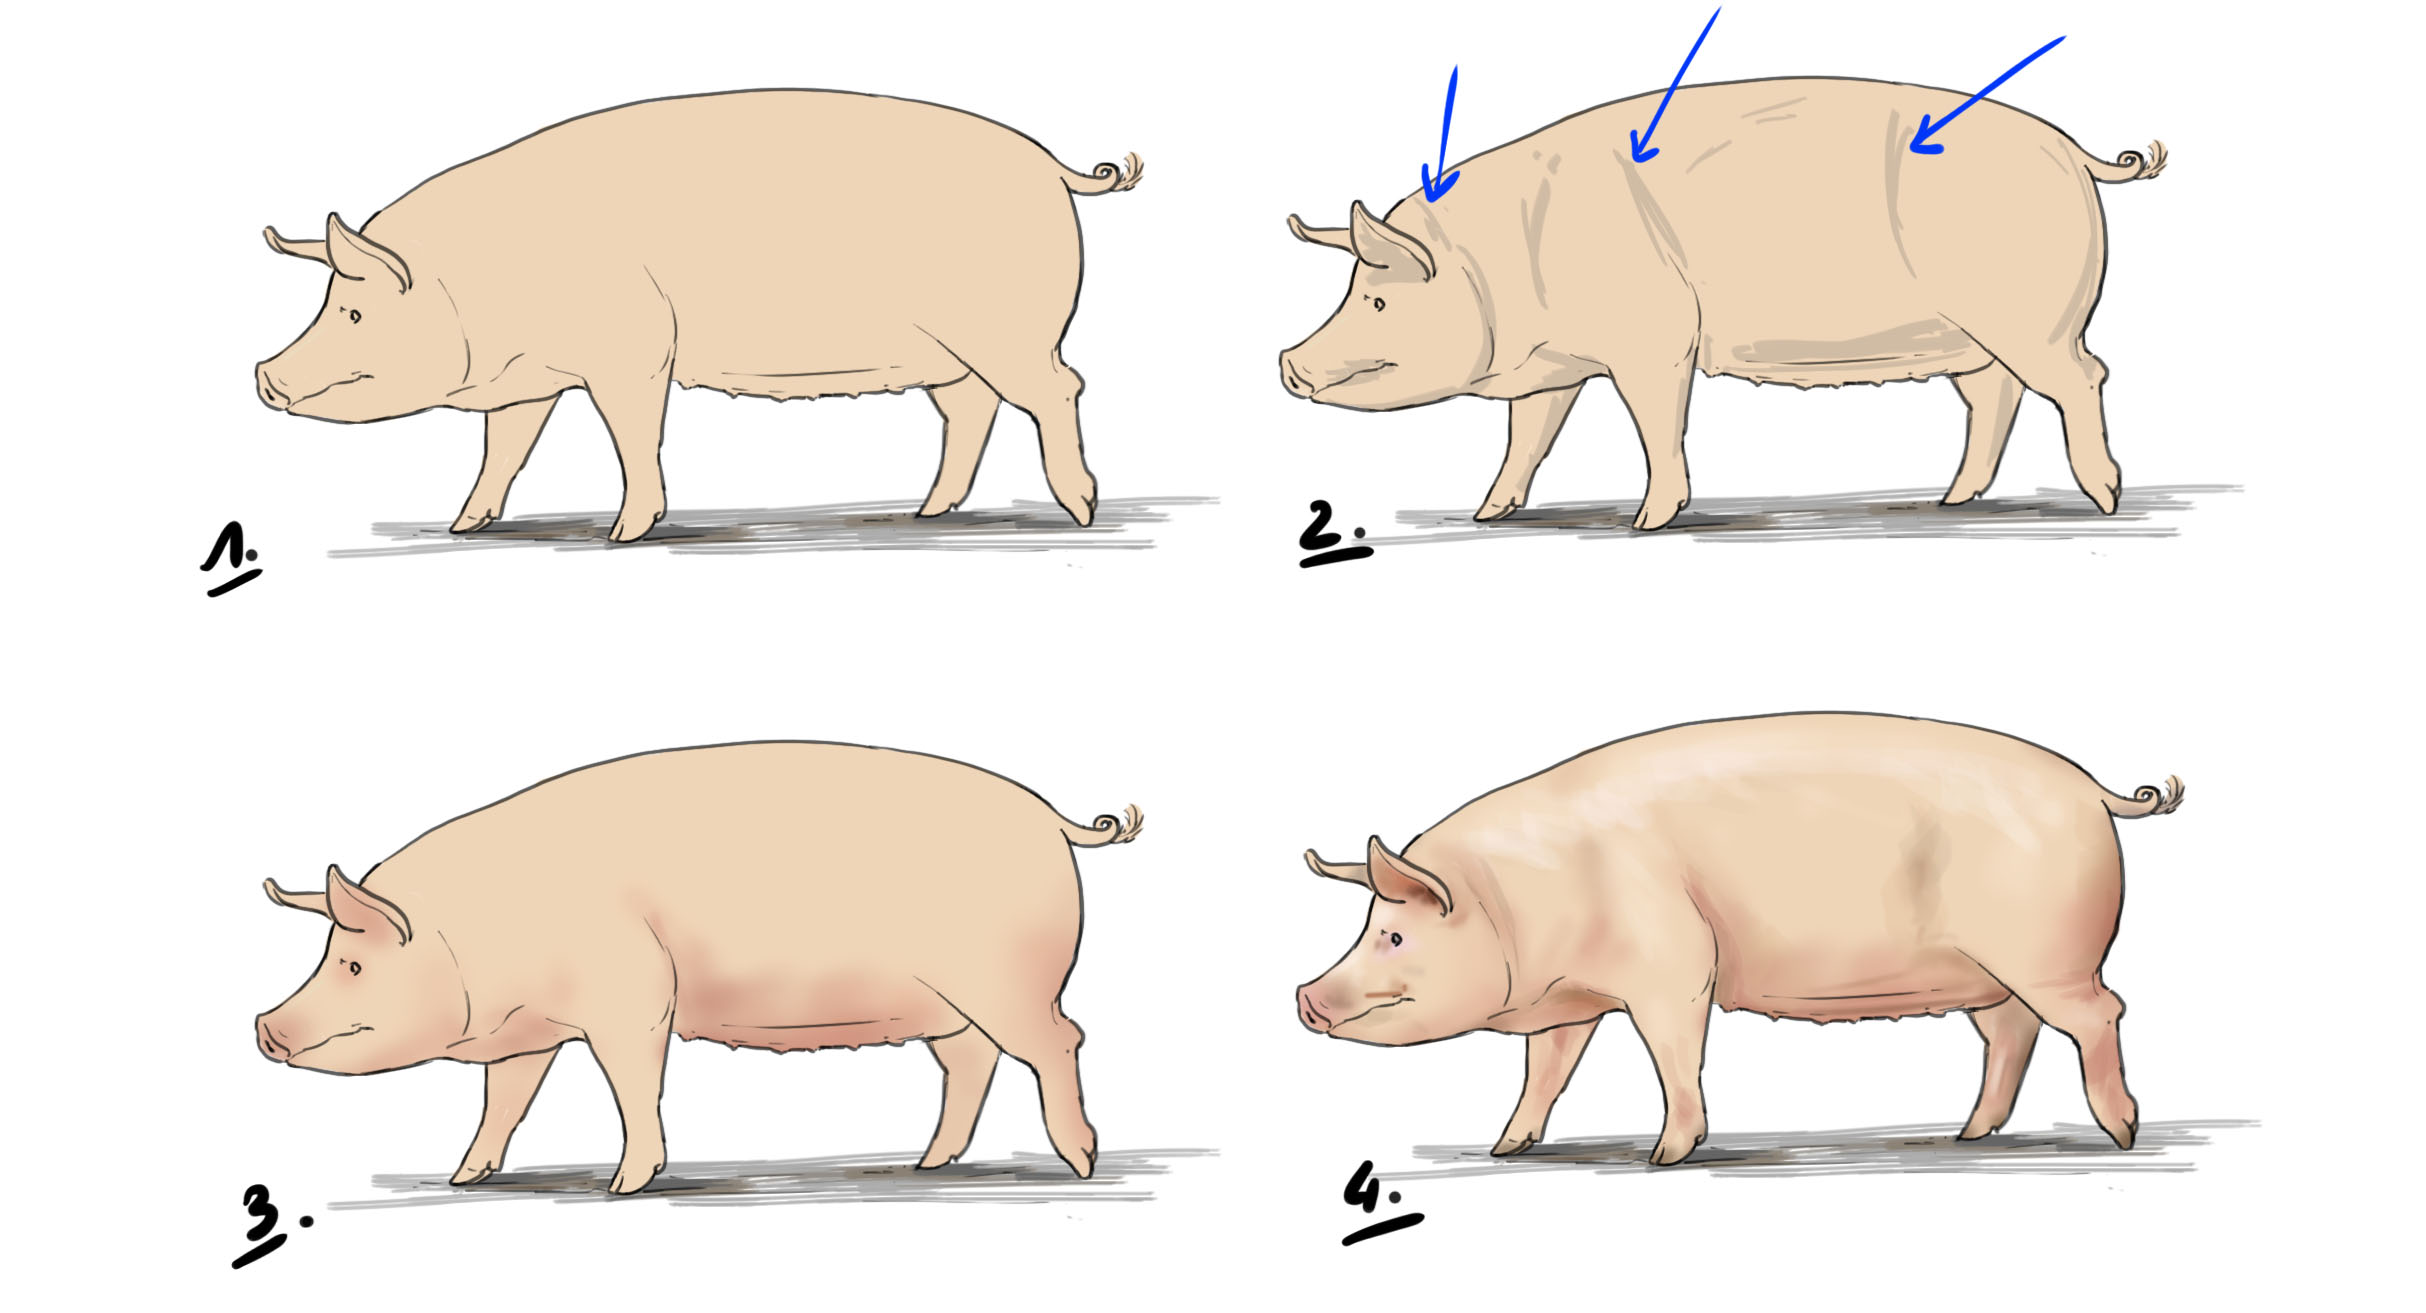
The pig, domestic pig or pork, is a subspecies of the wild boar. Like it, it is omnivorous. On average, the body is between 0.9m and 1.80m long and measures between 0.7m and 1m at the withers.
They are short-legged animals with relatively large heads compared to their bodies and big ears. The body is elongated but remains compact.
As is often the case, the structure of their legs features the same elements as the structure of our limbs.
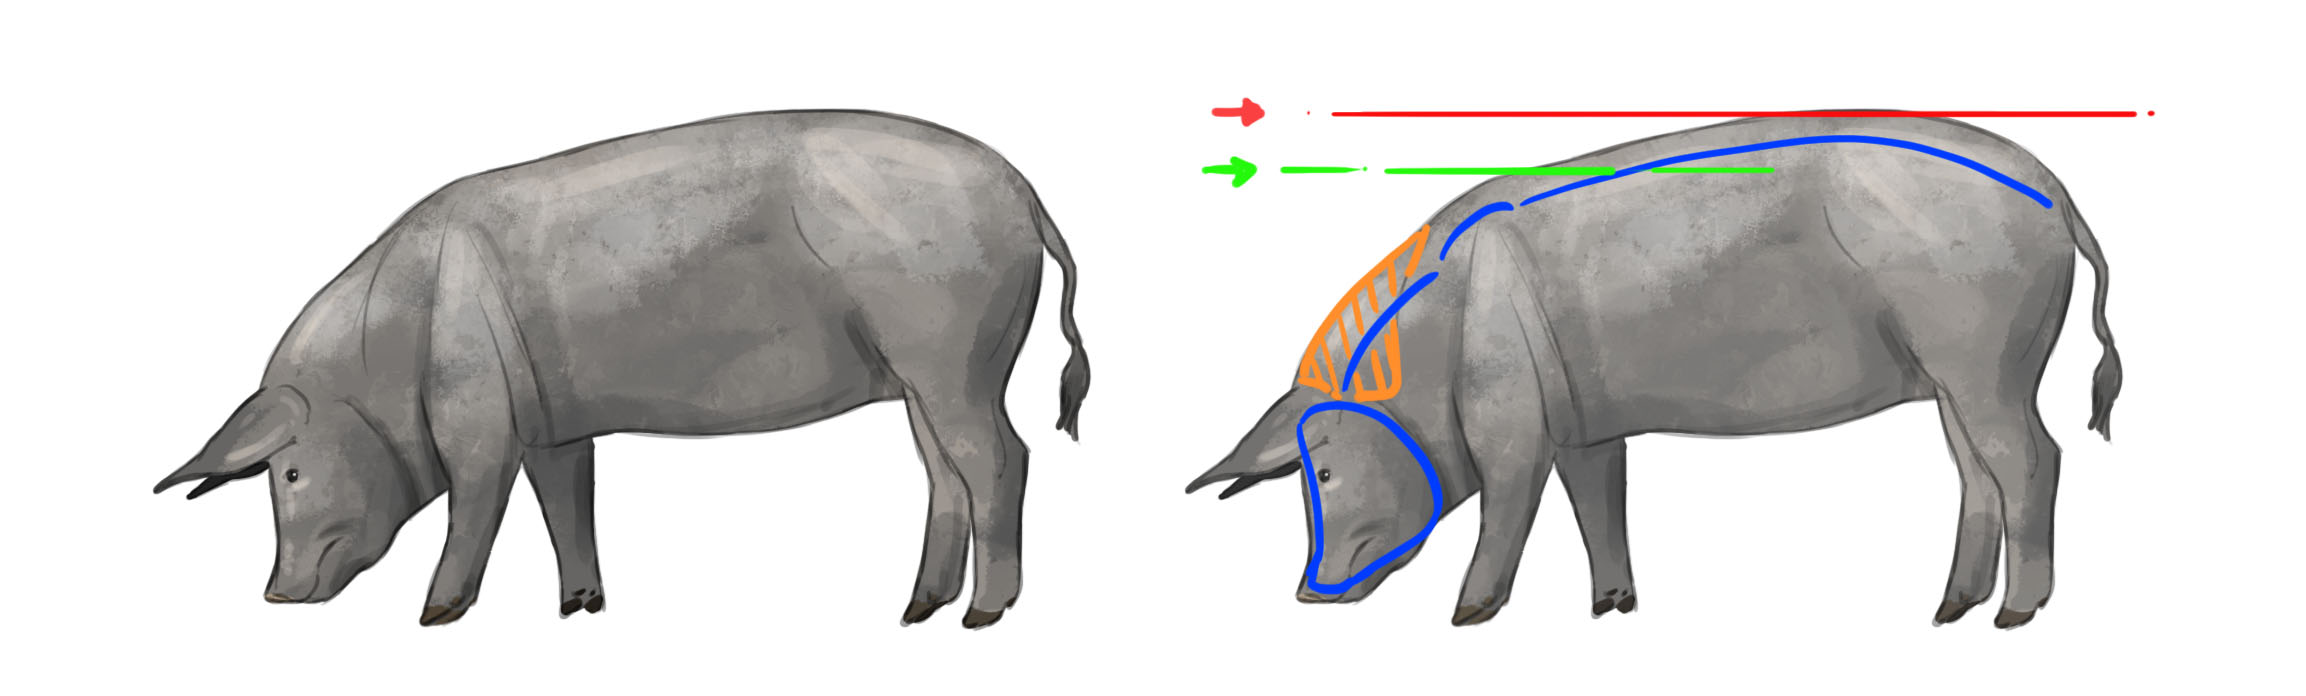
You can see that the back is long and rather straight. Due to the shape of their back (the way the vertebrae articulate and attach to the skull), pigs can only slightly raise their heads. So be careful, always keep this in mind, otherwise you might break its neck!
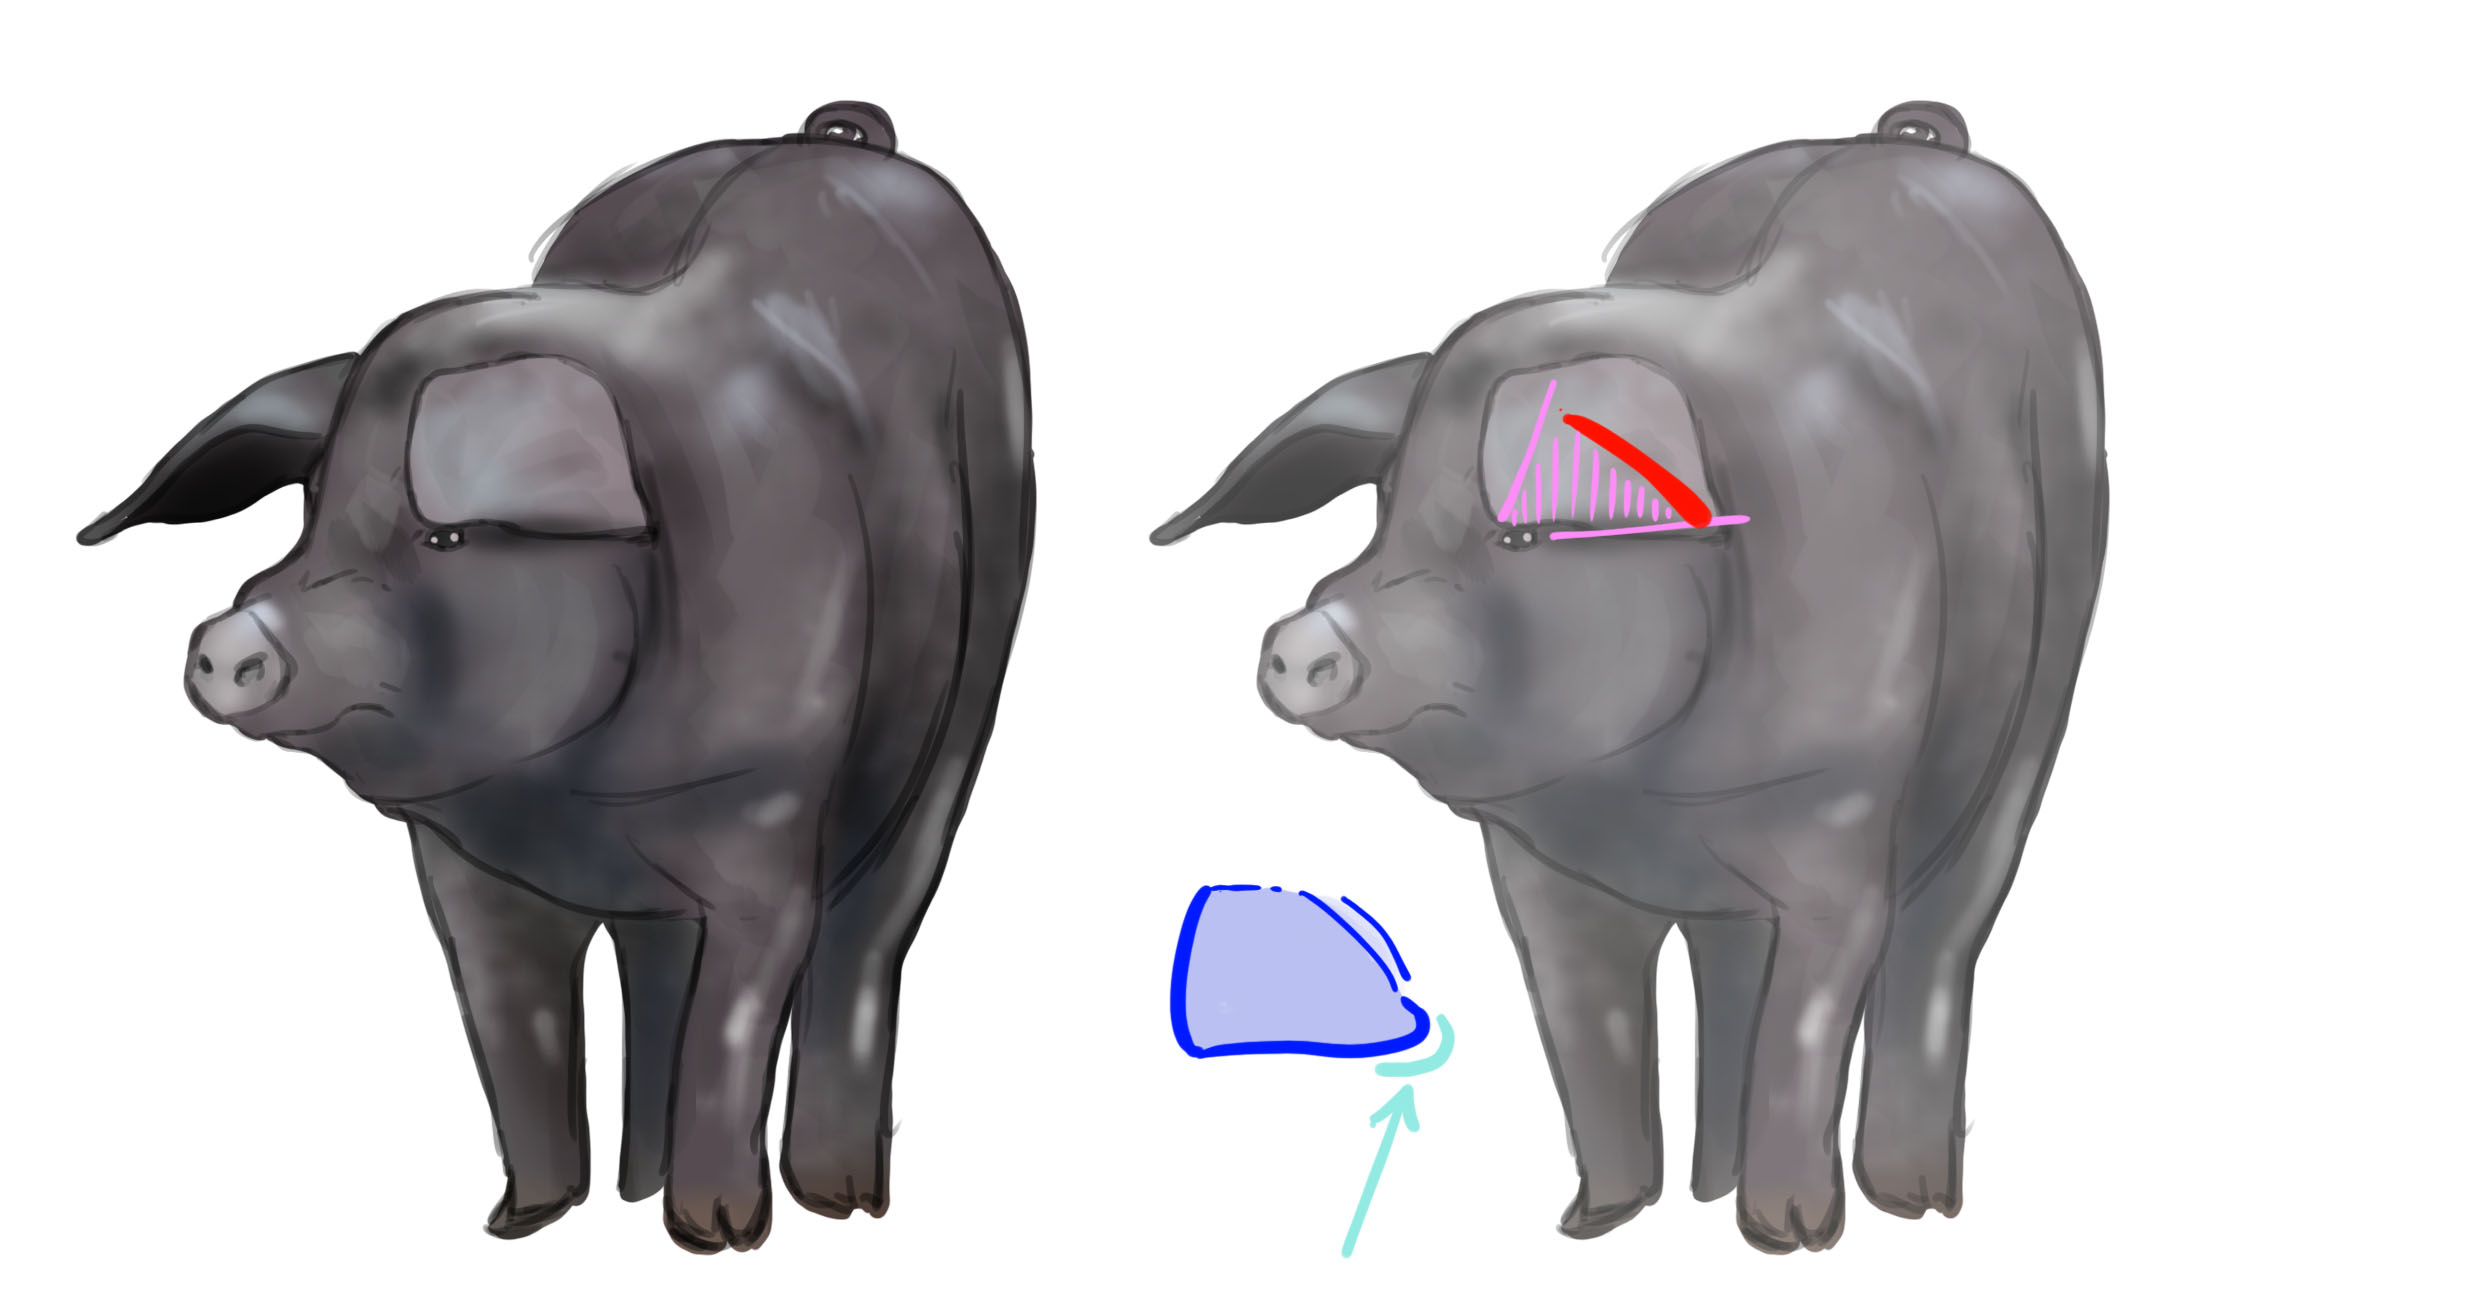
The head cannot rise too high but pigs often keep their heads down, looking for some treats. So, the neck muscles can be guessed at (orange hatched area) as shown in the following image.
You will notice that the hindquarters are slightly higher than the shoulders. In the image, I've illustrated this by marking the top of the front legs (green line) and the top of the back legs (red line). Note that this front/rear height difference is more or less pronounced in certain varieties of pigs.
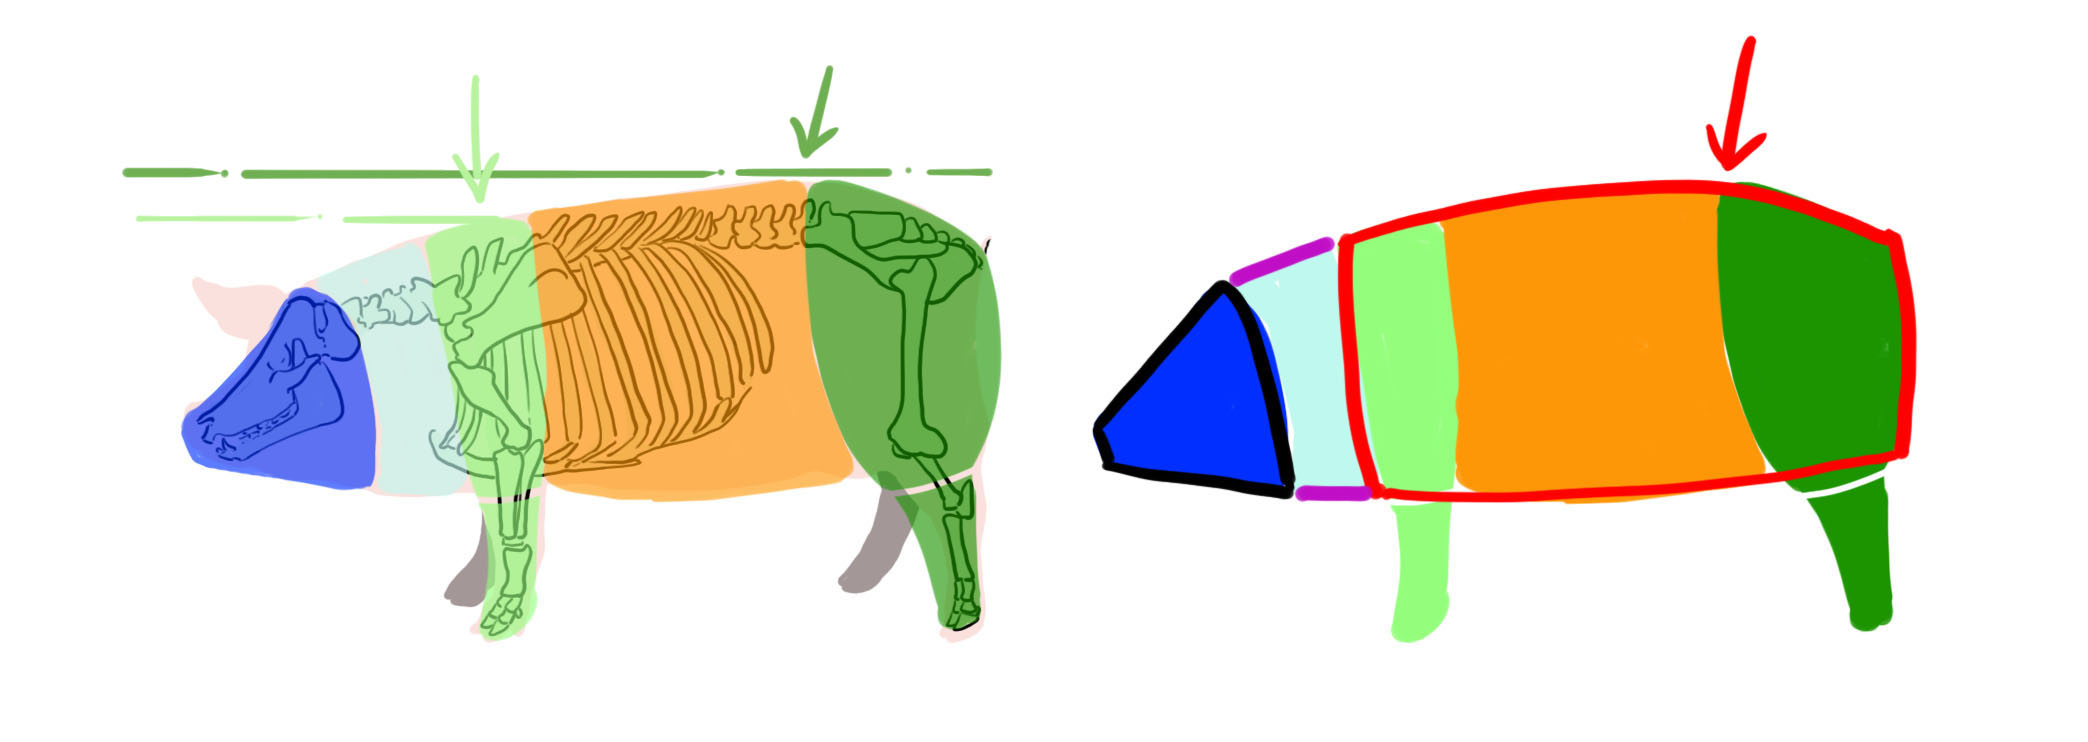
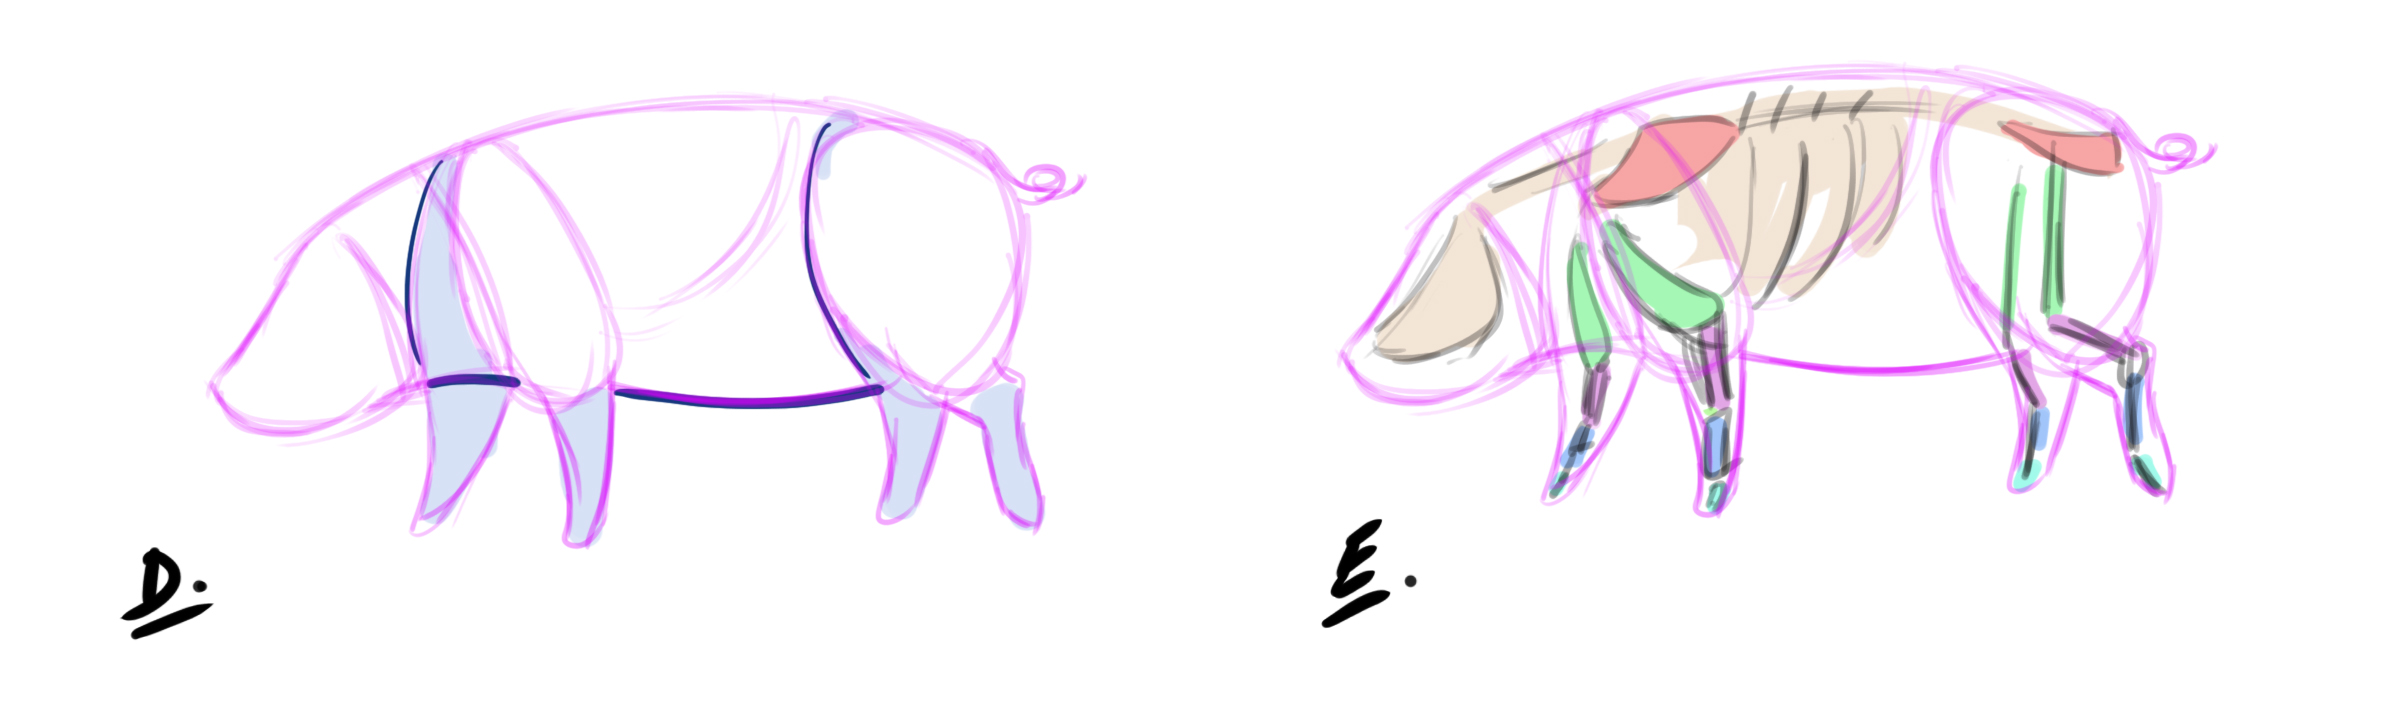
To simplify, we can segment our animal's body into a few distinct parts.
In dark blue: the head, which forms a triangle with a slightly square tip at the snout.
In light blue: the neck, which is wide and connects the head to the torso almost without demarcation.
In green: the limbs, in light green, the front legs, and in darker green, the hind legs with a larger muscle mass.
In orange: the "torso," with its wide rib cage.
In the drawing on the right, we simplify the animal even further. Ultimately, we have the triangle of the head, the neck and the body, with red outlines, which forms a slightly deformed rectangle. The red arrow highlights the tip of the hip, which breaks up the back line a bit.
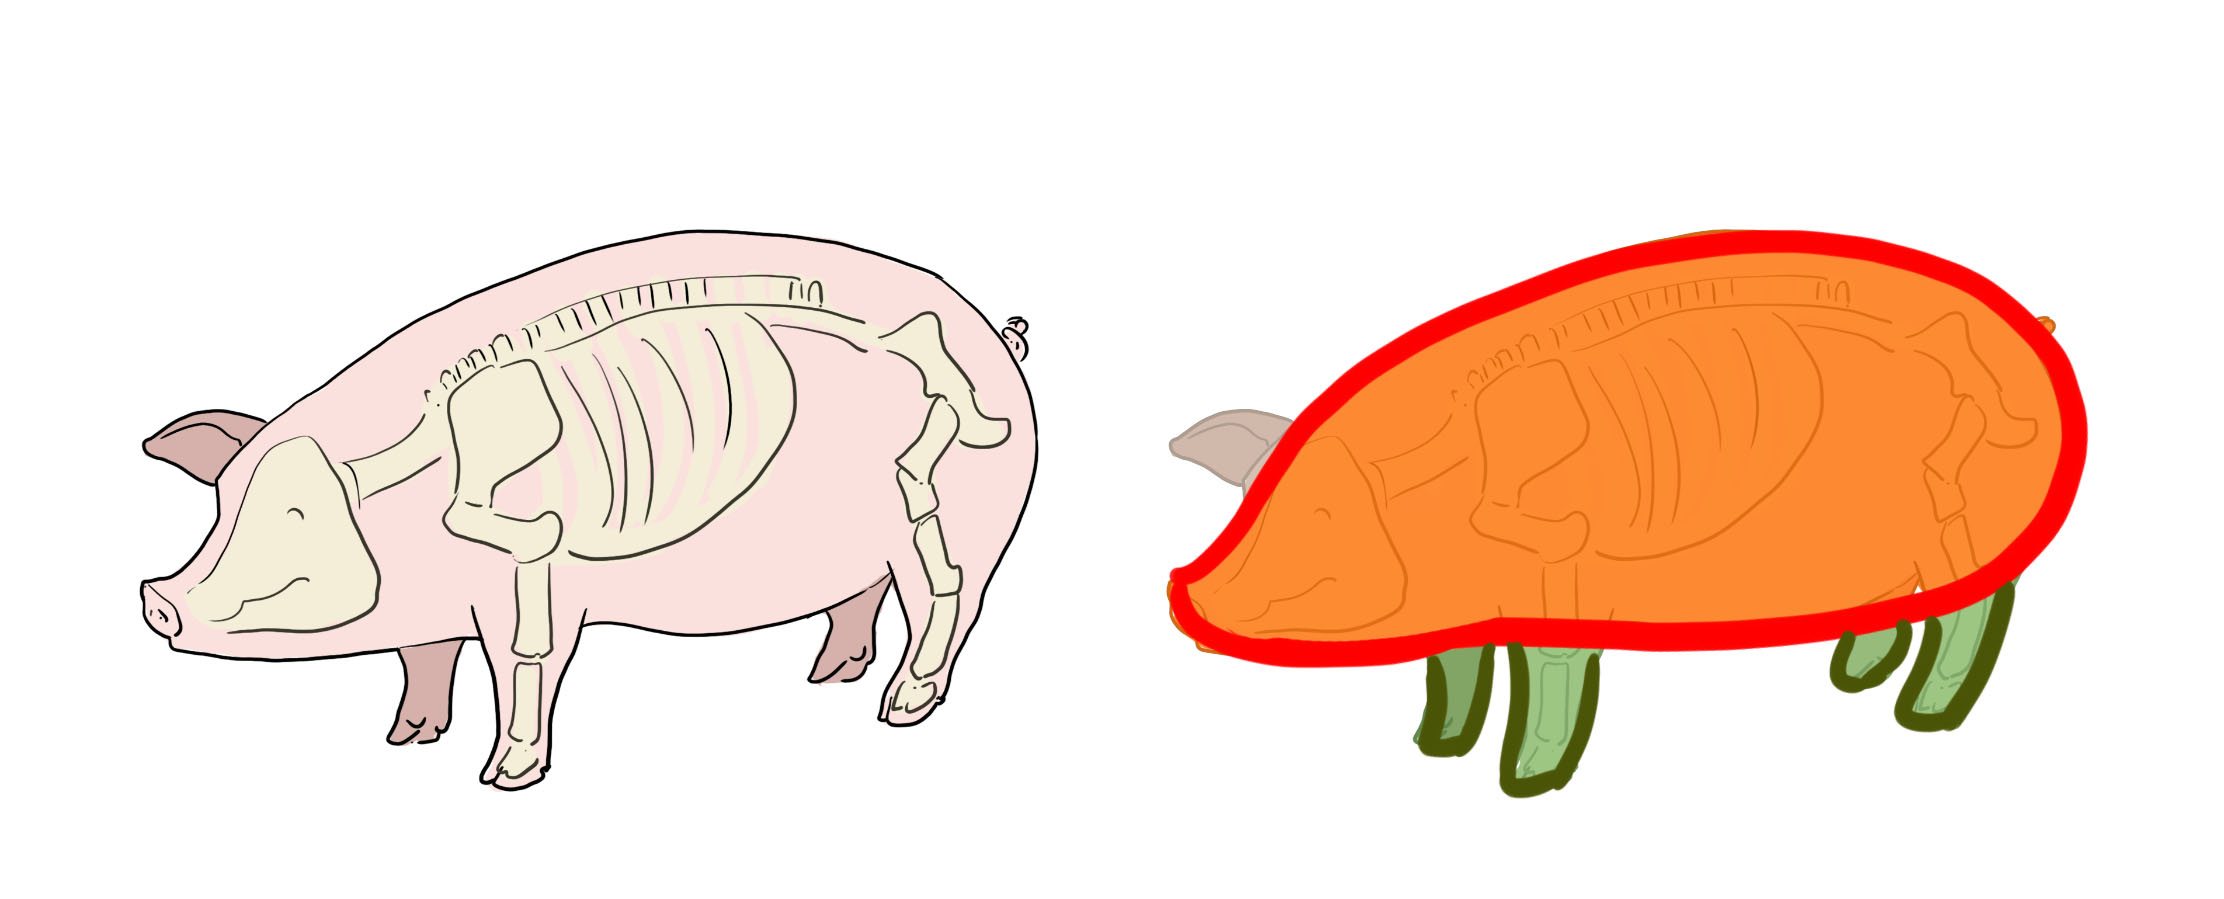
And if we keep only the outlines (useful for a simplified drawing), we can clearly see that the silhouette is oblong in shape, like a horizontally turned water droplet that is slightly thicker at the back.
You'll notice that the head is really in continuity with the body.
Let's now look at the construction of the head in more detail.
In a side view:
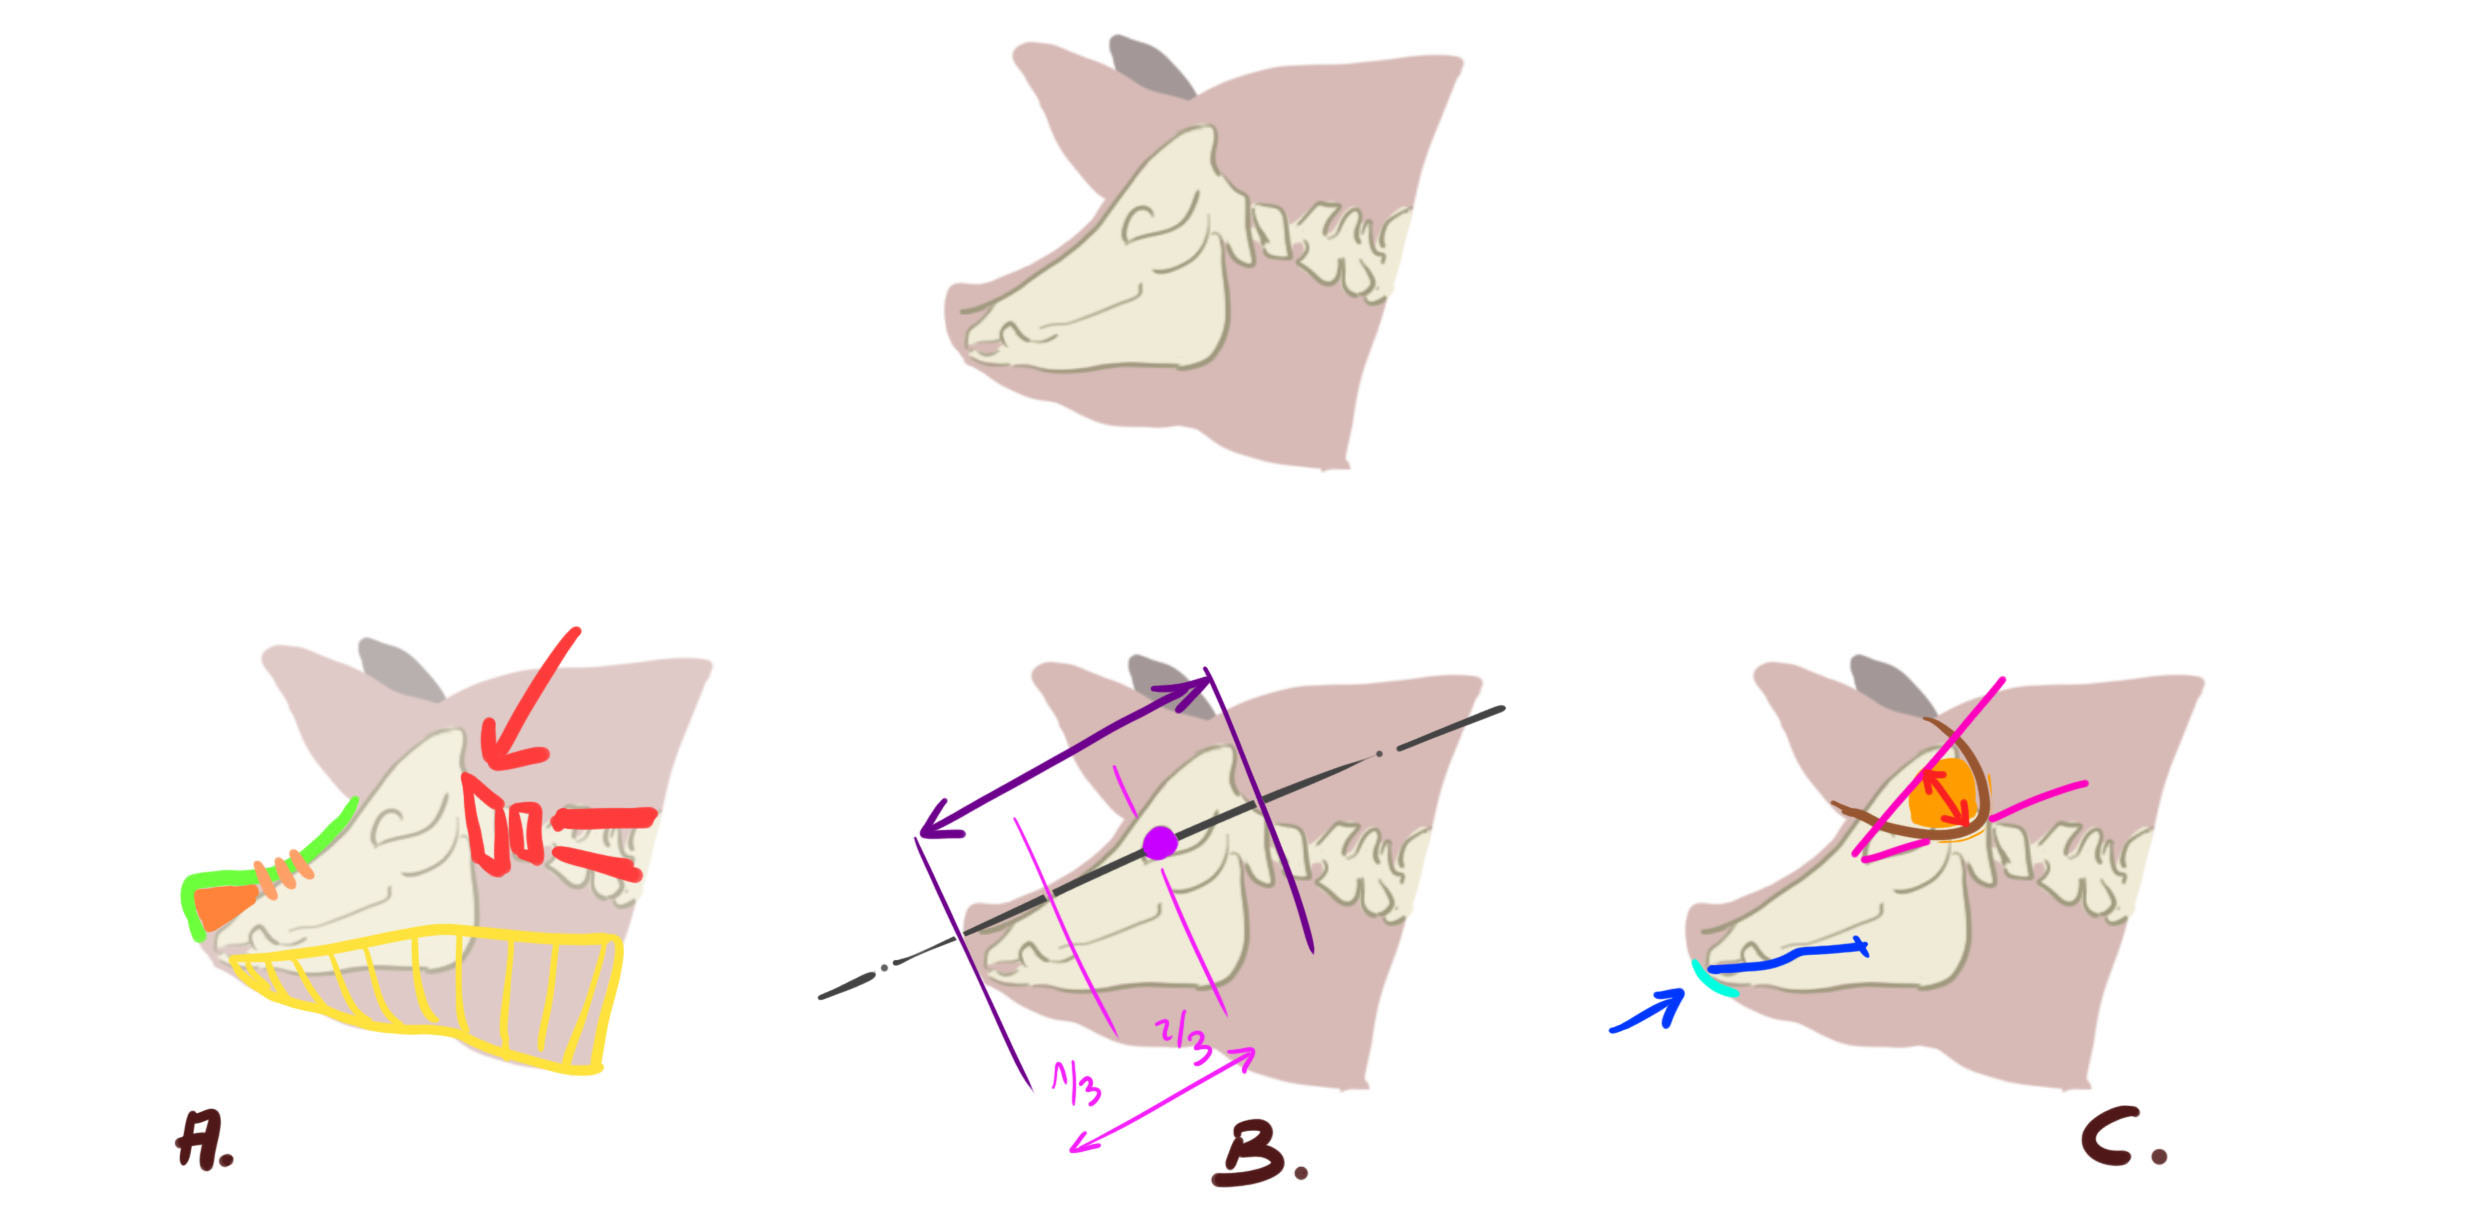
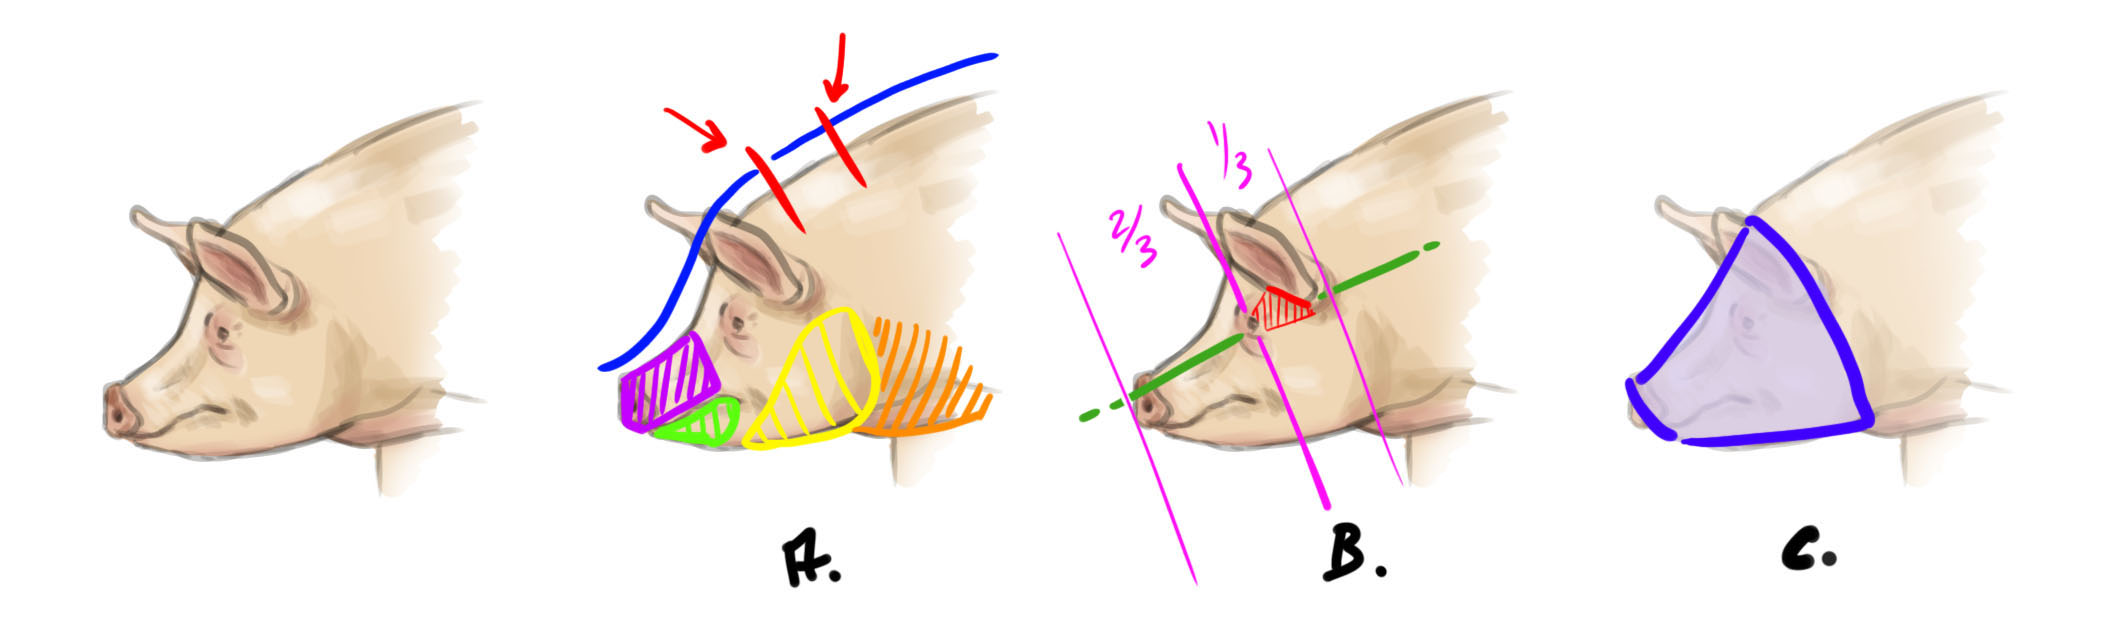
Image A:
In red is the attachment of the skull to the spine. The head cannot be lifted further; the red arrow indicates the mechanical limit of the joint.
In green is the line of the snout. Indeed, the skull is rather flat while the animal's profile displays a nice curvature. The muscles and terminations of the snout (in orange) are largely responsible for this.
In yellow is the entire "throat/chin" area. This part is very fleshy and thickens the animal's neck. You will notice that there are no clear demarcations between the lower and upper jaws. In fact, the line of the lower jaw gets lost in the mass of the throat.
Image B:
Here we are interested in the placement of the eye. It is located approximately on the back third of the head and is aligned with the top of the snout (gray line).
Image C:
Here are two pink lines, one starting from above the eye and the other from below. These lines create (in orange) what I call the hearing zone, the area the ears will cover. This hearing zone gives us the width of the ear attachments (red double-arrow). We will return to the ears in more detail.
In dark blue is the line of the lips, and in light blue is the edge of the lower lip. As we mentioned previously, the lower lip is very subtle.
From a front view:
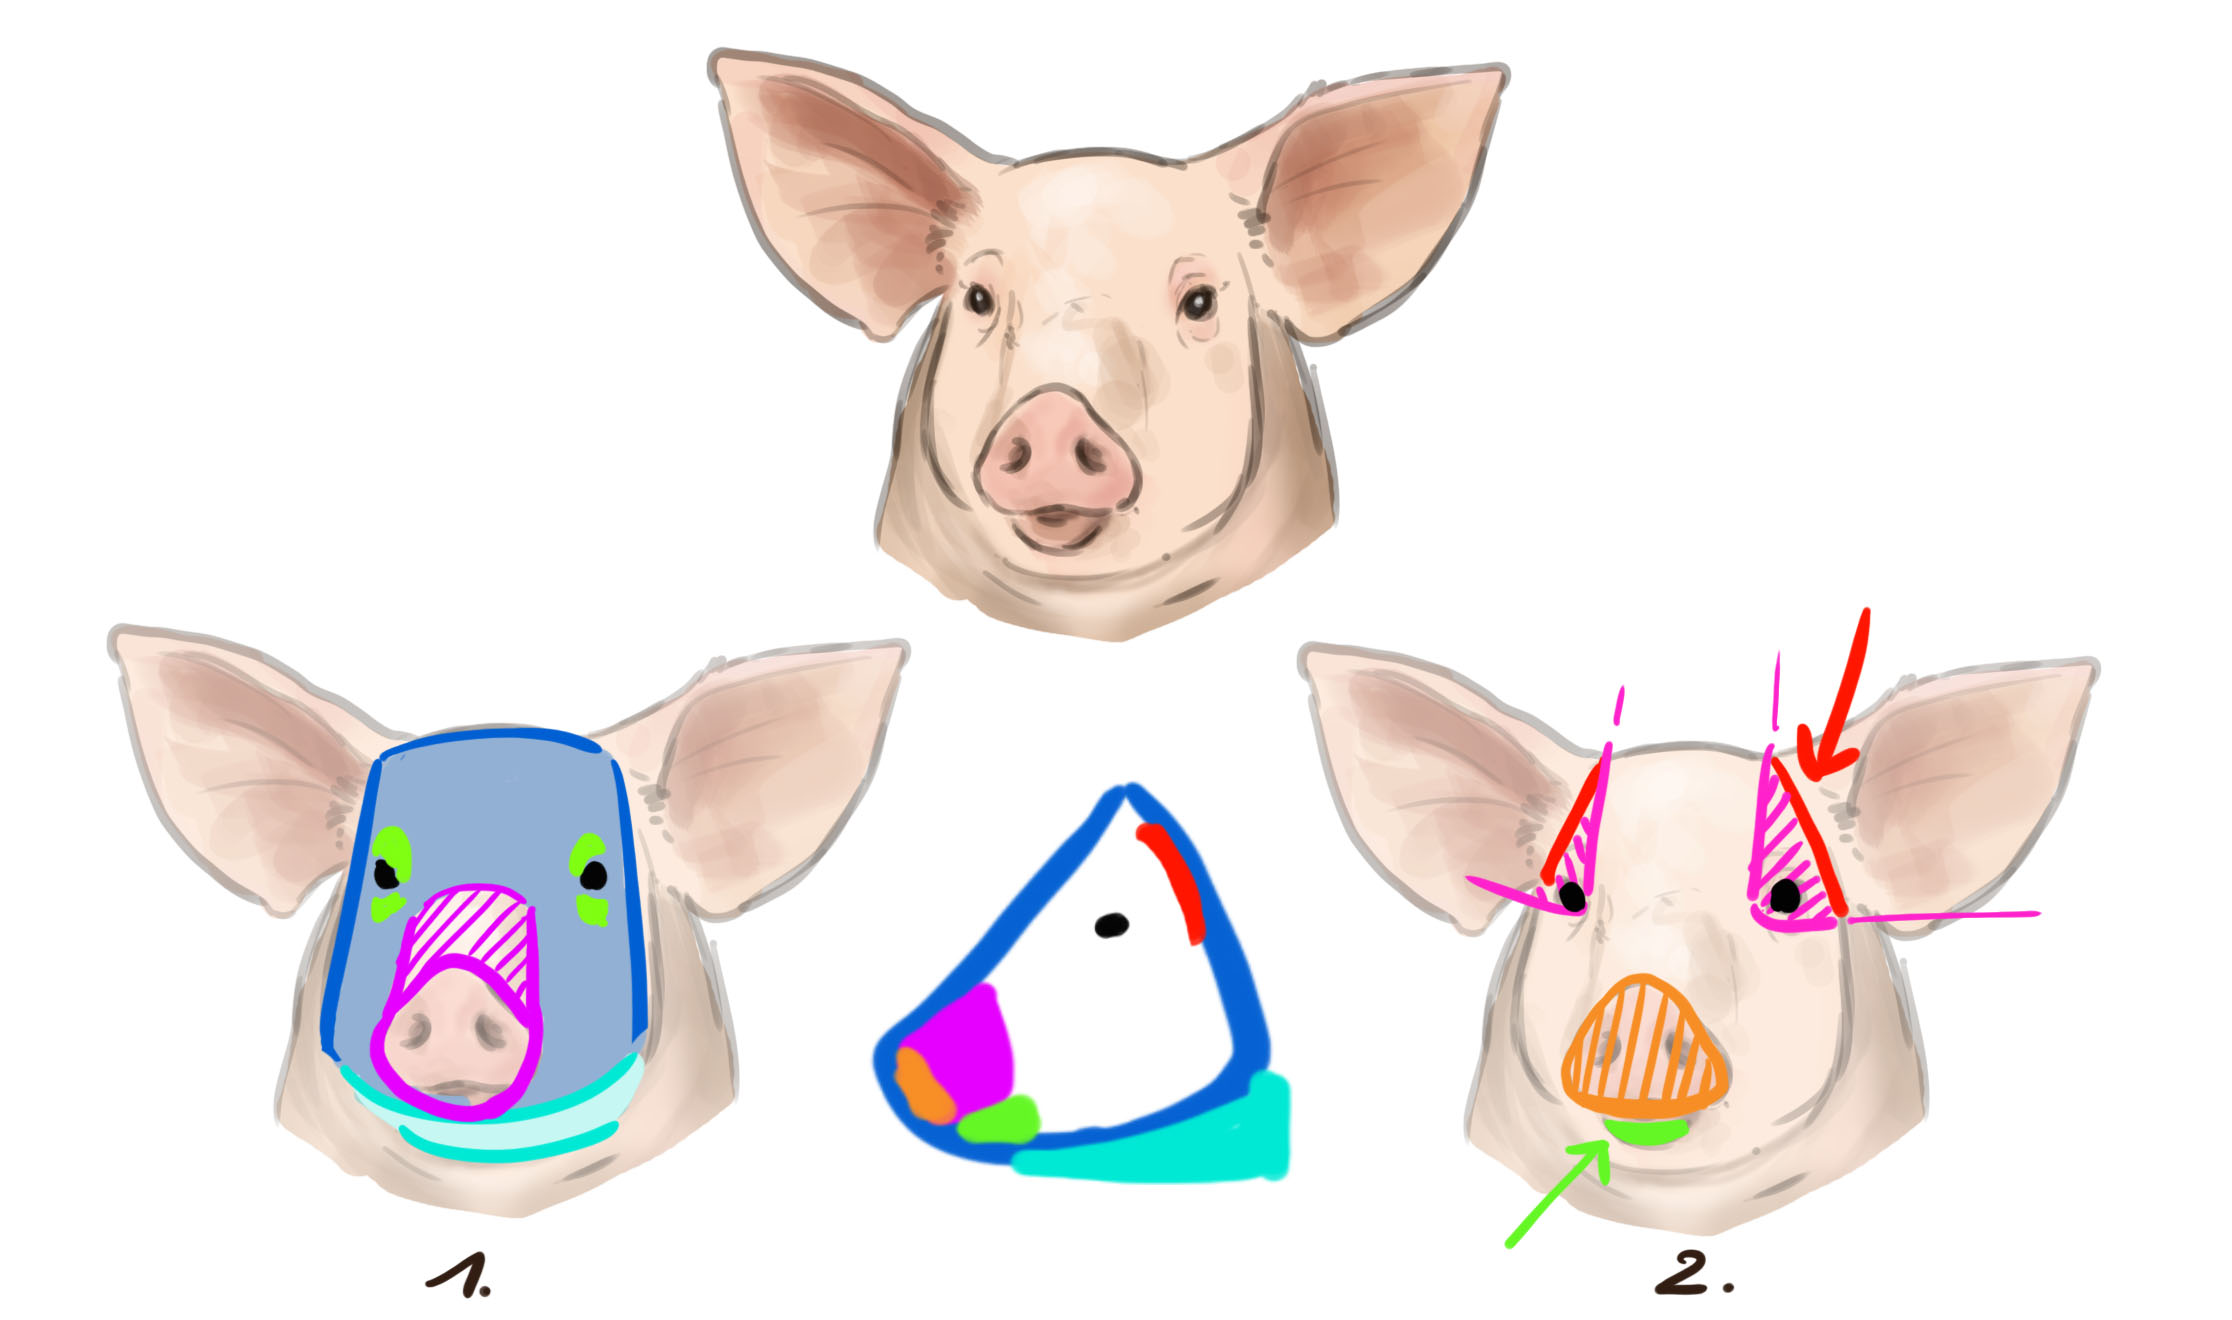
Schema 1:
The head can be embedded in a dark blue rectangle, which will be softened at the bottom by the fleshy area of the throat (in light blue).
The snout, in violet, forms a rectangle ending at its tip with the snout.
Schema 2:
The snout, roughly triangular in shape, constitutes a large surface across the entire end of the muzzle. In green, the lower jaw is very thin.
In pink are the lines that form the hearing area. In red is the area where the ears attach.
Between the two diagrams, you will find the color references on a simplified profile view.
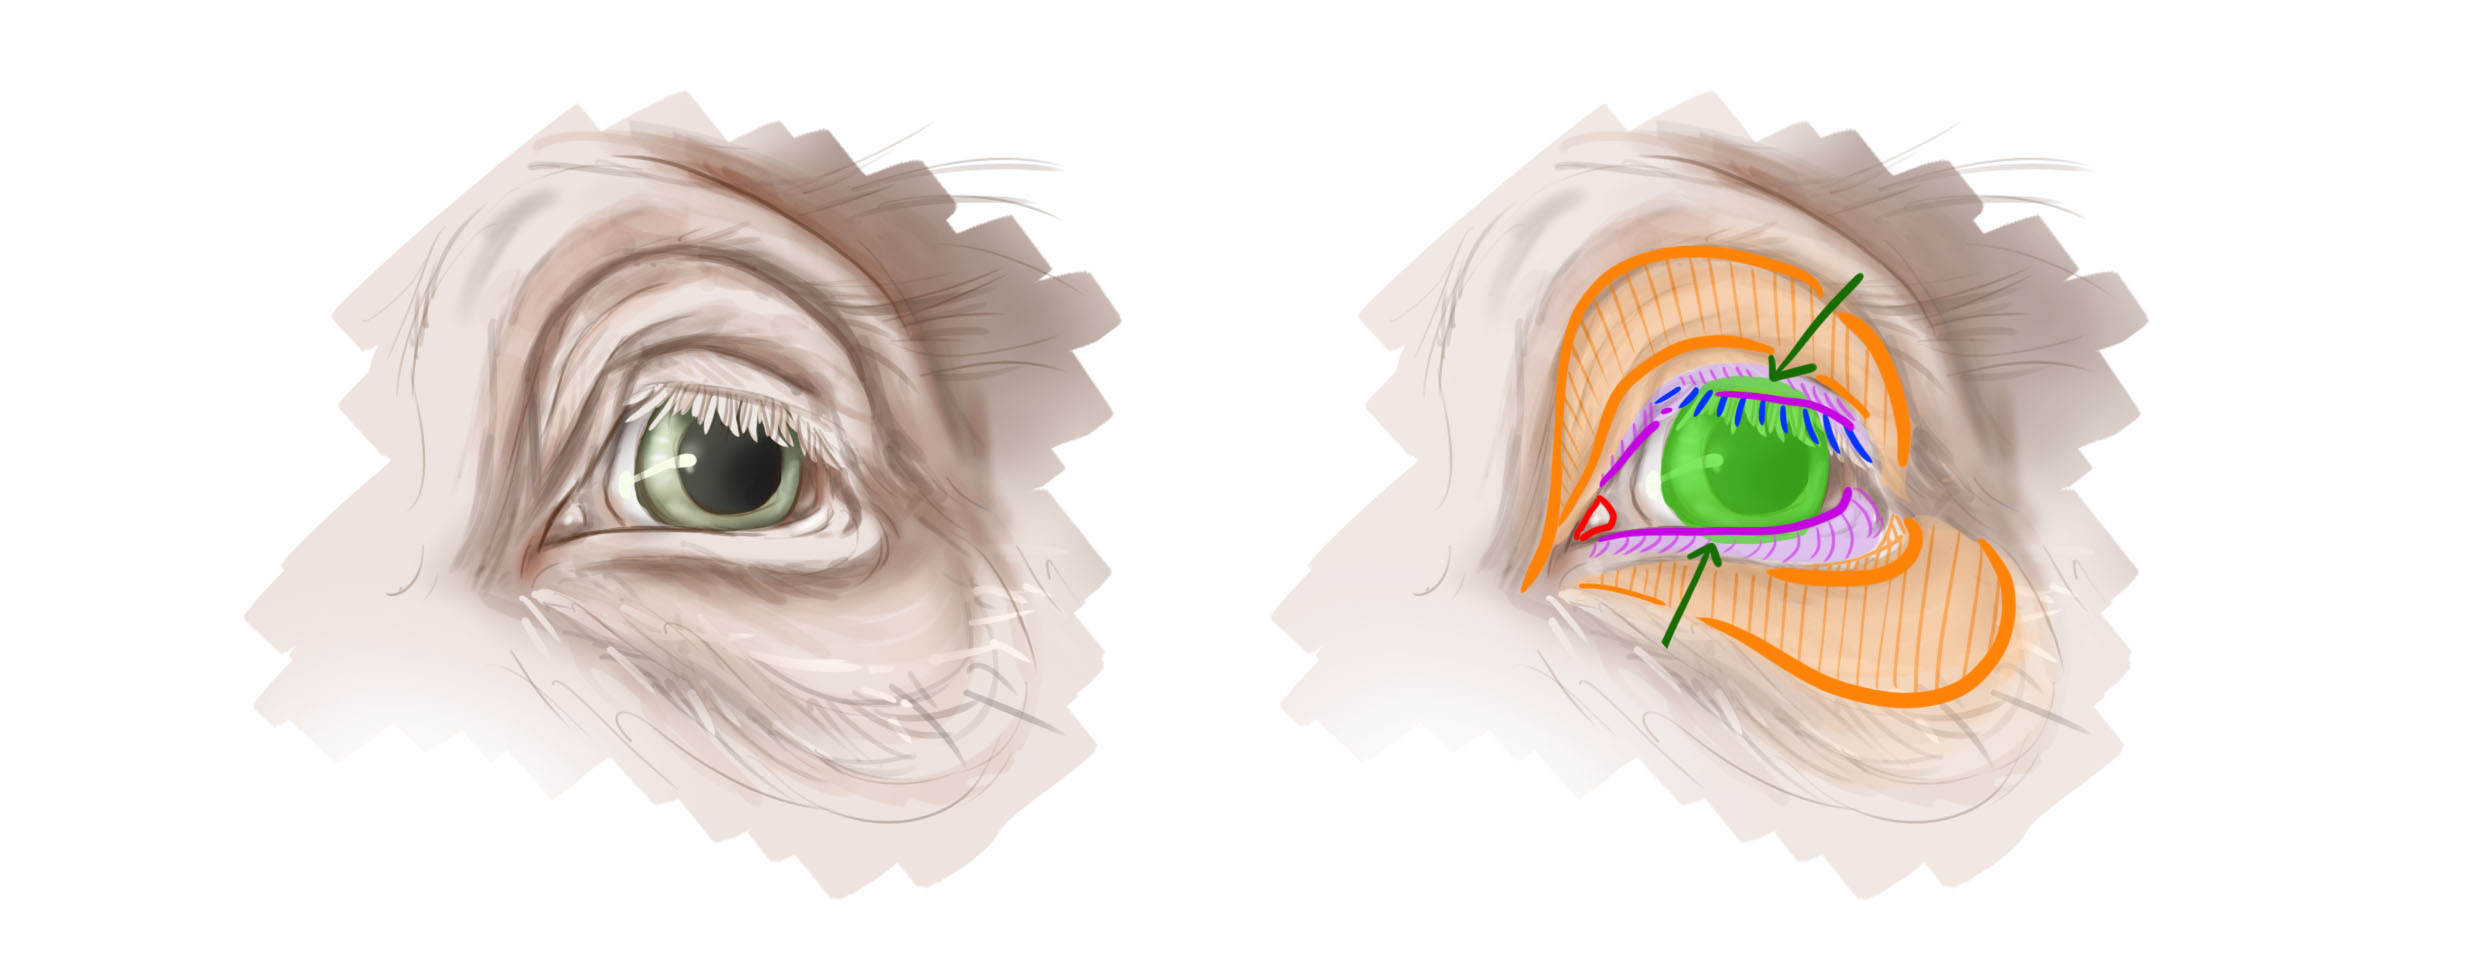
The pig's eye has a structure very similar to that of our eyes. The pupil is round and black. The iris is often shades of brown, but can also have nuances of blue/gray and green/gray (option chosen for this example).
The upper eyelid is rimmed with long eyelashes (blue lines), which are white in lighter varieties and black in animals with darker coats.
The lacrimal caruncle (the small bump in the corner of the eye) is highlighted in red. The skin around the eye (area hatched in orange) tends to be less hairy. The pink color of the skin stands out as a result. This area often appears lighter.
As is often the case, the eyelids (areas shaded in violet) partially cover the top and bottom (green arrows) of the eyeball (in green).
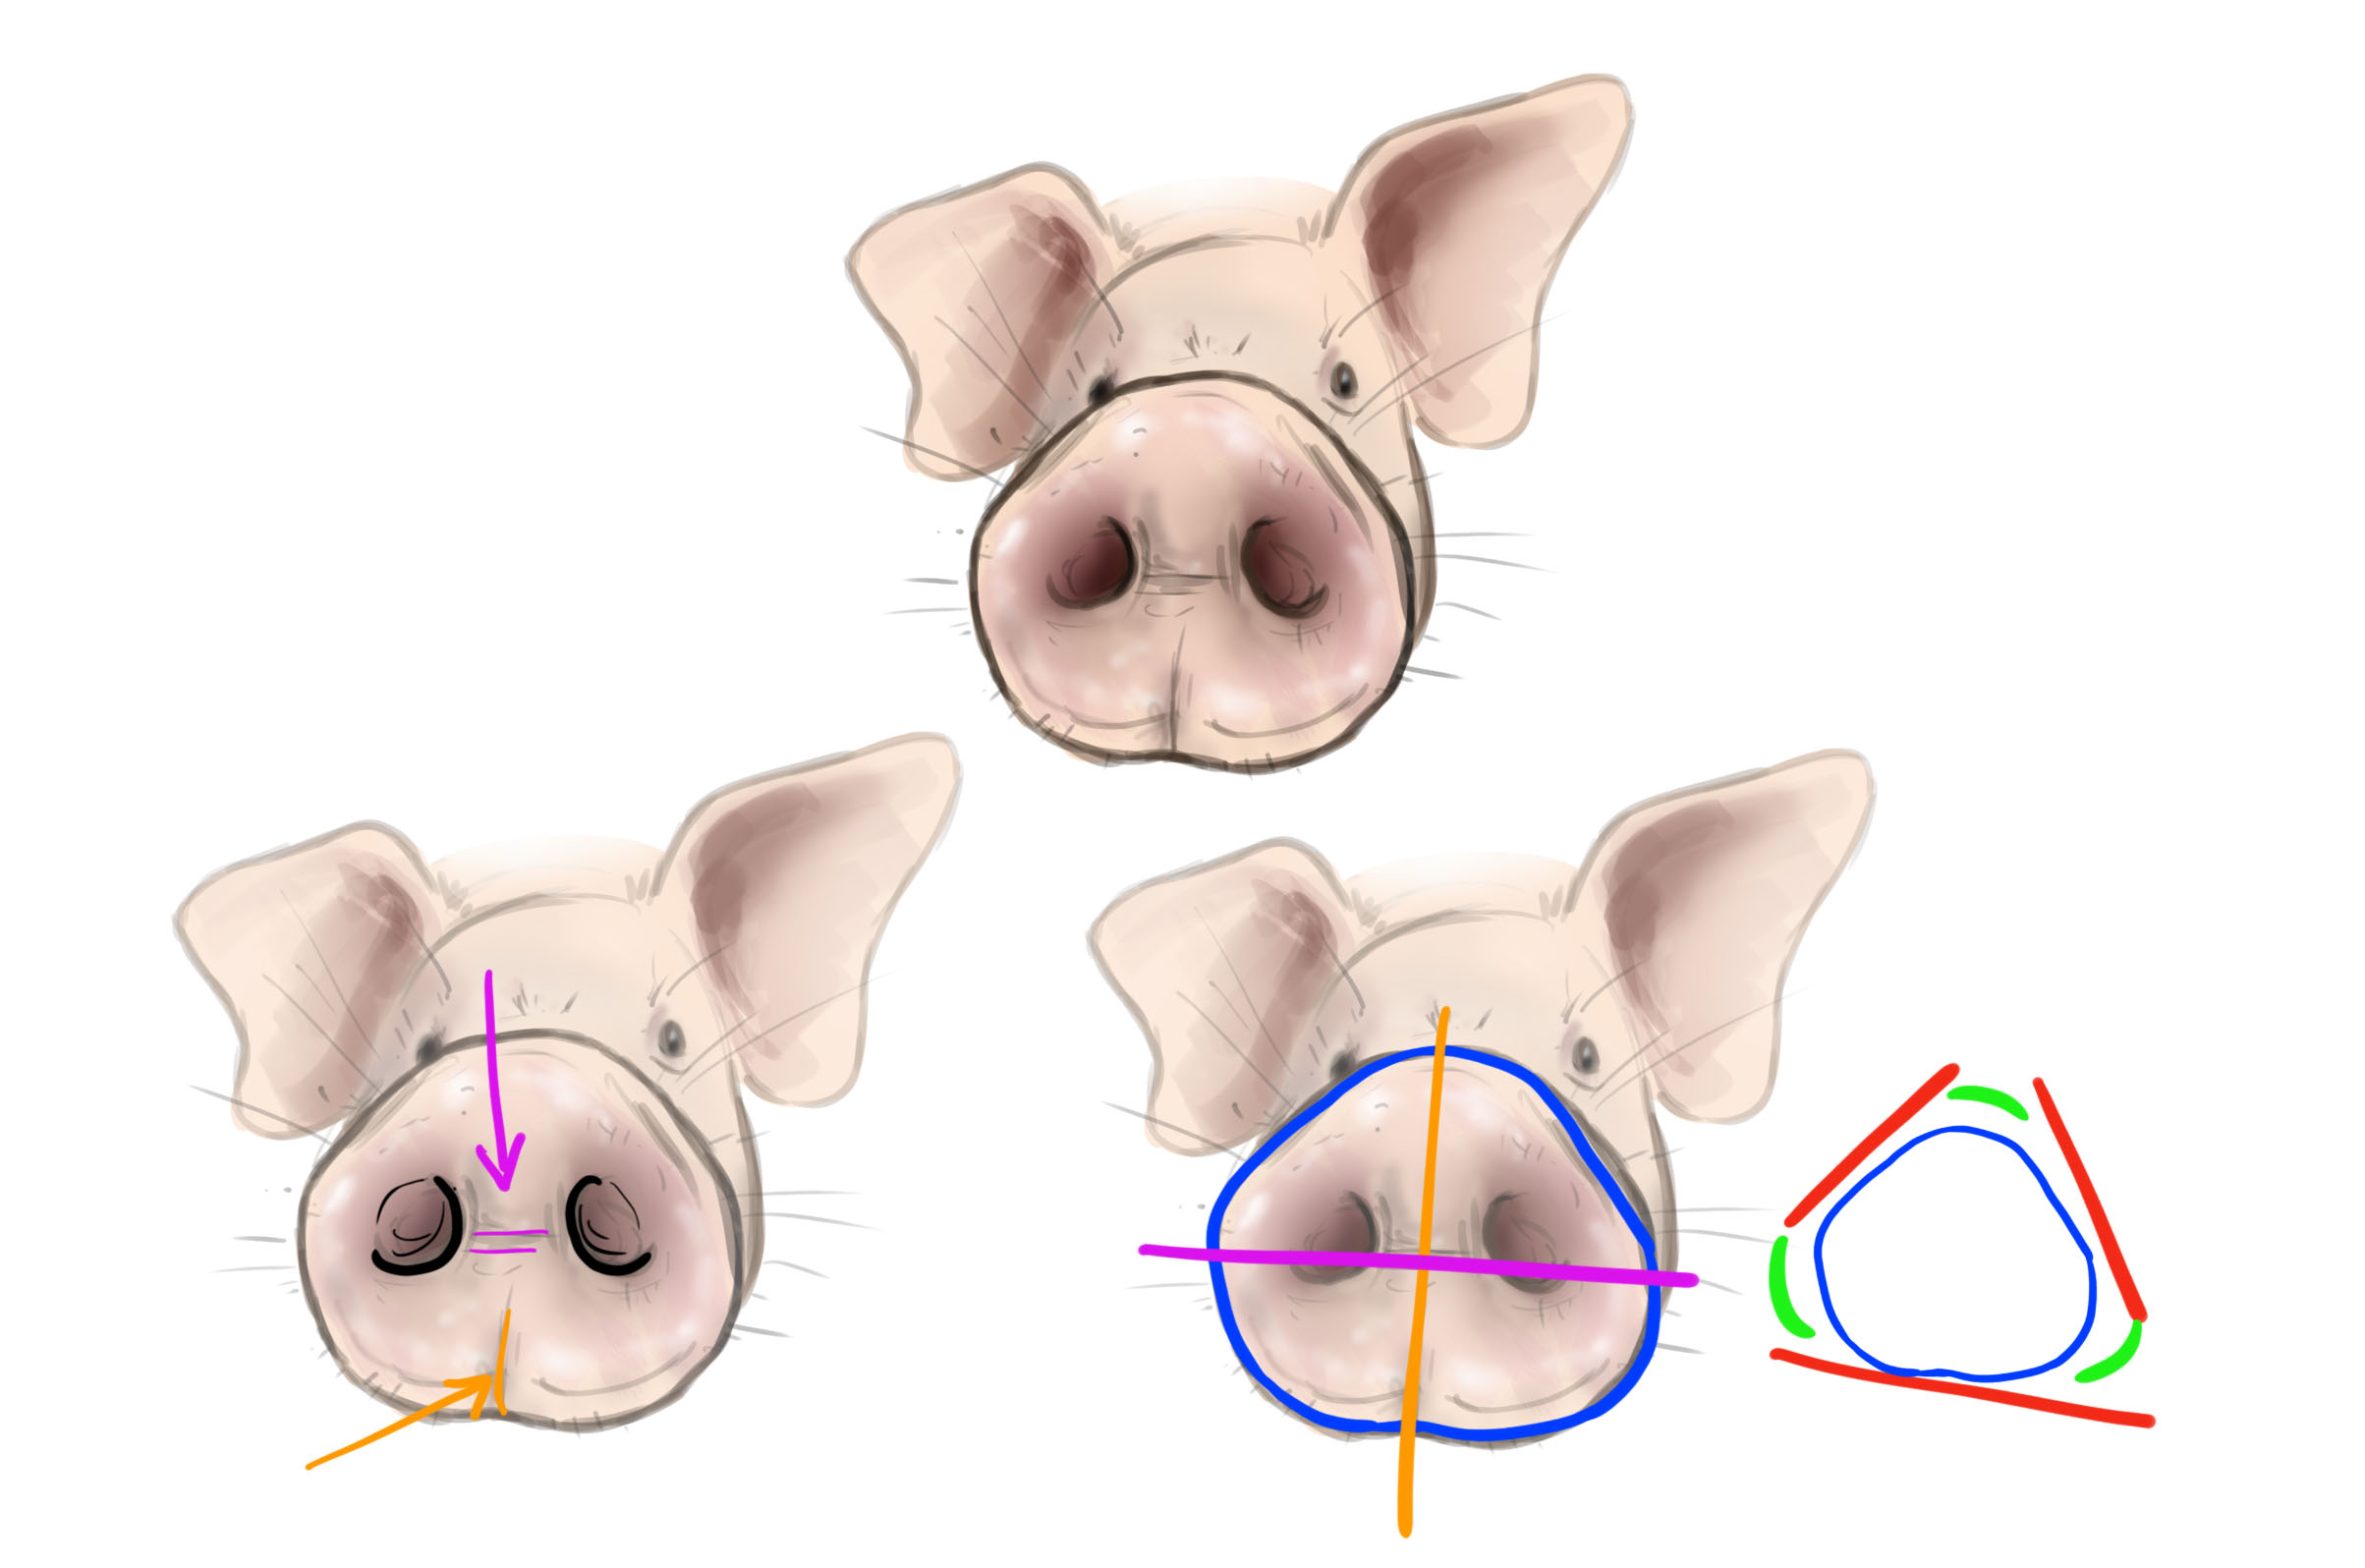
The snout is a well-developed organ in pigs and is very efficient. Indeed, pigs have an excellent sense of smell.
The shape is based on a triangle (small diagram to the right/red lines) that is rounded at the corners with a slightly wider base. In short, a very softened isosceles triangle.
In orange (the vertical line) is the support at the central axis around which the construction is symmetrical.
The orange arrow indicates a small fold resulting from it.
The horizontal violet line marks an axis of "folds." The snout can deform slightly and arch around this line. The violet arrow shows you the folds in relation to this structure.
The nostrils are round and placed in the center.
The area is bare and the "skin" there is a bit granular and tends to be moist. Do not hesitate to apply some light reflections there.
The hairs you see are actually on the snout, just behind it. They should only be depicted in the context of a realistic drawing, otherwise you might end up giving your pig cat whiskers!
Although pigs do not display tusks as developed as their wild boar cousins, males can have impressive teeth if they are not clipped (which is rarely the case).
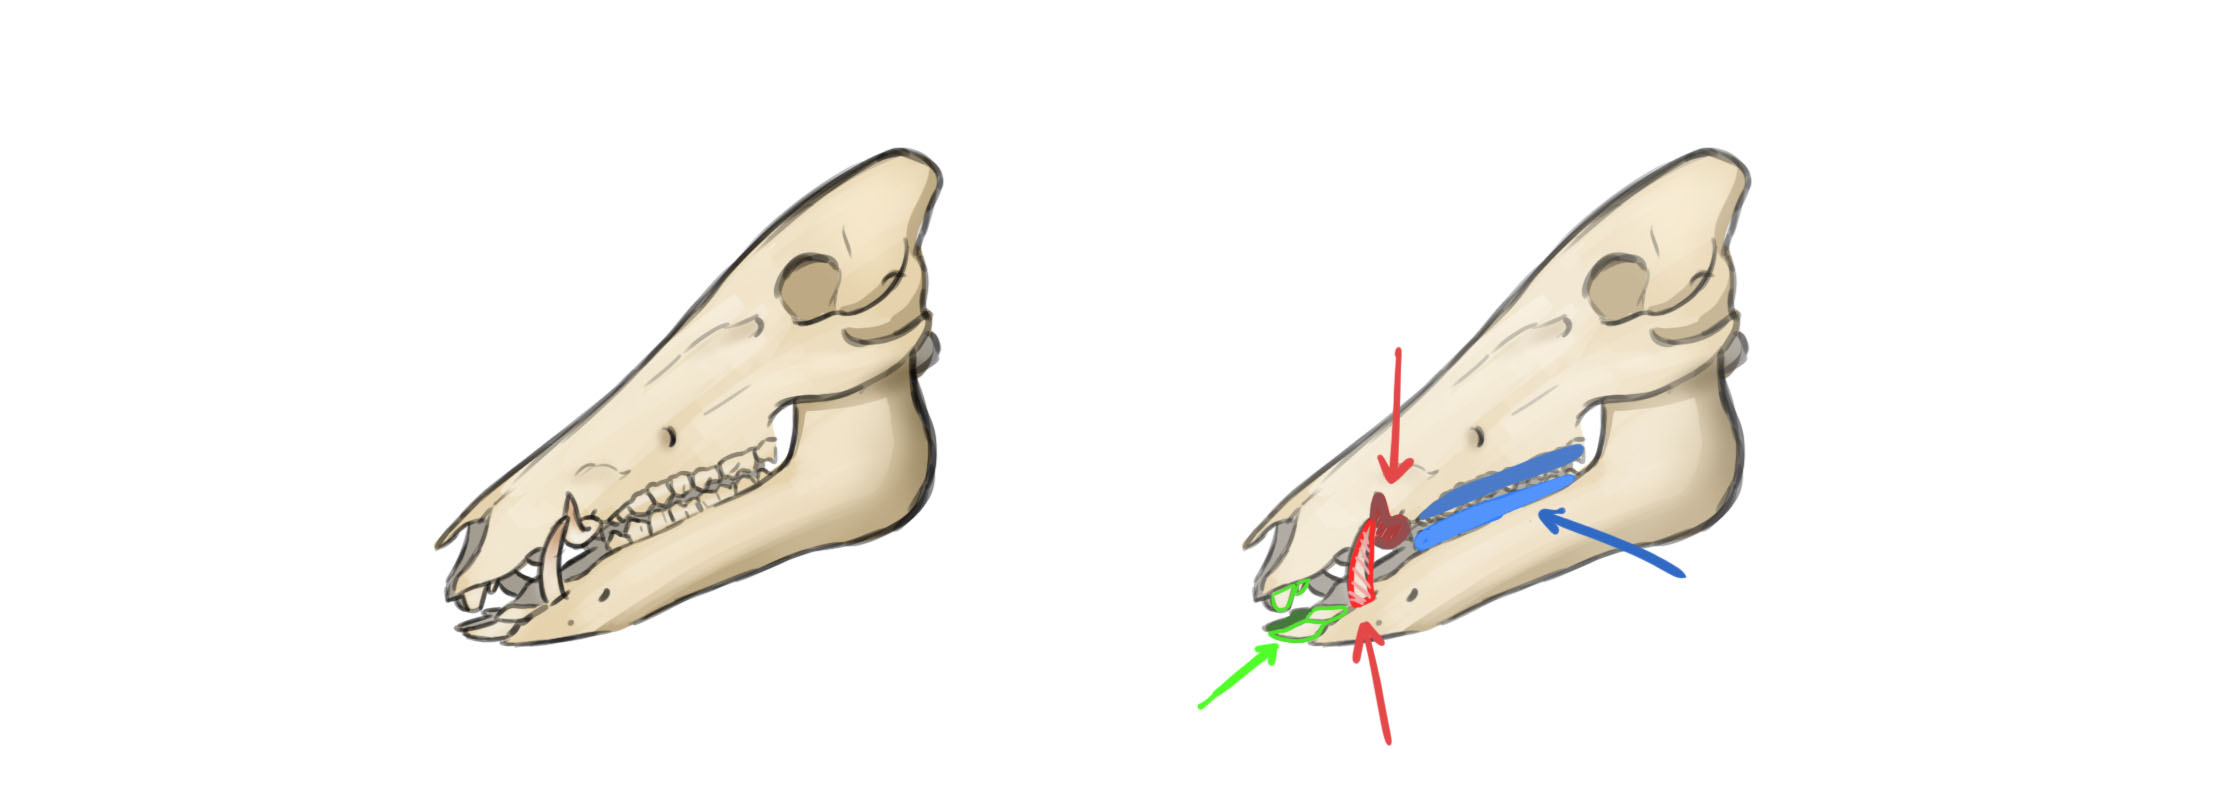
Let's quickly look at the skull for the dentition:
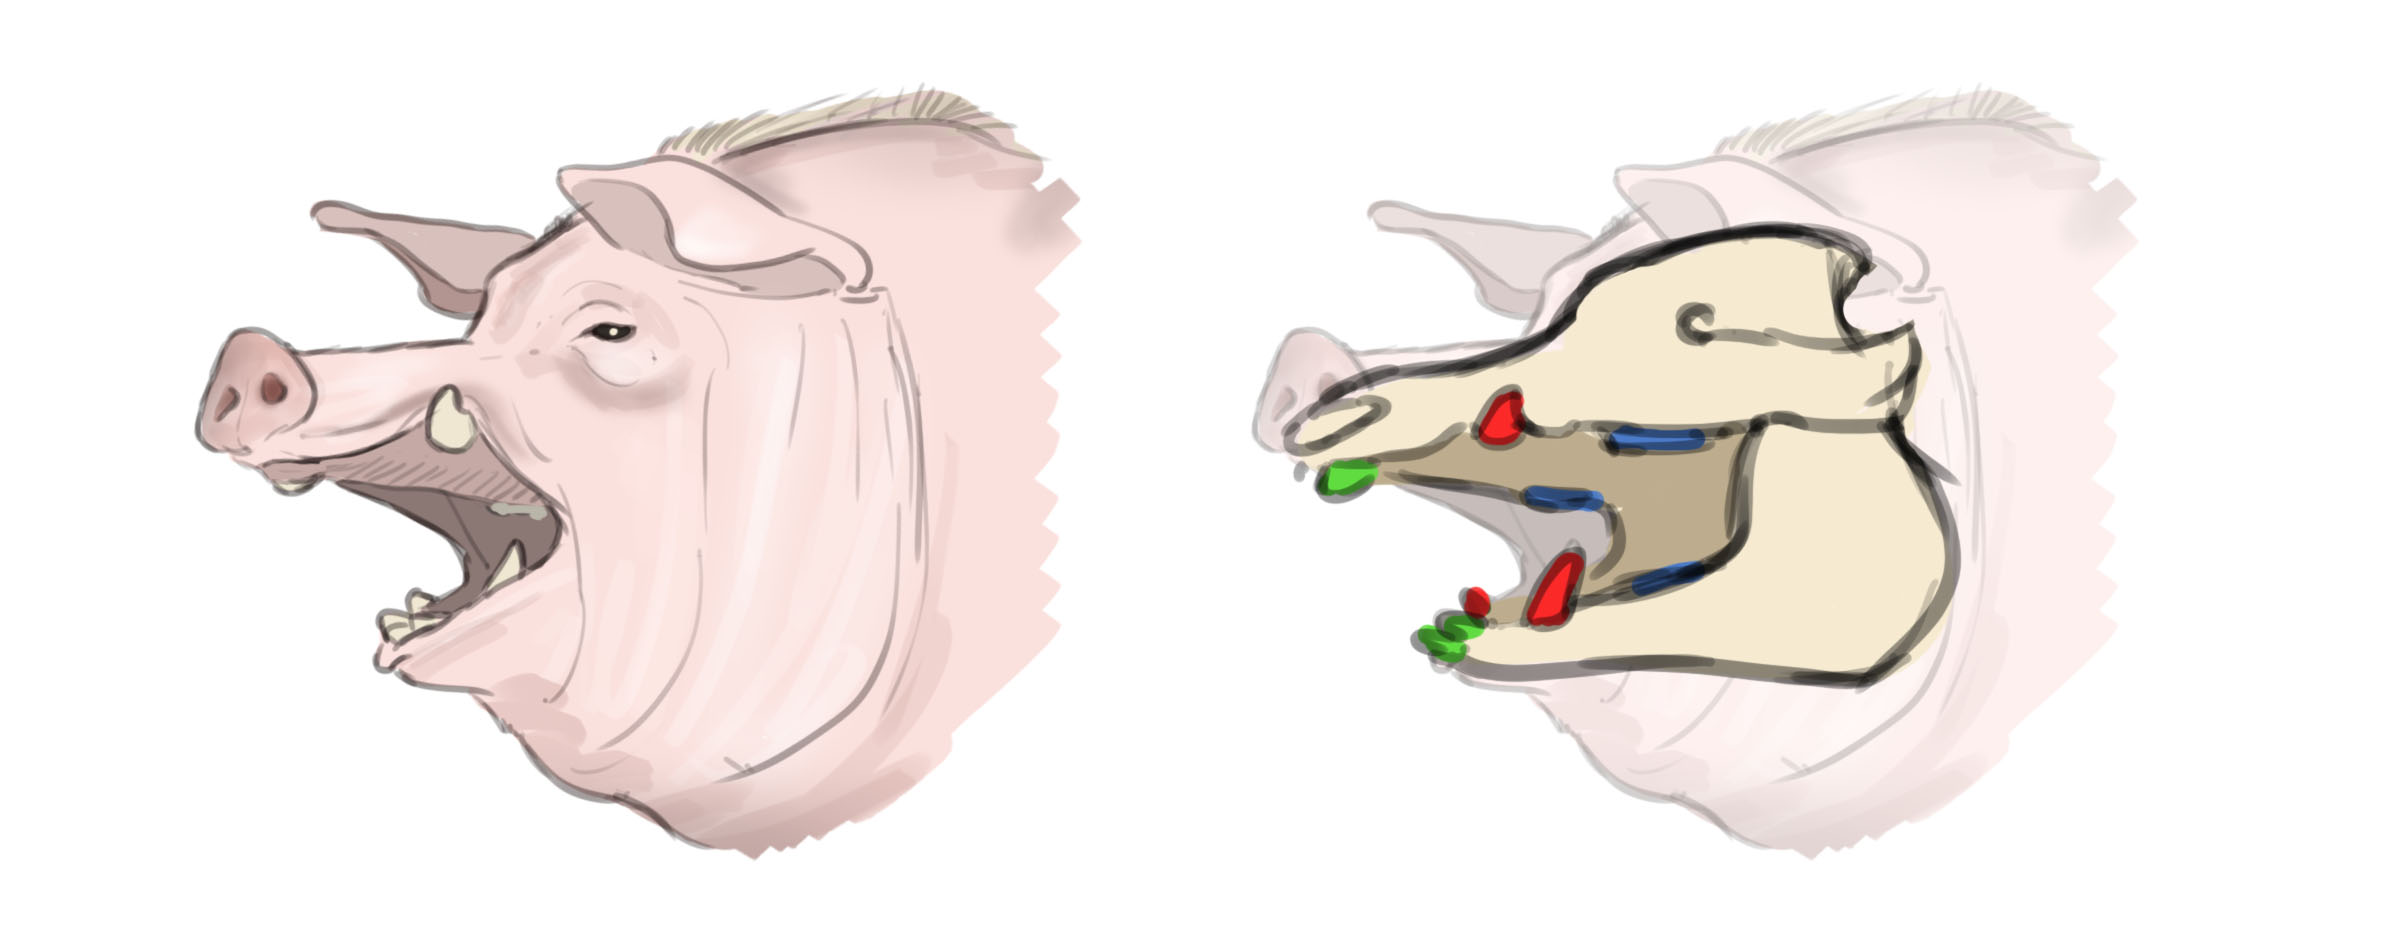
In red are the tusks, 2 on top and 2 on the bottom, which grow upwards. In green is what could be likened to our incisors, which jut out a bit. The rest of the teeth, in blue, are set back.
Note that the females have much less developed tusks.
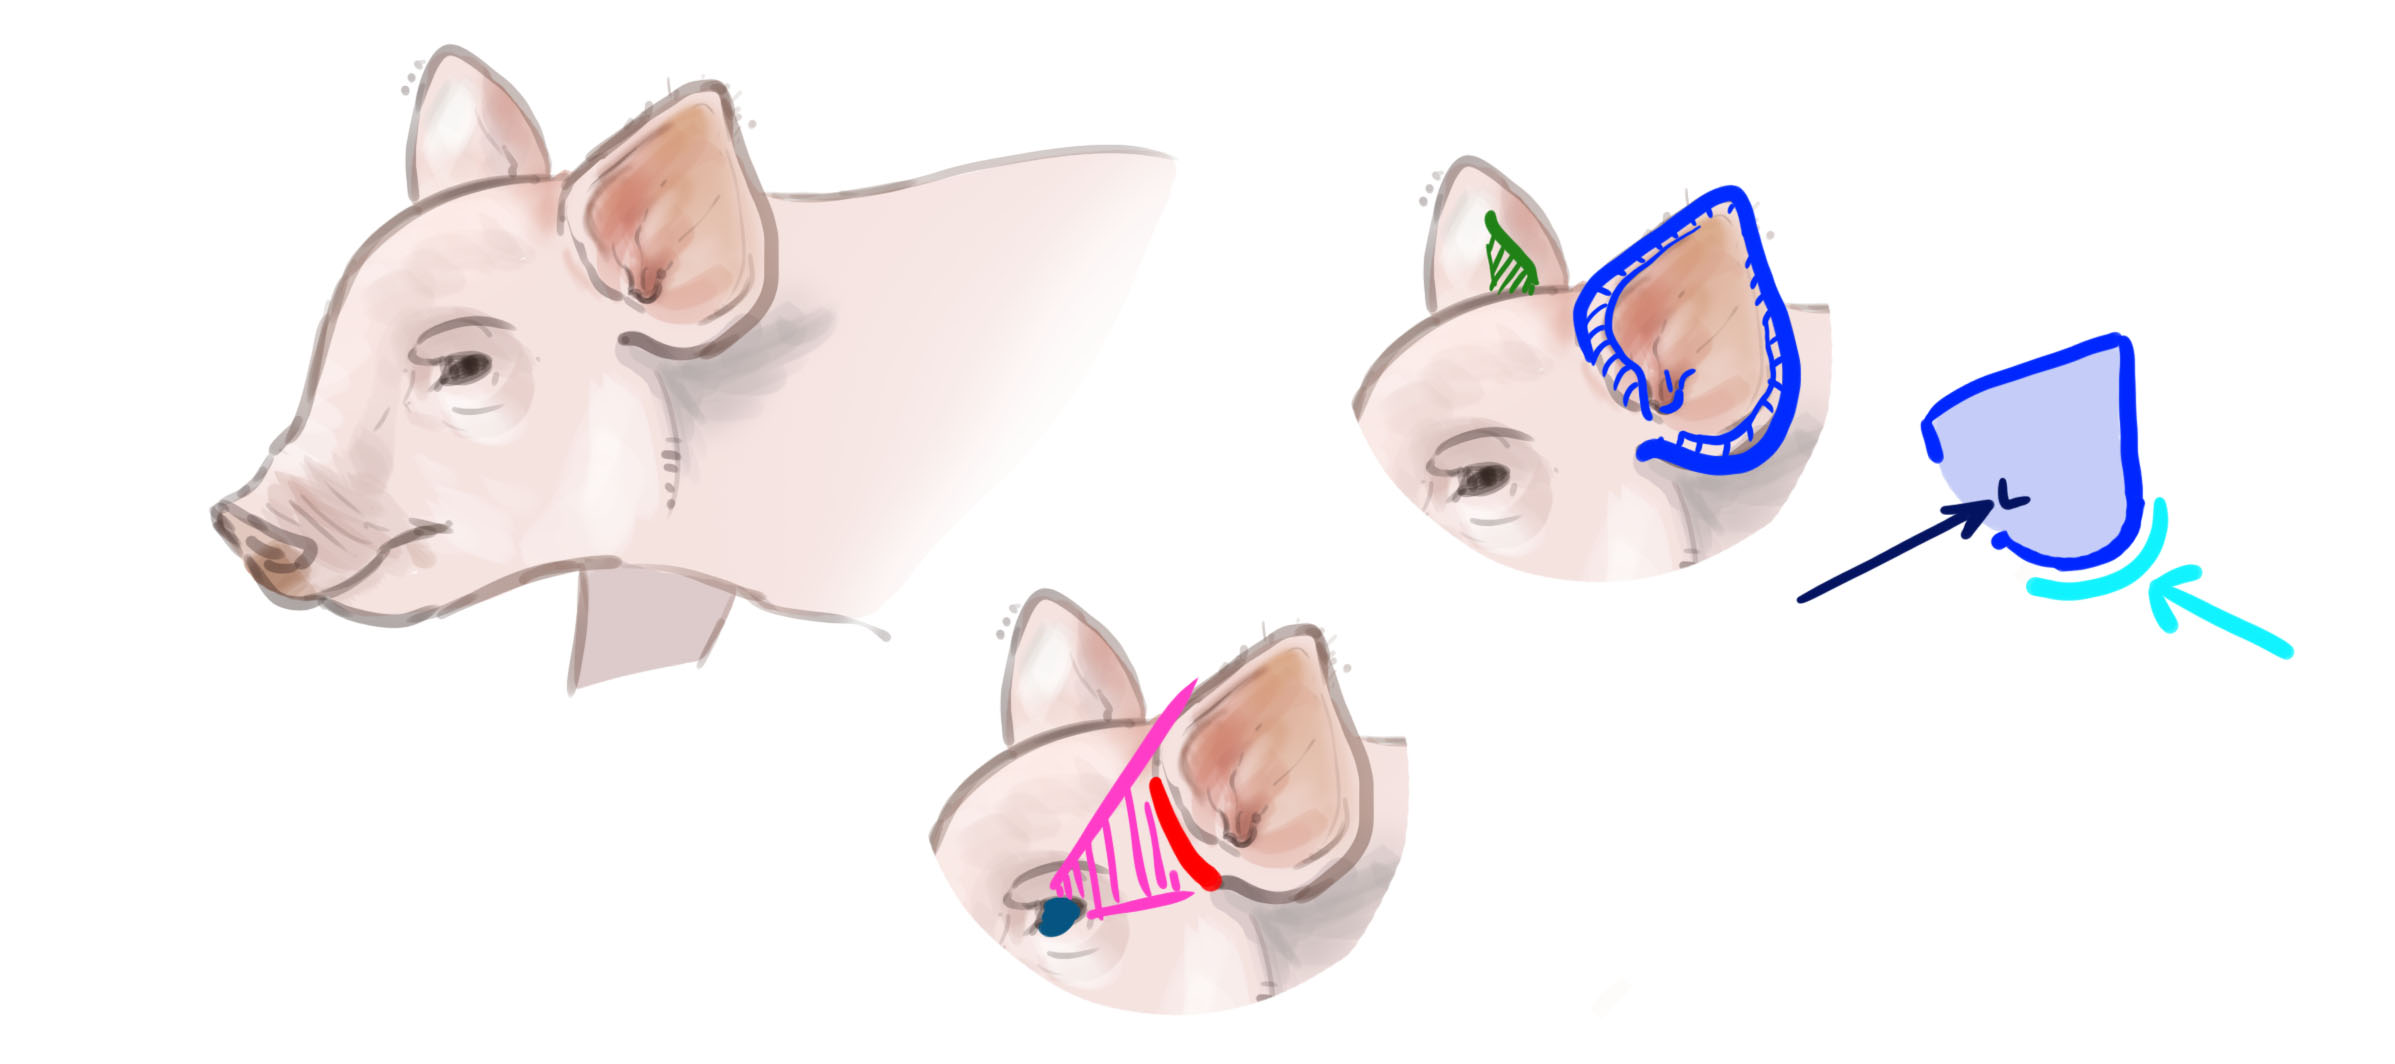
For the ears, we're going to look at a little piglet, for a change...
The ear is triangular in shape, with a more pronounced rounded return on the outside (highlighted in light blue). The skin is well vascularized, and in the context of a realistic drawing, you could suggest a few lines of veins going from the center to the outer edges.
The dark blue arrow indicates the center of the ear, an area to shade a bit more to indicate depth.
The skin on the inside is bare and covered with fine, short hairs on the outside.
In green, I've highlighted the pivot that will allow the ear to move. In the initial drawing, it is just implied by a small line.
In red is the ear attachment area, with the construction lines in pink that were used to define the size.
Some pigs have floppy ears. They lie forward, never to the sides.
You'll find the triangular shape and construction lines in red and pink.
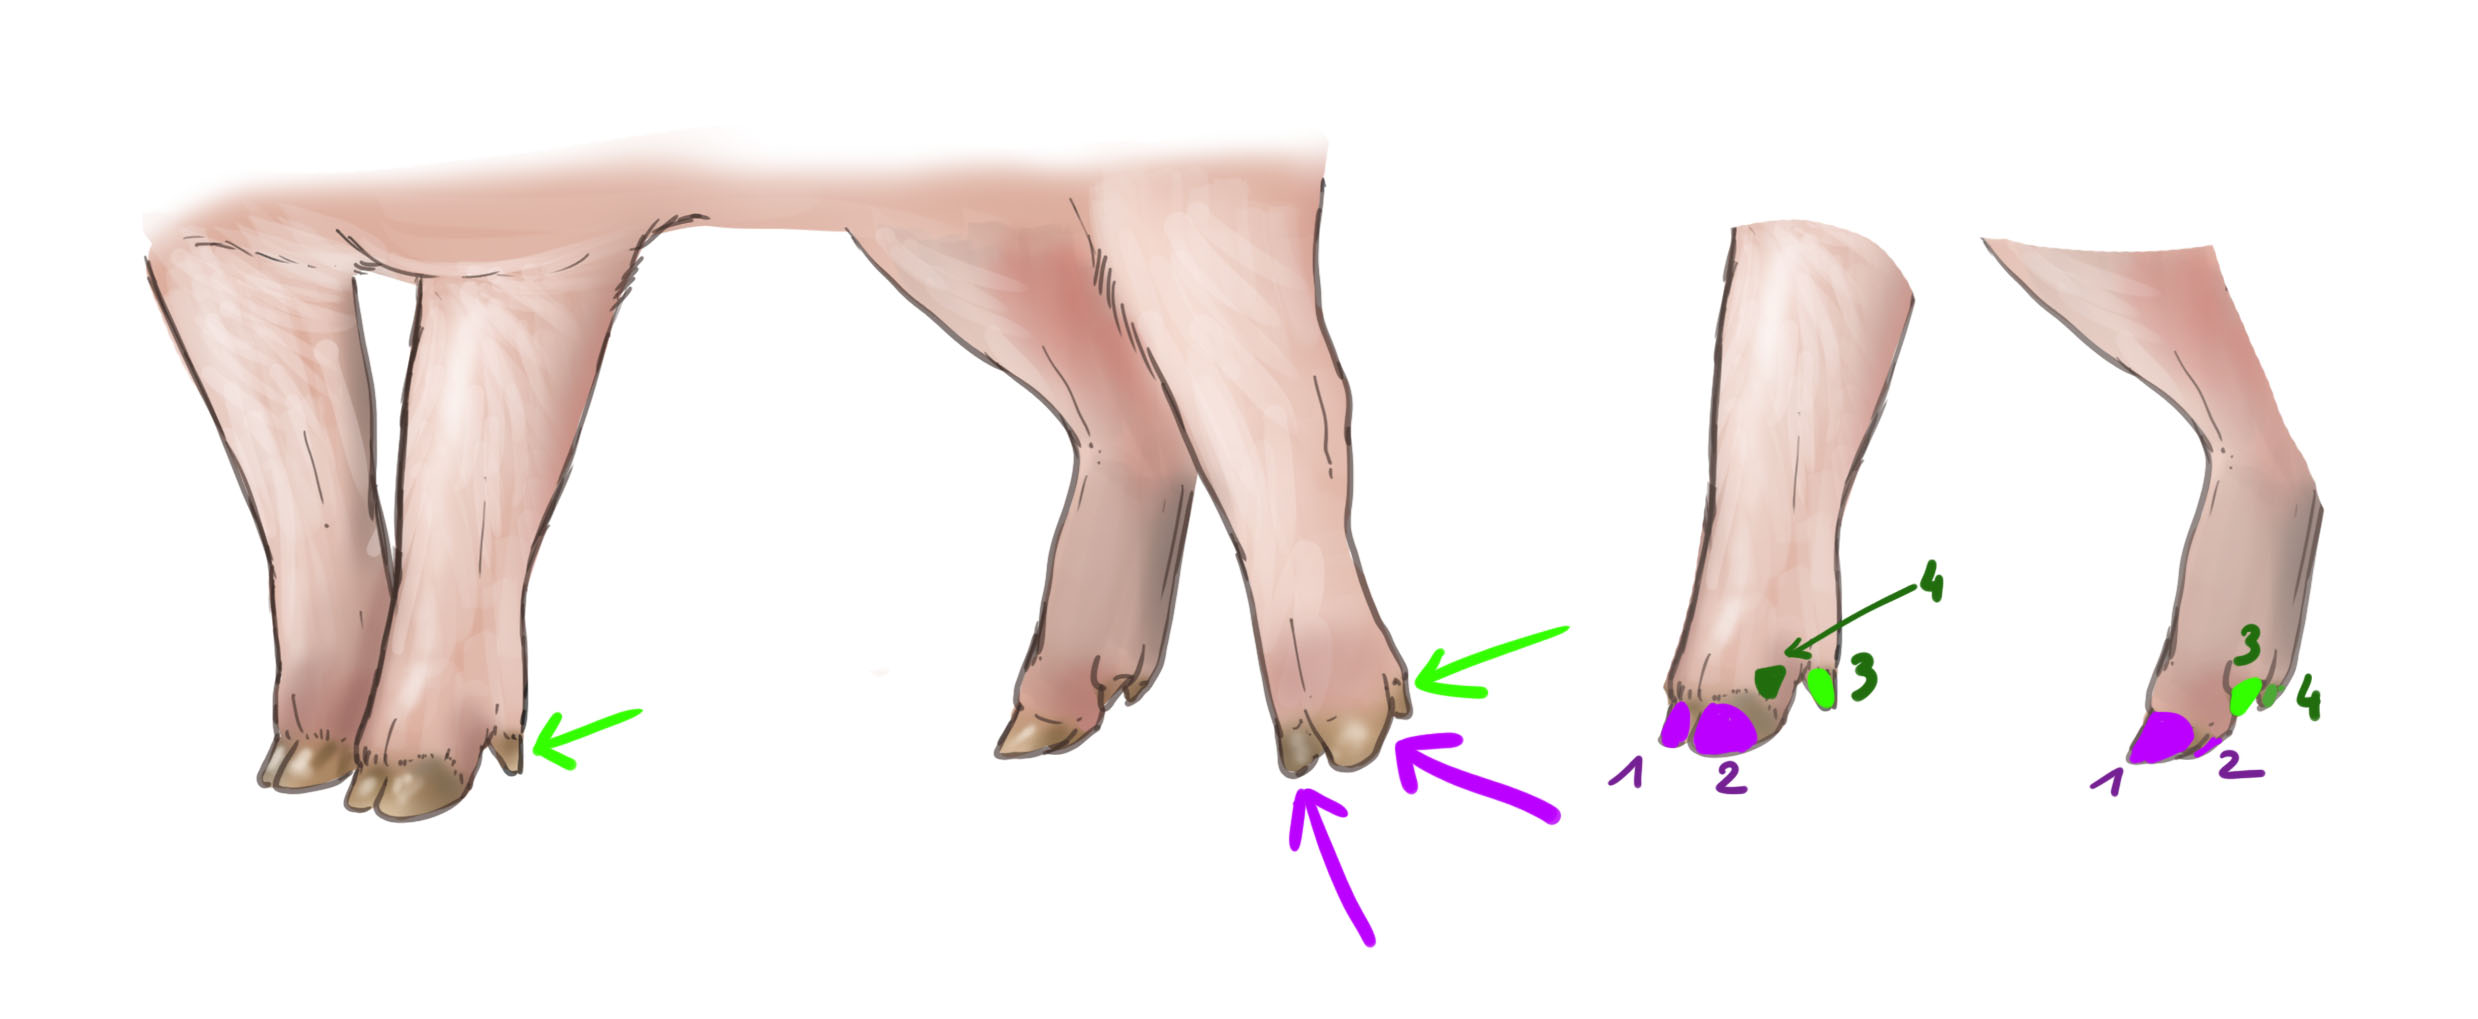
The pig is an ungulate; it walks on the tips of its toes.
They have 4 toes, two of which are real "claws"/"hooves" and bear the animal's weight.
On the diagram:
In purple, labeled 1 and 2, are the main toes at the front. In green, marked 3 and 4, are the smaller rear toes that are positioned higher on the back of the feet.
The forelimbs and hindlimbs display the same number of toes configured identically.
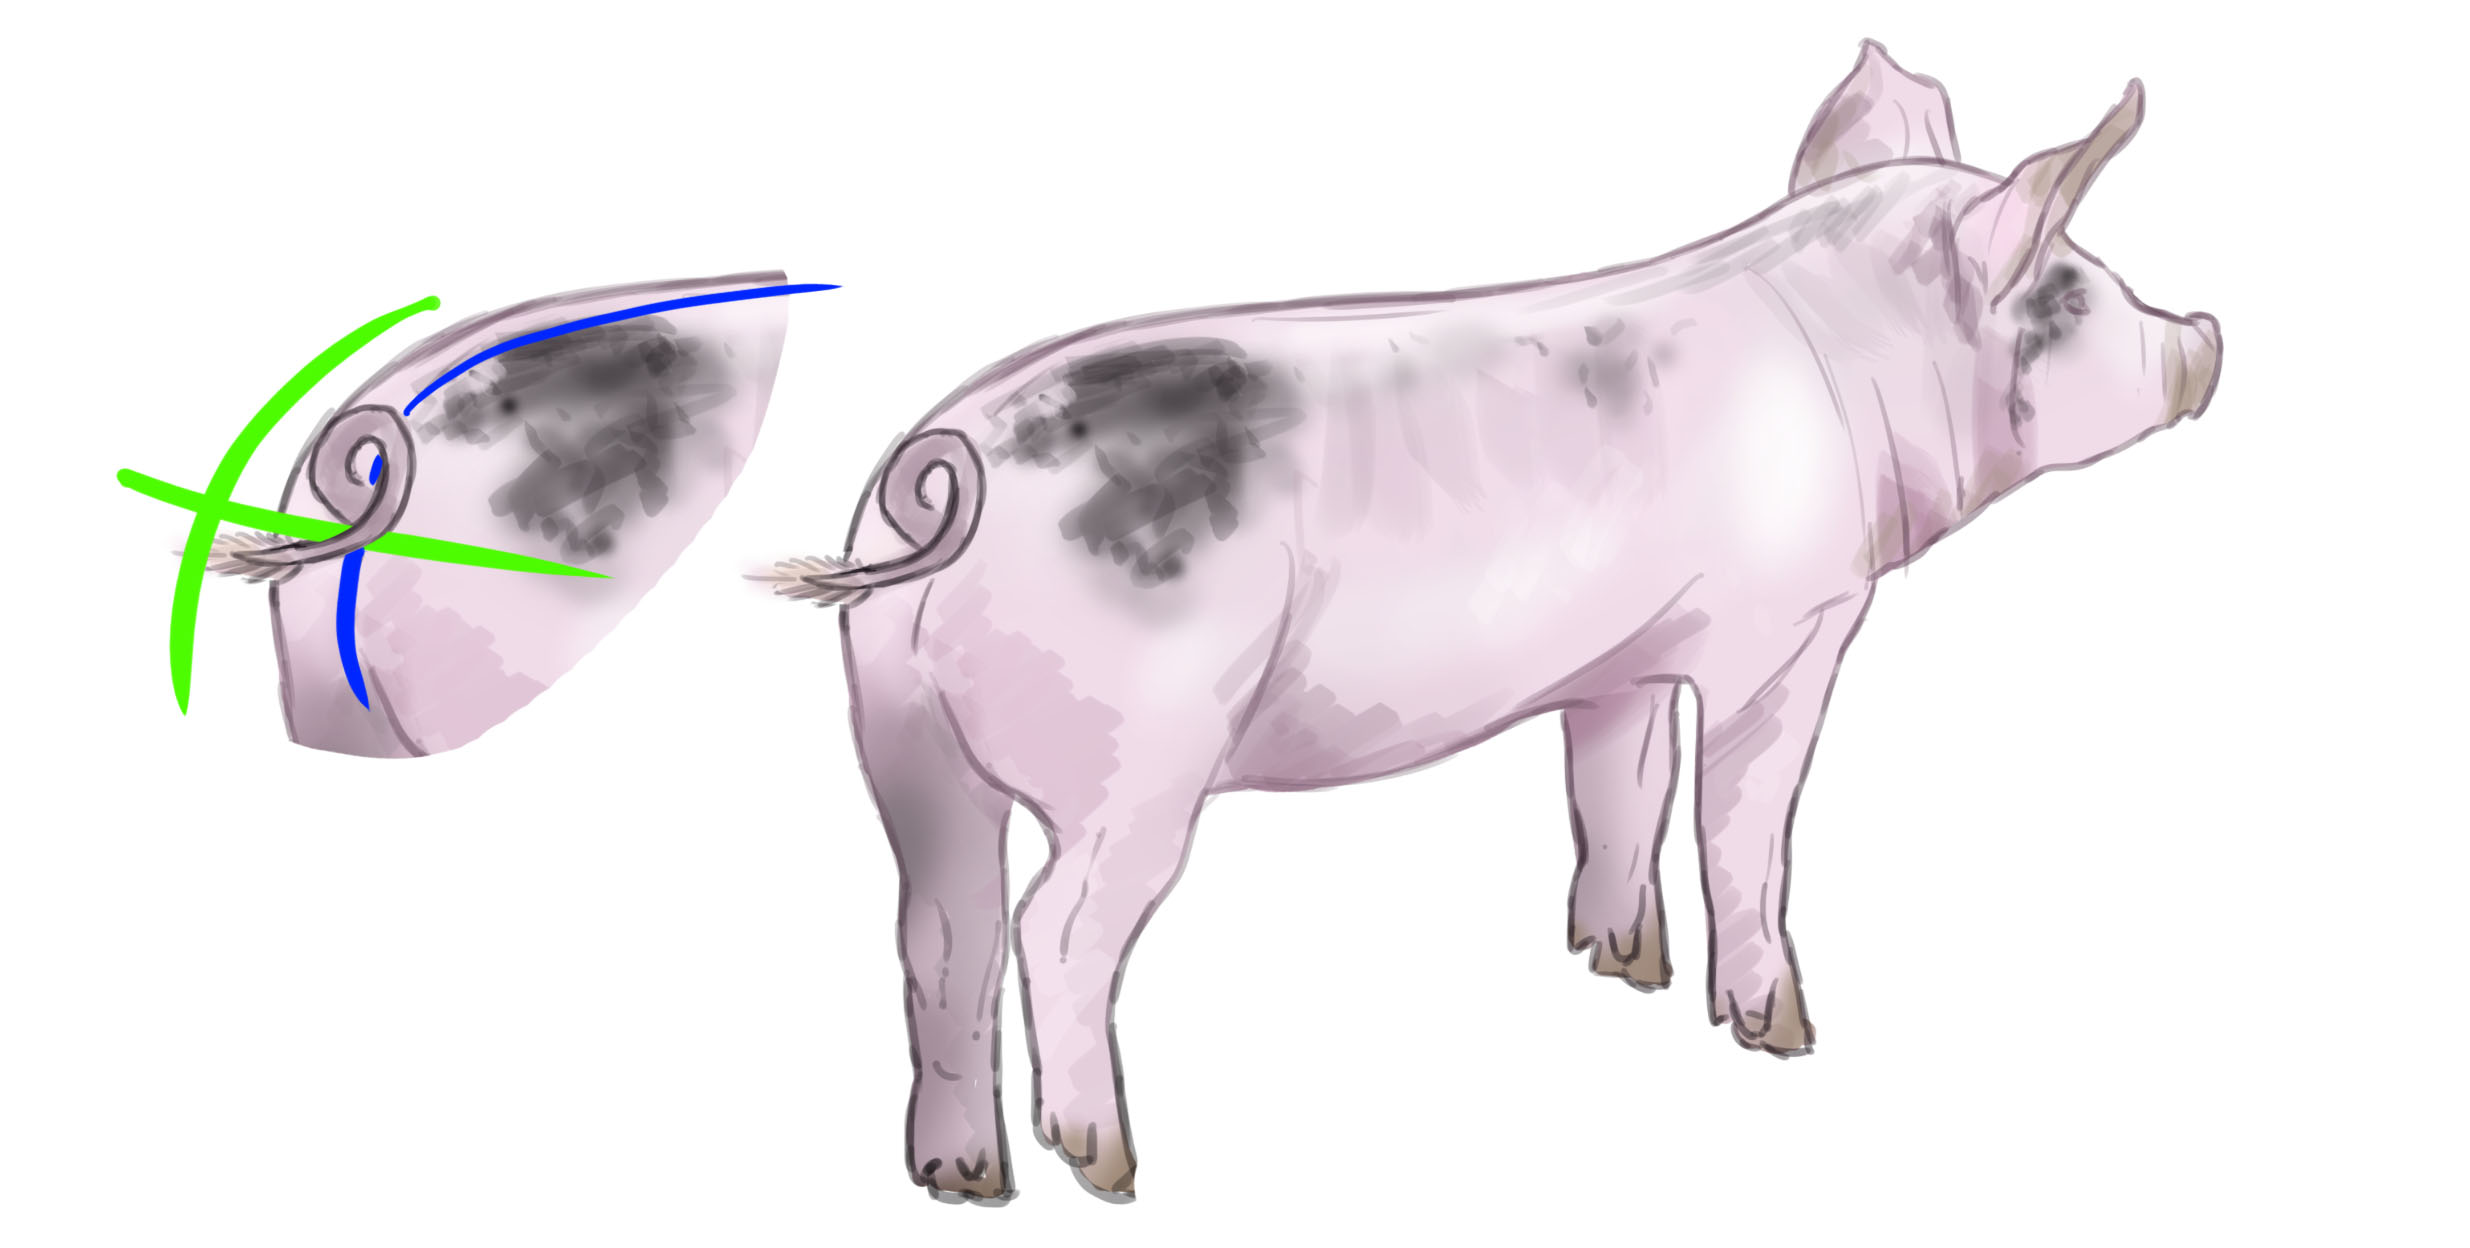
Often, the tail will be corkscrew-shaped! Well, a little corkscrew, just make one loop, that will be more than enough!
The tail attachment is located on the line of the column (blue line), and about halfway round the hindquarters (green line).
But although with many domestic pigs the tail curls on itself, it can remain straight and even hang with some breeds.
In any case, the tip is fringed with long hairs that create a small plume.
DRAWING A PIG STEP BY STEP
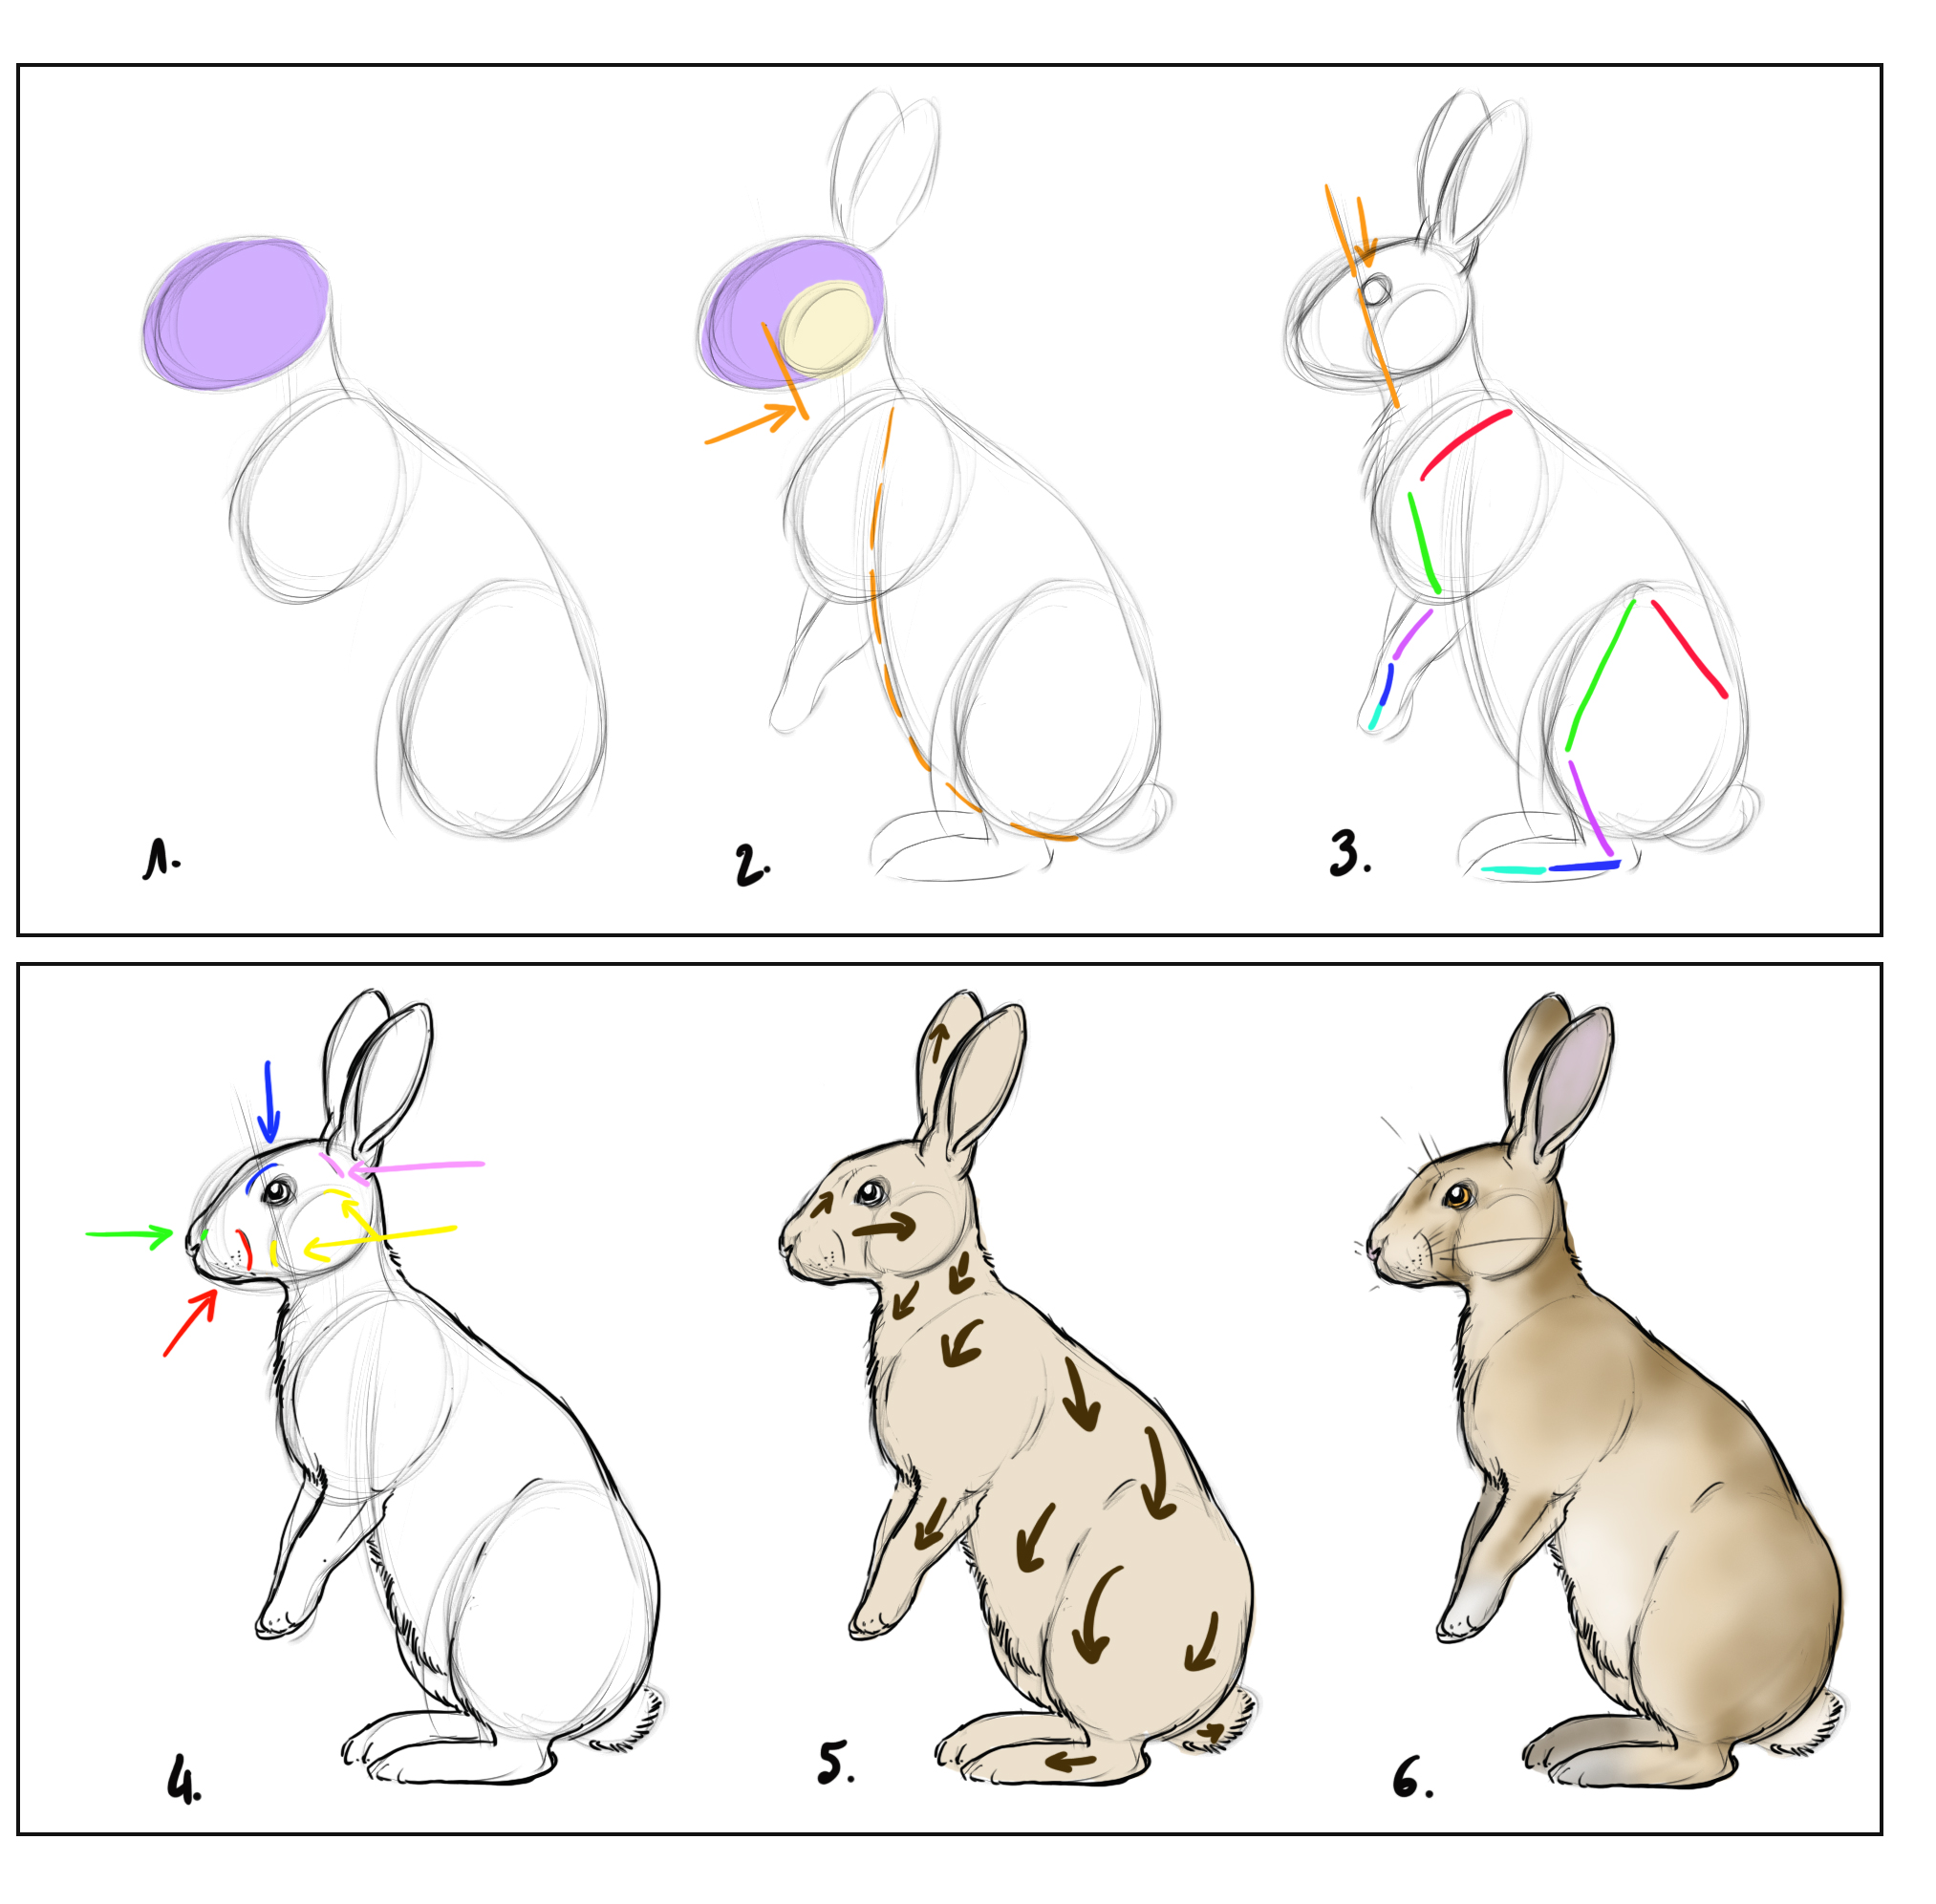
You are now ready to draw a pig! We will opt for an animal in profile, walking calmly. I made a quick sketch to give you the general idea.

The hind leg (in green) will be bent, ready to move forward to chase the front leg (in blue). In this configuration, the concerned front leg will be shifted backwards while the other foreleg will be forward.
And before we start, a quick reminder of what we saw regarding the construction of the head.
Schema A:
In blue is the profile line, with a nice curve. In purple is the snout, which is rectangular. In green is the discreet lower jaw. In yellow and orange are the very fleshy cheeks and throat. The head is in continuity with the body. If you like, you can just create one or two small irregularities in the line of the nape at the head/neck and neck/body junction areas (red arrows).
Schema B:
The eye is placed at the back third of the length of the head (pink lines), aligned with the top of the snout (green line). The ear is positioned on the hearing area defined by the red lines.
Schema C:
The general shape is triangular with a square tip at the snout.
 Let's finally go!
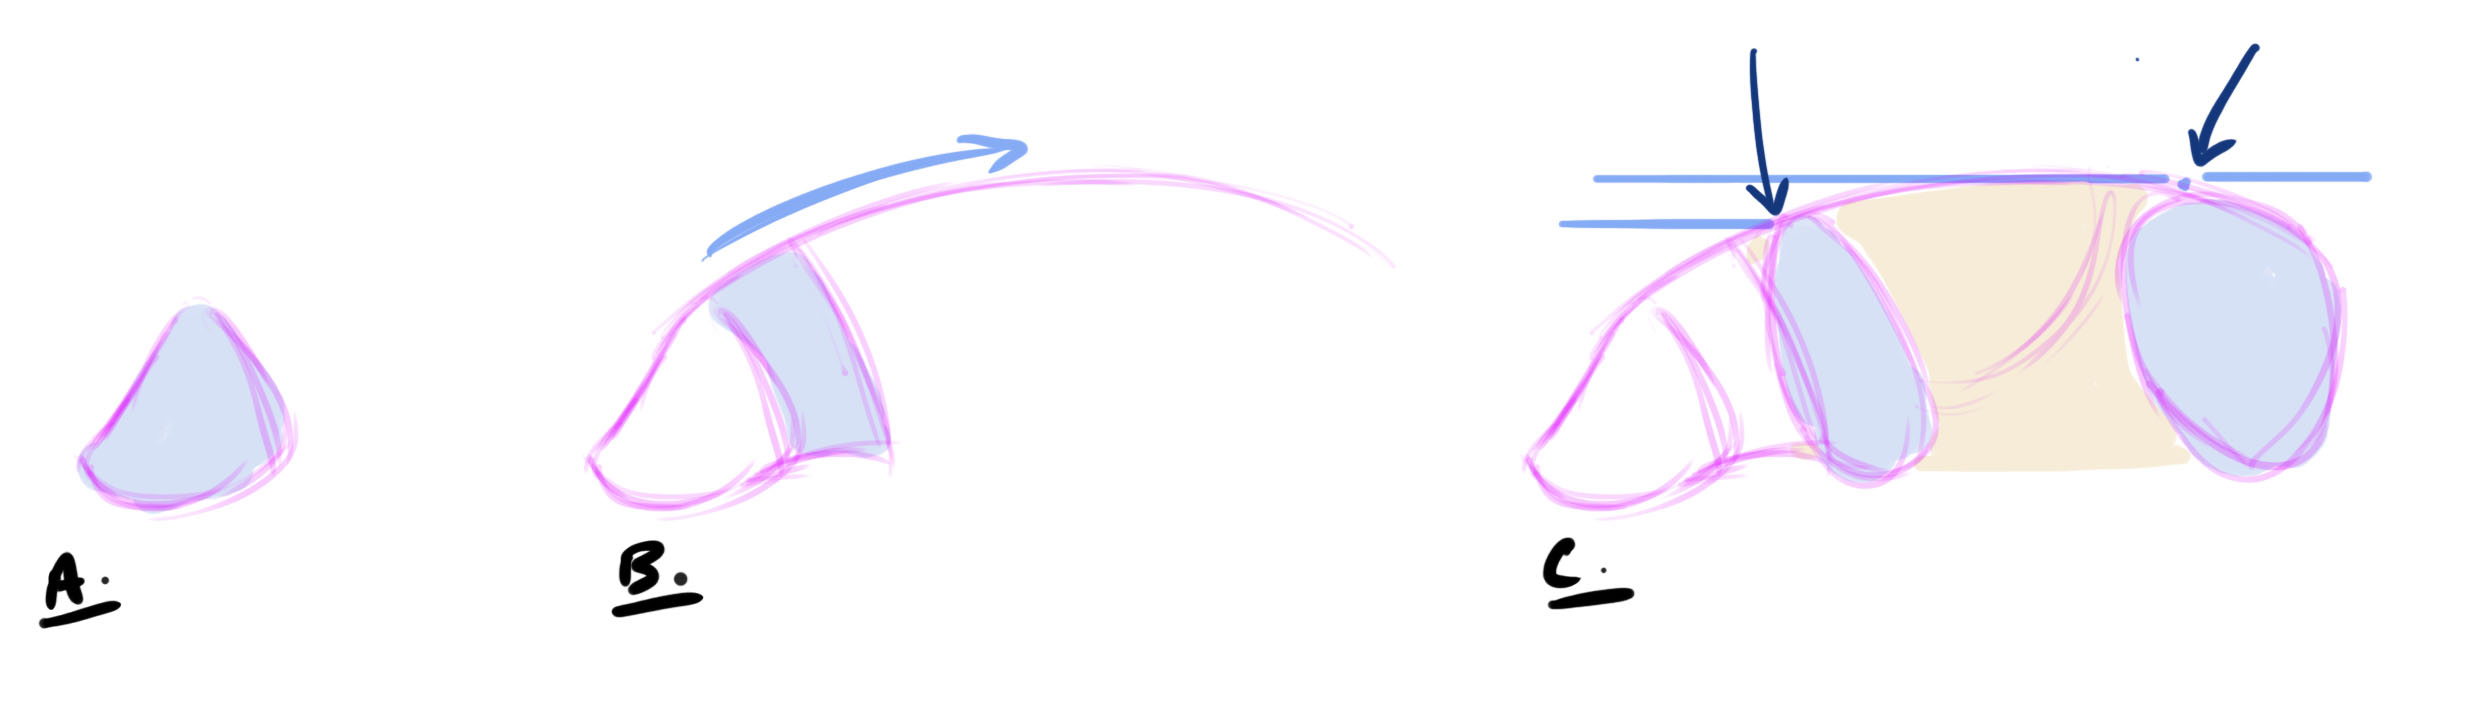
Step A: Draw the head.
Step B: Draw the back line and place the neck area.
Step C: Position the mass of the shoulder and that of the thigh, which is larger and round. Remember that the hindquarters should be a bit higher than the front. Check this by using the blue arrows. Place a small line for the rib cage, making sure that the chest area (light orange) is long and wide enough.
Step D: Finish the legs in the continuity of the masses placed in the previous step. Position the legs on the other side and close the belly in the continuity of the line of the throat (darker lines).
Step E: Check the accuracy of the construction by quickly replacing the bones. Initially, it is good to perform this step for the construction of the legs.
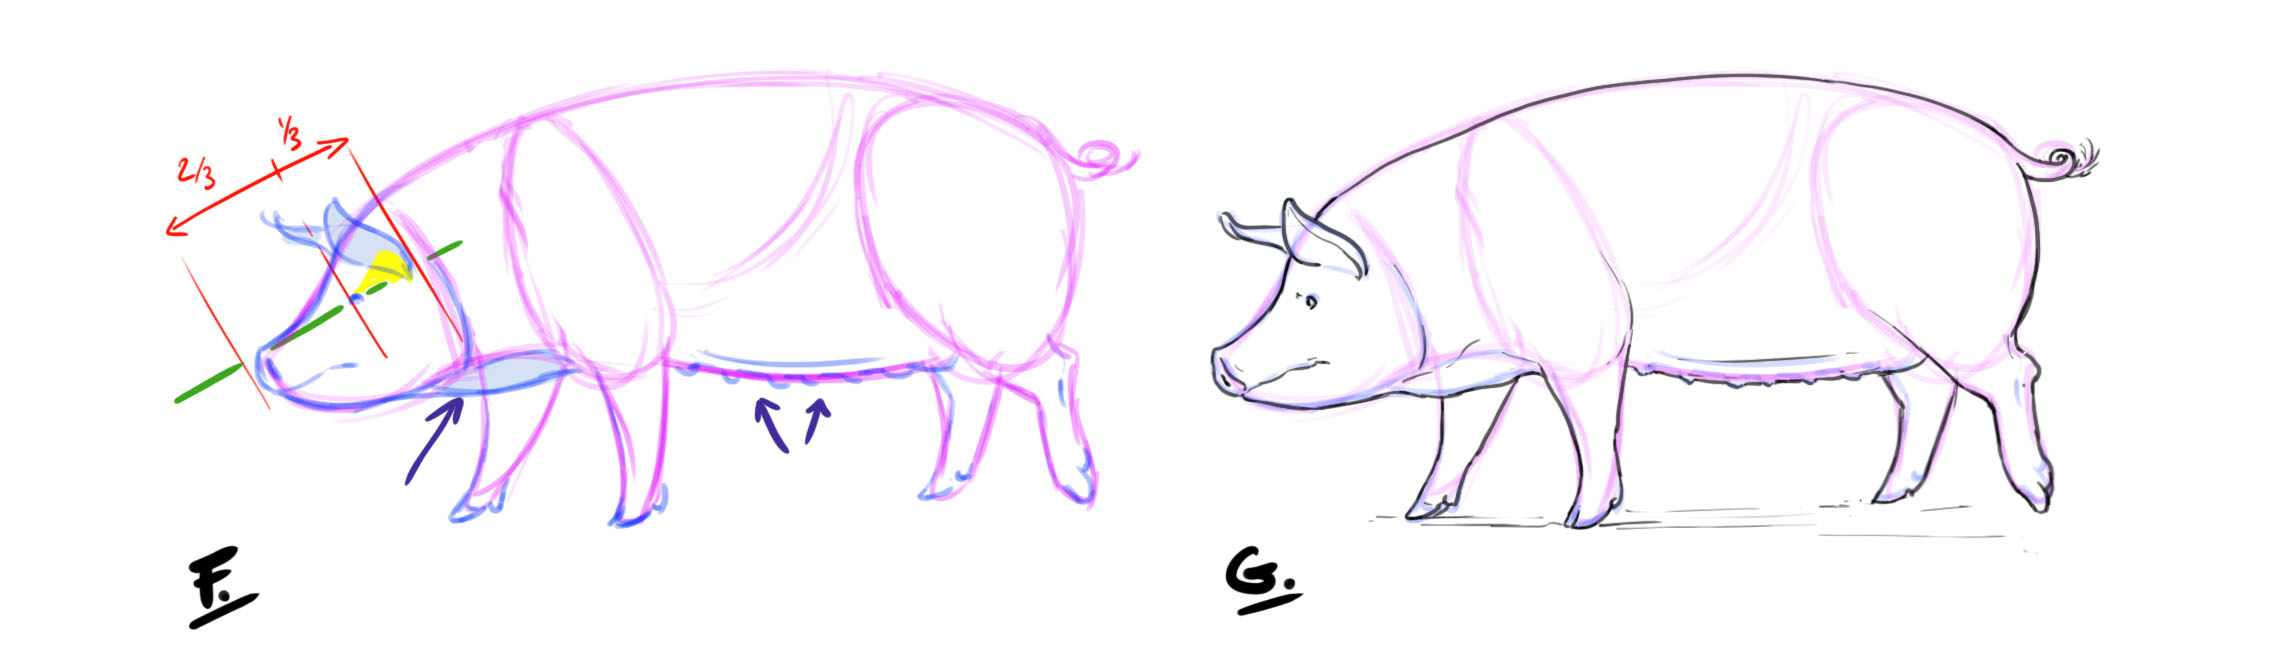
Step F: Place the ears and the eyes. Blue arrows: I've added a bit of volume under the chin for that fleshy look, and since I’ve decided that this will be a lady, I've placed teats along the belly (females have 7 pairs of teats, the first behind the front leg and the last at the start of the hind leg).
Step G: Clean up the construction lines a bit and outline the contours by defining more details (the fingers, the tail, etc.).
COLORING THE DRAWING
Now onto the coloring!

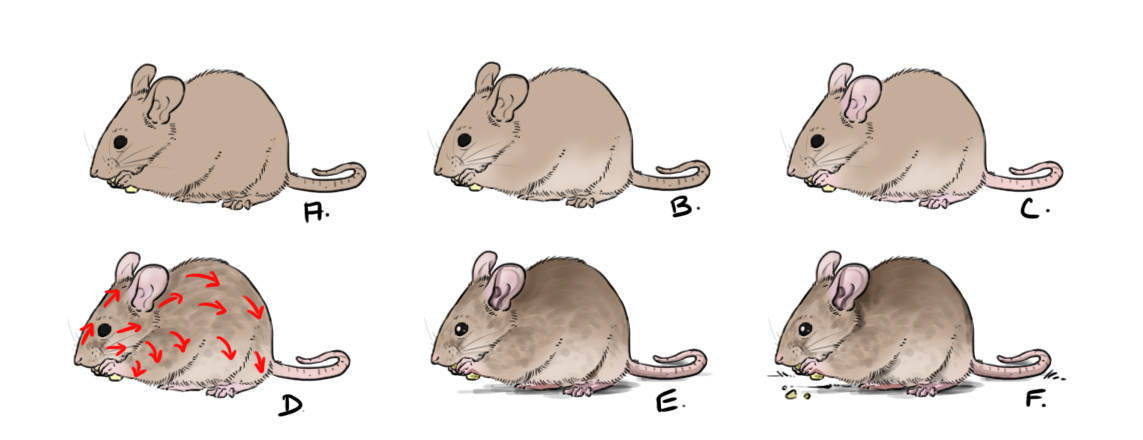
Step 1: The flat color. I'm opting for a little pink pig! Note that you can use solid shades of beige and varied browns, gray or black, but also add spots with touches of white if you like.
Step 2: Referring to the construction lines, place some shadow areas.
Step 3: Apply a darker and deeper pink to certain well-shadowed areas, the belly and udders, the snout, the ears, the throat, and the contours of the eye.
Step 4: The pinker areas and shadows should be highlighted, so apply a little light to the back.
Here is our pretty pig!
I hope you found this article interesting and that it inspired you to draw! And if you decide to start with quick little drawings, without too much detail, remember what we discussed at the beginning about the structure and simplified appearance of the animal.
Editor and illustrator: Elo Illus
Discussion
1 comment